2011 BMW 535I XDRIVE fuel
[x] Cancel search: fuelPage 78 of 304
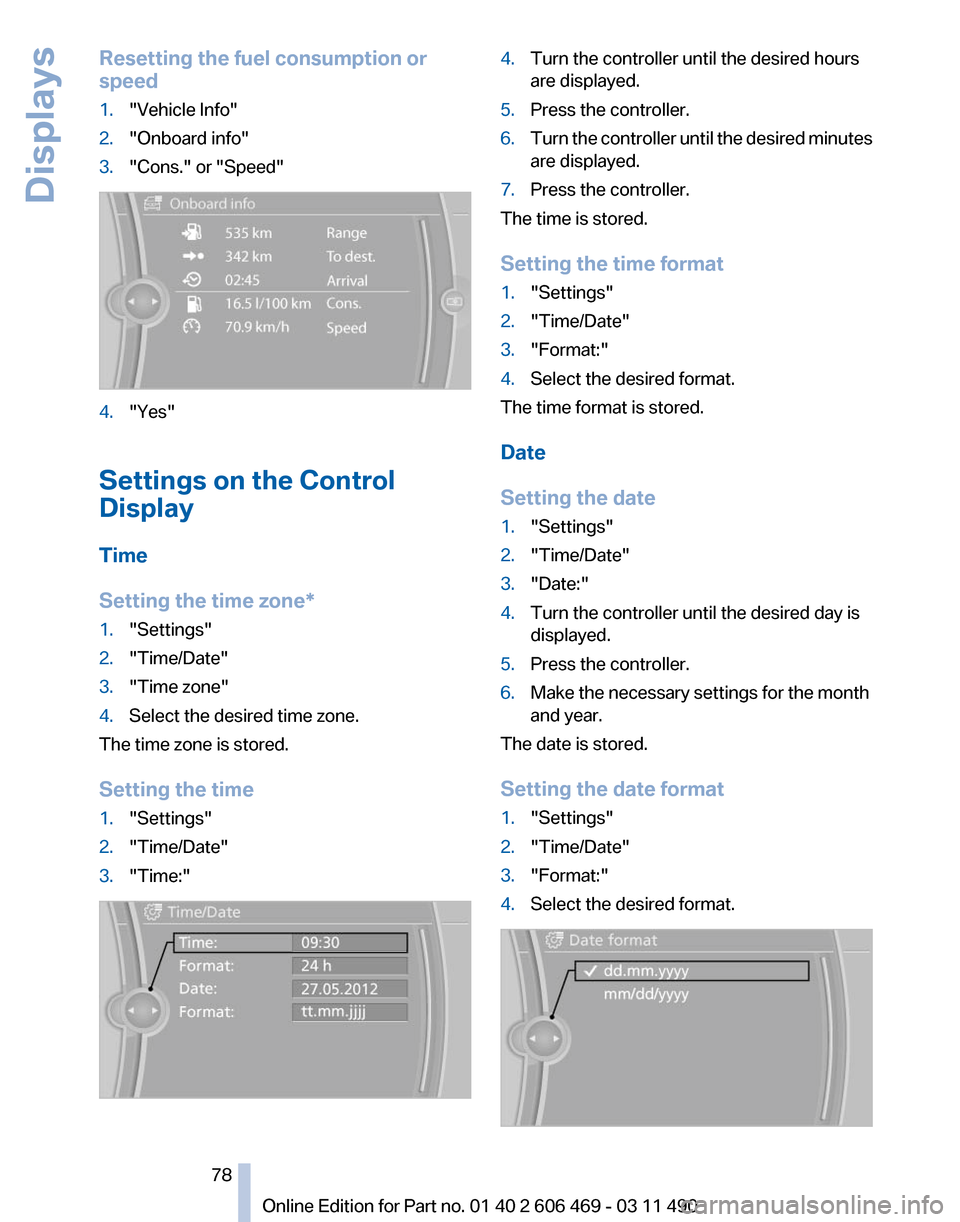
Resetting the fuel consumption or
speed
1.
"Vehicle Info"
2. "Onboard info"
3. "Cons." or "Speed" 4.
"Yes"
Settings on the Control
Display
Time
Setting the time zone
*
1. "Settings"
2. "Time/Date"
3. "Time zone"
4. Select the desired time zone.
The time zone is stored.
Setting the time
1. "Settings"
2. "Time/Date"
3. "Time:" 4.
Turn the controller until the desired hours
are displayed.
5. Press the controller.
6. Turn the controller until the desired minutes
are displayed.
7. Press the controller.
The time is stored.
Setting the time format
1. "Settings"
2. "Time/Date"
3. "Format:"
4. Select the desired format.
The time format is stored.
Date
Setting the date
1. "Settings"
2. "Time/Date"
3. "Date:"
4. Turn the controller until the desired day is
displayed.
5. Press the controller.
6. Make the necessary settings for the month
and year.
The date is stored.
Setting the date format
1. "Settings"
2. "Time/Date"
3. "Format:"
4. Select the desired format. Seite 78
78 Online Edition for Part no. 01 40 2 606 469 - 03 11 490
Displays
Page 79 of 304
The date format is stored.
Language
Setting the language
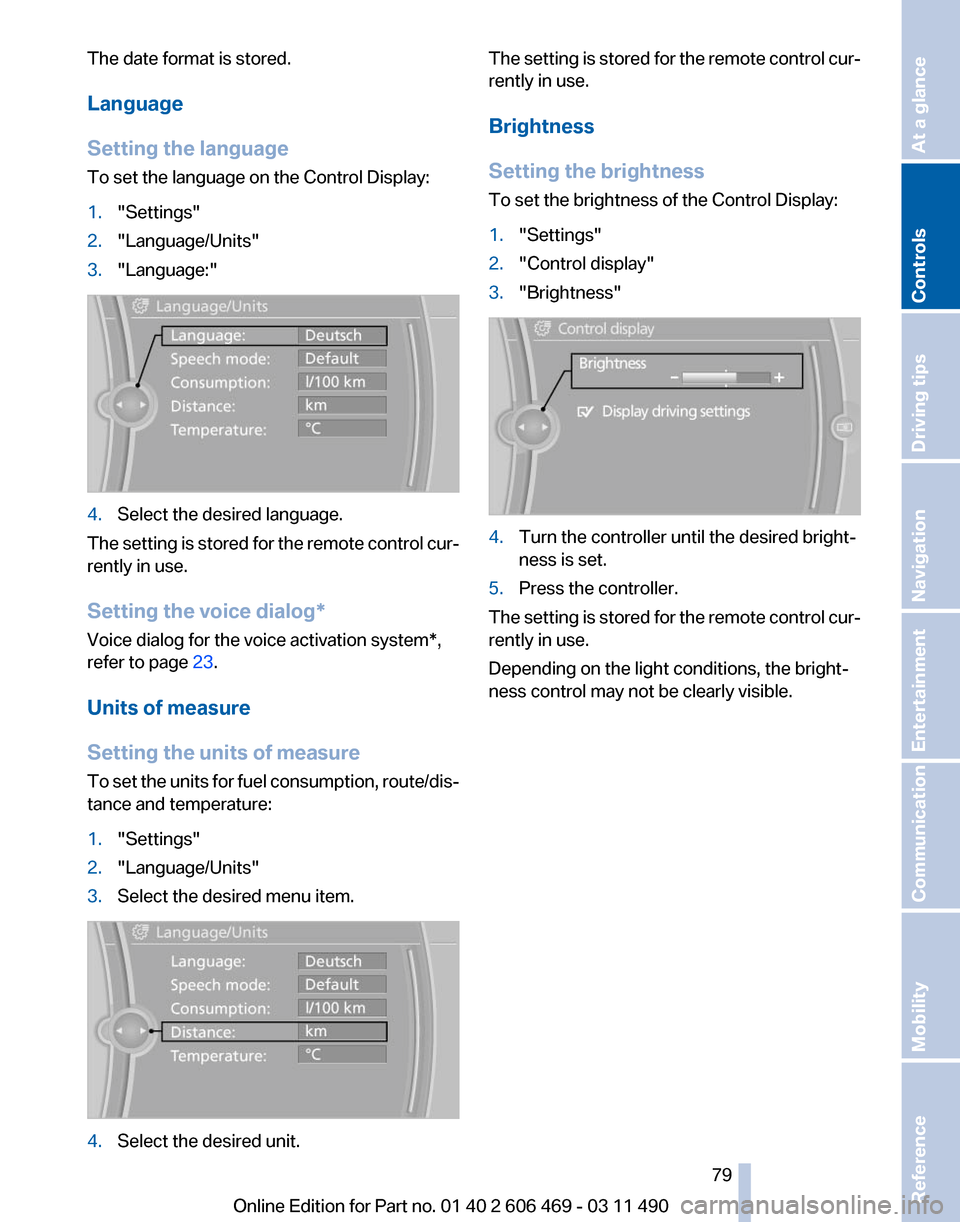
To set the language on the Control Display:
1.
"Settings"
2. "Language/Units"
3. "Language:" 4.
Select the desired language.
The setting is stored for the remote control cur‐
rently in use.
Setting the voice dialog
*
Voice dialog for the voice activation system*,
refer to page 23.
Units of measure
Setting the units of measure
To set the units for fuel consumption, route/dis‐
tance and temperature:
1. "Settings"
2. "Language/Units"
3. Select the desired menu item. 4.
Select the desired unit. The setting is stored for the remote control cur‐
rently in use.
Brightness
Setting the brightness
To set the brightness of the Control Display:
1.
"Settings"
2. "Control display"
3. "Brightness" 4.
Turn the controller until the desired bright‐
ness is set.
5. Press the controller.
The setting is stored for the remote control cur‐
rently in use.
Depending on the light conditions, the bright‐
ness control may not be clearly visible.
Seite 79
79Online Edition for Part no. 01 40 2 606 469 - 03 11 490
Reference Mobility Communication Entertainment Navigation Driving tips
Controls At a glance
Page 91 of 304

or more of your tires is significantly under-in‐
flated. Accordingly, when the low tire pressure
telltale illuminates, you should stop and check
your tires as soon as possible, and inflate them
to
the proper pressure. Driving on a significantly
under-inflated tire causes the tire to overheat
and can lead to tire failure. Under-inflation also
reduces fuel efficiency and tire tread life, and
may affect the vehicle's handling and stopping
ability. Please note that the TPMS is not a sub‐
stitute for proper tire maintenance, and it is the
driver's responsibility to maintain correct tire
pressure, even if under-inflation has not reached
the level to trigger illumination of the TPMS low
tire pressure telltale. Your vehicle has also been
equipped with a TPMS malfunction indicator to
indicate when the system is not operating prop‐
erly. The TPMS malfunction indicator is com‐
bined with the low tire pressure telltale. When
the system detects a malfunction, the telltale will
flash for approximately one minute and then re‐
main continuously illuminated. This sequence
will continue upon subsequent vehicle start-ups
as long as the malfunction exists. When the mal‐
function indicator is illuminated, the system may
not be able to detect or signal low tire pressure
as intended. TPMS malfunctions may occur for
a variety of reasons, including the installation of
replacement or alternate tires or wheels on the
vehicle that prevent the TPMS from functioning
properly. Always check the TPMS malfunction
telltale after replacing one or more tires or
wheels on your vehicle to ensure that the re‐
placement or alternate tires and wheels allow
the TPMS to continue to function properly.
Lane departure warning*
The concept
This system issues a warning at speeds above
approx. 40 mph/65 km/h if the vehicle is about
to leave the lane on roads with lane markings.
The steering wheel begins vibrating gently.
The system does not provide a warning if the
turn signal is set before leaving the lane. Switching on/off
Press the button.
▷ On: the LED lights up.
▷ Off: the LED goes out.
The system can issue warnings at speeds above
approx. 40 mph/65 km/h.
The state is stored for the remote control cur‐
rently in use.
Display ▷
Lines, arrow 1: the system is activated.
▷ Arrows, arrow 2: at least one lane marking
was detected and warnings can be issued.
Issued warning
If you leave the lane and if a lane marking has
been detected, the steering wheel begins vi‐
brating.
If
the turn signal is set before changing the lane,
a warning is not issued.
End of warning
The warning ends:
▷ Automatically after approx. 3 seconds.
▷ When returning to your own lane. Seite 91
91Online Edition for Part no. 01 40 2 606 469 - 03 11 490
Reference Mobility Communication Entertainment Navigation Driving tips
Controls At a glance
Page 150 of 304
Securing cargo
Always position and secure the cargo as
described
above; otherwise, it can endanger the
car's occupants if sudden braking or swerving
becomes necessary.
Heavy or hard objects should not be carried
loose inside the car; otherwise, they could be
thrown around as a result of hard braking, sud‐
den swerves, etc., and endanger the occu‐
pants.◀
Roof-mounted luggage rack
Note
Roof racks are available as special accessories.
Attachment
Follow the installation instructions of the roof
rack.
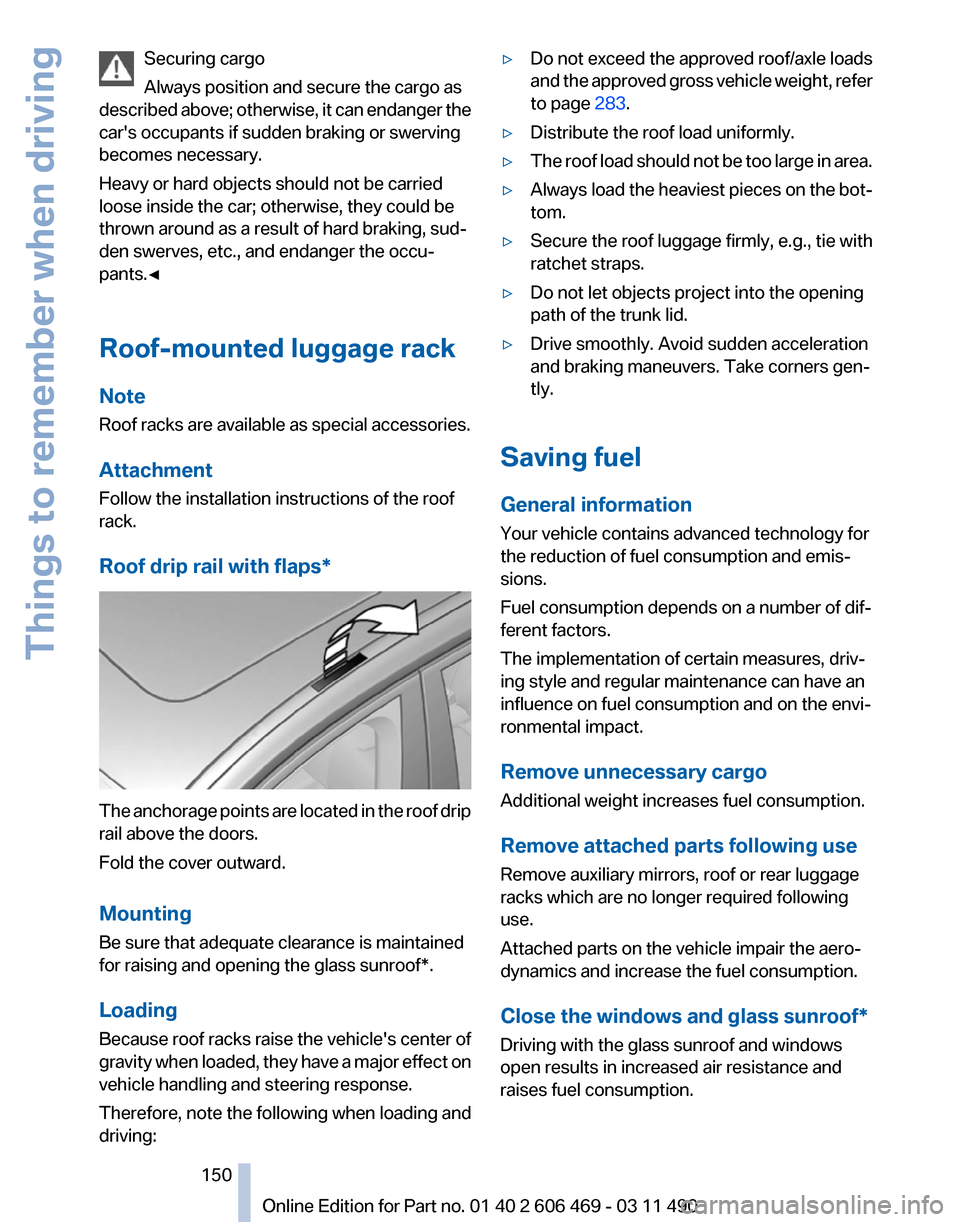
Roof drip rail with flaps* The anchorage points are located in the roof drip
rail above the doors.
Fold the cover outward.
Mounting
Be sure that adequate clearance is maintained
for raising and opening the
glass sunroof*.
Loading
Because roof racks raise the vehicle's center of
gravity when loaded, they have a major effect on
vehicle handling and steering response.
Therefore, note the following when loading and
driving: ▷
Do not exceed the approved roof/axle loads
and
the approved gross vehicle weight, refer
to page 283.
▷ Distribute the roof load uniformly.
▷ The roof load should not be too large in area.
▷ Always load the heaviest pieces on the bot‐
tom.
▷ Secure the roof luggage firmly, e.g., tie with
ratchet straps.
▷ Do not let objects project into the opening
path of the trunk lid.
▷ Drive smoothly. Avoid sudden acceleration
and braking maneuvers. Take corners gen‐
tly.
Saving fuel
General information
Your vehicle contains advanced technology for
the reduction of fuel consumption and emis‐
sions.
Fuel consumption depends on a number of dif‐
ferent factors.
The implementation of certain measures, driv‐
ing style and regular maintenance can have an
influence on fuel consumption and on the envi‐
ronmental impact.
Remove unnecessary cargo
Additional weight increases fuel consumption.
Remove attached parts following use
Remove auxiliary mirrors, roof or rear luggage
racks which are no longer required following
use.
Attached parts on the vehicle impair the aero‐
dynamics and increase the fuel consumption.
Close the windows and glass sunroof
*
Driving with the glass sunroof and windows
open results in increased air resistance and
raises fuel consumption.
Seite 150
150 Online Edition for Part no. 01 40 2 606 469 - 03 11 490
Things to remember when driving
Page 151 of 304
Check the tire inflation pressure
regularly
Check
and, if necessary, correct the tire inflation
pressure at least twice a month and before start‐
ing on a long trip.
Low tire inflation pressure increases rolling re‐
sistance and thus raises fuel consumption and
tire wear.
Drive away without delay
Do not wait for the engine to warm up while the
vehicle remains stationary. Start driving right
away, but at moderate engine speeds.
This is the fastest way for the cold engine to
reach its operating temperature.
Look well ahead when driving
Avoid unnecessary acceleration and braking.
By maintaining a suitable distance to the vehicle
driving ahead of you.
Driving smoothly and looking ahead reduces
fuel consumption.
Avoid high engine speeds
Use 1st gear to get the vehicle in motion. Be‐
ginning with 2nd gear, accelerate rapidly. When
accelerating, shift up before reaching high en‐
gine speeds.
When you reach the desired speed, shift into the
highest applicable gear and drive with the en‐
gine speed as low as possible and at a constant
speed.
As a rule: driving at low engine speeds lowers
fuel consumption and reduces wear.
The gear shift indicator* of your vehicle indi‐
cates the most fuel efficient gear.
Use coasting conditions
When approaching a red light, take your foot off
the accelerator and let the vehicle coast to a halt.
On a downhill gradient, take your foot off the ac‐
celerator and let the vehicle roll.
The flow of fuel is interrupted while coasting. Switch off the engine during longer
stops
Switch off the engine during longer stops, e.g.,
at traffic lights, railroad crossings or in traffic
congestion.
Fuel savings are achieved after the vehicle is
switched off for only approx. 4 seconds.
Switch off any functions that are not
currently needed
Functions
such as seat heating and the rear win‐
dow defroster require a lot of energy and con‐
sume additional fuel, especially in city and stop-
and-go traffic.
Therefore, switch off these functions if they are
not actually needed.
Have maintenance carried out
Have vehicles maintained regularly to achieve
optimal vehicle economy and operating life.
Have the maintenance carried out by your serv‐
ice center.
Please also note the BMW Maintenance Sys‐
tem.
Seite 151
151Online Edition for Part no. 01 40 2 606 469 - 03 11 490
Reference Mobility Communication Entertainment Navigation
Driving tips Controls At a glance
Page 163 of 304
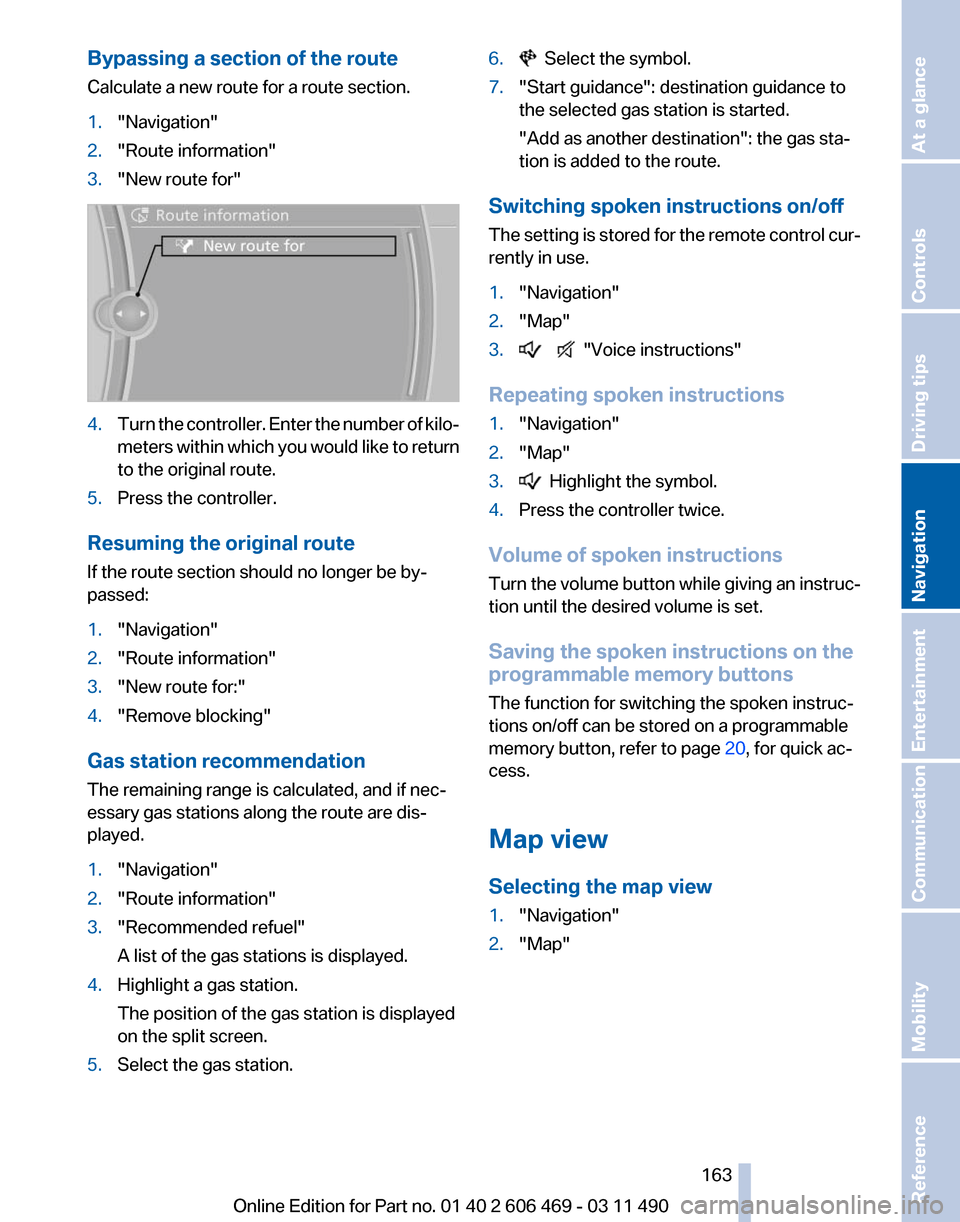
Bypassing a section of the route
Calculate a new route for a route section.
1.
"Navigation"
2. "Route information"
3. "New route for" 4.
Turn the controller. Enter the number of kilo‐
meters
within which you would like to return
to the original route.
5. Press the controller.
Resuming the original route
If the route section should no longer be by‐
passed:
1. "Navigation"
2. "Route information"
3. "New route for:"
4. "Remove blocking"
Gas station recommendation
The remaining range is calculated, and if nec‐
essary gas stations along the route are dis‐
played.
1. "Navigation"
2. "Route information"
3. "Recommended refuel"
A list of the gas stations is displayed.
4. Highlight a gas station.
The position of the gas station is displayed
on the split screen.
5. Select the gas station. 6. Select the symbol.
7. "Start guidance": destination guidance to
the selected gas station is started.
"Add as another destination"
: the gas sta‐
tion is added to the route.
Switching spoken instructions on/off
The
setting is stored for the remote control cur‐
rently in use.
1. "Navigation"
2. "Map"
3. "Voice instructions"
Repeating spoken instructions
1. "Navigation"
2. "Map"
3. Highlight the symbol.
4. Press the controller twice.
Volume of spoken instructions
Turn
the volume button while giving an instruc‐
tion until the desired volume is set.
Saving the spoken instructions on the
programmable memory buttons
The function for switching the spoken instruc‐
tions on/off can be stored on a programmable
memory button, refer to page 20, for quick ac‐
cess.
Map view
Selecting the map view
1. "Navigation"
2. "Map"
Seite 163
163Online Edition for Part no. 01 40 2 606 469 - 03 11 490
Reference Mobility Communication Entertainment
Navigation Driving tips Controls At a glance
Page 239 of 304
Mobility
To
ensure that you remain mobile at all times, this
chapter supplies you with important information
on the topics of fuels and lubricants, wheels and tires, service, maintenance, and Roadside Assistance.
Online Edition for Part no. 01 40 2 606 469 - 03 11 490
Page 240 of 304
Refueling
Fuel cap
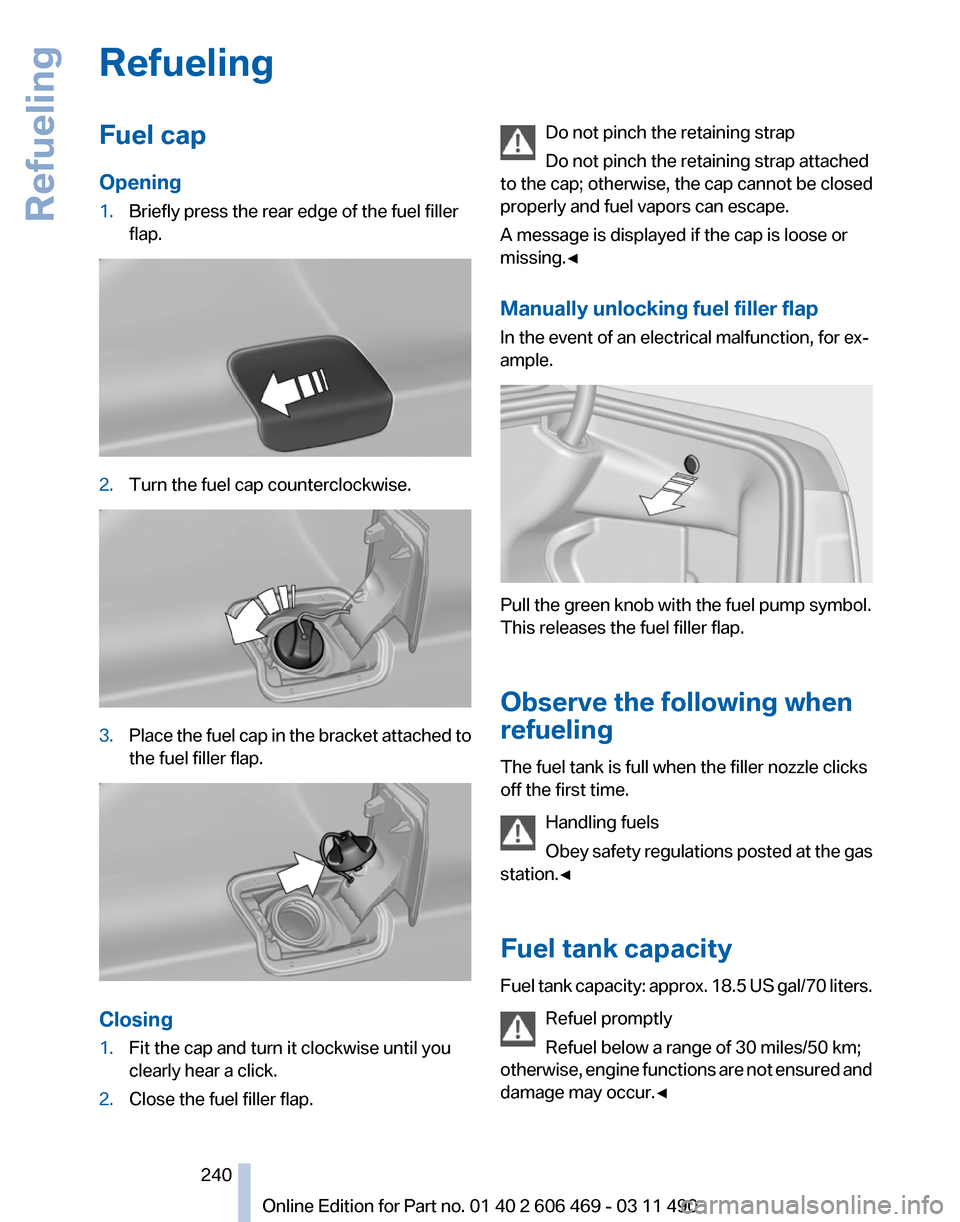
Opening
1.
Briefly press the rear edge of the fuel filler
flap. 2.
Turn the fuel cap counterclockwise. 3.
Place the fuel cap in the bracket attached to
the fuel filler flap. Closing
1.
Fit the cap and turn it clockwise until you
clearly hear a click.
2. Close the fuel filler flap. Do not pinch the retaining strap
Do not pinch the retaining strap attached
to the cap; otherwise, the cap cannot be closed
properly and fuel vapors can escape.
A message is displayed if the cap is loose or
missing.◀
Manually unlocking fuel filler flap
In the event of an electrical malfunction, for ex‐
ample. Pull the green knob with the fuel pump symbol.
This releases the fuel filler flap.
Observe the following when
refueling
The fuel tank is full when the filler nozzle clicks
off the first time.
Handling fuels
Obey
safety regulations posted at the gas
station.◀
Fuel tank capacity
Fuel tank capacity: approx. 18.5 US gal/70 liters.
Refuel promptly
Refuel below a range of 30 miles/50 km;
otherwise, engine functions are not ensured and
damage may occur.◀ Seite 240
240 Online Edition for Part no. 01 40 2 606 469 - 03 11 490
Refueling