2011 BMW 535I GRAN TURISMO fold seats
[x] Cancel search: fold seatsPage 57 of 297
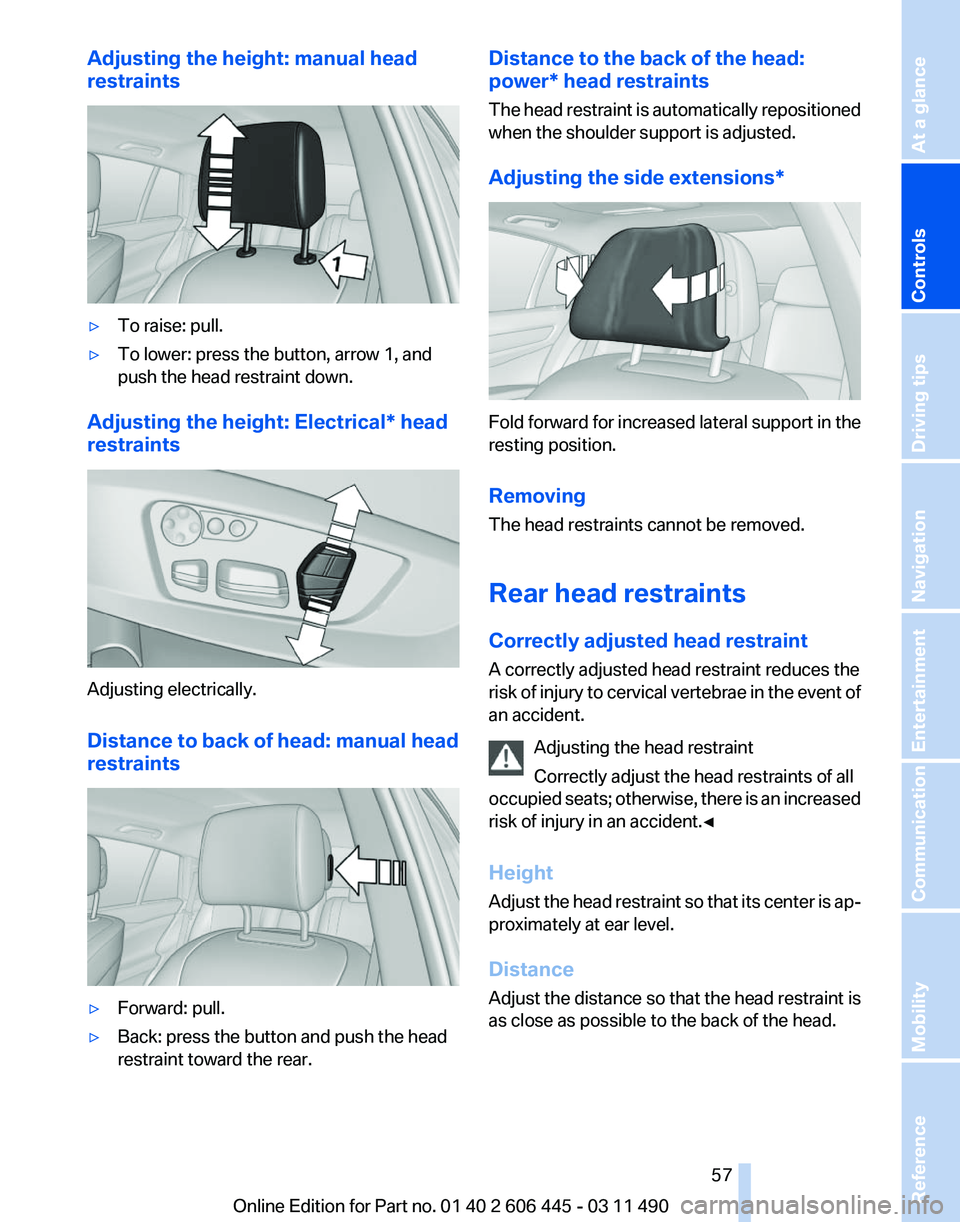
Adjusting the height: manual head
restraints
▷
To raise: pull.
▷ To lower: press the button, arrow 1, and
push the head restraint down.
Adjusting the height: Electrical* head
restraints Adjusting electrically.
Distance to back of head: manual head
restraints
▷
Forward: pull.
▷ Back: press the button and push the head
restraint toward the rear. Distance to the back of the head:
power* head restraints
The
head restraint is automatically repositioned
when the shoulder support is adjusted.
Adjusting the side extensions* Fold forward for increased lateral support in the
resting position.
Removing
The head restraints cannot be removed.
Rear head restraints
Correctly adjusted head restraint
A correctly adjusted head restraint reduces the
risk
of injury to cervical vertebrae in the event of
an accident.
Adjusting the head restraint
Correctly adjust the head restraints of all
occupied seats; otherwise, there is an increased
risk of injury in an accident.◀
Height
Adjust the head restraint so that its center is ap‐
proximately at ear level.
Distance
Adjust the distance so that the head restraint is
as close as possible to the back of the head. Seite 57
57Online Edition for Part no. 01 40 2 606 445 - 03 11 490
Reference Mobility Communication Entertainment Navigation Driving tips
Controls At a glance
Page 64 of 297
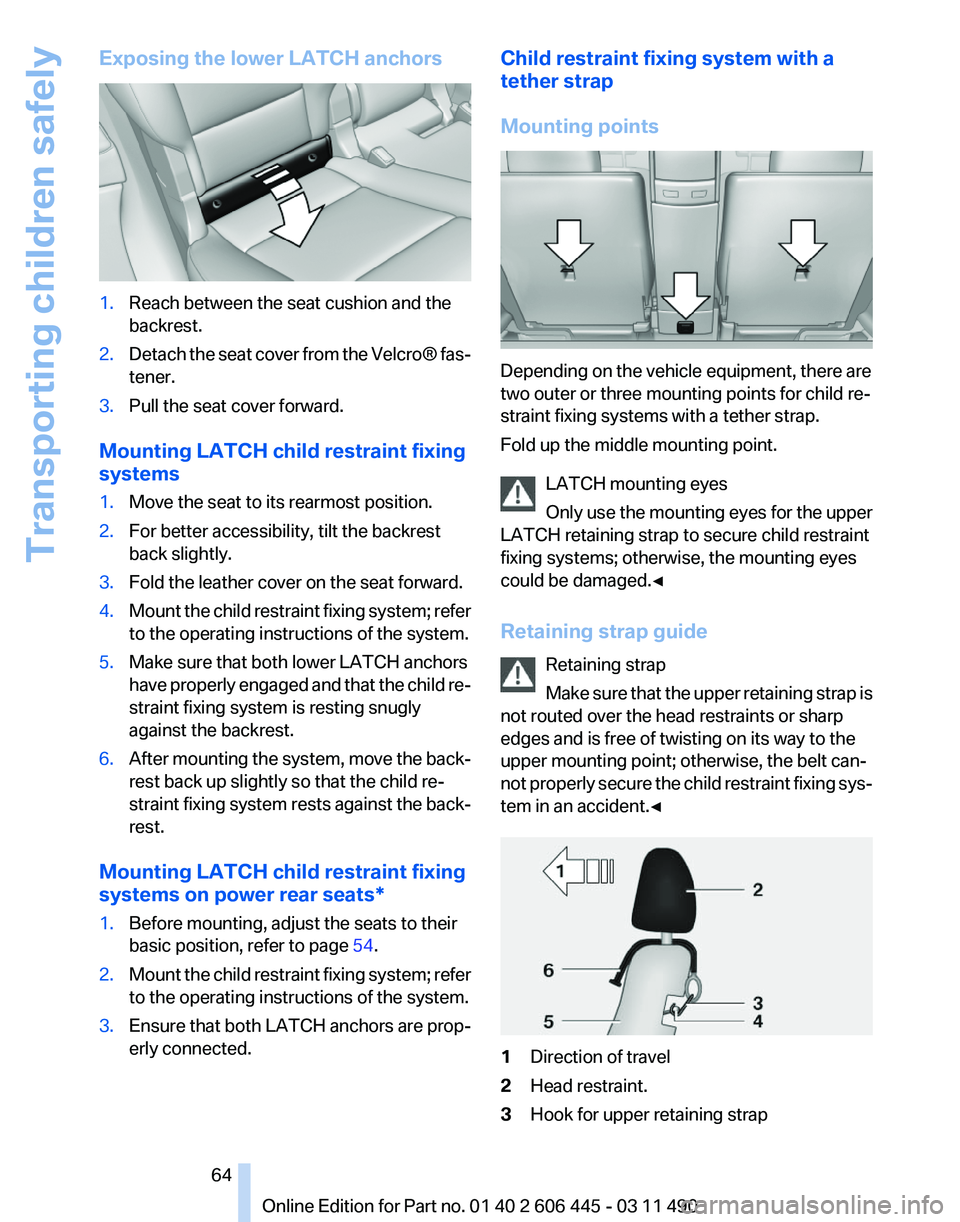
Exposing the lower LATCH anchors
1.
Reach between the seat cushion and the
backrest.
2. Detach the seat cover from the Velcro® fas‐
tener.
3. Pull the seat cover forward.
Mounting LATCH child restraint fixing
systems
1. Move the seat to its rearmost position.
2. For better accessibility, tilt the backrest
back slightly.
3. Fold the leather cover on the seat forward.
4. Mount the child restraint fixing system; refer
to the operating instructions of the system.
5. Make sure that both lower LATCH anchors
have
properly engaged and that the child re‐
straint fixing system is resting snugly
against the backrest.
6. After mounting the system, move the back‐
rest back up slightly so that the child re‐
straint
fixing system rests against the back‐
rest.
Mounting LATCH child restraint fixing
systems on power rear seats
*
1. Before mounting, adjust the seats to their
basic position, refer to page 54.
2. Mount the child restraint fixing system; refer
to the operating instructions of the system.
3. Ensure that both LATCH anchors are prop‐
erly connected. Child restraint fixing system with a
tether strap
Mounting points
Depending on the vehicle equipment, there are
two outer or three mounting points for child re‐
straint fixing systems with a tether strap.
Fold up the middle mounting point.
LATCH mounting eyes
Only
use the mounting eyes for the upper
LATCH retaining strap to secure child restraint
fixing systems; otherwise, the mounting eyes
could be damaged.◀
Retaining strap guide
Retaining strap
Make sure that the upper retaining strap is
not routed over the head restraints or sharp
edges and is free of twisting on its way to the
upper mounting point; otherwise, the belt can‐
not properly secure the child restraint fixing sys‐
tem in an accident.◀ 1
Direction of travel
2 Head restraint.
3 Hook for upper retaining strap Seite 64
64 Online Edition for Part no. 01 40 2 606 445 - 03 11 490
Transporting children safely
Page 137 of 297
The cargo partition and the rear backrest are
subdivided at a ratio of 40–20–40. You can also
fold down the left and right sides separately.
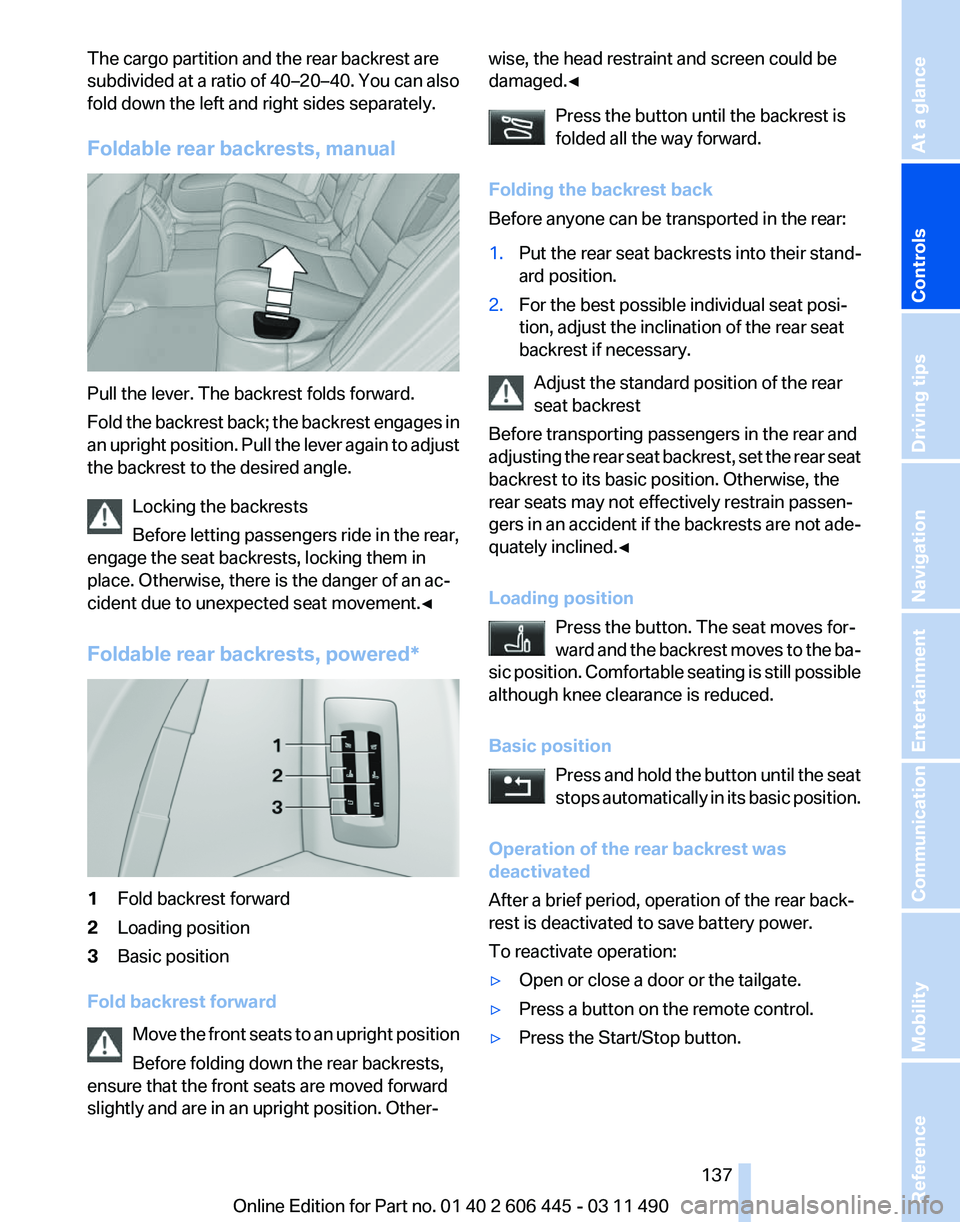
Foldable rear backrests, manual
Pull the lever. The backrest folds forward.
Fold
the backrest back; the backrest engages in
an upright position. Pull the lever again to adjust
the backrest to the desired angle.
Locking the backrests
Before letting passengers ride in the rear,
engage the seat backrests, locking them in
place. Otherwise, there is the danger of an ac‐
cident due to unexpected seat movement.◀
Foldable rear backrests, powered* 1
Fold backrest forward
2 Loading position
3 Basic position
Fold backrest forward Move
the front seats to an upright position
Before folding down the rear backrests,
ensure that the front seats are moved forward
slightly and are in an upright position. Other‐ wise, the head restraint and screen could be
damaged.
◀
Press the button until the backrest is
folded all the way forward.
Folding the backrest back
Before anyone can be transported in the rear:
1. Put the rear seat backrests into their stand‐
ard position.
2. For the best possible individual seat posi‐
tion, adjust the inclination of the rear seat
backrest if necessary.
Adjust the standard position of the rear
seat backrest
Before transporting passengers in the rear and
adjusting
the rear seat backrest, set the rear seat
backrest to its basic position. Otherwise, the
rear seats may not effectively restrain passen‐
gers in an accident if the backrests are not ade‐
quately inclined.◀
Loading position
Press the button. The seat moves for‐
ward and the backrest moves to the ba‐
sic position. Comfortable seating is still possible
although knee clearance is reduced.
Basic position
Press and hold the button until the seat
stops automatically in its basic position.
Operation of the rear backrest was
deactivated
After a brief period, operation of the rear back‐
rest is deactivated to save battery power.
To reactivate operation:
▷ Open or close a door or the tailgate.
▷ Press a button on the remote control.
▷ Press the Start/Stop button. Seite 137
137Online Edition for Part no. 01 40 2 606 445 - 03 11 490
Reference Mobility Communication Entertainment Navigation Driving tips
Controls At a glance
Page 139 of 297
Storage compartments
Storage compartments
The following storage compartments are avail‐
able in the vehicle interior:
▷
Glove compartment on the driver's and front
passenger side, refer to page 139.
▷ Storage compartment in the center console,
refer to page 141.
▷ Storage compartment in the center armrest,
refer to page 140, in the front and rear.
▷ Compartments in the doors.
▷ Pockets on the backrests of the front seats*.
▷ Net in the front passenger footwell.
No loose objects in the passenger com‐
partment
Do not stow any objects in the passenger com‐
partment without securing them; otherwise,
they may present a danger to occupants for in‐
stance during braking and avoidance maneu‐
vers.◀
Glove compartment
Front passenger side
Opening Pull the handle.
The
light in the glove compartment switches on. Close the glove compartment again im‐
mediately
Close
the glove compartment immediately after
use while driving; otherwise, injury may occur
during accidents.◀
Closing
Fold up the cover.
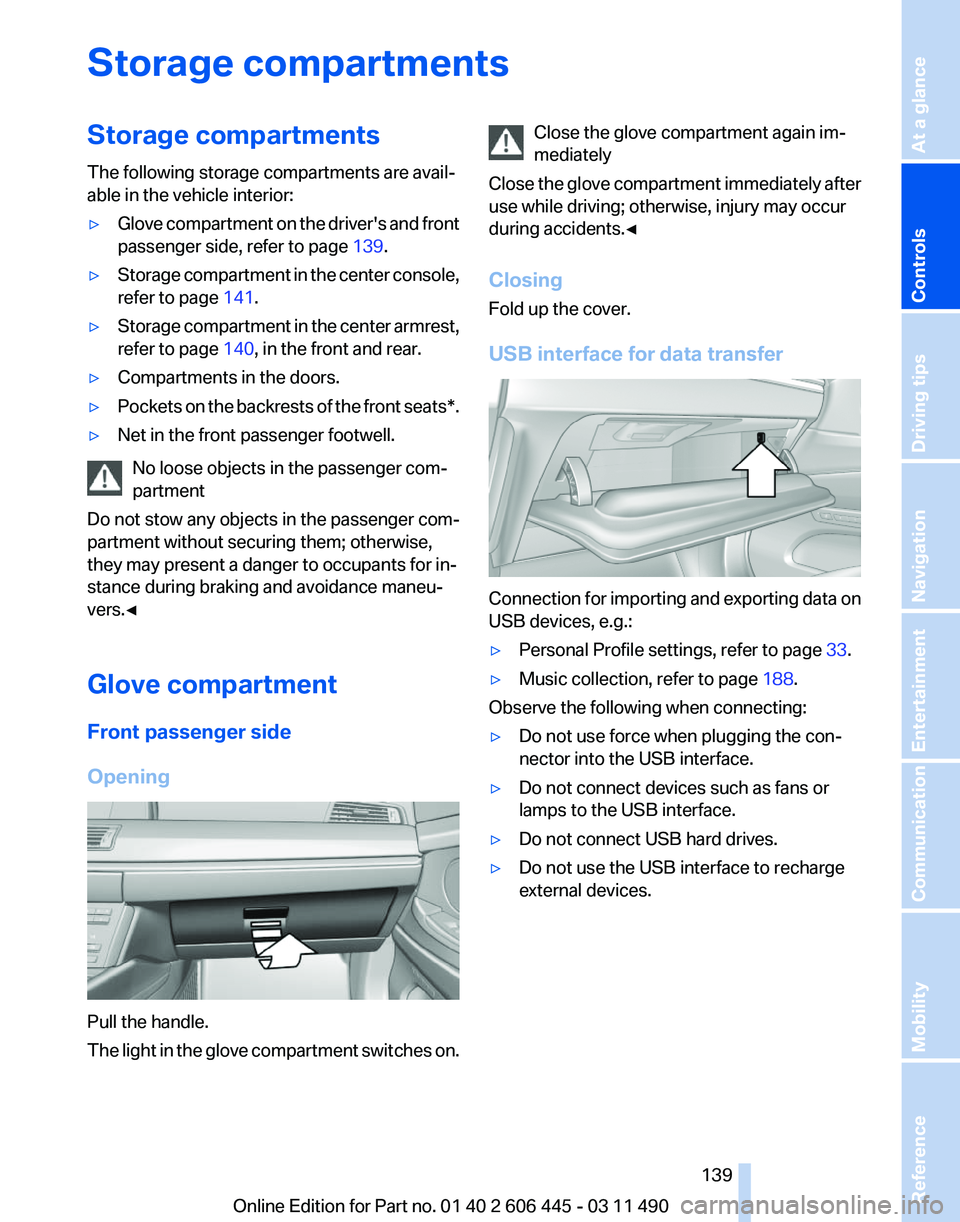
USB interface for data transfer Connection for importing and exporting data on
USB devices, e.g.:
▷
Personal Profile settings, refer to page 33.
▷ Music collection, refer to page 188.
Observe the following when connecting:
▷ Do not use force when plugging the con‐
nector into the USB interface.
▷ Do not connect devices such as fans or
lamps to the USB interface.
▷ Do not connect USB hard drives.
▷ Do not use the USB interface to recharge
external devices. Seite 139
139Online Edition for Part no. 01 40 2 606 445 - 03 11 490
Reference Mobility Communication Entertainment Navigation Driving tips
Controls At a glance
Page 140 of 297
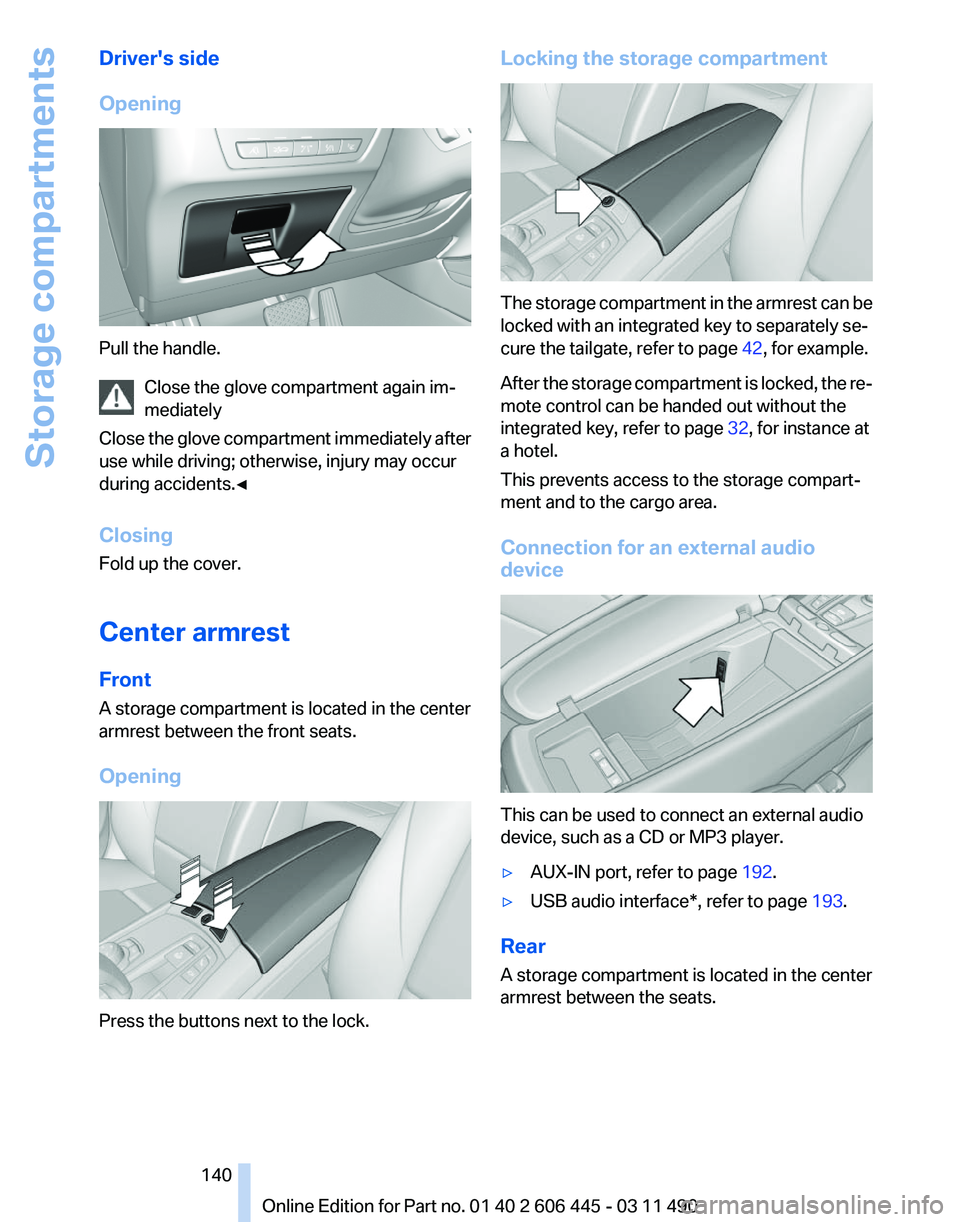
Driver's side
Opening
Pull the handle.
Close the glove compartment again im‐
mediately
Close
the glove compartment immediately after
use while driving; otherwise, injury may occur
during accidents.◀
Closing
Fold up the cover.
Center armrest
Front
A storage compartment is located in the center
armrest between the front seats.
Opening Press the buttons next to the lock. Locking the storage compartment
The storage compartment in the armrest can be
locked with an integrated key to separately se‐
cure the tailgate, refer to page
42, for example.
After
the storage compartment is locked, the re‐
mote control can be handed out without the
integrated key, refer to page 32, for instance at
a hotel.
This prevents access to the storage compart‐
ment and to the cargo area.
Connection for an external audio
device This can be used to connect an external audio
device, such as a CD or MP3 player.
▷
AUX-IN port, refer to page 192.
▷ USB audio interface*, refer to page 193.
Rear
A storage compartment is located in the center
armrest between the seats.
Seite 140
140 Online Edition for Part no. 01 40 2 606 445 - 03 11 490
Storage compartments
Page 201 of 297
Rear entertainment*
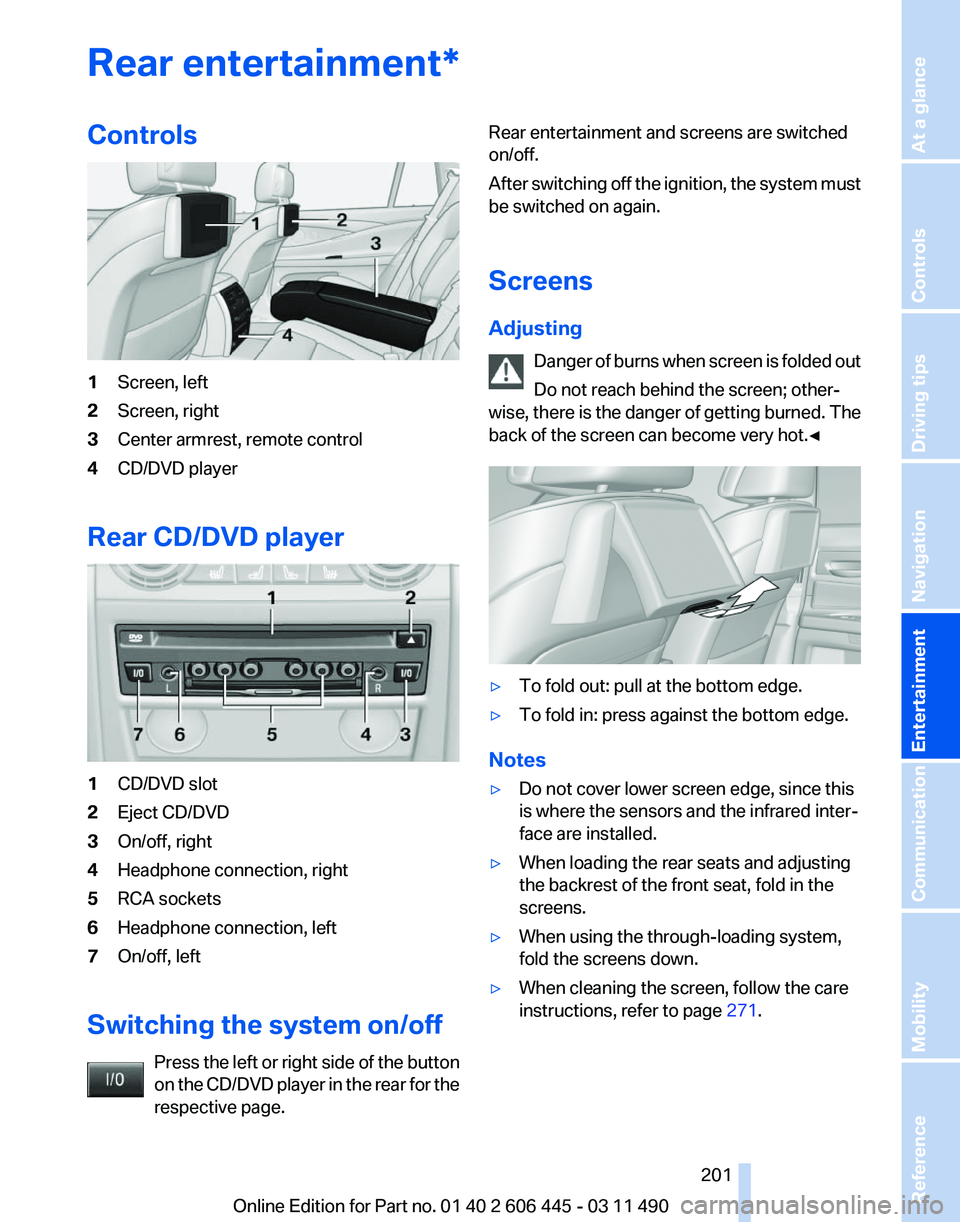
Controls
1
Screen, left
2 Screen, right
3 Center armrest, remote control
4 CD/DVD player
Rear CD/DVD player 1
CD/DVD slot
2 Eject CD/DVD
3 On/off, right
4 Headphone connection, right
5 RCA sockets
6 Headphone connection, left
7 On/off, left
Switching the system on/off Press the left or right side of the button
on the CD/DVD player in the rear for the
respective page. Rear entertainment and screens are switched
on/off.
After
switching off the ignition, the system must
be switched on again.
Screens
Adjusting
Danger of burns when screen is folded out
Do not reach behind the screen; other‐
wise, there is the danger of getting burned. The
back of the screen can become very hot.◀ ▷
To fold out: pull at the bottom edge.
▷ To fold in: press against the bottom edge.
Notes
▷ Do not cover lower screen edge, since this
is where the sensors and the infrared inter‐
face are installed.
▷ When loading the rear seats and adjusting
the backrest of the front seat, fold in the
screens.
▷ When using the through-loading system,
fold the screens down.
▷ When cleaning the screen, follow the care
instructions, refer to page 271. Seite 201
201Online Edition for Part no. 01 40 2 606 445 - 03 11 490
Reference Mobility Communication
Entertainment Navigation Driving tips Controls At a glance
Page 289 of 297
Engine start, refer to Starting
the engine 66
Engine start, Starting aid 265
Engine stop 67
Engine temperature 77
Equalizer 172
Equipment, interior 133
ESP Electronic Stability Pro‐ gram, refer to DSC 99
Exchanging wheels/tires 248
Exhaust system 146
Exterior
mirror, automatic dim‐
ming feature, dimmable exte‐
rior mirrors 60
Exterior mirrors 59
External devices 192
External start 265
External temperature dis‐ play 77
External temperature warn‐ ing 77
Eyes for securing cargo 149
F
Fader 172
Failure message, refer to Check Control 83
False alarm, refer to Uninten‐ tional alarm 45
Fan, refer to Air volume 128
Fault displays, refer to Check Control 83
Filler neck for engine oil 253
Fine wood, care 271
First aid kit 265
Fitting for towing, refer to Tow fitting 267
Flat tire, Tire Pressure Monitor TPM 92
Flat tire, warning lamp 93
Flat tire, wheel change 261
Flooding 147
Floor carpet, care 271
Floor mats, care 271
FM/AM station 174
Fold-out position, windshield wipers 73 Foot brake
147
Front airbags 89
Front fog lamps 88
Front
fog lamps, front, bulb re‐
placement 260
Front lamps 259
Front passenger airbags, au‐ tomatic deactivation 90
Front passenger airbags, indi‐ cator lamp 91
Front seats, adjusting 49
Fuel cap 240
Fuel consumption, current 77
Fuel consumption, refer to Average fuel consump‐
tion 79
Fuel filler flap 240
Fuel gauge 76
Fuel quality 242
Fuel, tank capacity 276
Fuse 263
G
Garage door opener, refer to Integrated universal remote
control 133
Gas station recommenda‐ tion 163
Gear change, automatic trans‐ mission 74
General driving notes 146
Glass sunroof, refer to Panor‐ amic glass sunroof 47
Glove compartment 139
GPS navigation, refer to Navi‐ gation system 154
Gross vehicle weight, ap‐ proved 275
Gross weight, permissible for trailer towing 275
H
Hand brake, refer to Parking brake 67
Hand-held transmitter, alter‐ nating code 134 Hazard warning flashers 264
HDC
Hill Descent Control 100
HD Radio 175
Head airbags 89
Headlamp control, auto‐ matic 86
Headlamp courtesy delay fea‐ ture 85
Headlamp courtesy delay fea‐ ture via remote control 36
Headlamp flasher 71
Headlamp glass 259
Headlamps 259
Headlamps, care 270
Headlamp washer system 71
Headliner 18
Headphones, rear entertain‐ ment 205
Head restraints 49
Head restraints, front 56
Head restraints, rear 57
Head-up Display 125
Head-up Display, care 271
Heavy cargo, stowing 149
Height, seats 49
Height with roof-mounted aer‐ ial, vehicle 274
High-beam Assistant 87
High beams 71
High beams/low beams, refer to High-beam Assistant 87
Hill Descent Control HDC 100
Hills 148
Hill start assistant, refer to Drive-off assistant 99
Hints 6
Holder for beverages 141
Homepage 6
Hood 251
Horn 12
Hotel function, tailgate 42
Hot exhaust system 146
House number, entering for navigation 155
Hydroplaning 147
Seite 289
289Online Edition for Part no. 01 40 2 606 445 - 03 11 490
Reference Mobility Communication Entertainment Navigation Driving tips Controls At a glance