2011 BMW 528I trunk
[x] Cancel search: trunkPage 148 of 304

Driving in wet conditions
When
roads are wet or there is heavy rain, briefly
exert gentle pressure on the brake pedal every
few miles.
Ensure that this action does not endanger other
road users.
The heat generated in this process helps dry the
brake discs and pads.
In this way braking efficiency will be available
when you need it.
Hills
Drive long or steep downhill gradients in the gear
in which the least braking is required. Otherwise,
the brake system may overheat, resulting in a
reduction in the brake system efficiency.
Manual transmission:
You can increase the engine's braking effect by
shifting down, going all the way to first gear, if
necessary.
Automatic transmission*:
You can increase the engine's braking effect by
shifting down in the manual mode of the auto‐
matic transmission, refer to page 65.
Avoid load on the brakes
Avoid placing excessive load on the brake
system. Light but consistent brake pressure can
lead to high temperatures, brake wear and pos‐
sibly even brake failure.◀
Do not drive in neutral
Do not drive in neutral or with the engine
stopped, as doing so disables engine braking. In
addition, steering and brake assist is unavailable
with the engine stopped.◀
Brake disc corrosion
Corrosion on the brake discs and contamination
on the brake pads are furthered by:
▷ Low mileage.
▷ Extended periods when the vehicle is not
used at all.
▷ Infrequent use of the brakes. Corrosion occurs when the minimum pressure
that must be exerted by the pads during brake
applications to clean the discs is not reached.
Should corrosion form on the brake discs, the
brakes will tend to respond with a pulsating ef‐
fect that generally cannot be corrected.
Condensation
under the parked vehicle
When using the automatic climate control, con‐
densation water develops that exits underneath
the vehicle.
Therefore, traces of condensed water under the
vehicle are normal.
Loading
Overloading the vehicle
To avoid exceeding the approved carrying
capacity of the tires, never overload the vehicle.
Overloading can lead to overheating and in‐
creases the rate at which damage develops in‐
side the tires. This could result in a sudden loss
of tire inflation pressure.◀
No fluids in the trunk
Make sure that fluids do not leak into the
trunk; otherwise, the vehicle may be damaged.◀
Determining the load limit 1.
Locate the following statement on your ve‐
hicle’s placard*:
▷The combined weight of occupants and
cargo should never exceed XXX kg or
YYY lbs. Otherwise, damage to the ve‐ Seite 148
148 Online Edition for Part no. 01 40 2 606 469 - 03 11 490
Things to remember when driving
Page 150 of 304
Securing cargo
Always position and secure the cargo as
described
above; otherwise, it can endanger the
car's occupants if sudden braking or swerving
becomes necessary.
Heavy or hard objects should not be carried
loose inside the car; otherwise, they could be
thrown around as a result of hard braking, sud‐
den swerves, etc., and endanger the occu‐
pants.◀
Roof-mounted luggage rack
Note
Roof racks are available as special accessories.
Attachment
Follow the installation instructions of the roof
rack.
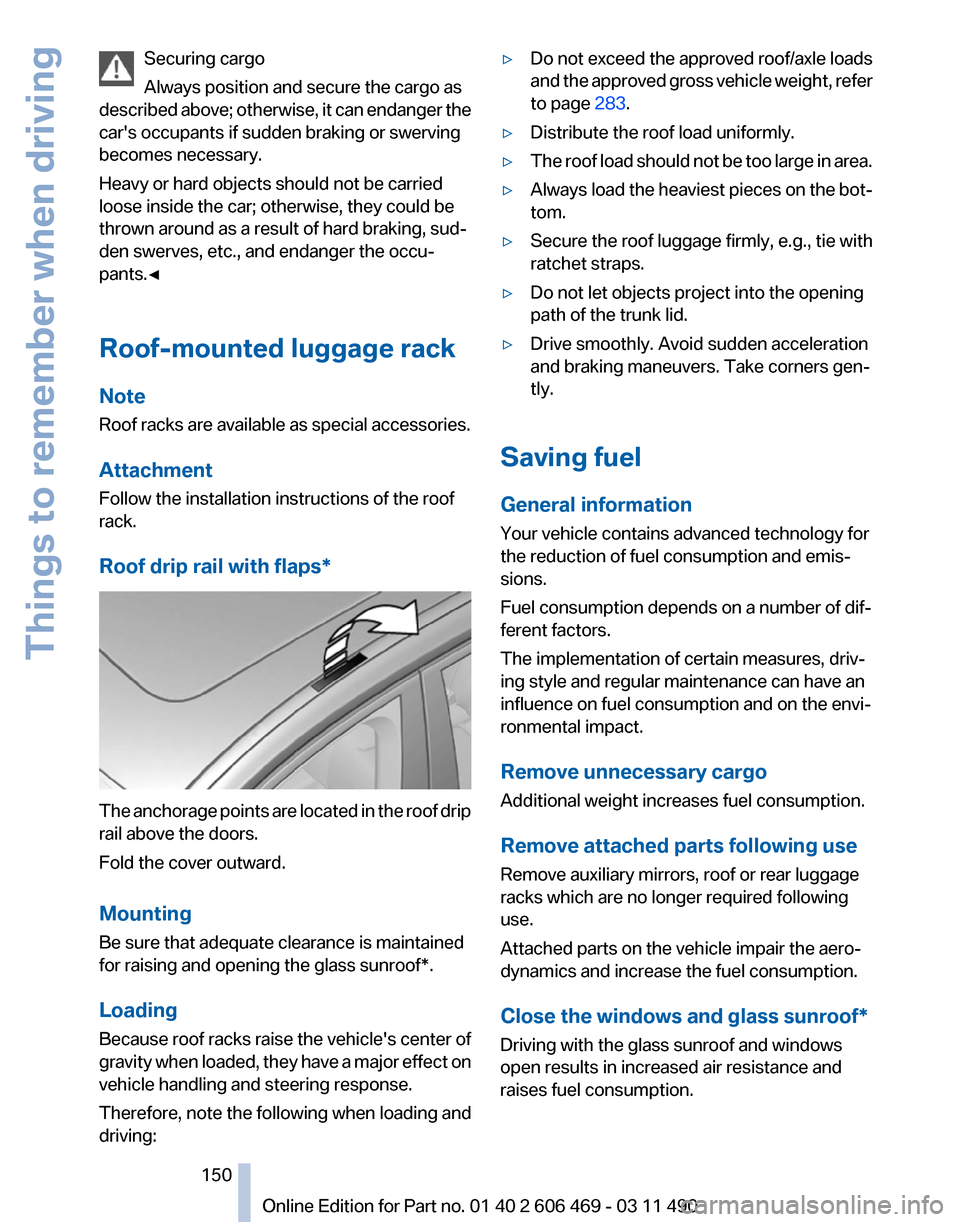
Roof drip rail with flaps* The anchorage points are located in the roof drip
rail above the doors.
Fold the cover outward.
Mounting
Be sure that adequate clearance is maintained
for raising and opening the
glass sunroof*.
Loading
Because roof racks raise the vehicle's center of
gravity when loaded, they have a major effect on
vehicle handling and steering response.
Therefore, note the following when loading and
driving: ▷
Do not exceed the approved roof/axle loads
and
the approved gross vehicle weight, refer
to page 283.
▷ Distribute the roof load uniformly.
▷ The roof load should not be too large in area.
▷ Always load the heaviest pieces on the bot‐
tom.
▷ Secure the roof luggage firmly, e.g., tie with
ratchet straps.
▷ Do not let objects project into the opening
path of the trunk lid.
▷ Drive smoothly. Avoid sudden acceleration
and braking maneuvers. Take corners gen‐
tly.
Saving fuel
General information
Your vehicle contains advanced technology for
the reduction of fuel consumption and emis‐
sions.
Fuel consumption depends on a number of dif‐
ferent factors.
The implementation of certain measures, driv‐
ing style and regular maintenance can have an
influence on fuel consumption and on the envi‐
ronmental impact.
Remove unnecessary cargo
Additional weight increases fuel consumption.
Remove attached parts following use
Remove auxiliary mirrors, roof or rear luggage
racks which are no longer required following
use.
Attached parts on the vehicle impair the aero‐
dynamics and increase the fuel consumption.
Close the windows and glass sunroof
*
Driving with the glass sunroof and windows
open results in increased air resistance and
raises fuel consumption.
Seite 150
150 Online Edition for Part no. 01 40 2 606 469 - 03 11 490
Things to remember when driving
Page 262 of 304
Replacing components
Tool kit
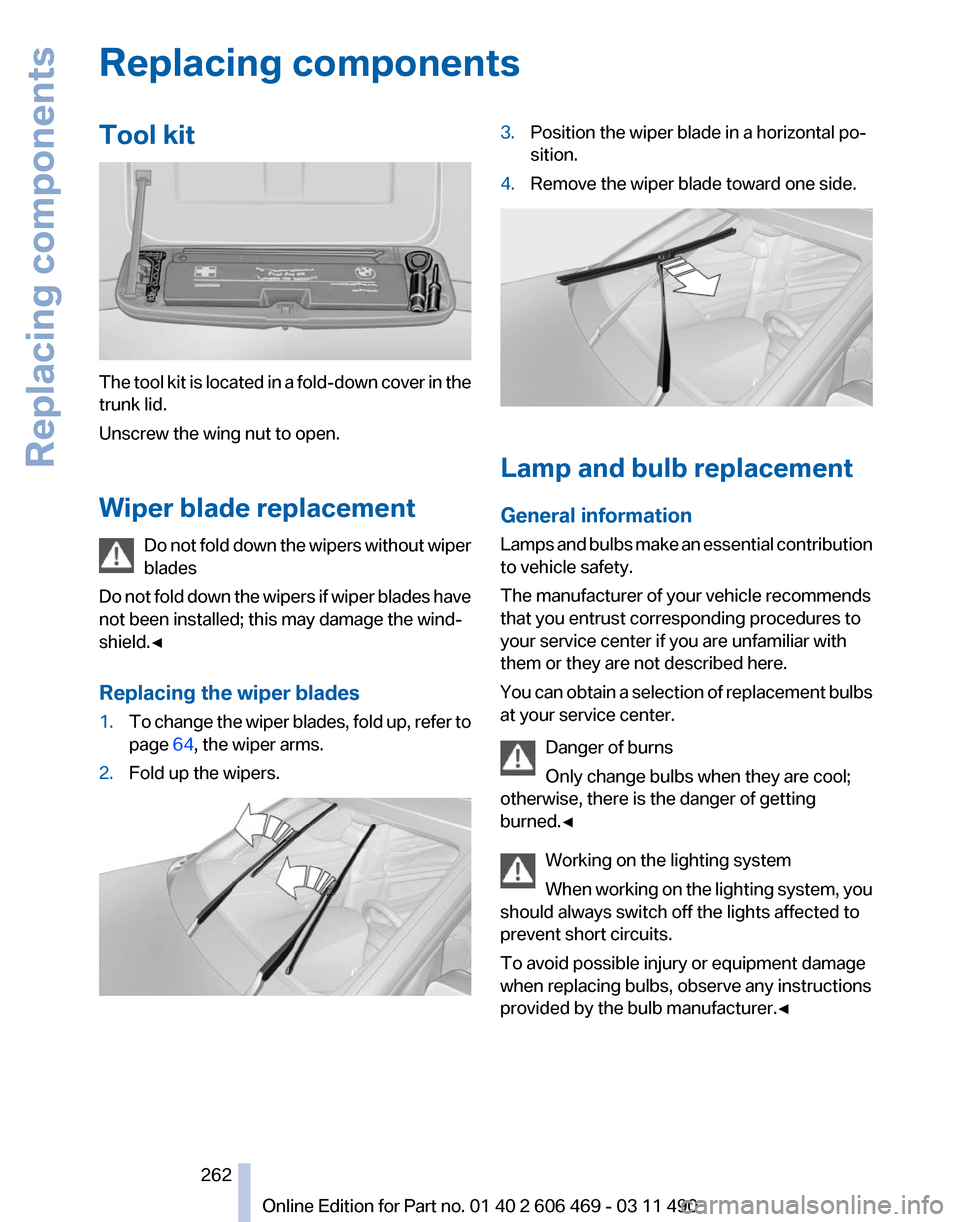
The tool kit is located in a fold-down cover in the
trunk lid.
Unscrew the wing nut to open.
Wiper blade replacement
Do
not fold down the wipers without wiper
blades
Do not fold down the wipers if wiper blades have
not been installed; this may damage the wind‐
shield.◀
Replacing the wiper blades
1. To change the wiper blades, fold up, refer to
page 64, the wiper arms.
2. Fold up the wipers. 3.
Position the wiper blade in a horizontal po‐
sition.
4. Remove the wiper blade toward one side. Lamp and bulb replacement
General information
Lamps
and bulbs make an essential contribution
to vehicle safety.
The manufacturer of your vehicle recommends
that you entrust corresponding procedures to
your service center if you are unfamiliar with
them or they are not described here.
You can obtain a selection of replacement bulbs
at your service center.
Danger of burns
Only change bulbs when they are cool;
otherwise, there is the danger of getting
burned.◀
Working on the lighting system
When working on the lighting system, you
should always switch off the lights affected to
prevent short circuits.
To avoid possible injury or equipment damage
when replacing bulbs, observe any instructions
provided by the bulb manufacturer.◀ Seite 262
262 Online Edition for Part no. 01 40 2 606 469 - 03 11 490Replacing components
Page 266 of 304

Turn signal, outer brake, tail, and
license plate lamps
Follow the general instructions on lamps and
bulbs, refer to page
262.
These lights are made using LED technology.
Contact your service center in the event of a
malfunction.
Lamps in the trunk lid
Access to the lamps
1. Remove the three screws using the screw
driver from the tool kit. 2.
Fold away the cover. Inside brake lamp*
Follow the general instructions on lamps and
bulbs, refer to page
262.
21-watt bulb, H21W The illustration shows the position of the bulb in
the installed bulb holder.
Squeeze the clips together and remove the bulb
holder.
Press the bulb into the bulb holder, turn coun‐
terclockwise and remove.
Backup lamp
Follow the general instructions on lamps and
bulbs, refer to page
262.
16-watt bulb, W16W The illustration shows the position of the bulb in
the installed bulb holder.
Seite 266
266 Online Edition for Part no. 01 40 2 606 469 - 03 11 490Replacing components
Page 270 of 304
Assist Response Center may still be able to
hear you.
Initiating an Emergency Request
automatically
Under certain conditions, an Emergency Re‐
quest is automatically initiated immediately after
a severe accident. Automatic Collision Notifica‐
tion is not affected by pressing the SOS button.
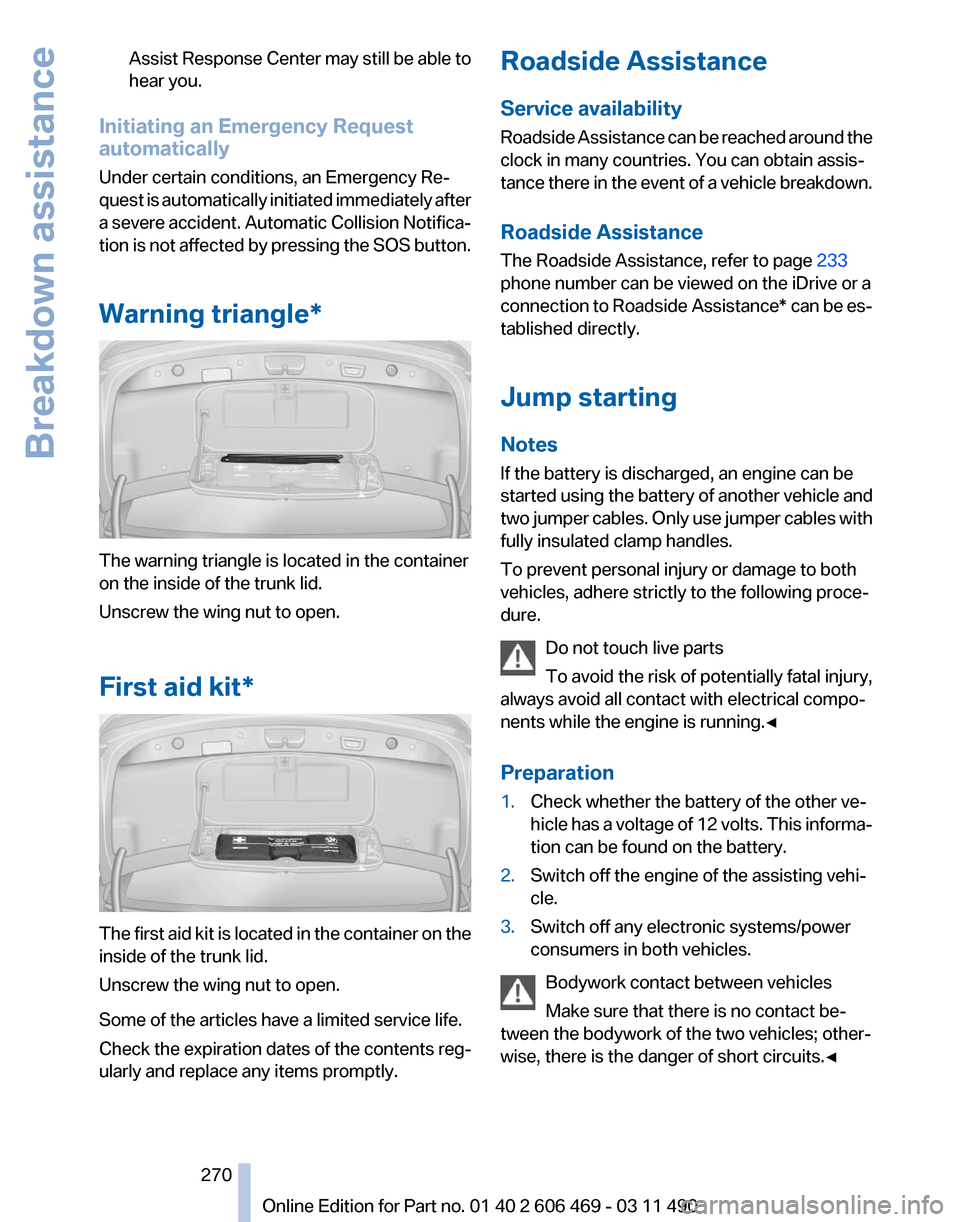
Warning triangle* The warning triangle is located in the container
on the inside of the trunk lid.
Unscrew the wing nut to open.
First aid kit*
The first aid kit is located in the container on the
inside of the trunk lid.
Unscrew the wing nut to open.
Some of the articles have a limited service life.
Check the expiration dates of the contents reg‐
ularly and replace any items promptly. Roadside Assistance
Service availability
Roadside Assistance can be reached around the
clock in many countries. You can obtain assis‐
tance there in the event of a vehicle breakdown.
Roadside Assistance
The Roadside Assistance, refer to page
233
phone number can be viewed on the iDrive or a
connection to Roadside Assistance* can be es‐
tablished directly.
Jump starting
Notes
If the battery is discharged, an engine can be
started using the battery of another vehicle and
two jumper cables. Only use jumper cables with
fully insulated clamp handles.
To prevent personal injury or damage to both
vehicles, adhere strictly to the following proce‐
dure.
Do not touch live parts
To avoid the risk of potentially fatal injury,
always avoid all contact with electrical compo‐
nents while the engine is running.◀
Preparation
1. Check whether the battery of the other ve‐
hicle has a voltage of 12 volts. This informa‐
tion can be found on the battery.
2. Switch off the engine of the assisting vehi‐
cle.
3. Switch off any electronic systems/power
consumers in both vehicles.
Bodywork contact between vehicles
Make sure that there is no contact be‐
tween the bodywork of the two vehicles; other‐
wise, there is the danger of short circuits.◀ Seite 270
270 Online Edition for Part no. 01 40 2 606 469 - 03 11 490Breakdown assistance
Page 273 of 304
▷
Maneuvering capability is limited during cor‐
nering.
▷ The tow bar will generate lateral forces if it
is secured with an offset.
Tow rope
When starting to tow the vehicle, make sure that
the tow rope is taut.
To avoid jerking and the associated stresses on
the vehicle components when towing, always
use nylon ropes or nylon straps.
Attaching the tow rope correctly
Only secure the tow rope on the tow fit‐
ting; otherwise, damage can occur when it is se‐
cured on other parts of the vehicle.◀
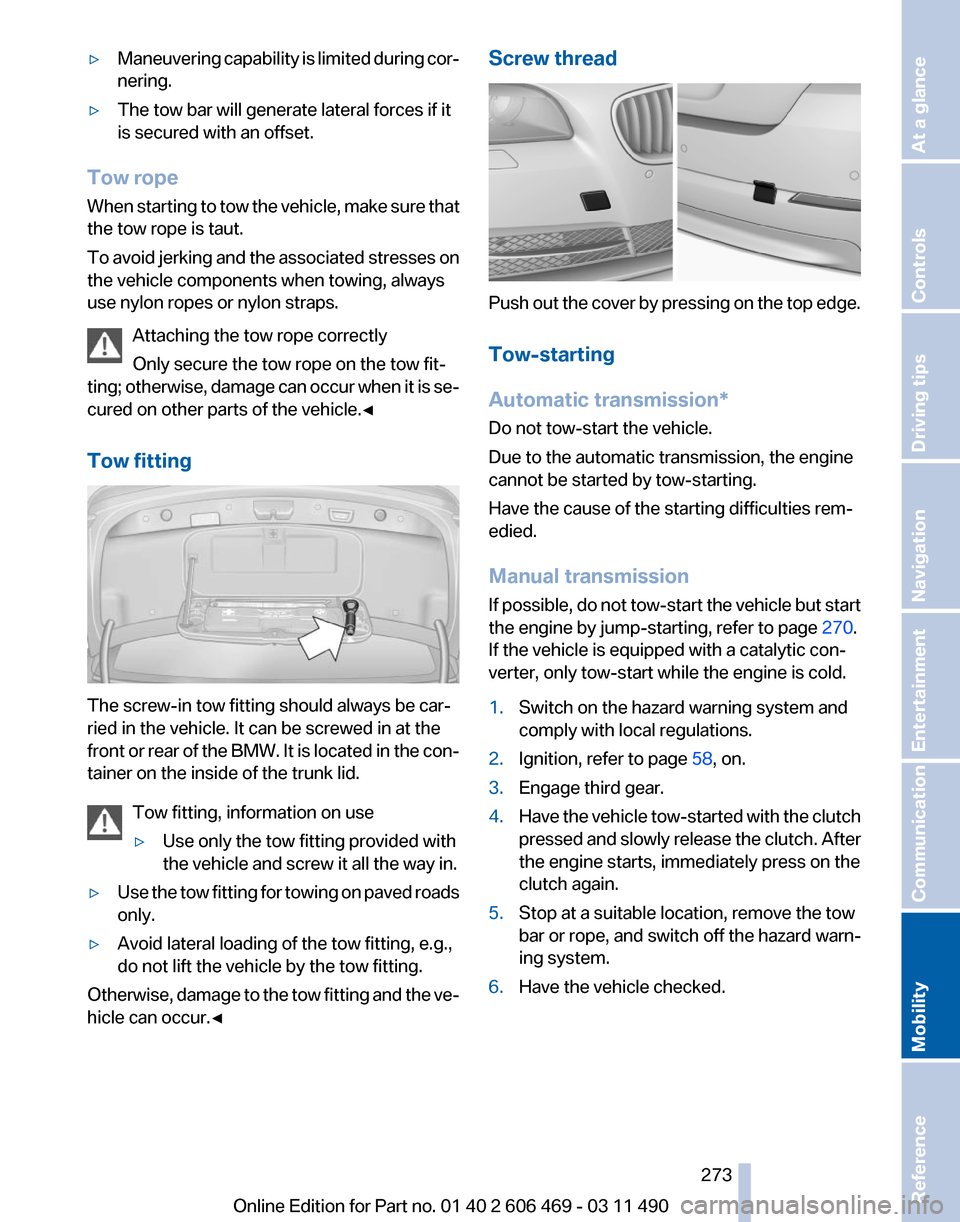
Tow fitting The screw-in tow fitting should always be car‐
ried in the vehicle. It can be screwed in at the
front
or rear of the BMW. It is located in the con‐
tainer on the inside of the trunk lid.
Tow fitting, information on use
▷Use only the tow fitting provided with
the vehicle and screw it all the way in.
▷ Use the tow fitting for towing on paved roads
only.
▷ Avoid lateral loading of the tow fitting, e.g.,
do not lift the vehicle by the tow fitting.
Otherwise, damage to the tow fitting and the ve‐
hicle can occur.◀ Screw thread
Push out the cover by pressing on the top edge.
Tow-starting
Automatic transmission
*
Do not tow-start the vehicle.
Due to the automatic transmission, the engine
cannot be started by tow-starting.
Have the cause of the starting difficulties rem‐
edied.
Manual transmission
If possible, do not tow-start the vehicle but start
the engine by jump-starting, refer to page 270.
If the vehicle is equipped with a catalytic con‐
verter, only tow-start while the engine is cold.
1. Switch on the hazard warning system and
comply with local regulations.
2. Ignition, refer to page 58, on.
3. Engage third gear.
4. Have the vehicle tow-started with the clutch
pressed
and slowly release the clutch. After
the engine starts, immediately press on the
clutch again.
5. Stop at a suitable location, remove the tow
bar or rope, and switch off the hazard warn‐
ing system.
6. Have the vehicle checked.
Seite 273
273Online Edition for Part no. 01 40 2 606 469 - 03 11 490
Reference
Mobility Communication Entertainment Navigation Driving tips Controls At a glance
Page 283 of 304
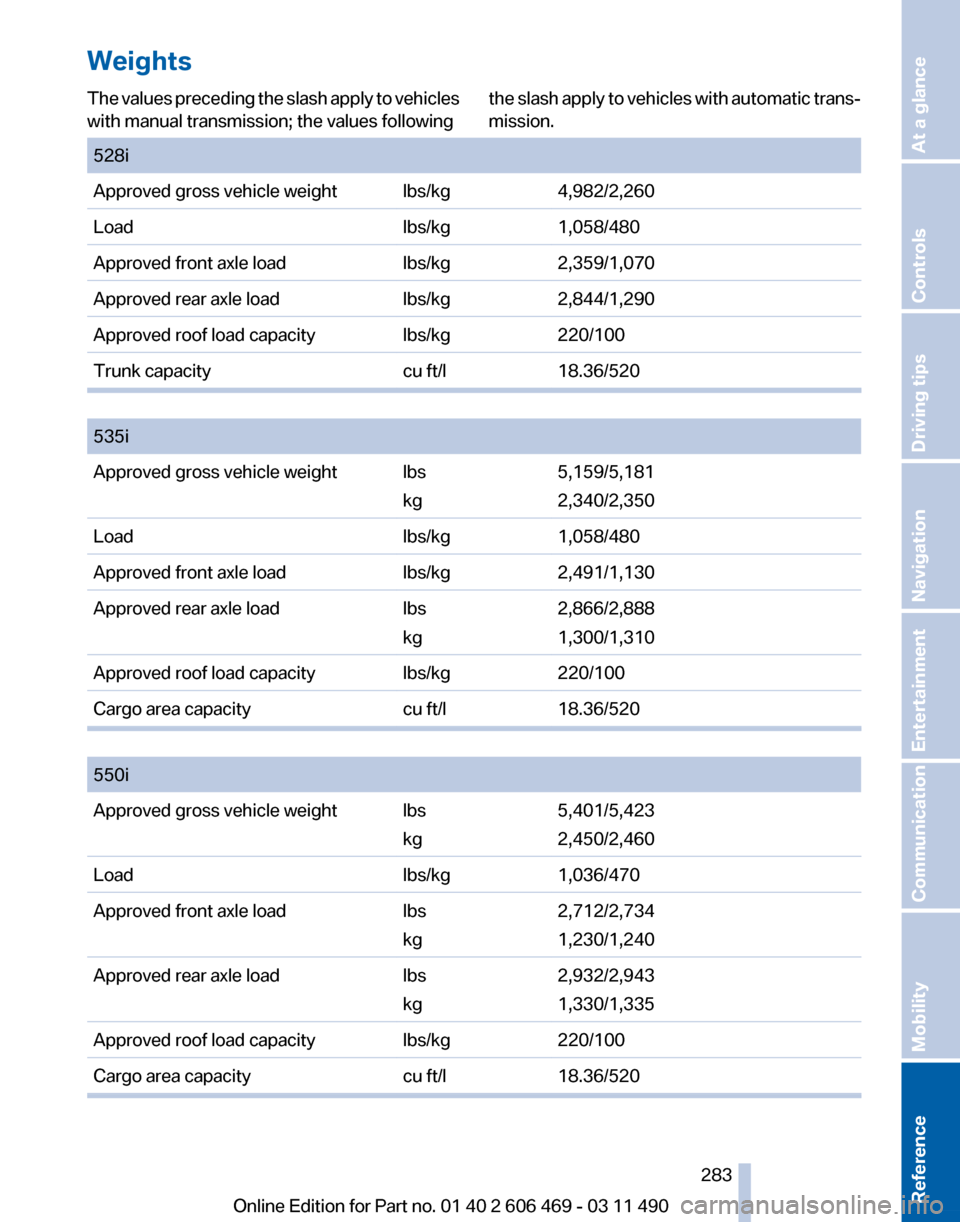
Weights
The values preceding the slash apply to vehicles
with manual transmission; the values following
the slash apply to vehicles with automatic trans‐
mission.
528i
Approved gross vehicle weight lbs/kg
4,982/2,260
Load lbs/kg1,058/480
Approved front axle load lbs/kg2,359/1,070
Approved rear axle load lbs/kg2,844/1,290
Approved roof load capacity lbs/kg220/100
Trunk capacity cu ft/l18.36/520
535i
Approved gross vehicle weight lbs
kg5,159/5,181
2,340/2,350
Load lbs/kg1,058/480
Approved front axle load lbs/kg2,491/1,130
Approved rear axle load lbs
kg2,866/2,888
1,300/1,310
Approved roof load capacity lbs/kg220/100
Cargo area capacity cu ft/l18.36/520
550i
Approved gross vehicle weight lbs
kg5,401/5,423
2,450/2,460
Load lbs/kg1,036/470
Approved front axle load lbs
kg2,712/2,734
1,230/1,240
Approved rear axle load lbs
kg2,932/2,943
1,330/1,335
Approved roof load capacity lbs/kg220/100
Cargo area capacity cu ft/l18.36/520 Seite 283
283Online Edition for Part no. 01 40 2 606 469 - 03 11 490
Reference Mobility Communication Entertainment Navigation Driving tips Controls At a glance
Page 294 of 304

Everything from A to Z
Index
A
ABS, Antilock Brake Sys‐
tem 95
ACC, Active Cruise Control with Stop & Go 102
Activated-charcoal filter 129
Active Blind Spot Detec‐ tion 92
Active Cruise Control with Stop & Go, ACC 102
Active seat, front 46
Active seat ventilation, front 47
Active Steering, integral 98
Adaptive brake assistant 95
Adaptive brake lights, refer to Brake force display 94
Adaptive drive 97
Adaptive light control 81
Additional telephone 210
Additives, oil 258
Adjustments, seats/head re‐ straints 44
Airbags 85
Airbags, indicator/warning light 86
Air circulation, refer to Recir‐ culated-air mode 127
Air distribution, manual 126
Air drying, refer to Cooling function 128
Air pressure, tires 242
Air vents, refer to Ventila‐ tion 129
Air volume, automatic climate control 127
Alarm system 39
Alarm, unintentional 40
All around the center con‐ sole 14
All around the headliner 15 All around the steering
wheel 12
ALL program, automatic cli‐ mate control 128
All-season tires, refer to Win‐ ter tires 252
All-wheel-drive 96
Alternating-code hand-held transmitter 133
Alternative oil types 258
AM/FM station 174
Announcement, navigation, refer to Spoken instruc‐
tions 163
Antifreeze, washer fluid 64
Antilock Brake System, ABS 95
Anti-slip control, refer to DSC 95
Appointments 226
Approved engine oils 258
Apps 236
Armrest, refer to Center arm‐ rest 139
Arrival time 77
Ashtray 134
Ashtray, front 134
Ashtray, rear 135
Assist 232
Assistance, Roadside Assis‐ tance 270
Assistance when driving off 95
Audio playback 181
Audio playback, Blue‐ tooth 196
AUTO intensity 127
Automatic car wash 274
Automatic climate con‐ trol 126
Automatic Cruise Control with Stop & Go 102
Automatic Curb Monitor 52 Automatic deactivation, front
passenger airbags 86
Automatic headlamp con‐ trol 81
Automatic Hold 60
Automatic locking 35
Automatic recirculated-air control 127
Automatic Soft Closing, doors 35
Automatic transmission with Steptronic 65
Automatic trunk lid 36
AUTO program, automatic cli‐ mate control 127
AUTO program, intensity 127
AUX-IN port 192
Average fuel consumption 76
Average speed 76
Axle loads, weights 283
B
Backrest curvature, refer to Lumbar support 46
Backrest, seats 44
Backup camera 113
Backup lamps, bulb replace‐ ment 266
Balance 172
Band-Aids, refer to First aid kit 270
Bar for tow-starting/tow‐ ing 272
Bass 172
Battery replacement, remote control, rear entertain‐
ment 202
Battery replacement, vehicle battery 267
Battery replacement, vehicle remote control 28
Battery, vehicle 267
Seite 294
294 Online Edition for Part no. 01 40 2 606 469 - 03 11 490Everything from A to Z