2011 BMW 528I Drive
[x] Cancel search: DrivePage 149 of 304
hicle and unstable driving situations may
result.
2. Determine the combined weight of the
driver and passengers that will be riding in
your vehicle.
3. Subtract the combined weight of the driver
and
passengers from XXX kilograms or YYY
pounds.
4. The resulting figure equals the available
amount
of cargo and luggage load capacity.
For example, if the YYY amount equals
1,000 lbs and there will be four 150 lbs pas‐
sengers in your vehicle, the amount of avail‐
able cargo and luggage load capacity is
400 lbs: 1,000 lbs minus 600 lbs = 400 lbs.
5. Determine the combined weight of luggage
and
cargo being loaded on the vehicle. That
weight may not safely exceed the available
cargo and luggage load capacity calculated
in Step 4.
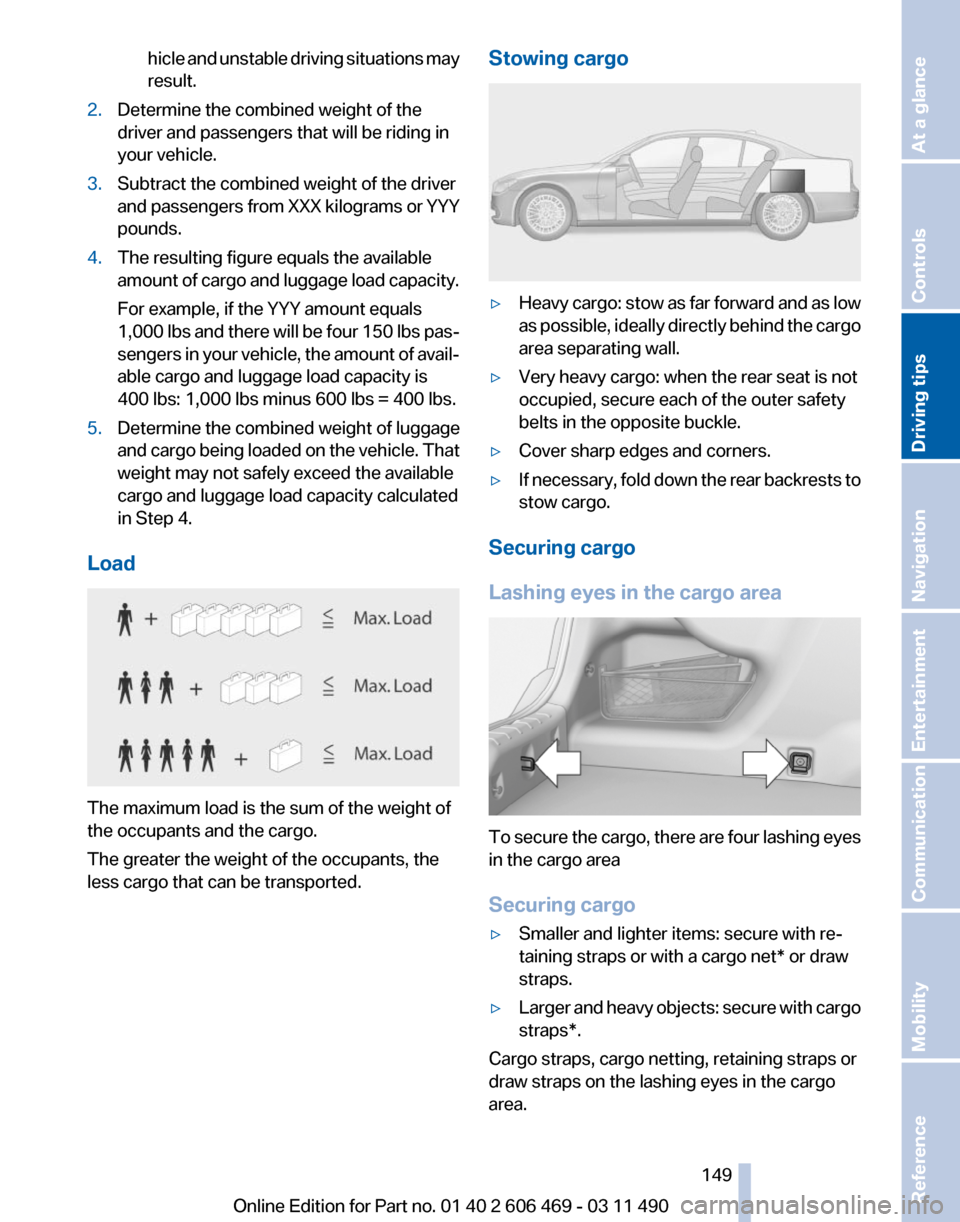
Load The maximum load is the sum of the weight of
the occupants and the cargo.
The greater the weight of the occupants, the
less cargo that can be transported. Stowing cargo ▷
Heavy cargo: stow as far forward and as low
as
possible, ideally directly behind the cargo
area separating wall.
▷ Very heavy cargo: when the rear seat is not
occupied, secure each of the outer safety
belts in the opposite buckle.
▷ Cover sharp edges and corners.
▷ If necessary, fold down the rear backrests to
stow cargo.
Securing cargo
Lashing eyes in the cargo area To secure the cargo, there are four lashing eyes
in the cargo area
Securing cargo
▷
Smaller and lighter items: secure with re‐
taining straps or with a
cargo net* or draw
straps.
▷ Larger and heavy objects: secure with cargo
straps*.
Cargo straps, cargo netting, retaining straps or
draw straps on the lashing eyes in the cargo
area.
Seite 149
149Online Edition for Part no. 01 40 2 606 469 - 03 11 490
Reference Mobility Communication Entertainment Navigation
Driving tips Controls At a glance
Page 150 of 304
Securing cargo
Always position and secure the cargo as
described
above; otherwise, it can endanger the
car's occupants if sudden braking or swerving
becomes necessary.
Heavy or hard objects should not be carried
loose inside the car; otherwise, they could be
thrown around as a result of hard braking, sud‐
den swerves, etc., and endanger the occu‐
pants.◀
Roof-mounted luggage rack
Note
Roof racks are available as special accessories.
Attachment
Follow the installation instructions of the roof
rack.
Roof drip rail with flaps* The anchorage points are located in the roof drip
rail above the doors.
Fold the cover outward.
Mounting
Be sure that adequate clearance is maintained
for raising and opening the
glass sunroof*.
Loading
Because roof racks raise the vehicle's center of
gravity when loaded, they have a major effect on
vehicle handling and steering response.
Therefore, note the following when loading and
driving: ▷
Do not exceed the approved roof/axle loads
and
the approved gross vehicle weight, refer
to page 283.
▷ Distribute the roof load uniformly.
▷ The roof load should not be too large in area.
▷ Always load the heaviest pieces on the bot‐
tom.
▷ Secure the roof luggage firmly, e.g., tie with
ratchet straps.
▷ Do not let objects project into the opening
path of the trunk lid.
▷ Drive smoothly. Avoid sudden acceleration
and braking maneuvers. Take corners gen‐
tly.
Saving fuel
General information
Your vehicle contains advanced technology for
the reduction of fuel consumption and emis‐
sions.
Fuel consumption depends on a number of dif‐
ferent factors.
The implementation of certain measures, driv‐
ing style and regular maintenance can have an
influence on fuel consumption and on the envi‐
ronmental impact.
Remove unnecessary cargo
Additional weight increases fuel consumption.
Remove attached parts following use
Remove auxiliary mirrors, roof or rear luggage
racks which are no longer required following
use.
Attached parts on the vehicle impair the aero‐
dynamics and increase the fuel consumption.
Close the windows and glass sunroof
*
Driving with the glass sunroof and windows
open results in increased air resistance and
raises fuel consumption.
Seite 150
150 Online Edition for Part no. 01 40 2 606 469 - 03 11 490
Things to remember when driving
Page 151 of 304
Check the tire inflation pressure
regularly
Check
and, if necessary, correct the tire inflation
pressure at least twice a month and before start‐
ing on a long trip.
Low tire inflation pressure increases rolling re‐
sistance and thus raises fuel consumption and
tire wear.
Drive away without delay
Do not wait for the engine to warm up while the
vehicle remains stationary. Start driving right
away, but at moderate engine speeds.
This is the fastest way for the cold engine to
reach its operating temperature.
Look well ahead when driving
Avoid unnecessary acceleration and braking.
By maintaining a suitable distance to the vehicle
driving ahead of you.
Driving smoothly and looking ahead reduces
fuel consumption.
Avoid high engine speeds
Use 1st gear to get the vehicle in motion. Be‐
ginning with 2nd gear, accelerate rapidly. When
accelerating, shift up before reaching high en‐
gine speeds.
When you reach the desired speed, shift into the
highest applicable gear and drive with the en‐
gine speed as low as possible and at a constant
speed.
As a rule: driving at low engine speeds lowers
fuel consumption and reduces wear.
The gear shift indicator* of your vehicle indi‐
cates the most fuel efficient gear.
Use coasting conditions
When approaching a red light, take your foot off
the accelerator and let the vehicle coast to a halt.
On a downhill gradient, take your foot off the ac‐
celerator and let the vehicle roll.
The flow of fuel is interrupted while coasting. Switch off the engine during longer
stops
Switch off the engine during longer stops, e.g.,
at traffic lights, railroad crossings or in traffic
congestion.
Fuel savings are achieved after the vehicle is
switched off for only approx. 4 seconds.
Switch off any functions that are not
currently needed
Functions
such as seat heating and the rear win‐
dow defroster require a lot of energy and con‐
sume additional fuel, especially in city and stop-
and-go traffic.
Therefore, switch off these functions if they are
not actually needed.
Have maintenance carried out
Have vehicles maintained regularly to achieve
optimal vehicle economy and operating life.
Have the maintenance carried out by your serv‐
ice center.
Please also note the BMW Maintenance Sys‐
tem.
Seite 151
151Online Edition for Part no. 01 40 2 606 469 - 03 11 490
Reference Mobility Communication Entertainment Navigation
Driving tips Controls At a glance
Page 159 of 304

Specifying the street
If
the system does not recognize a street, one of
the following is displayed:
▷ The name of a street in the vicinity.
▷ The county.
▷ The coordinates of the destination.
Additional functions
Additional functions are available on the inter‐
active map after the controller is pressed. ▷ Select the symbol.
"Start guidance" or "Add as another
destination"
Add a destination as a further destination,
refer to page 160.
▷ "Exit interactive map": return to the map
view.
▷ "View in northern direction" or "View in
driving direction"
▷ "Display destination": the map section
around the destination is displayed.
▷ "Display current location": the map section
around your current location is displayed.
▷ "Find
points of interest": the search for spe‐
cial destinations is started.
Destination entry by voice*
General information
▷ Instructions for voice activation system, re‐
fer to page 22.
▷ When making a destination entry by voice,
you can change between voice operation
and iDrive. ▷
To have the available spoken instructions
read out loud: ›Voice commands
‹
Saying the entries
▷ the town/city, street, and house number can
be entered as a single
command*.
▷ Countries, towns and cities, streets, and in‐
tersections can be said as whole words* or
spelled in the language of the system, refer
to page 79.
Example: to enter a town/city in a US state
as
a whole word, the language of the system
must be English.
▷ Spell the entry if the spoken language and
the language of the system differ.
▷ Say the letters smoothly, and avoid exag‐
gerating the pronunciation and inserting
lengthy pauses between the letters.
▷ The options available for entering data de‐
pend
on the navigation data and the country
and language settings.
entering an address using a command*
1. Press the button on the steering
wheel.
2. ›Enter address‹
3. Wait for a request from the system.
4. Say the address in the suggested order.
5. Continue making the entry as prompted by
the system.
If necessary, individually name the separate
components of the address, e.g., the town/city.
Entering a town/city separately
The name of the town/city can be said as a
word* or spelled out.
With the destination entry menu displayed:
1. Press the button on the steering
wheel.
2. ›City‹ or ›Spell city‹.
3. Wait for the system to prompt you for the
town/city.
Seite 159
159Online Edition for Part no. 01 40 2 606 469 - 03 11 490
Reference Mobility Communication Entertainment
Navigation Driving tips Controls At a glance
Page 165 of 304

Settings for the map view
The settings are stored for the remote control
currently in use.
1.
"Navigation"
2. "Map"
3. Open "Options".
4. "Settings"
Set the map view.
▷ "Day/night mode"
Select and create the necessary settings
depending on the light conditions.
"Traffic conditions/gray map" active: the
setting is disregarded.
▷ With the Professional navigation system:
"Satellite images"
Depending on availability and resolution,
satellite images* are displayed in a scale of
approx. 1 mile to 600 miles/2 km to
1,000 km.
▷ "Perspective view in 3D"
Prominent areas that are contained in the
navigation data are displayed on the map in
3D.
▷ "Traffic conditions/gray map"
The map is optimized for displaying traffic
bulletins,
refer to page 165. Symbols for the
special destinations are no longer displayed.
Map view for split screen
The map view can be selected for the split
screen independently from the main screen.
1. Open "Options".
2. "Split screen"
3. Move the controller to the right repeatedly
until the split screen is selected.
4. Select "Split screen content" or the scale.
5. Select the map view.
▷"Arrow display"
▷ "Map facing north"
▷ "Map direction of travel"
▷ "Map view with perspective" ▷
"Position"
▷ "Exit ramp view": selected blind drive‐
ways
are displayed three dimensionally.
Setting in some cases will affect the dis‐
play in the Head-Up Display*.
▷ "Traffic conditions/gray map"
6. To change the scale: select the split screen
and turn the controller.
Traffic bulletins*
At a glance
▷ Display the traffic bulletins from radio sta‐
tions that broadcast the TI Traffic Informa‐
tion
of a traffic information service. Informa‐
tion on traffic obstructions and hazards is
updated continuously.
Certain BMW models equipped with navi‐
gation have the capability to display real-
time traffic information. If your system has
this capability the following additional terms
and conditions apply:
An End-User shall no longer have the right
to use the Traffic Data in the event that the
End-User is in material breach of the terms
and conditions contained herein.
A. Total Traffic Network, a division of Clear
Channel Broadcasting, Inc. (“Total Traffic
Network”) holds the rights to the traffic in‐
cident data and RDS-TMC network through
which it is delivered. You may not modify,
copy, scan or use any other method to re‐
produce, duplicate, republish, transmit or
distribute in any way any portion of traffic in‐
cident data. You agree to indemnify, defend
and hold harmless BMW of North America,
LLC. (“BMW NA”) and Total Traffic Net‐
work, Inrix, Inc (and their affiliates) against
any and all claims, damages, costs or other
expenses that arise directly or indirectly out
of (a) your unauthorized use of the traffic in‐
cident data or the RDS-TMC network, (b)
your violation of this directive and/or (c) any
unauthorized or unlawful activities by you in
connection herewith.
Seite 165
165Online Edition for Part no. 01 40 2 606 469 - 03 11 490
Reference Mobility Communication Entertainment
Navigation Driving tips Controls At a glance
Page 167 of 304

in the map using triangles or gray bars along the
calculated route.
▷
Red: congestion.
▷ Orange: stop-and-go traffic.
▷ Yellow: heavy traffic.
▷ Green: clear roads.
▷ Gray: general traffic bulletins, e.g., construc‐
tion site.
The displayed information depends on the par‐
ticular traffic information service.
Filtering traffic bulletins
You
can set which traffic bulletins appear on the
map.
1. "Navigation"
2. "Map"
3. Open "Options".
4. "Traffic Info categories"
5. Select the desired categories. Traffic bulletins of the selected category are dis‐
played on the map.
▷
Traffic bulletins that are relevant to the route
are always shown.
▷ For your own safety, traffic bulletins that no‐
tify you of potentially dangerous situations,
such as wrong-way drivers, cannot be hid‐
den.
Destination guidance with traffic
bulletins
Semi-dynamic destination guidance
When traffic bulletin reception is switched on,
semi-dynamic destination guidance is active. The destination guidance system takes the
available
traffic information into account. A mes‐
sage is displayed depending on the route, the
traffic bulletins, and the possible detour routes.
A detour is suggested in the event of a traffic
obstruction. In addition, distance and time dif‐
ferences between the original route and the de‐
tour are displayed.
To accept the detour: "Detour"
In the event of special hazards, e.g., objects on
the road, a message is displayed without a de‐
tour suggestion.
Detours
can also be accepted if the traffic mes‐
sages are called up in the list.
1. "Navigation"
2. "Map"
3. "Traffic Info"
4. "Detour information"
5. "Detour"
Dynamic destination guidance
The
route is automatically changed in the event
of traffic obstructions.
▷ The system does not point out traffic ob‐
structions along the original route.
▷ Traffic bulletins continue to be displayed on
the map.
▷ Depending on road type and the kind and
extent of the traffic obstruction, the calcu‐
lated route may lead through the traffic ob‐
struction.
▷ Dangerous situations are displayed regard‐
less of the setting.
To activate dynamic destination guidance:
1. "Navigation"
2. Open "Options".
3. "Dynamic guidance"
Seite 167
167Online Edition for Part no. 01 40 2 606 469 - 03 11 490
Reference Mobility Communication Entertainment
Navigation Driving tips Controls At a glance
Page 177 of 304
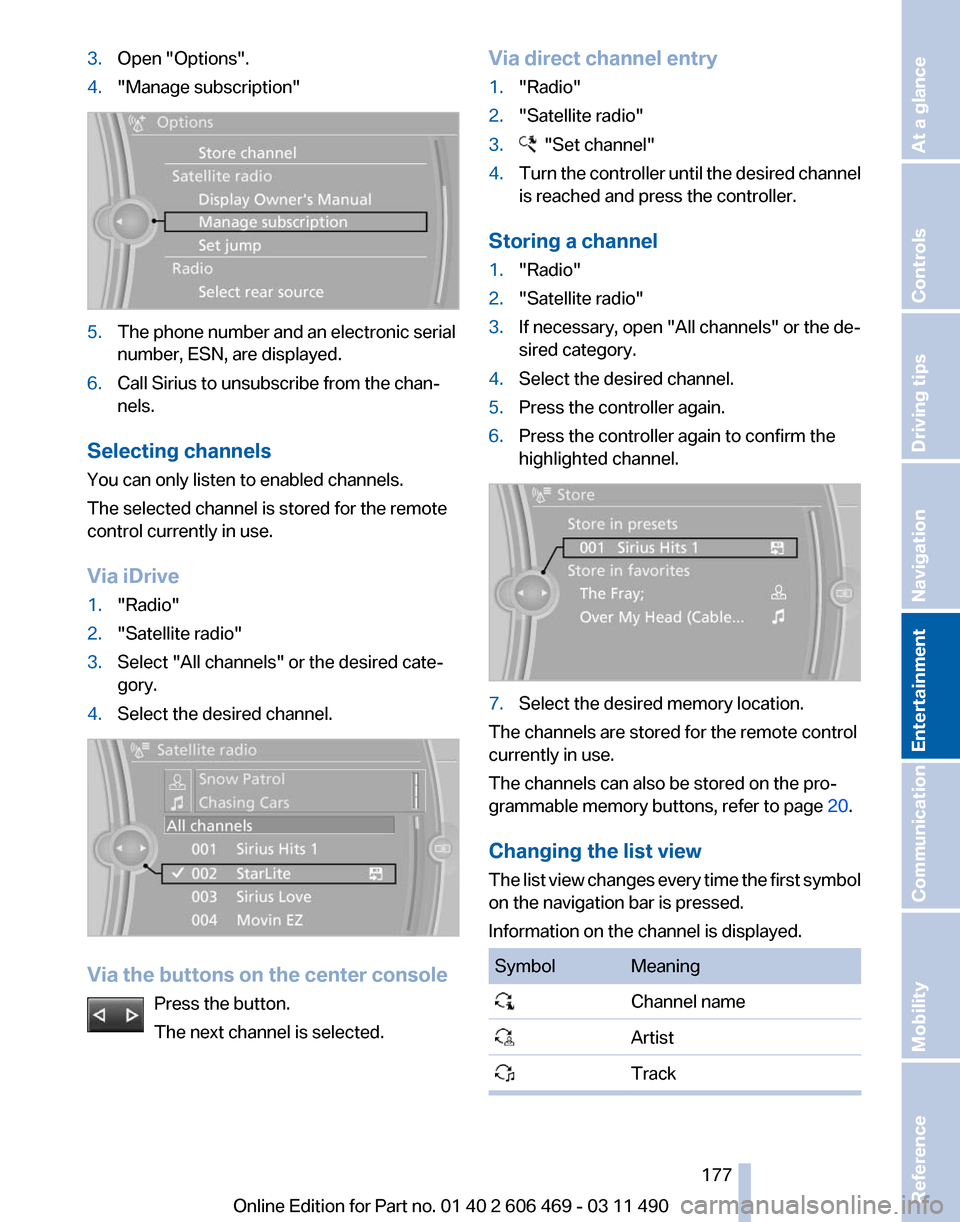
3.
Open "Options".
4. "Manage subscription" 5.
The phone number and an electronic serial
number, ESN, are displayed.
6. Call Sirius to unsubscribe from the chan‐
nels.
Selecting channels
You can only listen to enabled channels.
The selected channel is stored for the remote
control currently in use.
Via iDrive
1. "Radio"
2. "Satellite radio"
3. Select "All channels" or the desired cate‐
gory.
4. Select the desired channel. Via the buttons on the center console
Press the button.
The next channel is selected. Via direct channel entry
1.
"Radio"
2. "Satellite radio"
3. "Set channel"
4. Turn the controller until the desired channel
is reached and press the controller.
Storing a channel
1. "Radio"
2. "Satellite radio"
3. If necessary, open "All channels" or the de‐
sired category.
4. Select the desired channel.
5. Press the controller again.
6. Press the controller again to confirm the
highlighted channel. 7.
Select the desired memory location.
The channels are stored for the remote control
currently in use.
The channels can also be stored on the pro‐
grammable memory buttons, refer to page 20.
Changing the list view
The
list view changes every time the first symbol
on the navigation bar is pressed.
Information on the channel is displayed. Symbol Meaning
Channel name
Artist
Track Seite 177
177Online Edition for Part no. 01 40 2 606 469 - 03 11 490
Reference Mobility Communication
Entertainment Navigation Driving tips Controls At a glance
Page 181 of 304
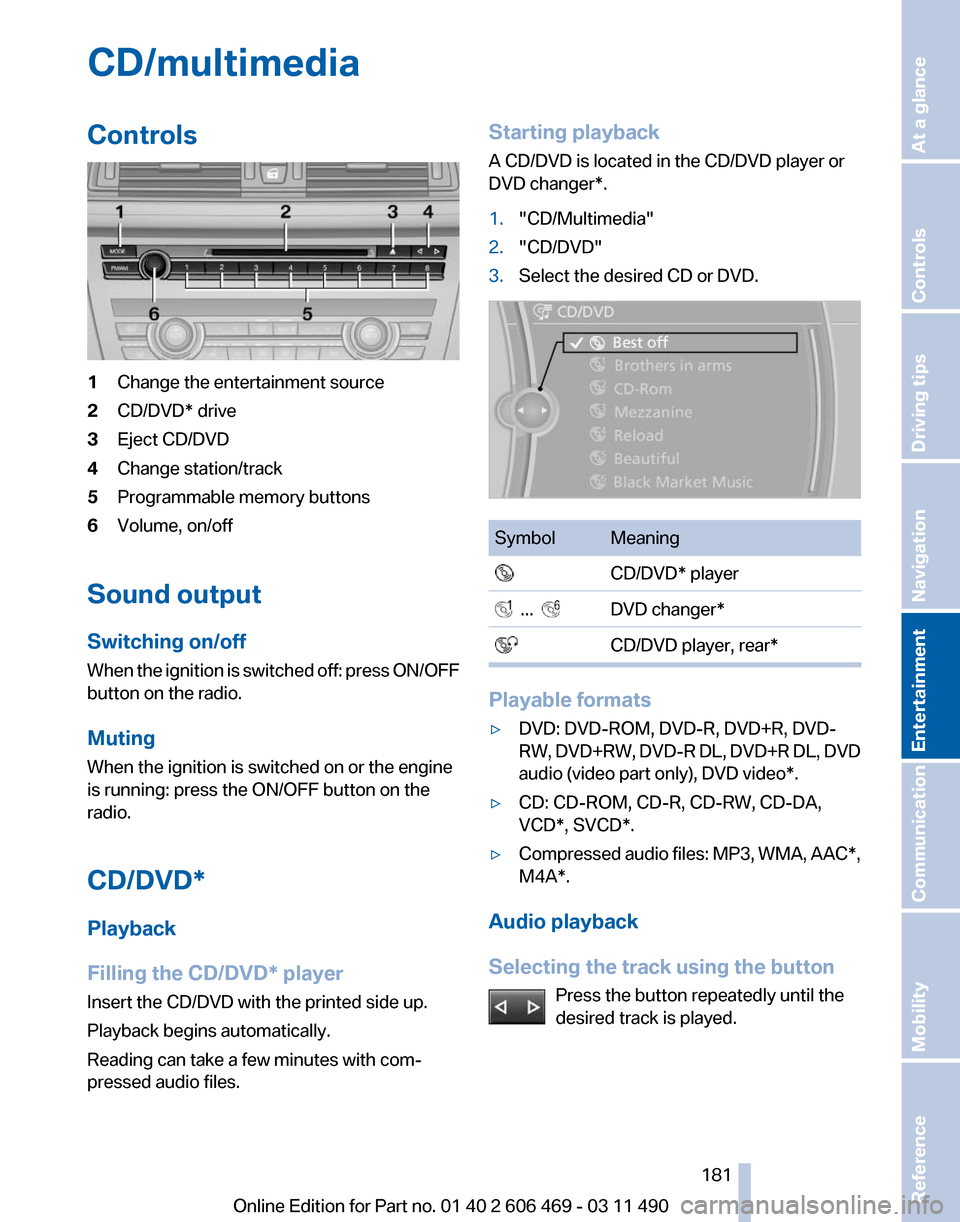
CD/multimedia
Controls
1
Change the entertainment source
2 CD/DVD* drive
3 Eject CD/DVD
4 Change station/track
5 Programmable memory buttons
6 Volume, on/off
Sound output
Switching on/off
When
the ignition is switched off: press ON/OFF
button on the radio.
Muting
When the ignition is switched on or the engine
is running: press the ON/OFF button on the
radio.
CD/DVD*
Playback
Filling the CD/DVD* player
Insert the CD/DVD with the printed side up.
Playback begins automatically.
Reading can take a few minutes with com‐
pressed audio files. Starting playback
A CD/DVD is located in the CD/DVD player or
DVD changer*.
1.
"CD/Multimedia"
2. "CD/DVD"
3. Select the desired CD or DVD. Symbol Meaning
CD/DVD* player ... DVD changer*
CD/DVD player, rear* Playable formats
▷
DVD: DVD-ROM, DVD-R, DVD+R, DVD-
RW,
DVD+RW, DVD-R DL, DVD+R DL, DVD
audio (video part only), DVD video*.
▷ CD: CD-ROM, CD-R, CD-RW, CD-DA,
VCD*, SVCD*.
▷ Compressed audio files: MP3, WMA, AAC*,
M4A*.
Audio playback
Selecting the track using the button Press the button repeatedly until the
desired track is played. Seite 181
181Online Edition for Part no. 01 40 2 606 469 - 03 11 490
Reference Mobility Communication
Entertainment Navigation Driving tips Controls At a glance