2011 BMW 335IS CONVERTIBLE climate settings
[x] Cancel search: climate settingsPage 29 of 278

Controls
27Reference
At a glance
Driving tips
Communications
Navigation
Entertainment
Mobility
>Settings for the display on the Control
Display and in the instrument cluster:
>12h/24h format of the clock, refer to
page83
>Date format, refer to page84
>Brightness of the Control Display, refer
to page87
>Language on the Control Display, refer
to page87
>Units of measure, refer to page80
>Show visual warning for Park Distance
Control PDC
*, refer to page89
>Light settings:
>Welcome lamps, refer to page101
>Pathway lighting, refer to page102
>Daytime running lights, refer to
page102
>High-beam assistant, refer to page103
>Automatic climate control: activating/deac-
tivating AUTO program, cooling function
and automatic recirculated-air control, set-
ting temperature, air volume and distribu-
tion, refer to page107 ff
>Entertainment:
>Tone control, refer to page154
>Speed-dependent volume control, refer
to page155
Central locking system
The concept
The central locking system functions when the
driver's door is closed.
The system simultaneously engages and
releases the locks on the following:
>Doors
>Trunk lid
>Fuel filler flap
>Convertible: glove compartment
Operating from outside
>Via the remote control
>Via the door lock
*
>In cars with Comfort Access*, via the
handles on the driver's and front passenger
doors
In addition, if the remote control is used, the
welcome lamps, interior lamps and the door's
courtesy lamps
* are switched on or off. The
alarm system
* is also armed or disarmed.
For further details of the alarm system,
refer to
page32.
Operating from inside
By means of the button for central locking,
refer to page30.
In the event of a sufficiently severe accident, the
central locking system unlocks automatically. In
addition, the hazard warning flashers and inte-
rior lamps come on.
Opening and closing:
Using the remote control
Persons or animals in a parked vehicle
could lock the doors from the inside. You
should therefore take the remote control with
you when you leave the vehicle so that the latter
can be opened from outside.<
Convertible: to operate the retractable
hardtop with the remote control, the
doors and trunk lid must be closed and the
cargo area partition must be folded down and
engaged on both sides. Refer also to page39.<
Unlocking
Press the button.
The interior lamps, the courtesy lamps
* and the
welcome lamps come on.
Page 109 of 278

Controls
107Reference
At a glance
Driving tips
Communications
Navigation
Entertainment
Mobility
Automatic climate control
Comfortable interior climate
AUTO program7 offers the ideal air distribution
and air volume for almost all conditions, refer to
AUTO program below. All you need to do is
select an interior temperature which is comfort-
able for you.
The following sections inform you in detail
about how to adjust the settings.
Most settings are stored for the remote control
currently in use, refer also to Personal Profile
settings on page26.
Adjusting air distribution manually
The air distribution can be
switched on and off manually. The
air is directed to the windshield, to
the upper body area and to the
footwell.
The automatic air distribution can be switched
back on by pressing the AUTO button. The
cooling function is switched on automatically
and the manual air distribution setting is
cleared.
Temperature
Turn to set the desired tempera-
ture.
The automatic climate control
achieves this temperature as
quickly as possible regardless of the season,
using maximum cooling or heating power if nec-
essary, and then maintains it.
Avoid rapid switching between different tem-
perature settings. The automatic climate con-
trol will not have sufficient time to adjust the set
temperature.
Maximum heating power can be obtained with
the highest setting, regardless of the outside
temperature.
The system cools steadily in the lowest setting,
regardless of the outside temperature.
Maximum cooling
Press the button.
The system is set to the lowest
temperature, maximum air volume
and recirculated-air mode.
Air flows out of the vent outlets for the upper
body region. Open them for this purpose.
Air is cooled as quickly as possible:
>Above an outside temperature of approx.
327/06
>When the engine is running
AUTO program
Press the button.
Air volume, air distribution and
temperature are controlled auto-
matically.
Depending on the selected temperature, AUTO
intensity and outside influences, the air is
directed toward the windshield, the side win-
dows, the upper body and the footwell.
Pressing the AUTO button automatically
switches on the cooling function.
At the same time, a condensation sensor con-
trols the program so as to prevent window con-
densation as much as possible.
The program is switched off when the air distri-
bution is set manually or the button is pressed
again.
Intensity of the AUTO program
With the AUTO program switched on, auto-
matic control of the air volume and air distribu-
tion can be adjusted:
Press the left side of the button
to reduce the intensity. Press
the right side of the button to
increase it.
The selected intensity is shown on the display
of the automatic climate control.
Page 112 of 278

Climate
110
Parked car ventilation
The concept
The parked car ventilation provides ventilation
to the passenger compartment and lowers its
temperature, if necessary. It is ready for use at
any outside temperature, as of radio readiness.
The parked car ventilation remains switched on
for approx. 30 minutes. Two different switch-on
times can be preselected. The system can also
be switched on and off directly.
Due to its high power consumption, it should
not be switched on twice in a row without driv-
ing in between to allow the battery to recharge.
The air emerges from the air vents for the upper
body area in the instrument panel. The air vents
must therefore be open.
The parked car ventilation system is operated
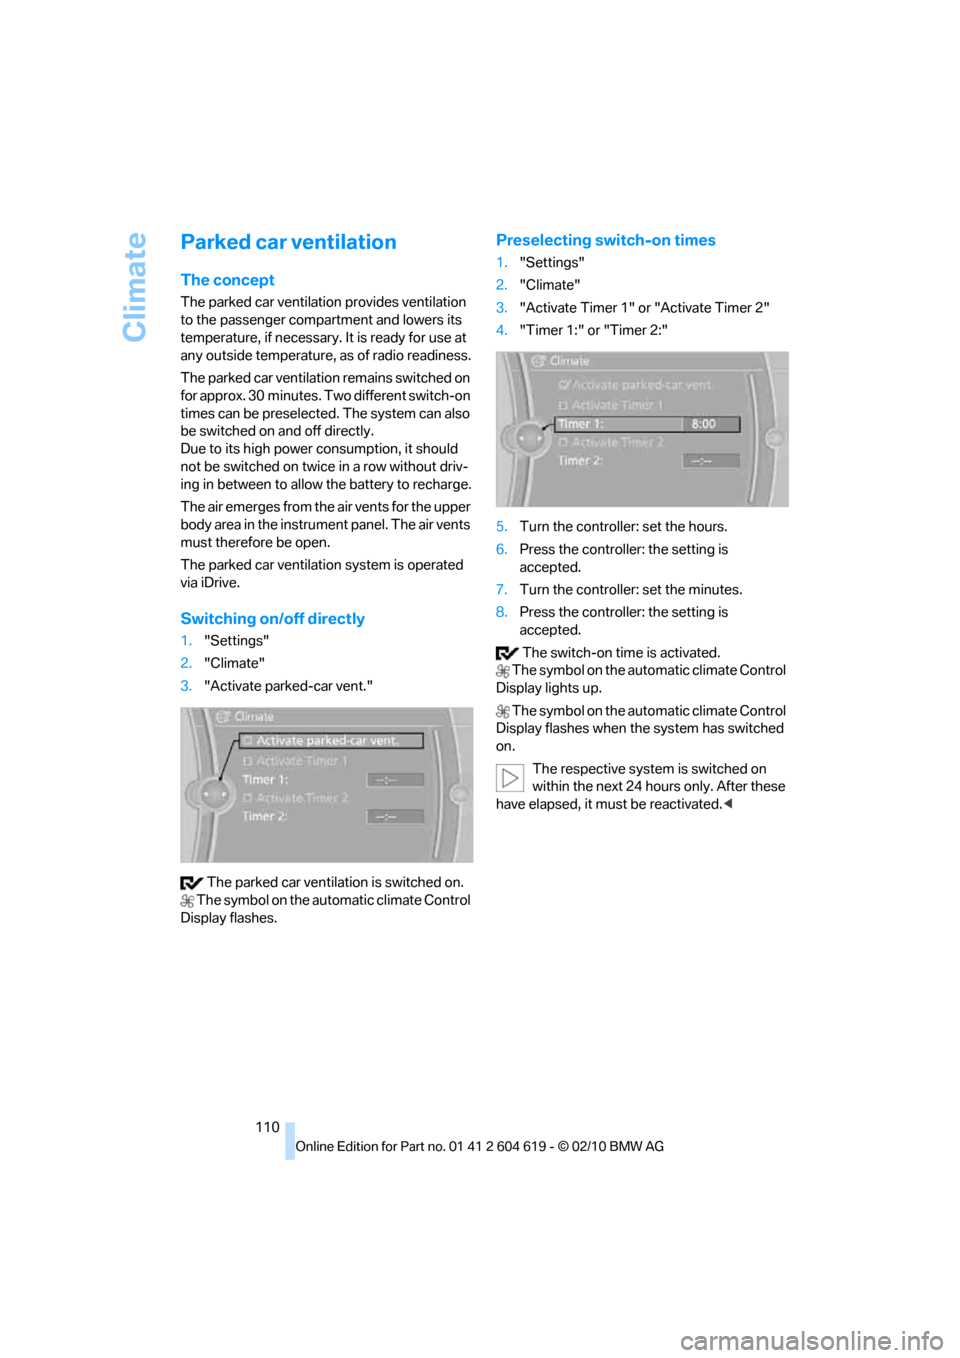
via iDrive.
Switching on/off directly
1."Settings"
2."Climate"
3."Activate parked-car vent."
The parked car ventilation is switched on.
The symbol on the automatic climate Control
Display flashes.
Preselecting switch-on times
1."Settings"
2."Climate"
3."Activate Timer 1" or "Activate Timer 2"
4."Timer 1:" or "Timer 2:"
5.Turn the controller: set the hours.
6.Press the controller: the setting is
accepted.
7.Turn the controller: set the minutes.
8.Press the controller: the setting is
accepted.
The switch-on time is activated.
The symbol on the automatic climate Control
Display lights up.
The symbol on the automatic climate Control
Display flashes when the system has switched
on.
The respective system is switched on
within the next 24 hours only. After these
have elapsed, it must be reactivated.<
Page 258 of 278

Short commands for the voice activation system
256
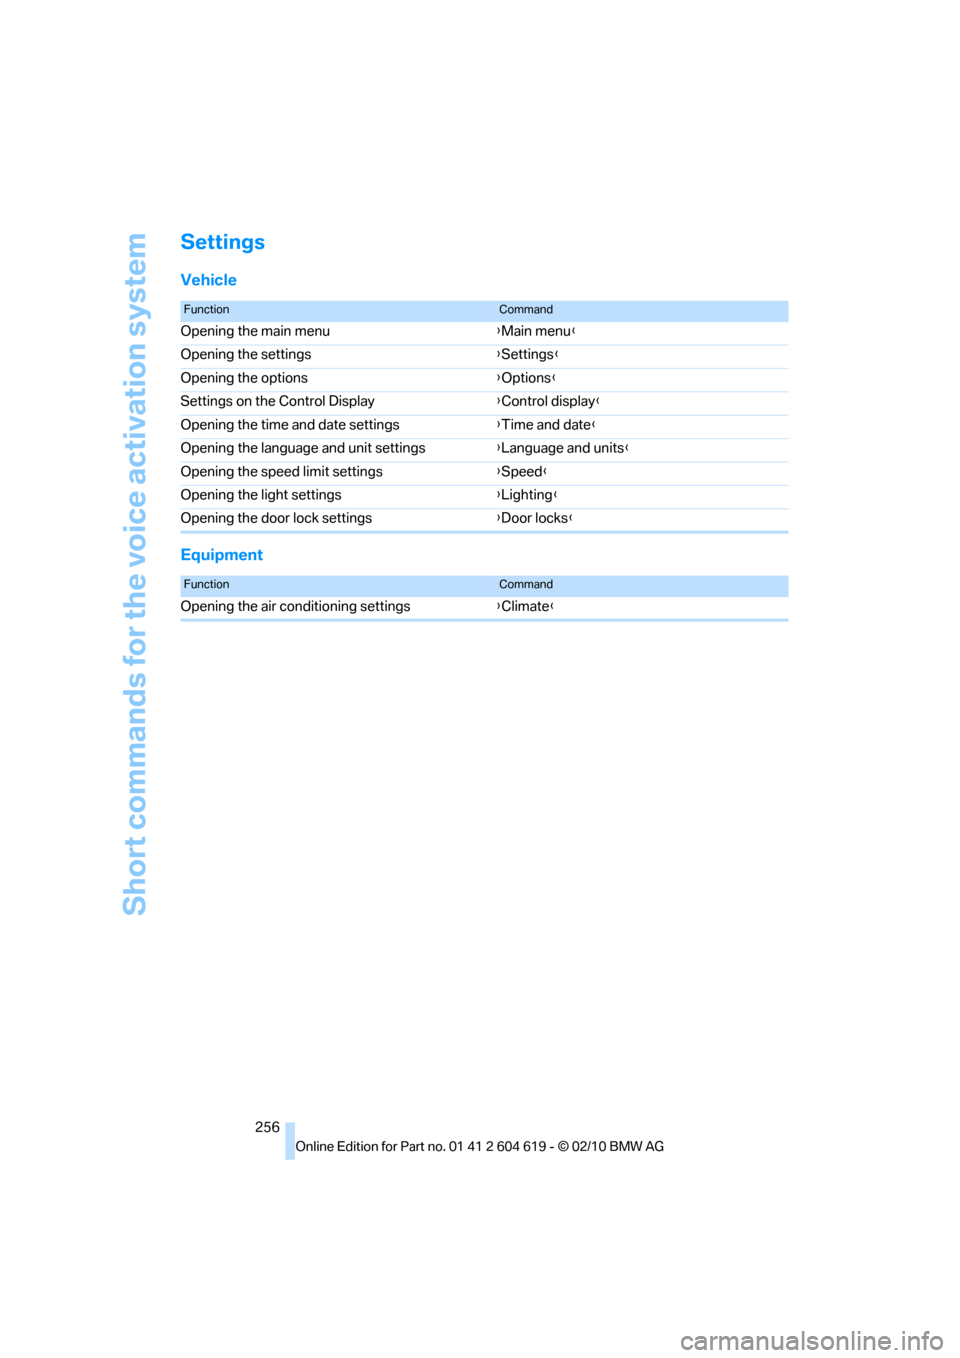
Settings
Vehicle
Equipment
FunctionCommand
Opening the main menu{Main menu}
Opening the settings{Settings}
Opening the options{Options}
Settings on the Control Display{Control display}
Opening the time and date settings{Time and date}
Opening the language and unit settings{Language and units}
Opening the speed limit settings{Speed}
Opening the light settings{Lighting}
Opening the door lock settings{Door locks}
FunctionCommand
Opening the air conditioning settings{Climate}
Page 266 of 278

Everything from A to Z
264 Glass roof, electric37
– closing after electrical
malfunction38
– convenient operation28,30
– initializing38
– opening, closing37
– operation with Comfort
Access34
– pinch protection system37
– power failure38
– raising37
– remote control28
Glove compartment114
GPS navigation, refer to
Navigation system134
Grills106
Gross vehicle weight, refer to
Weights249
H
Handbrake, refer to Parking
brake57
Hands-free system14
Hazard warning flashers14
HDC Hill Descent Control91
HD Radio158
Head airbags98
Headlamp control,
automatic101
Headlamp flasher64
– indicator lamp11,13
Head restraints45
– rear, removing46
– sitting safely42
Heated
– mirrors50
– rear window108
– seats47
– steering wheel51
Heating
– mirrors50
– rear window108
– seats47
– steering wheel51
Heating and ventilation, refer
to Climate106Heavy loads, refer to Stowing
cargo130
Height, refer to
Dimensions247
Height adjustment
– seats43
– steering wheel51
High-beam assistant103
High beams103
– headlamp flasher103
– indicator lamp13
High beams and low beams,
automatic, refer to High-
beam assistant103
High-pressure
washer229,230
High water, refer to Driving
through water128
Highways, refer to Route
criteria144
Hill Descent Control HDC91
Hills128
Holders for cups116
Homepage BMW4
Hood222
Hooks for shopping bags120
Horn10,11
Hotel function, refer to
Locking or unlocking
separately
31
Hot exhaust system127
Hydraulic brake assist, refer to
Dynamic Brake Control89
Hydroplaning127
I
IBOC, refer to HD Radio158
Ice warning, refer to Outside
temperature warning75
Identification marks
– run-flat tires220
– tire coding218iDrive16
– adjusting brightness87
– changing date and time83
– changing language87
– changing settings87
– changing units of measure
and display format80
– controls16
– menu guidance17
– operating principle16
– overview16
– start menu17
– status information19
iDrive operating principle16
Ignition55
– switched off56
– switched on55
Ignition key, refer to Remote
control with integrated
key26
Ignition key position 1, refer to
Radio readiness55
Ignition key position 2, refer to
Ignition on55
Ignition lock55
Imprint2
Indicator and warning
lamps13
– Tire Pressure Monitor
TPM95
Inflation pressure, refer to Tire
inflation pressure208
Inflation pressure monitoring,
refer to Tire Pressure
Monitor TPM94
Initializing
– after power failure237
– compass, refer to
Calibrating114
– Flat Tire Monitor FTM93
– glass roof38
– radio, refer to Station,
storing157
– refer to Setting the time and
date83
Installation location
– telephone115