2011 BMW 335I XDRIVE SEDAN mirror controls
[x] Cancel search: mirror controlsPage 12 of 286
Cockpit
10
Cockpit
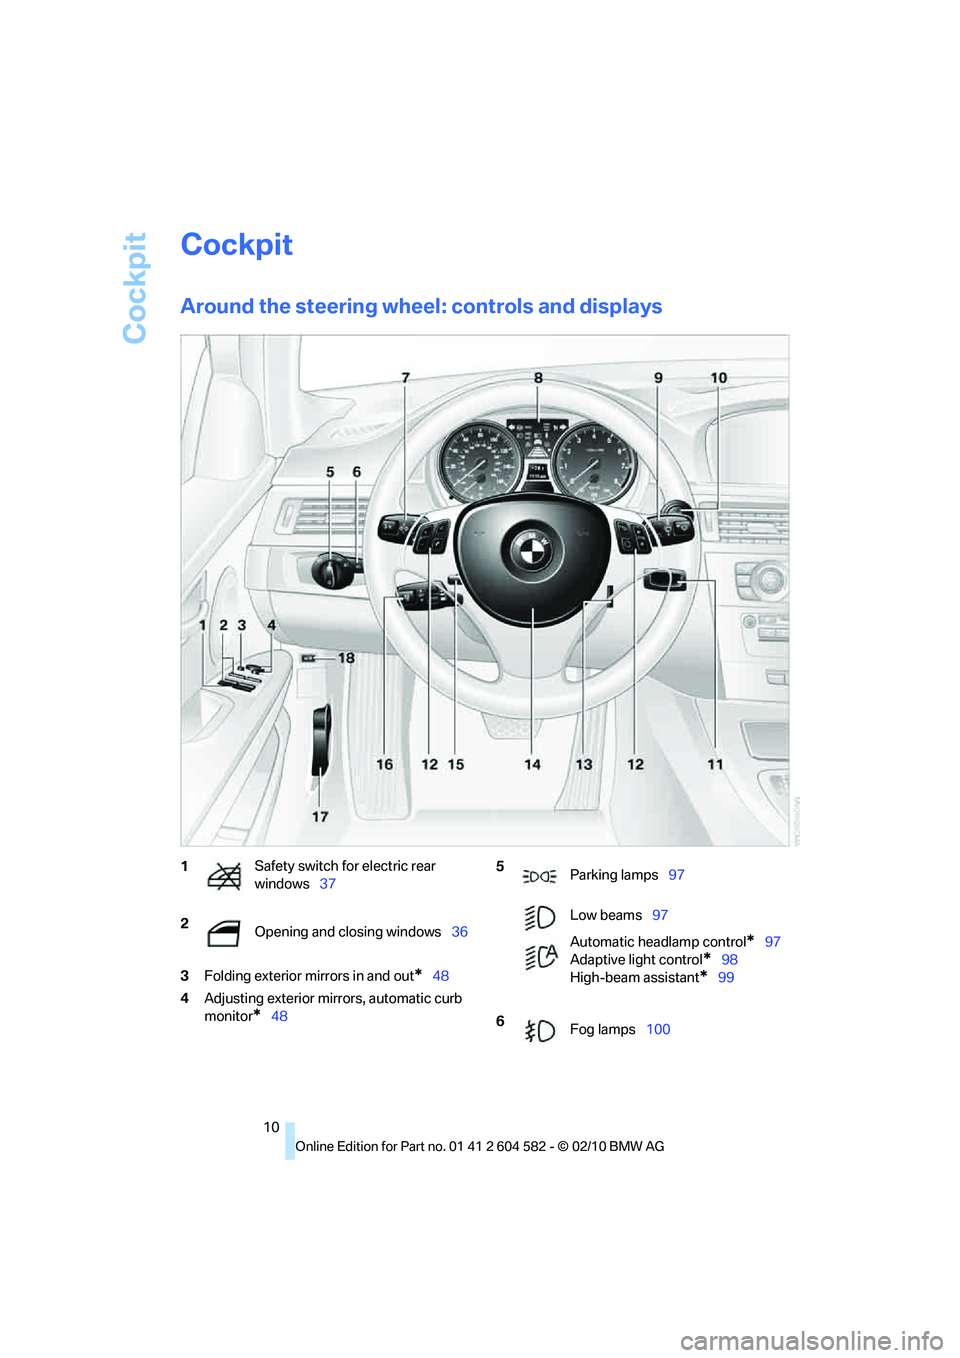
Around the steering wheel: controls and displays
3Folding exterior mirrors in and out*48
4Adjusting exterior mirrors, automatic curb
monitor
*48
1Safety switch for electric rear
windows37
2
Opening and closing windows36 5
Parking lamps97
Low beams97
Automatic headlamp control
*97
Adaptive light control
*98
High-beam assistant
*99
6
Fog lamps100
Page 51 of 286
Controls
49Reference
At a glance
Driving tips
Communications
Navigation
Entertainment
Mobility
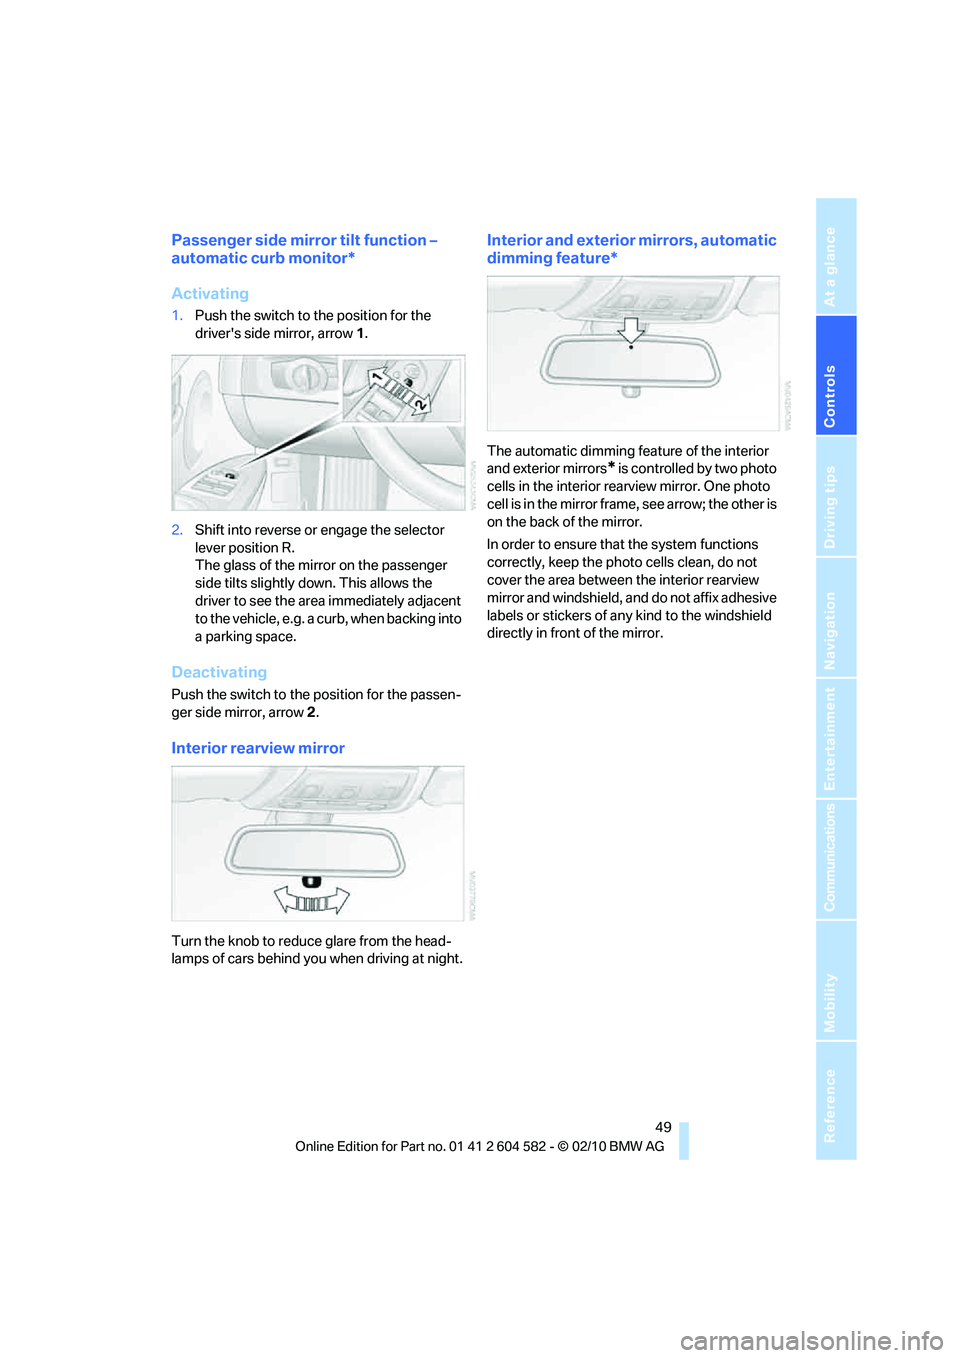
Passenger side mirror tilt function –
automatic curb monitor*
Activating
1.Push the switch to the position for the
driver's side mirror, arrow 1.
2.Shift into reverse or engage the selector
lever position R.
The glass of the mirror on the passenger
side tilts slightly down. This allows the
driver to see the area immediately adjacent
to the vehicle, e.g. a curb, when backing into
a parking space.
Deactivating
Push the switch to the position for the passen-
ger side mirror, arrow 2.
Interior rearview mirror
Turn the knob to reduce glare from the head-
lamps of cars behind you when driving at night.
Interior and exterior mirrors, automatic
dimming feature*
The automatic dimming feature of the interior
and exterior mirrors
* is controlled by two photo
cells in the interior rearview mirror. One photo
cell is in the mirror frame, see arrow; the other is
on the back of the mirror.
In order to ensure that the system functions
correctly, keep the photo cells clean, do not
cover the area between the interior rearview
mirror and windshield, and do not affix adhesive
labels or stickers of any kind to the windshield
directly in front of the mirror.
Page 63 of 286
Controls
61Reference
At a glance
Driving tips
Communications
Navigation
Entertainment
Mobility
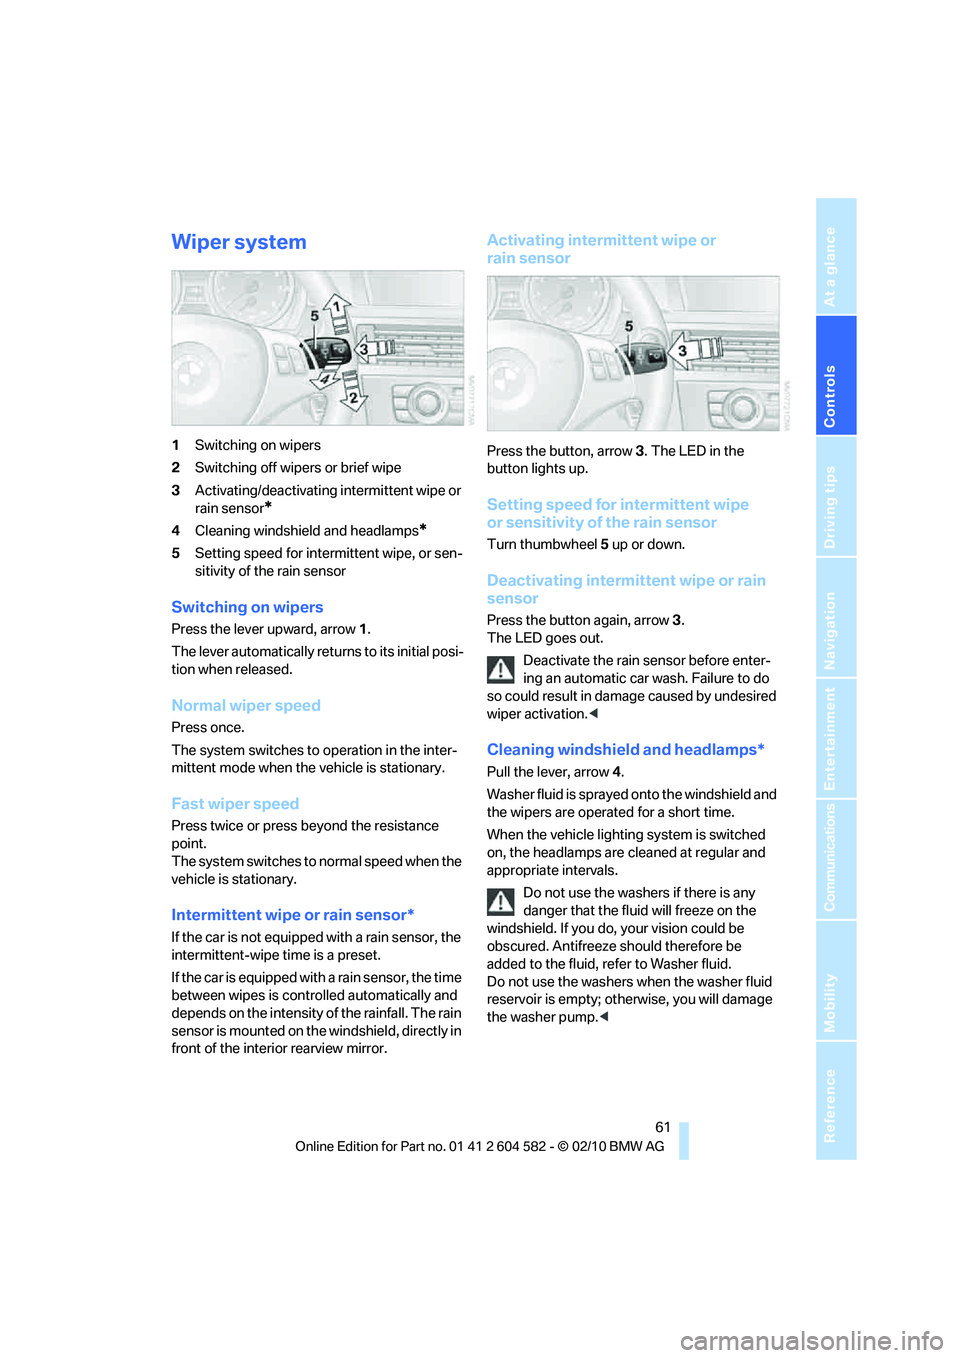
Wiper system
1Switching on wipers
2Switching off wipers or brief wipe
3Activating/deactivating intermittent wipe or
rain sensor
*
4Cleaning windshield and headlamps*
5Setting speed for intermittent wipe, or sen-
sitivity of the rain sensor
Switching on wipers
Press the lever upward, arrow 1.
The lever automatically returns to its initial posi-
tion when released.
Normal wiper speed
Press once.
The system switches to operation in the inter-
mittent mode when the vehicle is stationary.
Fast wiper speed
Press twice or press beyond the resistance
point.
The system switches to normal speed when the
vehicle is stationary.
Intermittent wipe or rain sensor*
If the car is not equipped with a rain sensor, the
intermittent-wipe time is a preset.
If the car is equipped with a rain sensor, the time
between wipes is controlled automatically and
depends on the intensity of the rainfall. The rain
sensor is mounted on the windshield, directly in
front of the interior rearview mirror.
Activating intermittent wipe or
rain sensor
Press the button, arrow3. The LED in the
button lights up.
Setting speed for intermittent wipe
or sensitivity of the rain sensor
Turn thumbwheel5 up or down.
Deactivating intermittent wipe or rain
sensor
Press the button again, arrow3.
The LED goes out.
Deactivate the rain sensor before enter-
ing an automatic car wash. Failure to do
so could result in damage caused by undesired
wiper activation.<
Cleaning windshield and headlamps*
Pull the lever, arrow 4.
Washer fluid is sprayed onto the windshield and
the wipers are operated for a short time.
When the vehicle lighting system is switched
on, the headlamps are cleaned at regular and
appropriate intervals.
Do not use the washers if there is any
danger that the fluid will freeze on the
windshield. If you do, your vision could be
obscured. Antifreeze should therefore be
added to the fluid, refer to Washer fluid.
Do not use the washers when the washer fluid
reservoir is empty; otherwise, you will damage
the washer pump.<
Page 97 of 286
Controls
95Reference
At a glance
Driving tips
Communications
Navigation
Entertainment
Mobility
Automatic deactivation of the front
passenger airbags
An analysis of the impression in the front pas-
senger seat cushion determines whether and
how the seat is occupied. The front and side air-
bags for the front passenger are activated or
deactivated by the system accordingly.
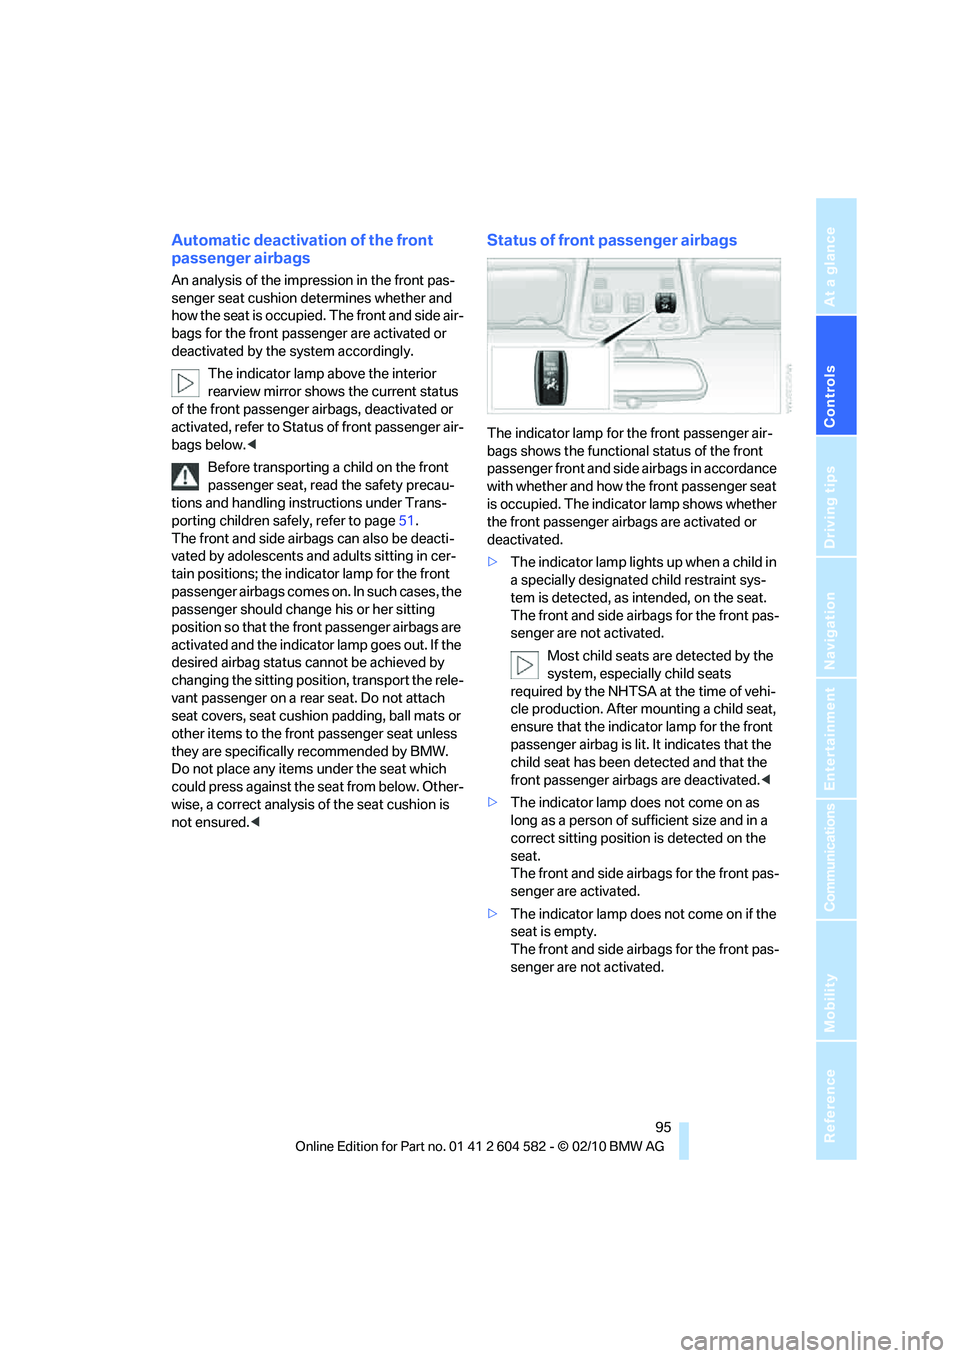
The indicator lamp above the interior
rearview mirror shows the current status
of the front passenger airbags, deactivated or
activated, refer to Status of front passenger air-
bags below.<
Before transporting a child on the front
passenger seat, read the safety precau-
tions and handling instructions under Trans-
porting children safely, refer to page51.
The front and side airbags can also be deacti-
vated by adolescents and adults sitting in cer-
tain positions; the indicator lamp for the front
passenger airbags comes on. In such cases, the
passenger should change his or her sitting
position so that the front passenger airbags are
activated and the indicator lamp goes out. If the
desired airbag status cannot be achieved by
changing the sitting position, transport the rele-
vant passenger on a rear seat. Do not attach
seat covers, seat cushion padding, ball mats or
other items to the front passenger seat unless
they are specifically recommended by BMW.
Do not place any items under the seat which
could press against the seat from below. Other-
wise, a correct analysis of the seat cushion is
not ensured.<
Status of front passenger airbags
The indicator lamp for the front passenger air-
bags shows the functional status of the front
passenger front and side airbags in accordance
with whether and how the front passenger seat
is occupied. The indicator lamp shows whether
the front passenger airbags are activated or
deactivated.
>The indicator lamp lights up when a child in
a specially designated child restraint sys-
tem is detected, as intended, on the seat.
The front and side airbags for the front pas-
senger are not activated.
Most child seats are detected by the
system, especially child seats
required by the NHTSA at the time of vehi-
cle production. After mounting a child seat,
ensure that the indicator lamp for the front
passenger airbag is lit. It indicates that the
child seat has been detected and that the
front passenger airbags are deactivated.<
>The indicator lamp does not come on as
long as a person of sufficient size and in a
correct sitting position is detected on the
seat.
The front and side airbags for the front pas-
senger are activated.
>The indicator lamp does not come on if the
seat is empty.
The front and side airbags for the front pas-
senger are not activated.
Page 101 of 286
Controls
99Reference
At a glance
Driving tips
Communications
Navigation
Entertainment
Mobility
High beams/roadside parking
lamps
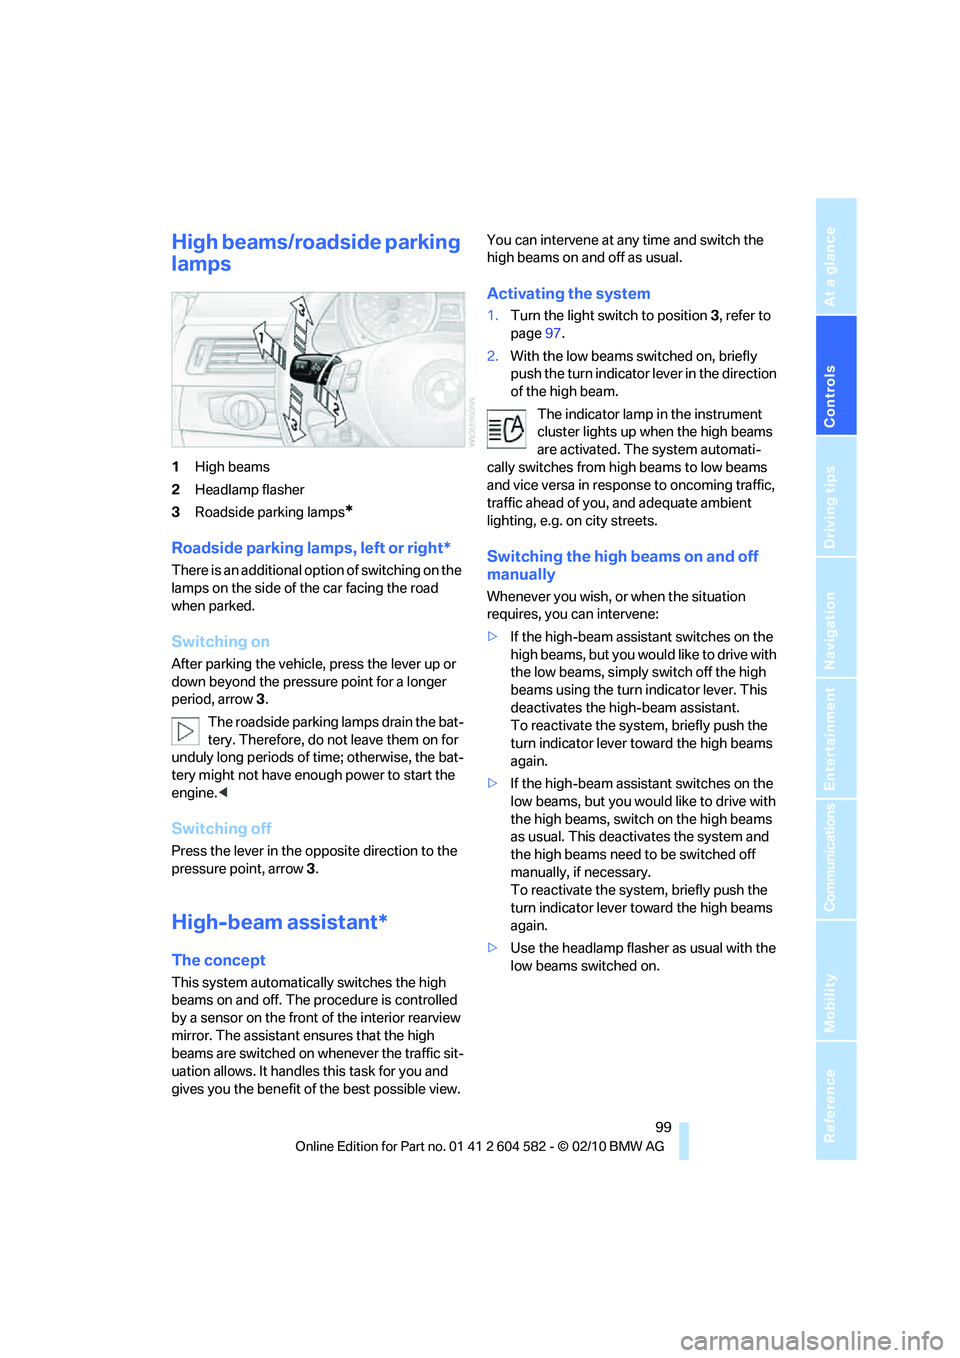
1High beams
2Headlamp flasher
3Roadside parking lamps
*
Roadside parking lamps, left or right*
There is an additional option of switching on the
lamps on the side of the car facing the road
when parked.
Switching on
After parking the vehicle, press the lever up or
down beyond the pressure point for a longer
period, arrow 3.
The roadside parking lamps drain the bat-
tery. Therefore, do not leave them on for
unduly long periods of time; otherwise, the bat-
tery might not have enough power to start the
engine.<
Switching off
Press the lever in the opposite direction to the
pressure point, arrow 3.
High-beam assistant*
The concept
This system automatically switches the high
beams on and off. The procedure is controlled
by a sensor on the front of the interior rearview
mirror. The assistant ensures that the high
beams are switched on whenever the traffic sit-
uation allows. It handles this task for you and
gives you the benefit of the best possible view. You can intervene at any time and switch the
high beams on and off as usual.
Activating the system
1.Turn the light switch to position3, refer to
page97.
2.With the low beams switched on, briefly
push the turn indicator lever in the direction
of the high beam.
The indicator lamp in the instrument
cluster lights up when the high beams
are activated. The system automati-
cally switches from high beams to low beams
and vice versa in response to oncoming traffic,
traffic ahead of you, and adequate ambient
lighting, e.g. on city streets.
Switching the high beams on and off
manually
Whenever you wish, or when the situation
requires, you can intervene:
>If the high-beam assistant switches on the
high beams, but you would like to drive with
the low beams, simply switch off the high
beams using the turn indicator lever. This
deactivates the high-beam assistant.
To reactivate the system, briefly push the
turn indicator lever toward the high beams
again.
>If the high-beam assistant switches on the
low beams, but you would like to drive with
the high beams, switch on the high beams
as usual. This deactivates the system and
the high beams need to be switched off
manually, if necessary.
To reactivate the system, briefly push the
turn indicator lever toward the high beams
again.
>Use the headlamp flasher as usual with the
low beams switched on.
Page 235 of 286
Mobility
233Reference
At a glance
Controls
Driving tips
Communications
Navigation
Entertainment
Care
Care products
Regular cleaning and care contributes signifi-
cantly to the value retention of your BMW.
BMW recommends cleaning and caring for your
vehicle with products that are approved by
BMW for this purpose.
Your BMW center will be happy to advise you on
the products and services available for cleaning
and caring for your BMW.
Original BMW Care Products have been
material tested, laboratory checked and
proven in the field, and offer optimal care and
protection for your vehicle.<
Do not use cleaners that contain alcohol
or solvents as these may result in dam-
age.<
Cleaning agents can contain substances
that are dangerous or hazardous to your
health. Therefore, follow the warning and safety
instructions on the packaging. When cleaning
inside the vehicle, always open the doors or
windows of the vehicle. In enclosed areas, pro-
vide for sufficient ventilation. Only use products
designed for cleaning vehicles.<
Exterior care
Washing the vehicle
Especially during the winter months,
ensure that the vehicle is washed more
frequently. Heavy soiling and road salt can lead
to vehicle damage.<
After washing the vehicle, apply the
brakes briefly to dry them; otherwise,
water can reduce braking efficiency over the
short term and the brake discs can corrode.<
Automatic car washes
Preference should be given to cloth car washes.
Before driving into a car wash, ensure that it is
suitable for your BMW. Check the following:
>Dimensions of your vehicle, refer to
page255.
>If necessary: fold in the exterior mirrors,
refer to page48.
>Maximum permissible tire width.
Avoid car washes with guide rail heights
over 4 in/10 cm; otherwise, there is the
danger of damaging chassis parts.<
Preparations before driving into an automatic
car wash:
>Unscrew the rod antenna
*.
>Deactivate the rain sensor
* to prevent unin-
tentional wiping.
>Sports Wagon: deactivate the rear window
wiper and protect it against damage. If nec-
essary, ask the operator of the car wash
about protective measures you should take.
>Remove additional add-on parts, e.g. spoil-
ers or phone antennas, if they could be
damaged.
Automatic transmission
Before driving into an automatic car wash, per-
form the following steps to ensure that the vehi-
cle can roll:
1.Insert the remote control into the ignition
lock, even with Comfort Access.
2.Move the selector lever to position N.
3.Release the parking brake.
4.Switch off the engine.
5.Leave the remote control in the ignition lock
so that the vehicle can roll.
Page 247 of 286
Mobility
245Reference
At a glance
Controls
Driving tips
Communications
Navigation
Entertainment
Power failure
After a temporary power loss, the functioning of
some equipment may be limited and require
reinitialization. Individual settings may likewise
have been lost and will have to be programmed:
>Time and date
These values must be updated, refer to
page79.
>Radio
In some cases, stations may have to be
stored again, refer to page154.
>Navigation system
Operability must be waited for, refer to
page130.
>Glass roof
It may happen that the roof can only be
raised. The system must be initialized.
Please contact your BMW center.
>Panorama glass roof
It may happen that the roof can only be
raised. The system must be initialized.
Please contact your BMW center.
>Seat and mirror memory
The positions must be stored again, refer to
page46.
>Inside rearview mirror with digital compass
The system must be calibrated, refer to
page110.
>Active steering
The system automatically initializes itself
briefly during a trip. The system is deacti-
vated during this time, refer to page92.
>xDrive
The system automatically initializes itself
during a trip. Indicator lamps light up during
this time. If the lamps do not go out during
the current trip, have the system checked.
Fuses
Never attempt to repair a blown fuse and
do not replace a defective fuse with a sub-
stitute of another color or amperage rating; oth-
erwise, this could lead to a circuit overload, ulti-
mately resulting in a fire in the vehicle.<
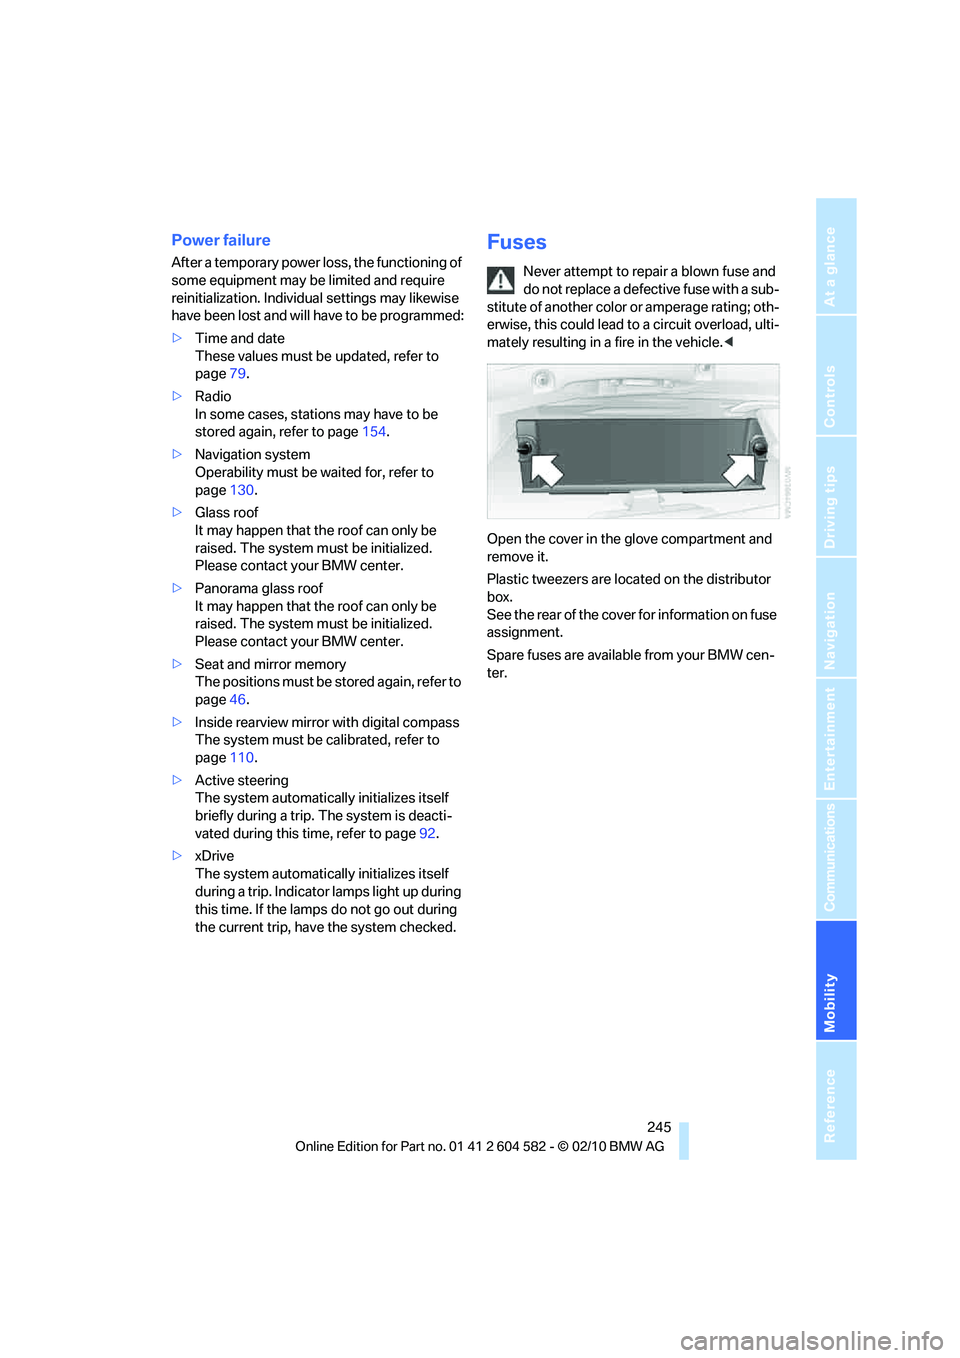
Open the cover in the glove compartment and
remove it.
Plastic tweezers are located on the distributor
box.
See the rear of the cover for information on fuse
assignment.
Spare fuses are available from your BMW cen-
ter.
Page 273 of 286
Reference 271
At a glance
Controls
Driving tips
Communications
Navigation
Entertainment
Mobility
Entering special destinations
by name136
Entering the postal code for
navigation132
Entry lamps, refer to Interior
lamps101
Entry map for destination136
Environmentally friendly
driving, refer to Energy
Control72
Equalizer, tone setting151
Error messages, refer to
Check Control80
ESP Electronic Stability
Program, refer to Dynamic
Stability Control DSC85
Exhaust system, refer to Hot
exhaust system123
Expanding the cargo area115
Extended connectivity of the
music player in the mobile
phone174
Exterior mirrors48
– adjusting48
– automatic dimming
feature49
– automatic heating48
– folding in and out48
External audio device111
External devices
– random sequence176
Eyes
– for tow-starting and towing
away249
– for tying down loads126
F
Failure messages, refer to
Check Control80
Failure of an electrical
consumer245
False alarm
– avoiding unintentional
alarm34
– switching off an alarm34
Fastening safety belts, refer to
Safety belts47Fastest route for
navigation140
Fast forward
– CD changer163
– CD player163
Filter
– refer to Microfilter/activated-
charcoal filter for automatic
climate control105
First aid pouch247
Fixture for remote control,
refer to Ignition lock55
Flash when locking/
unlocking28
Flat tire
– run-flat tires223
– Tire Pressure Monitor
TPM89
Flat Tire Monitor FTM88
– indicating a flat tire89
– indicator/warning lamp89
– initializing the system88
– snow chains88,224
– system limits88
Flat tires, refer to Tire
condition222
Fluid reservoir, refer to
Washer fluid reservoir62
FM, waveband153
Fog lamps100
– indicator lamp13,100
Folding rear seat backrest115
Folding up the floor panel117
Footbrake, refer to Braking
safely124
Footwell lamps, refer to
Interior lamps101
For your own safety5
Four-wheel drive, refer to
xDrive86
Free memory capacity, music
collection171
Front airbags94
FTM, refer to Flat Tire
Monitor88Fuel203
– additives204
– average consumption73
– gauge72
– high-quality brands
203
– quality203
– specifications203
– tank contents, refer to
Capacities258
Fuel clock, refer to Fuel
gauge72
Fuel consumption indicator
– average fuel
consumption73
Fuel display, refer to Fuel
gauge72
Fuel-efficient driving, refer to
Energy Control72
Fuel filler flap202
– releasing in the event of
electrical malfunction202
Fuses245
G
Garage door opener, refer to
Integrated universal remote
control107
Gasoline
– refer to Average
consumption73
Gasoline, refer to Required
fuel203
Gasoline display, refer to Fuel
gauge72
Gas station
recommendations142
Gear indicator, automatic
transmission with
Steptronic58
Gearshift lever
– automatic transmission with
Steptronic58
– manual transmission57
Gearshifts
– automatic transmission with
Steptronic58
– manual transmission57
General driving notes123