2011 BMW 335I TOURING Panel
[x] Cancel search: PanelPage 20 of 286

iDrive
18
Changing between panels
After selecting a menu item, e.g. "Radio", a new
menu is displayed on a panel. The panels can
overlap.
Move the controller to the left or right to change
between the panels.
White arrows pointing to the left or right indi-
cate that additional panels can be opened.
Open the Options menu
Press the OPTIONbutton.
The "Options" menu is displayed.
Another possibility: move the controller to the
right repeatedly until the "Options" menu
appears.
The "Options" menu contains the following:
>Screen settings, refer to page19.
>Control options for the selected menu.
Adjusting settings
1.Select a field.
2.Turn the controller until the desired setting
is displayed.
3.Press the controller to confirm the setting.
The scroll bar on the right side indicates
whether additional menu items or set-
tings can be selected that are currently not vis-
ible.<
Example: setting the clock
1.Press the MENUbutton.
The main menu is displayed.
2.Turn the controller until "Settings" is high-
lighted, and then press the controller.
3.Turn the controller until "Time/Date" is
highlighted, and then press the controller.
Page 96 of 286

Technology for driving comfort and safety
94
Airbags
The following airbags are located under the
marked covers:
1Front airbags
2Head airbags
3Side airbags in the seat backrests
Protective action
Observe the adjustment instructions on
page42 to ensure the best possible per-
sonal protection.<
The front airbags help protect the driver and
front passenger by responding to frontal
impacts in which safety belts alone cannot pro-
vide adequate restraint. When needed, the
head and side airbags help provide protection in
the event of side impact. The relevant side air-
bag supports the side upper body area. The
head air bag supports the head.
The airbags have been designed to not be trig-
gered in every collision situation, e.g. not in
minor accidents or rear-end collisions.
Do not apply adhesive materials to the
cover panels of the airbags, cover them or
modify them in any other way.
Keep the dashboard and windows on the front
passenger side clear, i.e. do not cover with
adhesive labels or coverings, and do not attach
holders such as for navigation instruments or
mobile phones.
Do not attach seat covers, cushions or other
objects not specifically approved for seats with
integral side airbags to the front seats. Do not
hang items of clothing such as coats or jackets
over the backrests. Do not attempt to remove the airbag retention system from the vehicle. Do
not modify the individual components of the
system or its wiring in any way. This includes
the upholstered covers on the steering wheel,
instrument panel, seats and roof posts, as well
as the sides of the roof lining. Do not attempt to
remove or dismantle the steering wheel.
Do not touch the individual components imme-
diately after the system has been triggered,
because there is a danger of burns.
In the event of malfunctions, deactivation or
triggering of the airbag restraint system, have
the testing, repair, removal and disposal of air-
bag generators executed only by a BMW center
or a workshop that works according to repair
procedures of BMW with correspondingly
trained personnel and that has the required
explosives licenses. Unprofessional attempts to
work on the system could lead to failure in an
emergency or to undesired airbag activation,
either of which could result in personal injury.<
Warning notices and information about the air-
bags can also be found on the sun visors.
Page 108 of 286

Climate
106
Parked car ventilation
The concept
The parked car ventilation provides ventilation
to the passenger compartment and lowers its
temperature, if necessary. It is ready for use at
any outside temperature, as of radio readiness.
The parked car ventilation remains switched on
for approx. 30 minutes. Two different switch-on
times can be preselected. The system can also
be switched on and off directly.
Due to its high power consumption, it should
not be switched on twice in a row without driv-
ing in between to allow the battery to recharge.
The air emerges from the air vents for the upper
body area in the instrument panel. The air vents
must therefore be open.
The parked car ventilation system is operated
via iDrive.
Switching on/off directly
1."Settings"
2."Climate"
3."Activate parked-car vent."
The parked car ventilation is switched on.
The symbol on the automatic climate Control
Display flashes.
Preselecting switch-on times
1."Settings"
2."Climate"
3."Activate Timer 1" or "Activate Timer 2"
4."Timer 1:" or "Timer 2:"
5.Turn the controller: set the hours.
6.Press the controller: the setting is
accepted.
7.Turn the controller: set the minutes.
8.Press the controller: the setting is
accepted.
The switch-on time is activated.
The symbol on the automatic climate
Control Display lights up.
The symbol on the automatic climate
Control Display flashes when the system has
switched on.
The respective system is switched on
within the next 24 hours only. After these
have elapsed, it must be reactivated.<
Page 118 of 286

Practical interior accessories
116
Partition net
Do not let the partition net retract; other-
wise, there is a risk of danger and the par-
tition net could be damaged.<
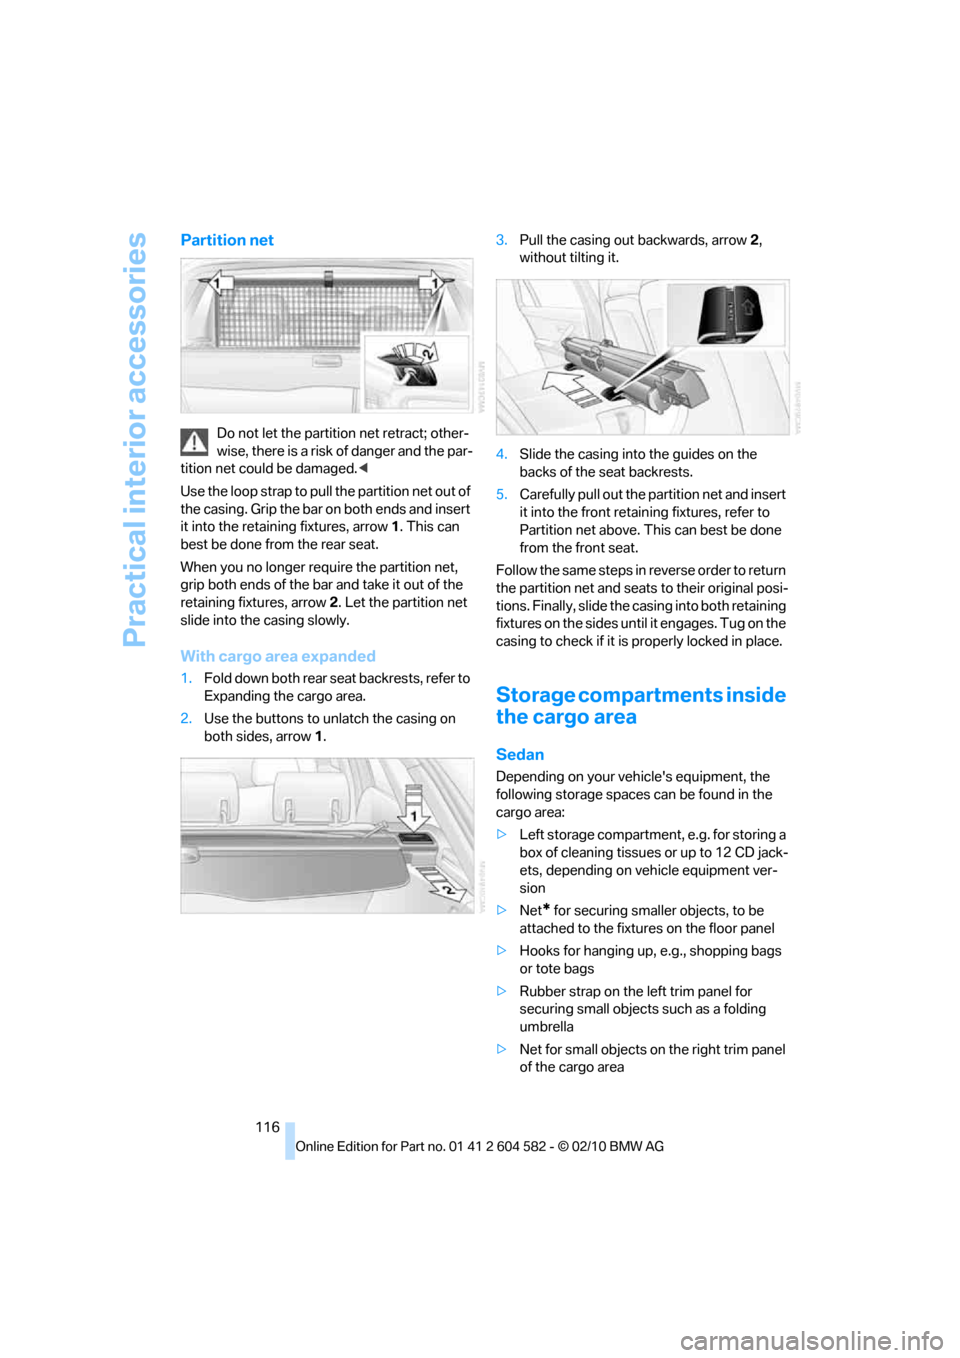
Use the loop strap to pull the partition net out of
the casing. Grip the bar on both ends and insert
it into the retaining fixtures, arrow 1. This can
best be done from the rear seat.
When you no longer require the partition net,
grip both ends of the bar and take it out of the
retaining fixtures, arrow 2. Let the partition net
slide into the casing slowly.
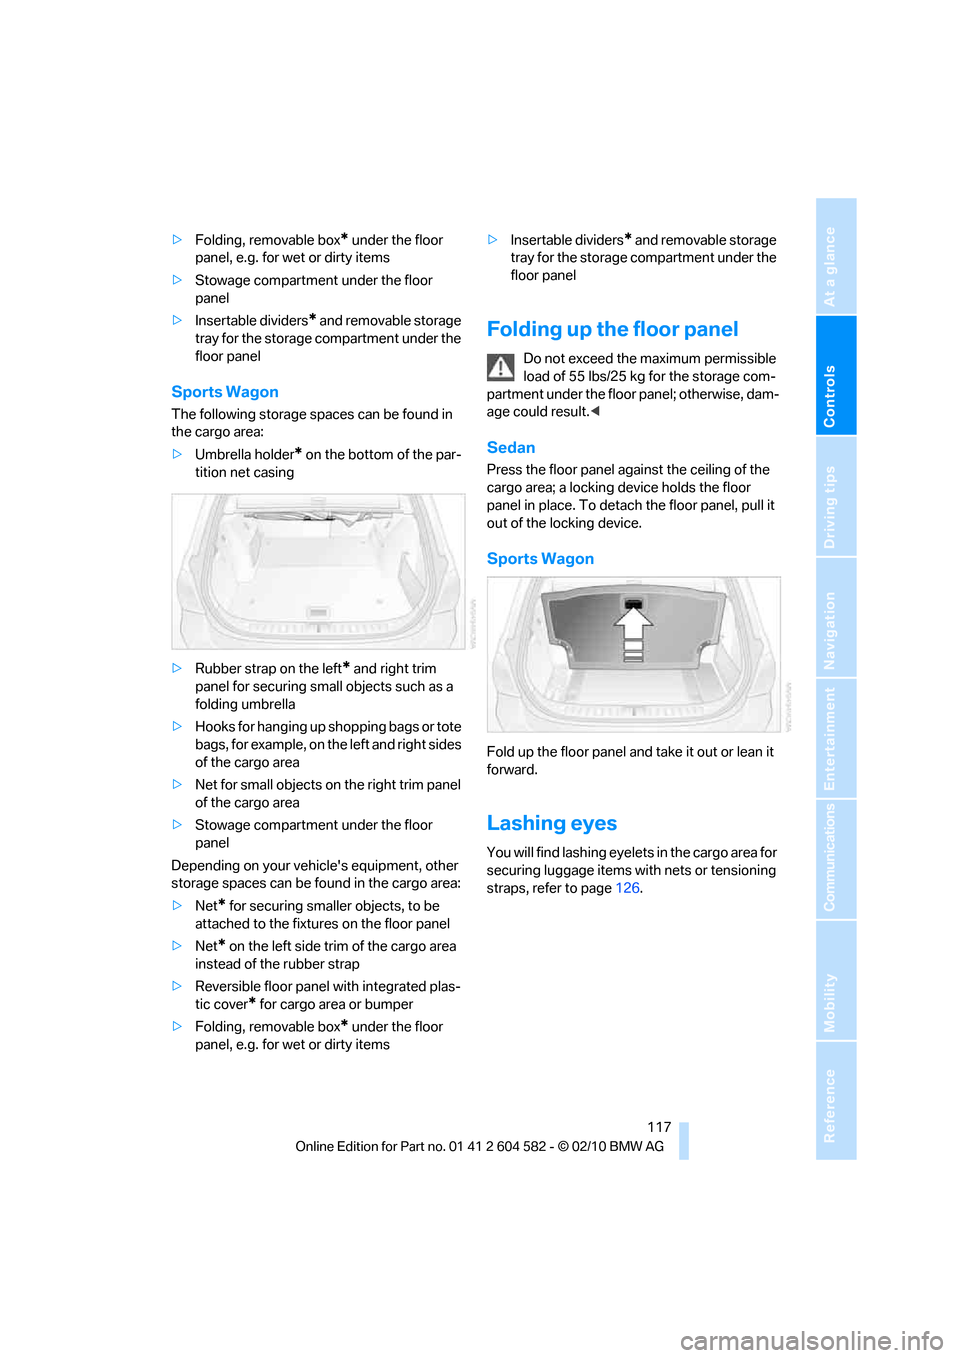
With cargo area expanded
1.Fold down both rear seat backrests, refer to
Expanding the cargo area.
2.Use the buttons to unlatch the casing on
both sides, arrow 1.3.Pull the casing out backwards, arrow 2,
without tilting it.
4.Slide the casing into the guides on the
backs of the seat backrests.
5.Carefully pull out the partition net and insert
it into the front retaining fixtures, refer to
Partition net above. This can best be done
from the front seat.
Follow the same steps in reverse order to return
the partition net and seats to their original posi-
tions. Finally, slide the casing into both retaining
fixtures on the sides until it engages. Tug on the
casing to check if it is properly locked in place.
Storage compartments inside
the cargo area
Sedan
Depending on your vehicle's equipment, the
following storage spaces can be found in the
cargo area:
>Left storage compartment, e.g. for storing a
box of cleaning tissues or up to 12 CD jack-
ets, depending on vehicle equipment ver-
sion
>Net
* for securing smaller objects, to be
attached to the fixtures on the floor panel
>Hooks for hanging up, e.g., shopping bags
or tote bags
>Rubber strap on the left trim panel for
securing small objects such as a folding
umbrella
>Net for small objects on the right trim panel
of the cargo area
Page 119 of 286

Controls
117Reference
At a glance
Driving tips
Communications
Navigation
Entertainment
Mobility
>Folding, removable box* under the floor
panel, e.g. for wet or dirty items
>Stowage compartment under the floor
panel
>Insertable dividers
* and removable storage
tray for the storage compartment under the
floor panel
Sports Wagon
The following storage spaces can be found in
the cargo area:
>Umbrella holder
* on the bottom of the par-
tition net casing
>Rubber strap on the left
* and right trim
panel for securing small objects such as a
folding umbrella
>Hooks for hanging up shopping bags or tote
bags, for example, on the left and right sides
of the cargo area
>Net for small objects on the right trim panel
of the cargo area
>Stowage compartment under the floor
panel
Depending on your vehicle's equipment, other
storage spaces can be found in the cargo area:
>Net
* for securing smaller objects, to be
attached to the fixtures on the floor panel
>Net
* on the left side trim of the cargo area
instead of the rubber strap
>Reversible floor panel with integrated plas-
tic cover
* for cargo area or bumper
>Folding, removable box
* under the floor
panel, e.g. for wet or dirty items>Insertable dividers
* and removable storage
tray for the storage compartment under the
floor panel
Folding up the floor panel
Do not exceed the maximum permissible
load of 55 lbs/25 kg for the storage com-
partment under the floor panel; otherwise, dam-
age could result.<
Sedan
Press the floor panel against the ceiling of the
cargo area; a locking device holds the floor
panel in place. To detach the floor panel, pull it
out of the locking device.
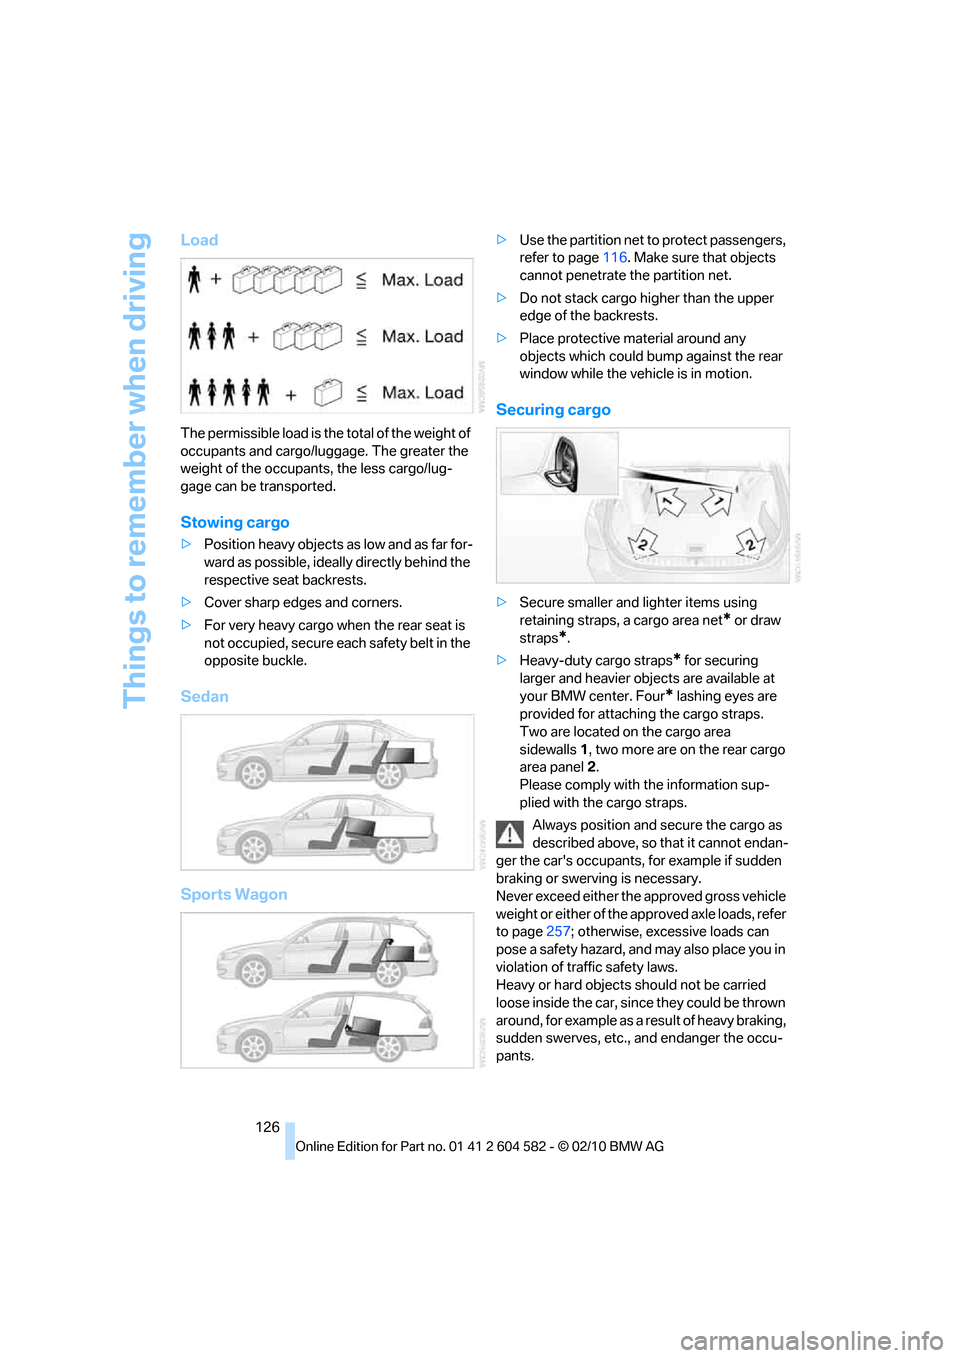
Sports Wagon
Fold up the floor panel and take it out or lean it
forward.
Lashing eyes
You will find lashing eyelets in the cargo area for
securing luggage items with nets or tensioning
straps, refer to page126.
Page 120 of 286

Practical interior accessories
118
Ski bag*
The ski bag is designed for safe, clean transport
of up to 4 pairs of standard skis or up to
2snowboards.
With the ski bag you can stow skis with a length
of up to 6.9 ft 10 in/2.10 m. When skis of 6.9 ft
10 in/2.10 m length are loaded, the overall
capacity of the ski bag is reduced due to its
tapered design.
Loading
1.Fold down the center armrest.
2.Press the button, reach into the recess and
fold down the cover.
3.Open the Velcro fastener, spread the ski
bag between the front seats and insert the
skis or snowboards.
The zip fastener makes objects in the ski
bag easier to reach.
4.Insert the latch plate of the ski bag's retain-
ing strap in the center belt buckle.
Only place clean skis in the ski bag. Wrap sharp
edges to prevent damage.
Securing cargo
After loading, secure the ski bag and its con-
tents. Tighten the retaining strap on the ten-
sioning buckle for this purpose.
Secure the ski bag in the manner
described; otherwise, it could endanger
the car's occupants, e.g. in case of heavy brak-
ing or sudden swerving.<
To store the ski bag, perform the steps
described for loading in reverse order.
Removing the ski bag
The ski bag can be completely removed, e.g. for
faste r drying or to allow you to use other inserts.
1.Fold down the center panel in the rear seat
backrest.
2.Pull the handle, arrow1.
3.Pull out the insert, arrow 2.
For more information on the various
inserts available, contact your BMW cen-
ter.<
Page 128 of 286

Things to remember when driving
126
Load
The permissible load is the total of the weight of
occupants and cargo/luggage. The greater the
weight of the occupants, the less cargo/lug-
gage can be transported.
Stowing cargo
>Position heavy objects as low and as far for-
ward as possible, ideally directly behind the
respective seat backrests.
>Cover sharp edges and corners.
>For very heavy cargo when the rear seat is
not occupied, secure each safety belt in the
opposite buckle.
Sedan
Sports Wagon
>Use the partition net to protect passengers,
refer to page116. Make sure that objects
cannot penetrate the partition net.
>Do not stack cargo higher than the upper
edge of the backrests.
>Place protective material around any
objects which could bump against the rear
window while the vehicle is in motion.
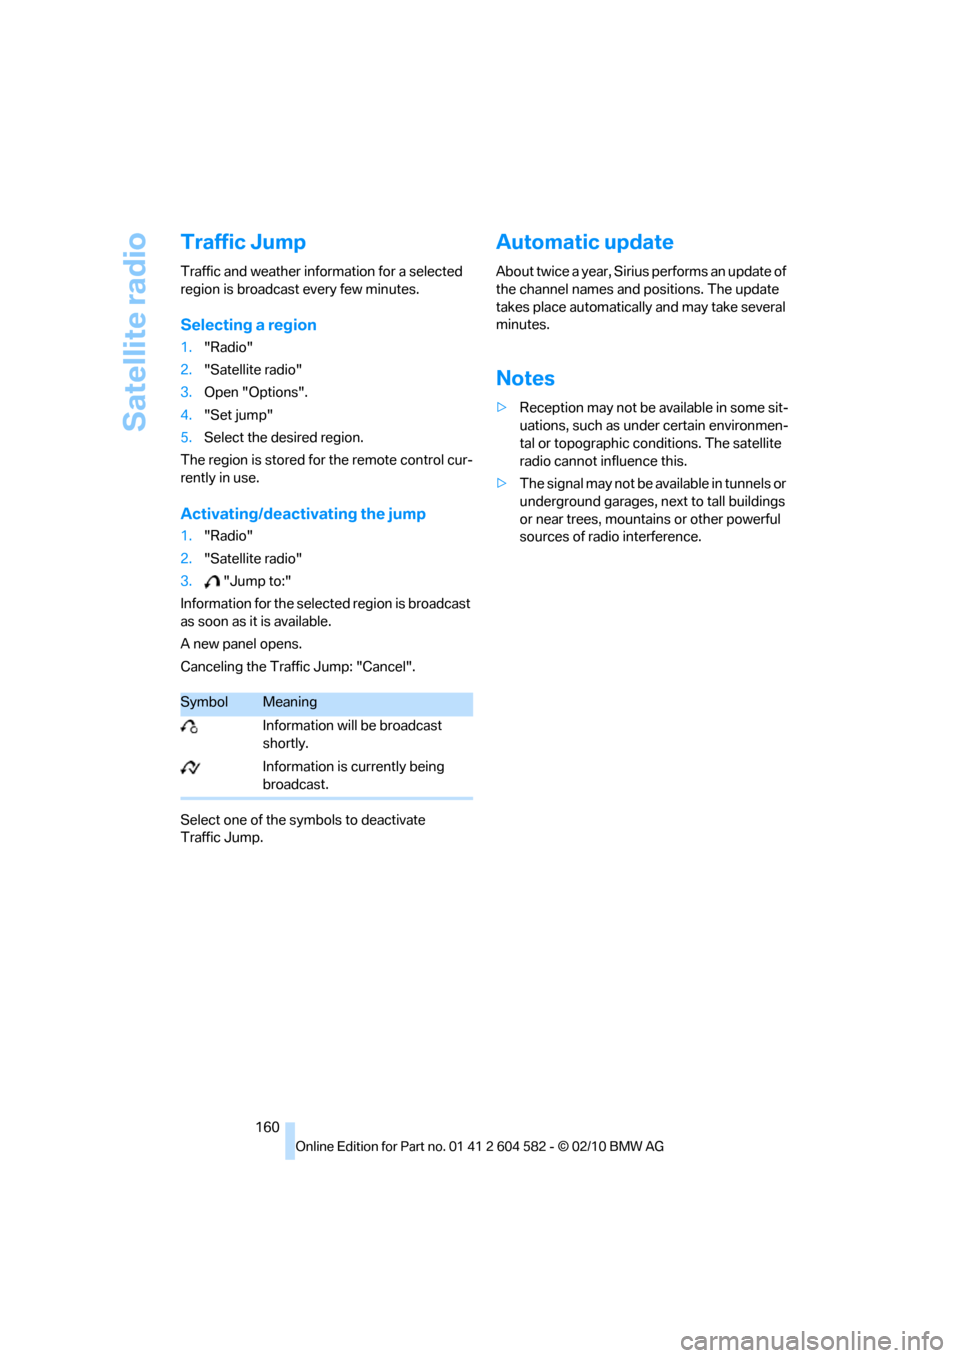
Securing cargo
>Secure smaller and lighter items using
retaining straps, a cargo area net
* or draw
straps
*.
>Heavy-duty cargo straps
* for securing
larger and heavier objects are available at
your BMW center. Four
* lashing eyes are
provided for attaching the cargo straps.
Two are located on the cargo area
sidewalls1, two more are on the rear cargo
area panel2.
Please comply with the information sup-
plied with the cargo straps.
Always position and secure the cargo as
described above, so that it cannot endan-
ger the car's occupants, for example if sudden
braking or swerving is necessary.
Never exceed either the approved gross vehicle
weight or either of the approved axle loads, refer
to page257; otherwise, excessive loads can
pose a safety hazard, and may also place you in
violation of traffic safety laws.
Heavy or hard objects should not be carried
loose inside the car, since they could be thrown
around, for example as a result of heavy braking,
sudden swerves, etc., and endanger the occu-
pants.
Page 162 of 286

Satellite radio
160
Traffic Jump
Traffic and weather information for a selected
region is broadcast every few minutes.
Selecting a region
1."Radio"
2."Satellite radio"
3.Open "Options".
4."Set jump"
5.Select the desired region.
The region is stored for the remote control cur-
rently in use.
Activating/deactivating the jump
1."Radio"
2."Satellite radio"
3."Jump to:"
Information for the selected region is broadcast
as soon as it is available.
A new panel opens.
Canceling the Traffic Jump: "Cancel".
Select one of the symbols to deactivate
Traffic Jump.
Automatic update
About twice a year, Sirius performs an update of
the channel names and positions. The update
takes place automatically and may take several
minutes.
Notes
>Reception may not be available in some sit-
uations, such as under certain environmen-
tal or topographic conditions. The satellite
radio cannot influence this.
>The signal may not be available in tunnels or
underground garages, next to tall buildings
or near trees, mountains or other powerful
sources of radio interference.
SymbolMeaning
Information will be broadcast
shortly.
Information is currently being
broadcast.