2011 BMW 335D TOURING belt
[x] Cancel search: beltPage 116 of 286

Practical interior accessories
114
Sedan:
Through-loading system*
Opening
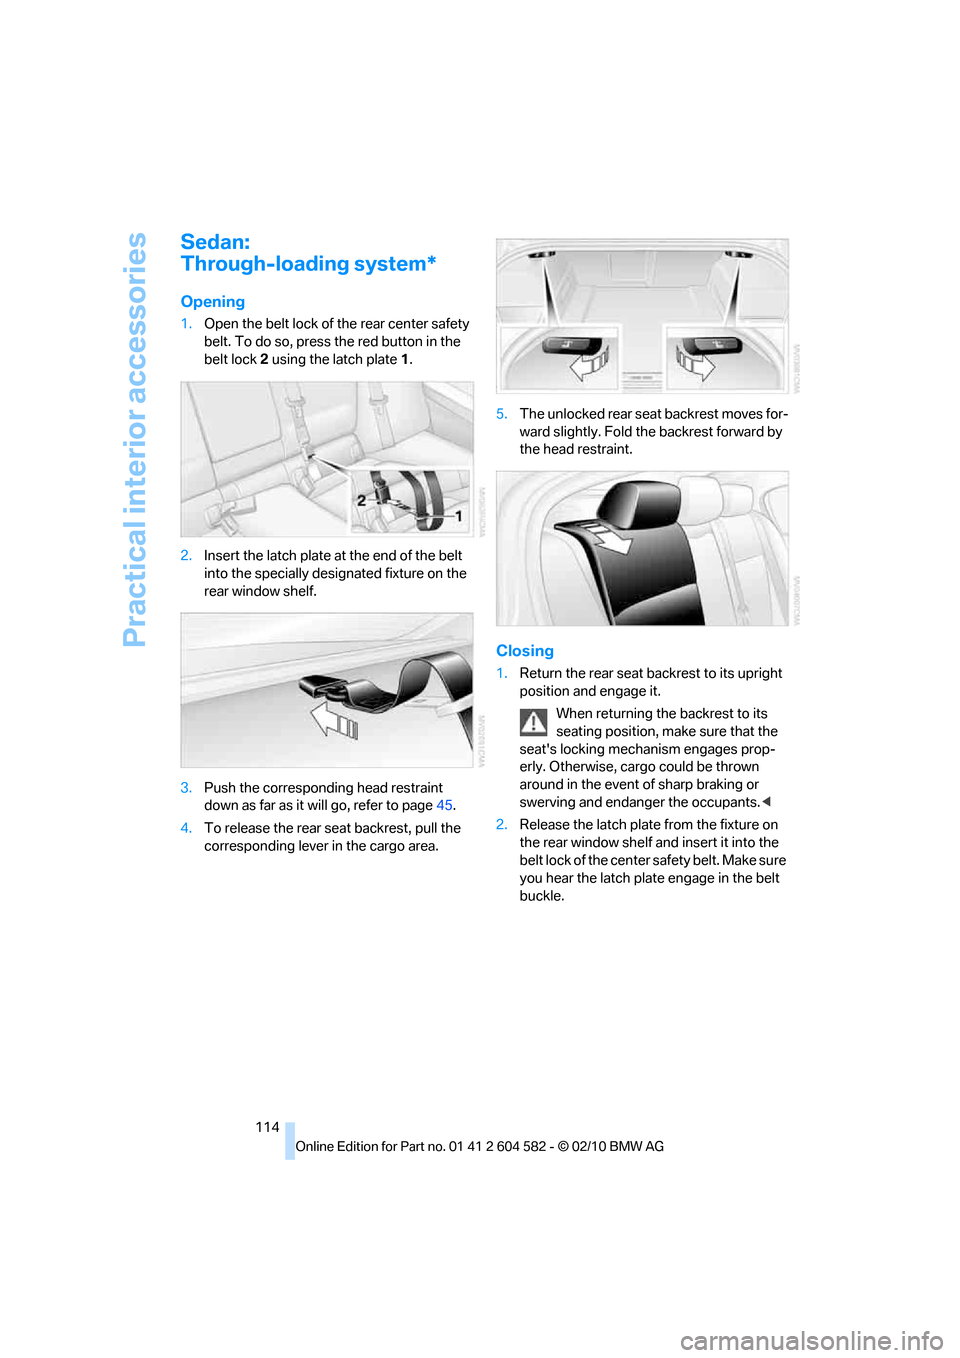
1.Open the belt lock of the rear center safety
belt. To do so, press the red button in the
belt lock2 using the latch plate1.
2.Insert the latch plate at the end of the belt
into the specially designated fixture on the
rear window shelf.
3.Push the corresponding head restraint
down as far as it will go, refer to page45.
4.To release the rear seat backrest, pull the
corresponding lever in the cargo area.5.The unlocked rear seat backrest moves for-
ward slightly. Fold the backrest forward by
the head restraint.
Closing
1.Return the rear seat backrest to its upright
position and engage it.
When returning the backrest to its
seating position, make sure that the
seat's locking mechanism engages prop-
erly. Otherwise, cargo could be thrown
around in the event of sharp braking or
swerving and endanger the occupants.<
2.Release the latch plate from the fixture on
the rear window shelf and insert it into the
belt lock of the center safety belt. Make sure
you hear the latch plate engage in the belt
buckle.
Page 117 of 286

Controls
115Reference
At a glance
Driving tips
Communications
Navigation
Entertainment
Mobility
The lashing eyes in the cargo area provide you
with a way to attach cargo area nets
* or draw
straps for securing suitcases and luggage,
refer to page126.
Sports Wagon:
Cargo area
Roller cover
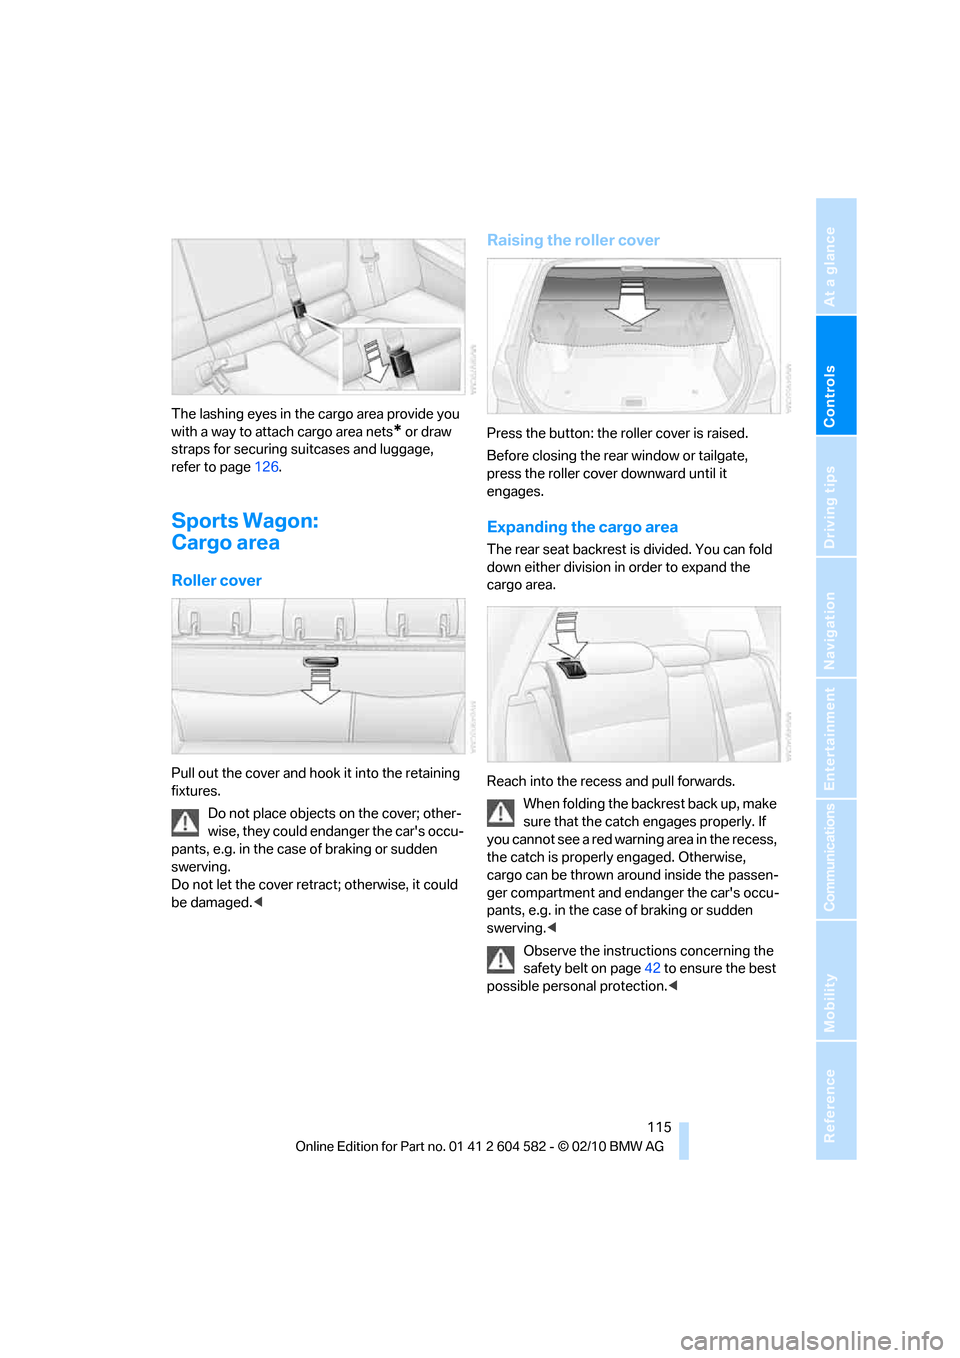
Pull out the cover and hook it into the retaining
fixtures.
Do not place objects on the cover; other-
wise, they could endanger the car's occu-
pants, e.g. in the case of braking or sudden
swerving.
Do not let the cover retract; otherwise, it could
be damaged.<
Raising the roller cover
Press the button: the roller cover is raised.
Before closing the rear window or tailgate,
press the roller cover downward until it
engages.
Expanding the cargo area
The rear seat backrest is divided. You can fold
down either division in order to expand the
cargo area.
Reach into the recess and pull forwards.
When folding the backrest back up, make
sure that the catch engages properly. If
you cannot see a red warning area in the recess,
the catch is properly engaged. Otherwise,
cargo can be thrown around inside the passen-
ger compartment and endanger the car's occu-
pants, e.g. in the case of braking or sudden
swerving.<
Observe the instructions concerning the
safety belt on page42 to ensure the best
possible personal protection.<
Page 120 of 286

Practical interior accessories
118
Ski bag*
The ski bag is designed for safe, clean transport
of up to 4 pairs of standard skis or up to
2snowboards.
With the ski bag you can stow skis with a length
of up to 6.9 ft 10 in/2.10 m. When skis of 6.9 ft
10 in/2.10 m length are loaded, the overall
capacity of the ski bag is reduced due to its
tapered design.
Loading
1.Fold down the center armrest.
2.Press the button, reach into the recess and
fold down the cover.
3.Open the Velcro fastener, spread the ski
bag between the front seats and insert the
skis or snowboards.
The zip fastener makes objects in the ski
bag easier to reach.
4.Insert the latch plate of the ski bag's retain-
ing strap in the center belt buckle.
Only place clean skis in the ski bag. Wrap sharp
edges to prevent damage.
Securing cargo
After loading, secure the ski bag and its con-
tents. Tighten the retaining strap on the ten-
sioning buckle for this purpose.
Secure the ski bag in the manner
described; otherwise, it could endanger
the car's occupants, e.g. in case of heavy brak-
ing or sudden swerving.<
To store the ski bag, perform the steps
described for loading in reverse order.
Removing the ski bag
The ski bag can be completely removed, e.g. for
faste r drying or to allow you to use other inserts.
1.Fold down the center panel in the rear seat
backrest.
2.Pull the handle, arrow1.
3.Pull out the insert, arrow 2.
For more information on the various
inserts available, contact your BMW cen-
ter.<
Page 128 of 286

Things to remember when driving
126
Load
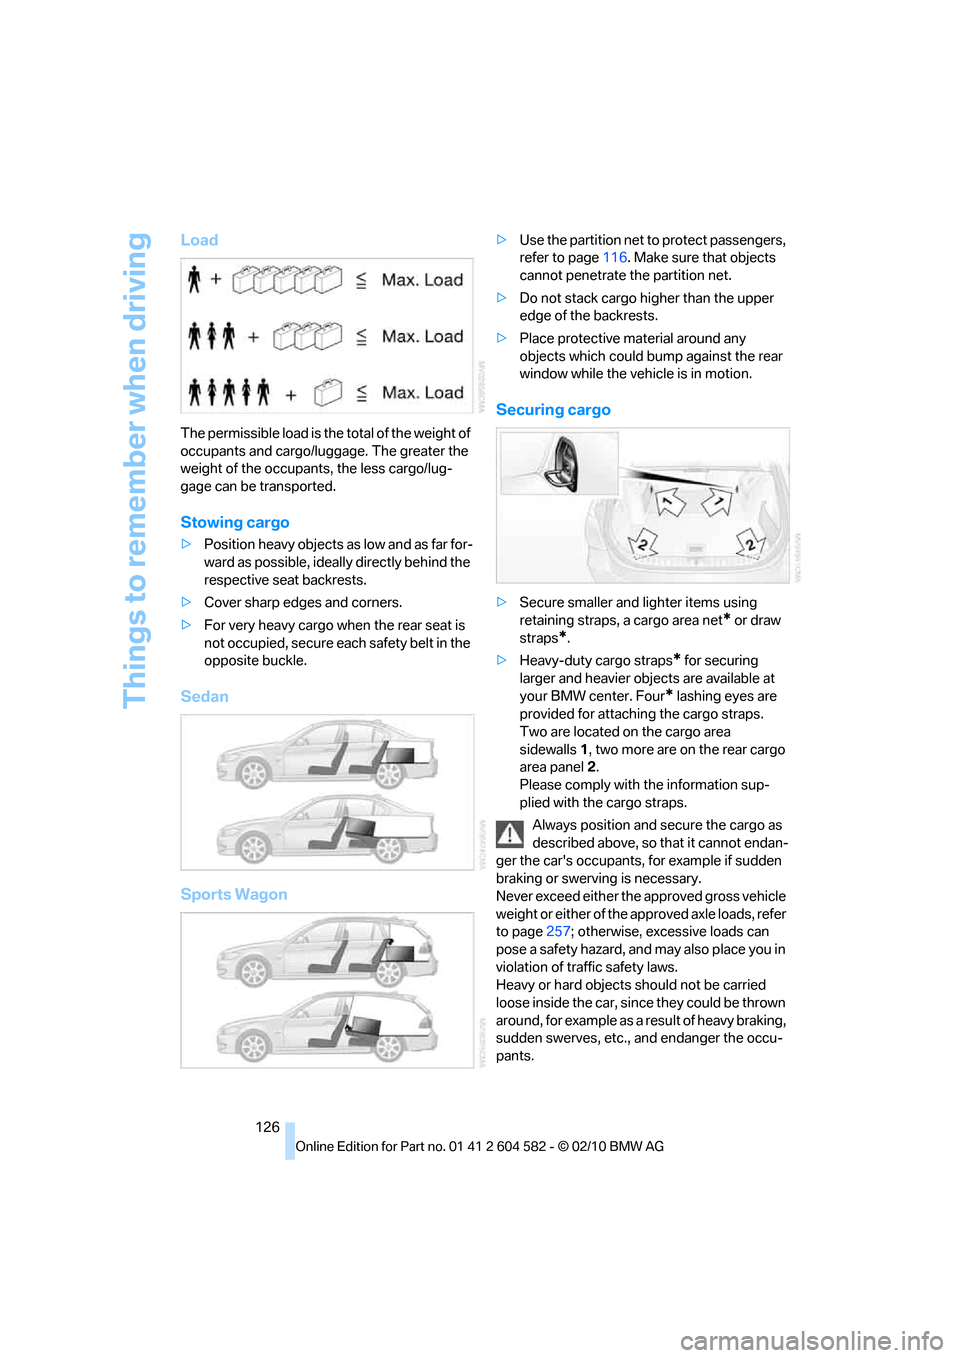
The permissible load is the total of the weight of
occupants and cargo/luggage. The greater the
weight of the occupants, the less cargo/lug-
gage can be transported.
Stowing cargo
>Position heavy objects as low and as far for-
ward as possible, ideally directly behind the
respective seat backrests.
>Cover sharp edges and corners.
>For very heavy cargo when the rear seat is
not occupied, secure each safety belt in the
opposite buckle.
Sedan
Sports Wagon
>Use the partition net to protect passengers,
refer to page116. Make sure that objects
cannot penetrate the partition net.
>Do not stack cargo higher than the upper
edge of the backrests.
>Place protective material around any
objects which could bump against the rear
window while the vehicle is in motion.
Securing cargo
>Secure smaller and lighter items using
retaining straps, a cargo area net
* or draw
straps
*.
>Heavy-duty cargo straps
* for securing
larger and heavier objects are available at
your BMW center. Four
* lashing eyes are
provided for attaching the cargo straps.
Two are located on the cargo area
sidewalls1, two more are on the rear cargo
area panel2.
Please comply with the information sup-
plied with the cargo straps.
Always position and secure the cargo as
described above, so that it cannot endan-
ger the car's occupants, for example if sudden
braking or swerving is necessary.
Never exceed either the approved gross vehicle
weight or either of the approved axle loads, refer
to page257; otherwise, excessive loads can
pose a safety hazard, and may also place you in
violation of traffic safety laws.
Heavy or hard objects should not be carried
loose inside the car, since they could be thrown
around, for example as a result of heavy braking,
sudden swerves, etc., and endanger the occu-
pants.
Page 154 of 286

On/off and tone
152
Volume
>"Speed volume": adjustment of volume
depending on driving speed
>"PDC"
*: volume of the PDC signal tone rel-
ative to the entertainment sound output
>"Gong": volume of the signal tone, e.g. for
the "Fasten safety belts" reminder, relative
to the entertainment sound output
Adjustments
1."CD/Multimedia", "Radio" or "Settings".
2."Tone"
3."Volume settings"
4.Select the desired volume setting.
5.To adjust: turn the controller.
6.To store: press the controller.
Resetting tone settings
You can reset all tone settings to the default
setting.
1."CD/Multimedia", "Radio" or "Settings".
2."Tone"
3."Reset"
Page 223 of 286

Mobility
221Reference
At a glance
Controls
Driving tips
Communications
Navigation
Entertainment
Tire identification marks
Knowledge of the labeling on the side of the tire
makes it easier to identify and choose the right
tires.
Tire size
Speed code letter
Q = up to 100 mph or 160 km/h
T = up to 118 mph or 190 km/h
H = up to 131 mph or 210 km/h
V = up to 150 mph or 240 km/h
W = up to 167 mph or 270 km/h
Y = up to 186 mph or 300 km/h
Tire Identification Number
Tires with DOT codes meet the guidelines of
the US Department of Transportation.
DOT code:
Tire age
The manufacturing date of tires is contained in
the tire coding: DOT … 1010 means that the
tire was manufactured in week 10 of 2010.
BMW recommends that you replace all tires
after 6 years at most, even if some tires may last
for 10 years.
Uniform Tire Quality Grading
Quality grades can be found where applicable
on the tire sidewall between tread shoulder and
maximum section width. For example:
Tread wear 200 Traction AA
Temperature A
DOT Quality Grades
Tread wear
Traction AA A B C
Temperature A B C
All passenger car tires must conform to
Federal Safety Requirements in addition
to these grades.<
Tread wear
The tread wear grade is a comparative rating
based on the wear rate of the tire when tested
under controlled conditions on a specified gov-
ernment test course. For example, a tire graded
150 would wear one and one-half (1γ) times as
well on the government course as a tire graded
100. The relative performance of tires depends
upon the actual conditions of their use, how-
ever, and may depart significantly from the
norm due to variations in driving habits, service
practices and differences in road characteris-
tics and climate.
Traction
The traction grades, from highest to lowest, are
AA, A, B, and C.
Those grades represent the tire's ability to stop
on wet pavement as measured under controlled
conditions on specified government test sur-
faces of asphalt and concrete. A tire marked C
may have poor traction performance.
The traction grade assigned to this tire is
based on straight-ahead braking traction
tests, and does not include acceleration, cor-
nering, hydroplaning, or peak traction charac-
teristics.<
Temperature
The temperature grades are A, the highest, B,
and C, representing the tire's resistance to the
generation of heat and its ability to dissipate
e.g.
Nominal width in mm
Aspect ratio in Ξ
Radial belt construction
Rim diameter in inches
Load rating,
not on ZR tires
Speed code letter, in
front of the R on ZR tires225/45 R1791 V
e.g.
Manufacturer's
code for tire make
Tire size and
tire design
Tire ageDOT xxxx xxx 1010
Page 237 of 286

Mobility
235Reference
At a glance
Controls
Driving tips
Communications
Navigation
Entertainment
Light-alloy wheels
For technical reasons, dust is generated during
braking that is deposited on the light-alloy
wheels. Remove the dust regularly using acid-
free rim cleaner.
Do not use aggressive, acidic, strongly
alkaline and abrasive cleaning agents or
steam jets over 1407/606; otherwise, dam-
age may occur.<
Outside sensors/cameras
Keep the sensors and cameras on the
outside of the vehicle, e.g. those for Park
Distance Control, clean and free of ice to ensure
that they remain fully functional.<
Interior care
Upholstery fabrics/cloth trims/
Alcantara fabrics
Vacuum regularly with a vacuum cleaner to
remove superficial dirt.
To remove severe spots such as stains from
beverages, use a soft sponge or lint-free
microfiber cloth and suitable interior cleaners.
Follow the instructions on the packaging.
Clean the upholstery down to the seams
using a sweeping motion. Avoid strong
rubbing.<
Opened Velcro fasteners on pants or
other articles of clothing can damage the
seat covers. Ensure that Velcro fasteners are
closed.<
Leather/leather trim
The leather used by BMW is a high quality
natural product. Slight irregularities in the
leather are a typical characteristic of natural
leather.<
Dust and road grit in the pores and folds of the
leather have an abrasive effect, leading to
increased wear and causing the leather surface
to become brittle prematurely. Therefore, fre-
quently clean the leather of dust using a cloth or
vacuum cleaner.Clean light-colored leather more frequently as
dust and dirt are more noticeable.
Treat the leather at least once every two
months using a leather lotion as dirt and grease
will gradually attack the leather's protective
layer.
Carpet/floor mats*
The floor mats can be removed for cleaning.
When heavily soiled, clean carpets with a
microfiber cloth and water or textile cleaner.
Rub back and forth in the direction of travel; oth-
erwise, the carpet may become matted.
Interior plastic parts
>Imitation leather surfaces
>Lamp glasses
>Display pane of instrument cluster
>Matte parts
Clean with water and solvent-free plastic
cleaner if necessary.
Fine wood parts
Clean fine wood trim and fine wood parts with a
damp cloth. Wipe dry with a soft cloth.
Safety belts
Dirty belt straps impede the reeling action and
thus have a negative impact on safety.
Do not clean chemically, as this may
destroy the webbing.<
Interior sensors/cameras
To clean interior sensors and cameras, e.g. of
the high-beam assistant, use a lint-free cloth
moistened with glass cleaner.
Page 269 of 286

Reference 267
At a glance
Controls
Driving tips
Communications
Navigation
Entertainment
Mobility
Available services199
Average fuel consumption73
– setting the units76
Average speed73
Avoid highways in
navigation140
Avoiding unintentional
alarms34
Axle loads, refer to
Weights257
B
Backrest contour, refer to
Lumbar support44
Backrests, refer to Seat
adjustment43
Backrest width adjustment44
Back seats
– refer to Rear seats45
Backup lamps
– replacing bulb242,243
Band-aids, refer to First aid
pouch247
Bar, refer to Towing
methods249
Base plate for telephone or
mobile phone
– refer to Snap-in adapter192
– refer to Snap-in adapter in
the center armrest storage
compartment111
Bass, tone setting150
Battery244
– charging244
– disposal36,244
– jump-starting247
– remote control26
– replacing244
– temporary power failure245
Battery for mobile phone192
Battery renewal
– remote control36
– remote control for vehicle36
Being towed249Belts, refer to Safety belts47
Belt tensioner, refer to Safety
belts47
Beverage holders, refer to
Cupholders112
Black ice, refer to Outside
temperature warning71
Blower, refer to Air
volume104
Bluetooth, activating/
deactivating183
BMW
– car shampoo235
BMW Advanced Diesel204
BMW Assist195
BMW Assist,
activating197,199
BMW Homepage4
BMW Maintenance
System231
BMW Search197
BMW webpage4
Bottle holders, refer to
Cupholders112
Brake Assist, refer to Dynamic
Brake Control DBC85
Brake fluid, refer to Service
requirements76
Brake Force Display93
Brake lamps
– Brake Force Display93
– replacing bulb242,243
Brake pads122
– breaking in122
Brake rotors125
– brakes122
– breaking in122
Brakes
– ABS85
– BMW Maintenance
System231
– Brake Force Display93
– breaking in122
– parking brake57
– service requirements76Brakes, refer to Braking
safely124
Brake system122
– BMW Maintenance
System231
– breaking in122
– disc brakes125
Breakdown services, refer to
Roadside Assistance246
Breaking in the clutch122
Breaking in the differential,
refer to Engine and
differential122
Break-in period122
Brightness of the Control
Display83
Bulb changing, refer to Lamps
and bulbs238
Button for starting the engine,
refer to Start/stop button55
Buttons on the steering
wheel11
C
California Proposition 65
warning6
Call
– accepting184
– ending184
– rejecting184
Calling, refer to Phone
numbers, dialing185
Calling, refer to Telephone
owner's manual
Can holders, refer to
Cupholders112
Capacities258
Capacity of the cargo area257
Car battery, refer to Vehicle
battery244
Car care, refer to Care233