2011 BMW 328I XDRIVE SPORTS WAGON High-beam Assistant
[x] Cancel search: High-beam AssistantPage 12 of 286
Cockpit
10
Cockpit
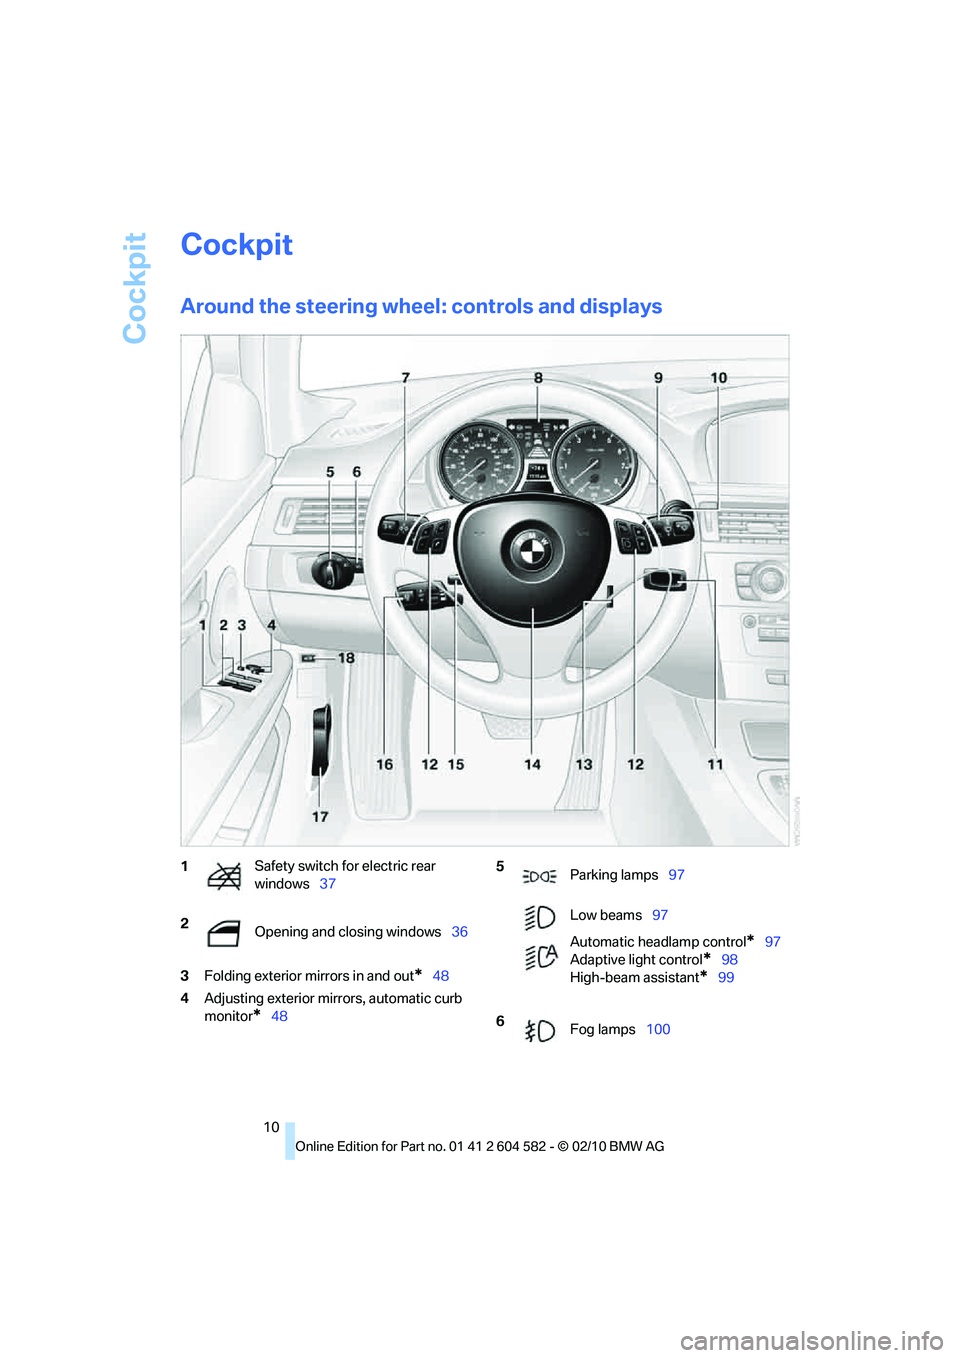
Around the steering wheel: controls and displays
3Folding exterior mirrors in and out*48
4Adjusting exterior mirrors, automatic curb
monitor
*48
1Safety switch for electric rear
windows37
2
Opening and closing windows36 5
Parking lamps97
Low beams97
Automatic headlamp control
*97
Adaptive light control
*98
High-beam assistant
*99
6
Fog lamps100
Page 13 of 286
At a glance
11Reference
Controls
Driving tips
Communications
Navigation
Entertainment
Mobility
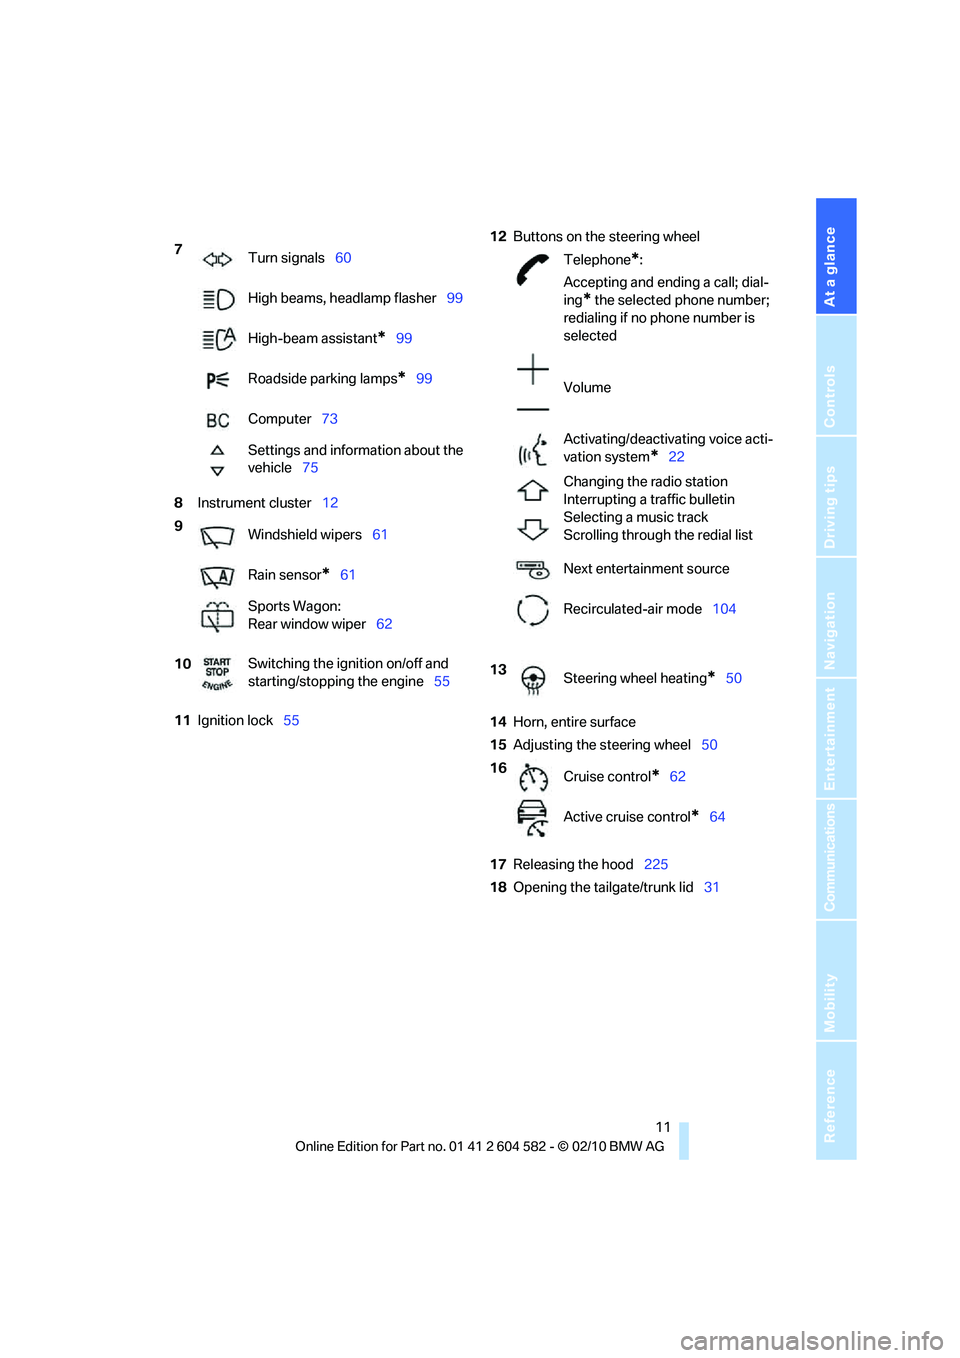
8Instrument cluster12
11Ignition lock5512Buttons on the steering wheel
14Horn, entire surface
15Adjusting the steering wheel50
17Releasing the hood225
18Opening the tailgate/trunk lid31 7
Turn signals60
High beams, headlamp flasher99
High-beam assistant
*99
Roadside parking lamps
*99
Computer73
Settings and information about the
vehicle75
9
Windshield wipers61
Rain sensor
*61
Sports Wagon:
Rear window wiper62
10Switching the ignition on/off and
starting/stopping the engine55
Telephone*:
Accepting and ending a call; dial-
ing
* the selected phone number;
redialing if no phone number is
selected
Volume
Activating/deactivating voice acti-
vation system
*22
Changing the radio station
Interrupting a traffic bulletin
Selecting a music track
Scrolling through the redial list
Next entertainment source
Recirculated-air mode104
13
Steering wheel heating
*50
16
Cruise control
*62
Active cruise control
*64
Page 14 of 286
Cockpit
12
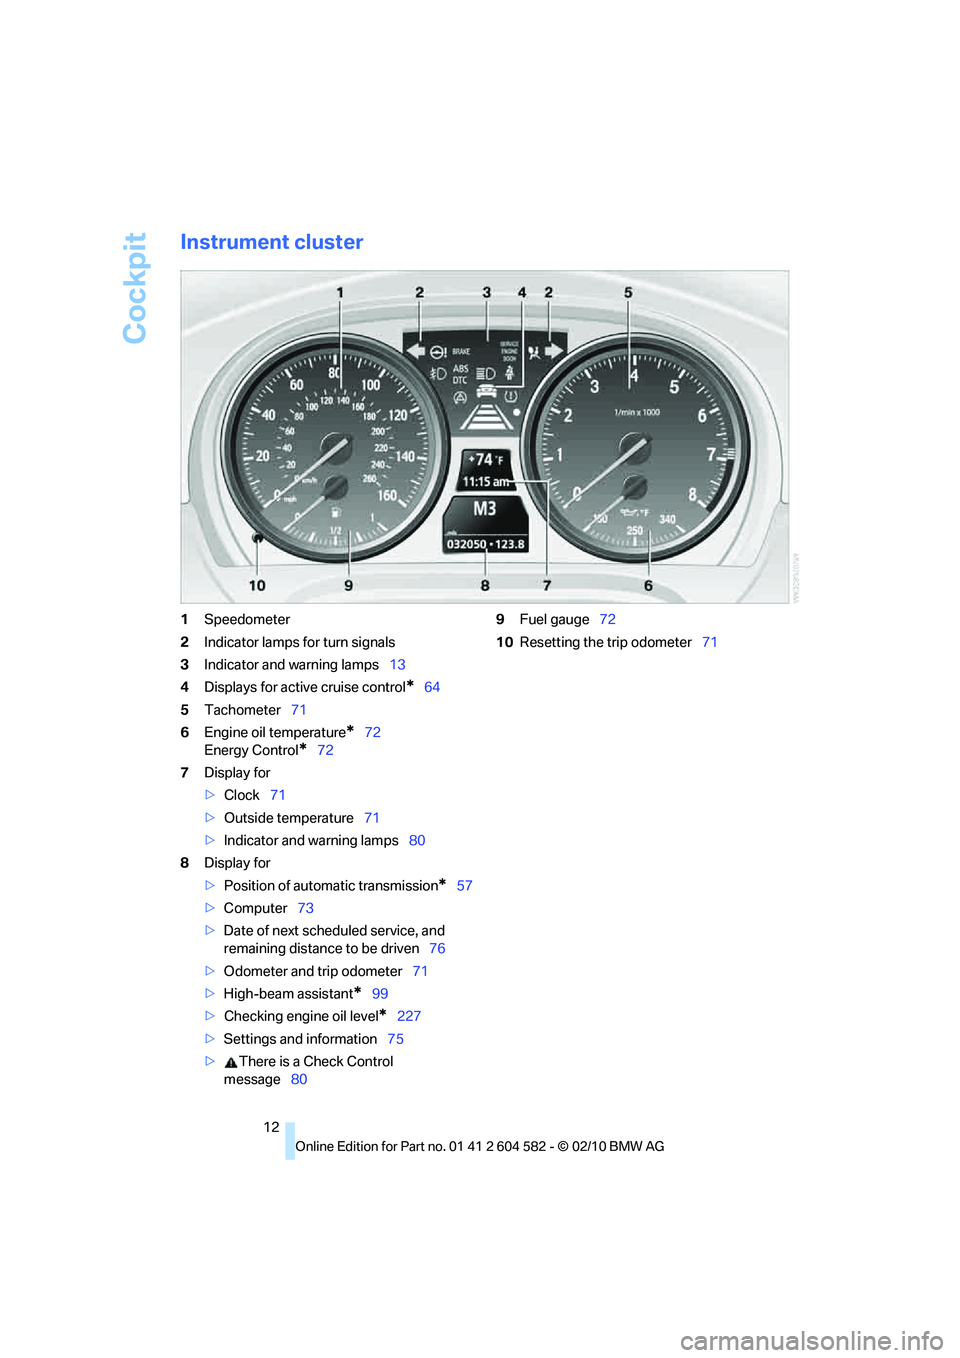
Instrument cluster
1Speedometer
2Indicator lamps for turn signals
3Indicator and warning lamps13
4Displays for active cruise control
*64
5Tachometer71
6Engine oil temperature
*72
Energy Control
*72
7Display for
>Clock71
>Outside temperature71
>Indicator and warning lamps80
8Display for
>Position of automatic transmission
*57
>Computer73
>Date of next scheduled service, and
remaining distance to be driven76
>Odometer and trip odometer71
>High-beam assistant
*99
>Checking engine oil level
*227
>Settings and information75
>There is a Check Control
message809Fuel gauge72
10Resetting the trip odometer71
Page 29 of 286
Controls
27Reference
At a glance
Driving tips
Communications
Navigation
Entertainment
Mobility
>Settings for the display on the Control Dis-
play and in the instrument cluster:
>12h/24h format of the clock, refer to
page79
>Date format, refer to page80
>Brightness of the Control Display, refer
to page83
>Language on the Control Display, refer
to page83
>Units of measure, refer to page76
>Show visual warning for Park Distance Con-
trol PDC
*, refer to page84
>Light settings:
>Welcome lamps, refer to page97
>Pathway lighting, refer to page98
>Daytime running lights, refer to page98
>High-beam assistant, refer to page99
>Automatic climate control: activating/deac-
tivating AUTO program, cooling function
and automatic recirculated-air control, set-
ting temperature, air volume and distribu-
tion, refer to page103 ff
>Entertainment:
>Tone control, refer to page150
>Speed-dependent volume control, refer
to page152
Central locking system
The concept
The central locking system functions when the
driver's door is closed.
The system simultaneously engages and
releases the locks on the following:
>Doors
>Trunk lid/tailgate
>Fuel filler flap
Operating from outside
>Via the remote control
>Via the door lock
*
>In cars with Comfort Access*, via the
handles on the driver's and front passenger
doors
In addition, if the remote control is used, the
interior lamps and the door's courtesy lamps
*
are also switched on or off. The alarm system*
is also armed or disarmed.
For further details of the alarm system,
refer to
page33.
Operating from inside
By means of the button for central locking,
refer to page30.
In the event of a sufficiently severe accident,
the central locking system unlocks automati-
cally. In addition, the hazard warning flashers
and interior lamps come on.
Opening and closing:
Using the remote control
Persons or animals in a parked vehicle
could lock the doors from the inside. You
should therefore take the remote control with
you when you leave the vehicle so that the latter
can be opened from outside.<
Unlocking
Press the button.
The interior lamps, the courtesy lamps
* and the
welcome lamps come on.
Page 99 of 286
Controls
97Reference
At a glance
Driving tips
Communications
Navigation
Entertainment
Mobility
Lamps
Parking lamps/low beams
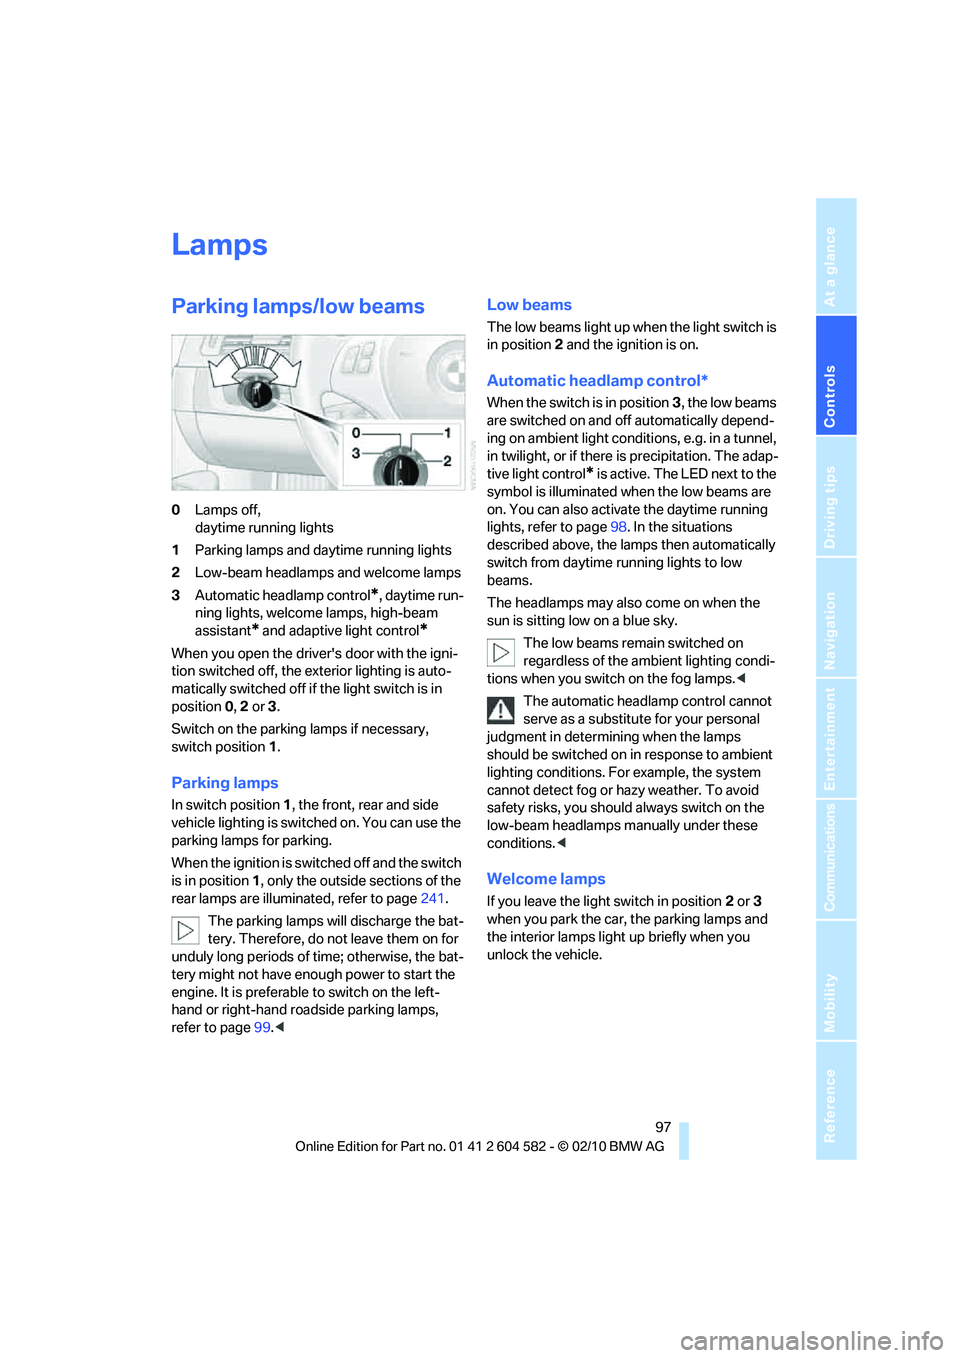
0Lamps off,
daytime running lights
1Parking lamps and daytime running lights
2Low-beam headlamps and welcome lamps
3Automatic headlamp control
*, daytime run-
ning lights, welcome lamps, high-beam
assistant
* and adaptive light control*
When you open the driver's door with the igni-
tion switched off, the exterior lighting is auto-
matically switched off if the light switch is in
position 0, 2 or 3.
Switch on the parking lamps if necessary,
switch position 1.
Parking lamps
In switch position1, the front, rear and side
vehicle lighting is switched on. You can use the
parking lamps for parking.
When the ignition is switched off and the switch
is in position 1, only the outside sections of the
rear lamps are illuminated, refer to page241.
The parking lamps will discharge the bat-
tery. Therefore, do not leave them on for
unduly long periods of time; otherwise, the bat-
tery might not have enough power to start the
engine. It is preferable to switch on the left-
hand or right-hand roadside parking lamps,
refer to page99.<
Low beams
The low beams light up when the light switch is
in position 2 and the ignition is on.
Automatic headlamp control*
When the switch is in position3, the low beams
are switched on and off automatically depend-
ing on ambient light conditions, e.g. in a tunnel,
in twilight, or if there is precipitation. The adap-
tive light control
* is active. The LED next to the
symbol is illuminated when the low beams are
on. You can also activate the daytime running
lights, refer to page98. In the situations
described above, the lamps then automatically
switch from daytime running lights to low
beams.
The headlamps may also come on when the
sun is sitting low on a blue sky.
The low beams remain switched on
regardless of the ambient lighting condi-
tions when you switch on the fog lamps.<
The automatic headlamp control cannot
serve as a substitute for your personal
judgment in determining when the lamps
should be switched on in response to ambient
lighting conditions. For example, the system
cannot detect fog or hazy weather. To avoid
safety risks, you should always switch on the
low-beam headlamps manually under these
conditions.<
Welcome lamps
If you leave the light switch in position 2 or 3
when you park the car, the parking lamps and
the interior lamps light up briefly when you
unlock the vehicle.
Page 101 of 286
Controls
99Reference
At a glance
Driving tips
Communications
Navigation
Entertainment
Mobility
High beams/roadside parking
lamps
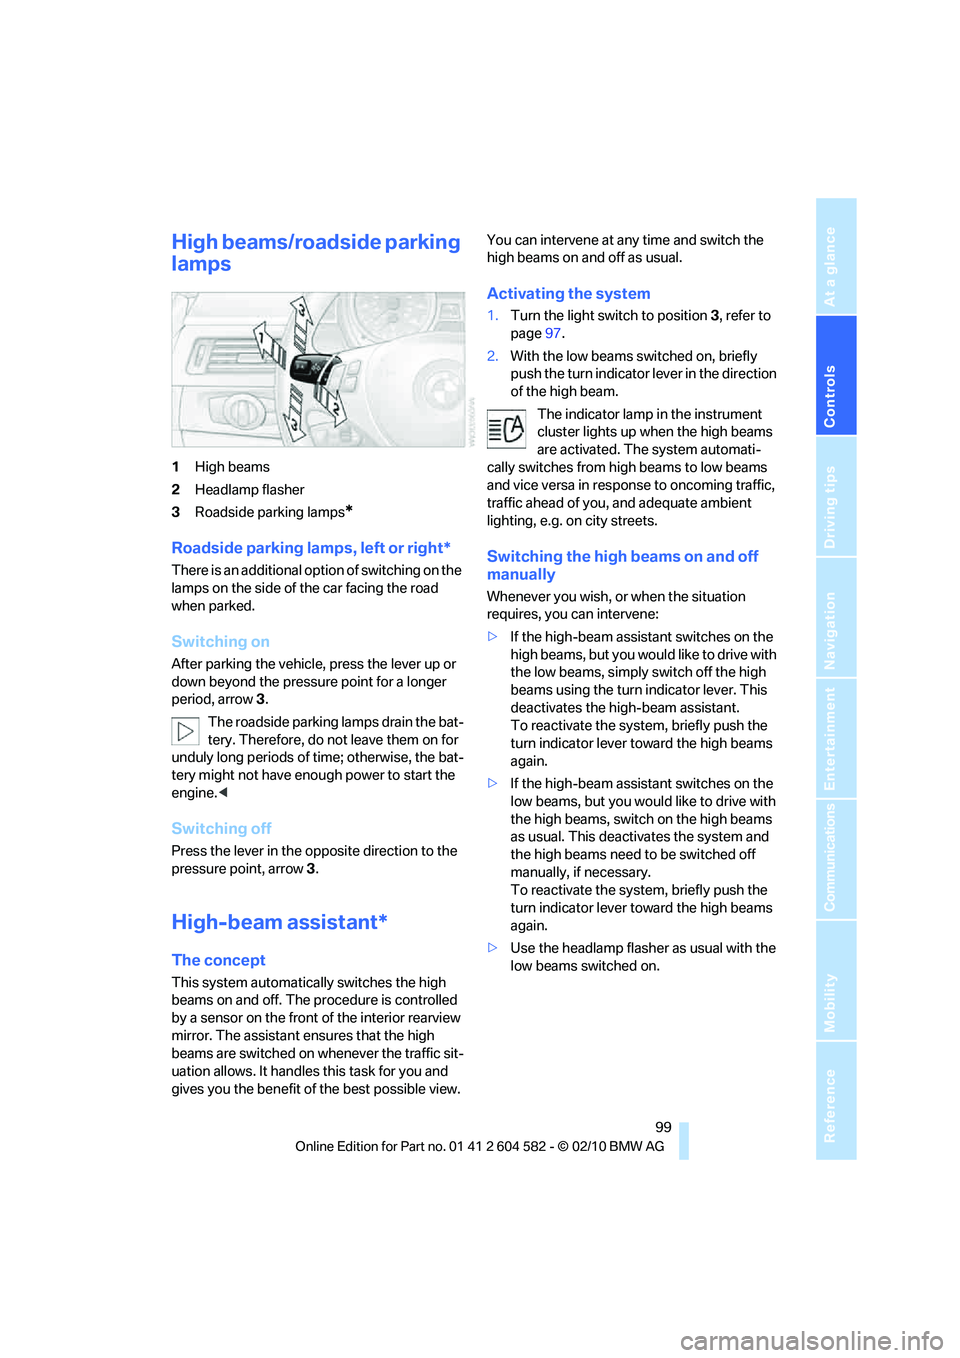
1High beams
2Headlamp flasher
3Roadside parking lamps
*
Roadside parking lamps, left or right*
There is an additional option of switching on the
lamps on the side of the car facing the road
when parked.
Switching on
After parking the vehicle, press the lever up or
down beyond the pressure point for a longer
period, arrow 3.
The roadside parking lamps drain the bat-
tery. Therefore, do not leave them on for
unduly long periods of time; otherwise, the bat-
tery might not have enough power to start the
engine.<
Switching off
Press the lever in the opposite direction to the
pressure point, arrow 3.
High-beam assistant*
The concept
This system automatically switches the high
beams on and off. The procedure is controlled
by a sensor on the front of the interior rearview
mirror. The assistant ensures that the high
beams are switched on whenever the traffic sit-
uation allows. It handles this task for you and
gives you the benefit of the best possible view. You can intervene at any time and switch the
high beams on and off as usual.
Activating the system
1.Turn the light switch to position3, refer to
page97.
2.With the low beams switched on, briefly
push the turn indicator lever in the direction
of the high beam.
The indicator lamp in the instrument
cluster lights up when the high beams
are activated. The system automati-
cally switches from high beams to low beams
and vice versa in response to oncoming traffic,
traffic ahead of you, and adequate ambient
lighting, e.g. on city streets.
Switching the high beams on and off
manually
Whenever you wish, or when the situation
requires, you can intervene:
>If the high-beam assistant switches on the
high beams, but you would like to drive with
the low beams, simply switch off the high
beams using the turn indicator lever. This
deactivates the high-beam assistant.
To reactivate the system, briefly push the
turn indicator lever toward the high beams
again.
>If the high-beam assistant switches on the
low beams, but you would like to drive with
the high beams, switch on the high beams
as usual. This deactivates the system and
the high beams need to be switched off
manually, if necessary.
To reactivate the system, briefly push the
turn indicator lever toward the high beams
again.
>Use the headlamp flasher as usual with the
low beams switched on.
Page 102 of 286
Lamps
100
System limitations
The high-beam assistant cannot serve as
a substitute for the driver's personal judg-
ment of when to use the high beams. Therefore,
manually switch off the high beams in situations
where this is required to avoid a safety risk.<
The system is not fully functional in situations
such as the following, and driver intervention
may be necessary:
>In very unfavorable weather conditions,
such as fog or heavy precipitation
>In detecting poorly-lit road users, such as
pedestrians, cyclists, horseback riders and
wagons; when driving close to train or ship
traffic; and at animal crossings
>In tight curves, on hilltops or in depressions,
in cross traffic or half-obscured oncoming
traffic on highways
>In poorly lit towns and cities and in the pres-
ence of highly reflective signs
>At low speeds
>When the windshield in front of the interior
rearview mirror is fogged over, dirty or cov-
ered with stickers, etc.
>If the sensor is dirty. Clean the sensor on
the front of the interior rearview mirror using
a cloth moistened with a small amount of
glass cleaner.
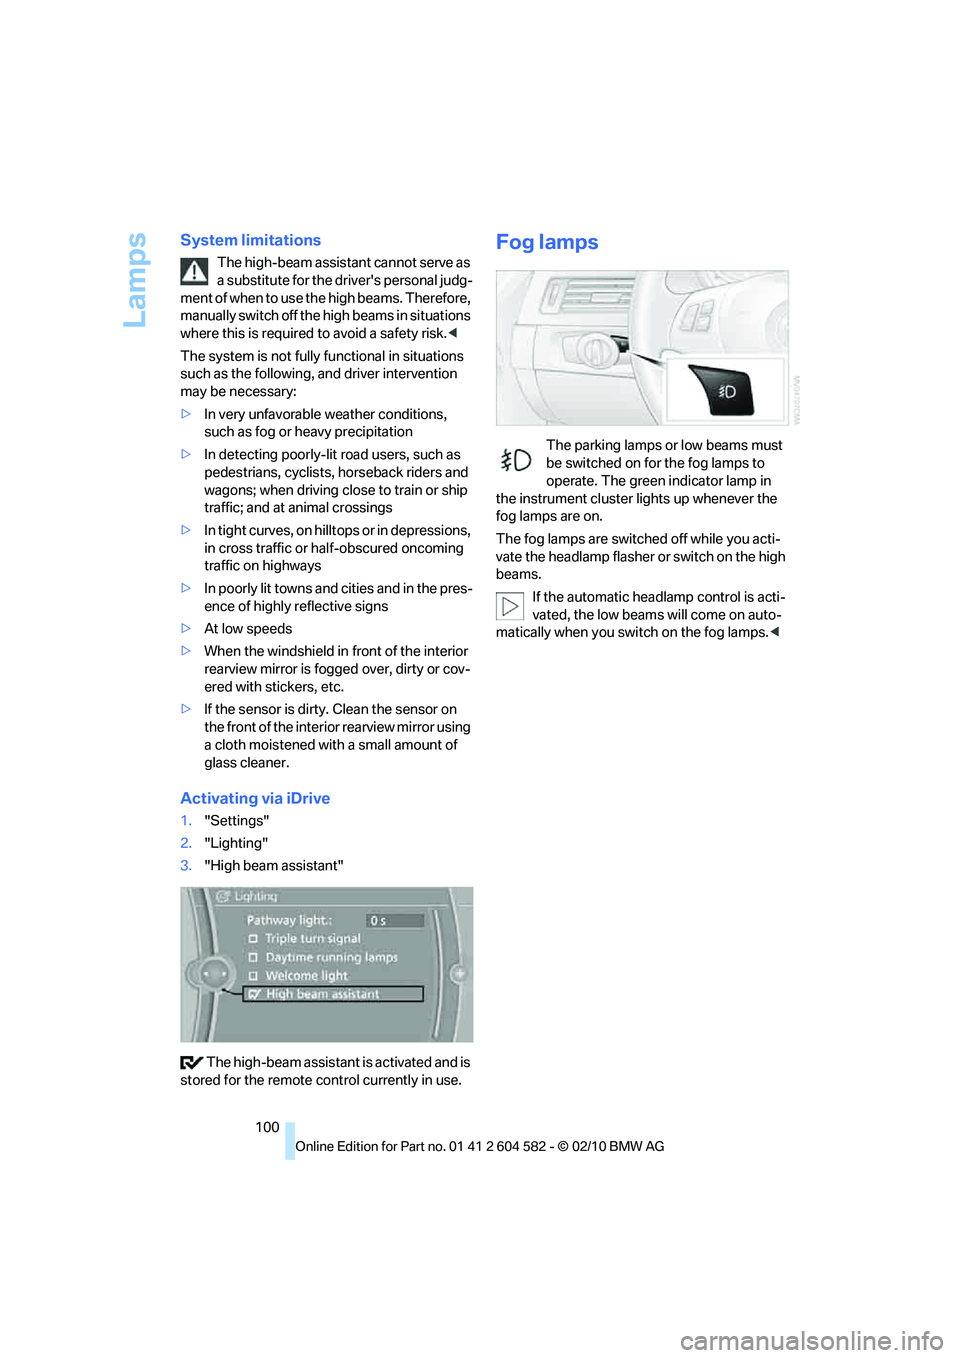
Activating via iDrive
1."Settings"
2."Lighting"
3."High beam assistant"
The high-beam assistant is activated and is
stored for the remote control currently in use.
Fog lamps
The parking lamps or low beams must
be switched on for the fog lamps to
operate. The green indicator lamp in
the instrument cluster lights up whenever the
fog lamps are on.
The fog lamps are switched off while you acti-
vate the headlamp flasher or switch on the high
beams.
If the automatic headlamp control is acti-
vated, the low beams will come on auto-
matically when you switch on the fog lamps.<
Page 237 of 286
Mobility
235Reference
At a glance
Controls
Driving tips
Communications
Navigation
Entertainment
Light-alloy wheels
For technical reasons, dust is generated during
braking that is deposited on the light-alloy
wheels. Remove the dust regularly using acid-
free rim cleaner.
Do not use aggressive, acidic, strongly
alkaline and abrasive cleaning agents or
steam jets over 1407/606; otherwise, dam-
age may occur.<
Outside sensors/cameras
Keep the sensors and cameras on the
outside of the vehicle, e.g. those for Park
Distance Control, clean and free of ice to ensure
that they remain fully functional.<
Interior care
Upholstery fabrics/cloth trims/
Alcantara fabrics
Vacuum regularly with a vacuum cleaner to
remove superficial dirt.
To remove severe spots such as stains from
beverages, use a soft sponge or lint-free
microfiber cloth and suitable interior cleaners.
Follow the instructions on the packaging.
Clean the upholstery down to the seams
using a sweeping motion. Avoid strong
rubbing.<
Opened Velcro fasteners on pants or
other articles of clothing can damage the
seat covers. Ensure that Velcro fasteners are
closed.<
Leather/leather trim
The leather used by BMW is a high quality
natural product. Slight irregularities in the
leather are a typical characteristic of natural
leather.<
Dust and road grit in the pores and folds of the
leather have an abrasive effect, leading to
increased wear and causing the leather surface
to become brittle prematurely. Therefore, fre-
quently clean the leather of dust using a cloth or
vacuum cleaner.Clean light-colored leather more frequently as
dust and dirt are more noticeable.
Treat the leather at least once every two
months using a leather lotion as dirt and grease
will gradually attack the leather's protective
layer.
Carpet/floor mats*
The floor mats can be removed for cleaning.
When heavily soiled, clean carpets with a
microfiber cloth and water or textile cleaner.
Rub back and forth in the direction of travel; oth-
erwise, the carpet may become matted.
Interior plastic parts
>Imitation leather surfaces
>Lamp glasses
>Display pane of instrument cluster
>Matte parts
Clean with water and solvent-free plastic
cleaner if necessary.
Fine wood parts
Clean fine wood trim and fine wood parts with a
damp cloth. Wipe dry with a soft cloth.
Safety belts
Dirty belt straps impede the reeling action and
thus have a negative impact on safety.
Do not clean chemically, as this may
destroy the webbing.<
Interior sensors/cameras
To clean interior sensors and cameras, e.g. of
the high-beam assistant, use a lint-free cloth
moistened with glass cleaner.