2011 BMW 328I XDRIVE CONVERTIBLE length
[x] Cancel search: lengthPage 122 of 278
Practical interior accessories
120
Storage compartment behind the
rear seat backrest
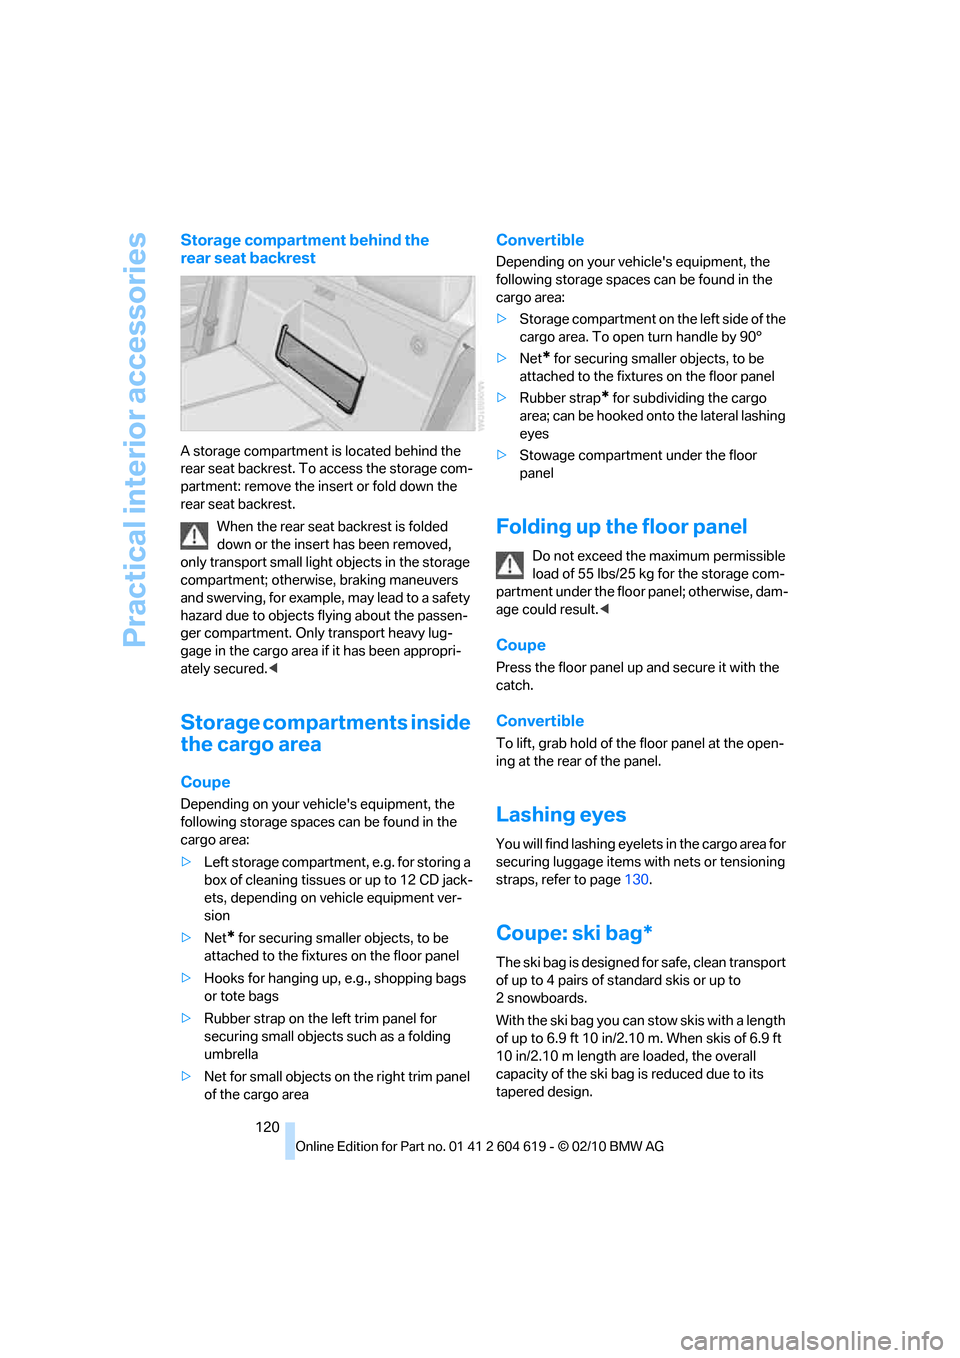
A storage compartment is located behind the
rear seat backrest. To access the storage com-
partment: remove the insert or fold down the
rear seat backrest.
When the rear seat backrest is folded
down or the insert has been removed,
only transport small light objects in the storage
compartment; otherwise, braking maneuvers
and swerving, for example, may lead to a safety
hazard due to objects flying about the passen-
ger compartment. Only transport heavy lug-
gage in the cargo area if it has been appropri-
ately secured.<
Storage compartments inside
the cargo area
Coupe
Depending on your vehicle's equipment, the
following storage spaces can be found in the
cargo area:
>Left storage compartment, e.g. for storing a
box of cleaning tissues or up to 12 CD jack-
ets, depending on vehicle equipment ver-
sion
>Net
* for securing smaller objects, to be
attached to the fixtures on the floor panel
>Hooks for hanging up, e.g., shopping bags
or tote bags
>Rubber strap on the left trim panel for
securing small objects such as a folding
umbrella
>Net for small objects on the right trim panel
of the cargo area
Convertible
Depending on your vehicle's equipment, the
following storage spaces can be found in the
cargo area:
>Storage compartment on the left side of the
cargo area. To open turn handle by 90°
>Net
* for securing smaller objects, to be
attached to the fixtures on the floor panel
>Rubber strap
* for subdividing the cargo
area; can be hooked onto the lateral lashing
eyes
>Stowage compartment under the floor
panel
Folding up the floor panel
Do not exceed the maximum permissible
load of 55 lbs/25 kg for the storage com-
partment under the floor panel; otherwise, dam-
age could result.<
Coupe
Press the floor panel up and secure it with the
catch.
Convertible
To lift, grab hold of the floor panel at the open-
ing at the rear of the panel.
Lashing eyes
You will find lashing eyelets in the cargo area for
securing luggage items with nets or tensioning
straps, refer to page130.
Coupe: ski bag*
The ski bag is designed for safe, clean transport
of up to 4 pairs of standard skis or up to
2snowboards.
With the ski bag you can stow skis with a length
of up to 6.9 ft 10 in/2.10 m. When skis of 6.9 ft
10 in/2.10 m length are loaded, the overall
capacity of the ski bag is reduced due to its
tapered design.
Page 123 of 278
Controls
121Reference
At a glance
Driving tips
Communications
Navigation
Entertainment
Mobility
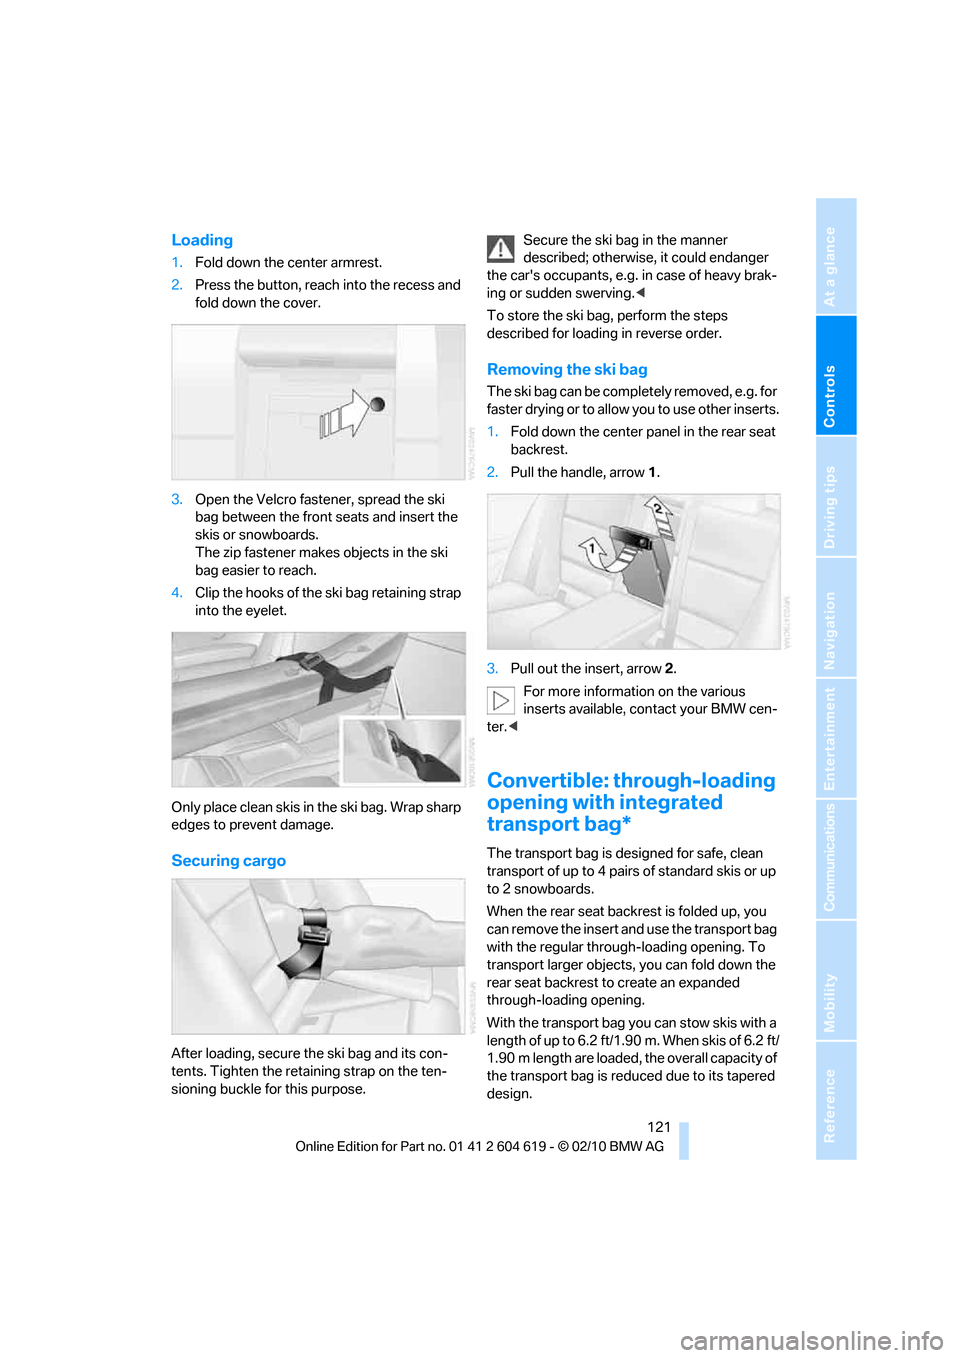
Loading
1.Fold down the center armrest.
2.Press the button, reach into the recess and
fold down the cover.
3.Open the Velcro fastener, spread the ski
bag between the front seats and insert the
skis or snowboards.
The zip fastener makes objects in the ski
bag easier to reach.
4.Clip the hooks of the ski bag retaining strap
into the eyelet.
Only place clean skis in the ski bag. Wrap sharp
edges to prevent damage.
Securing cargo
After loading, secure the ski bag and its con-
tents. Tighten the retaining strap on the ten-
sioning buckle for this purpose.Secure the ski bag in the manner
described; otherwise, it could endanger
the car's occupants, e.g. in case of heavy brak-
ing or sudden swerving.<
To store the ski bag, perform the steps
described for loading in reverse order.
Removing the ski bag
The ski bag can be completely removed, e.g. for
faster drying or to allow you to use other inserts.
1.Fold down the center panel in the rear seat
backrest.
2.Pull the handle, arrow1.
3.Pull out the insert, arrow 2.
For more information on the various
inserts available, contact your BMW cen-
ter.<
Convertible: through-loading
opening with integrated
transport bag*
The transport bag is designed for safe, clean
transport of up to 4 pairs of standard skis or up
to 2 snowboards.
When the rear seat backrest is folded up, you
can remove the insert and use the transport bag
with the regular through-loading opening. To
transport larger objects, you can fold down the
rear seat backrest to create an expanded
through-loading opening.
With the transport bag you can stow skis with a
length of up to 6.2 ft/1.90 m. When skis of 6.2 ft/
1.90 m length are loaded, the overall capacity of
the transport bag is reduced due to its tapered
design.
Page 124 of 278
Practical interior accessories
122
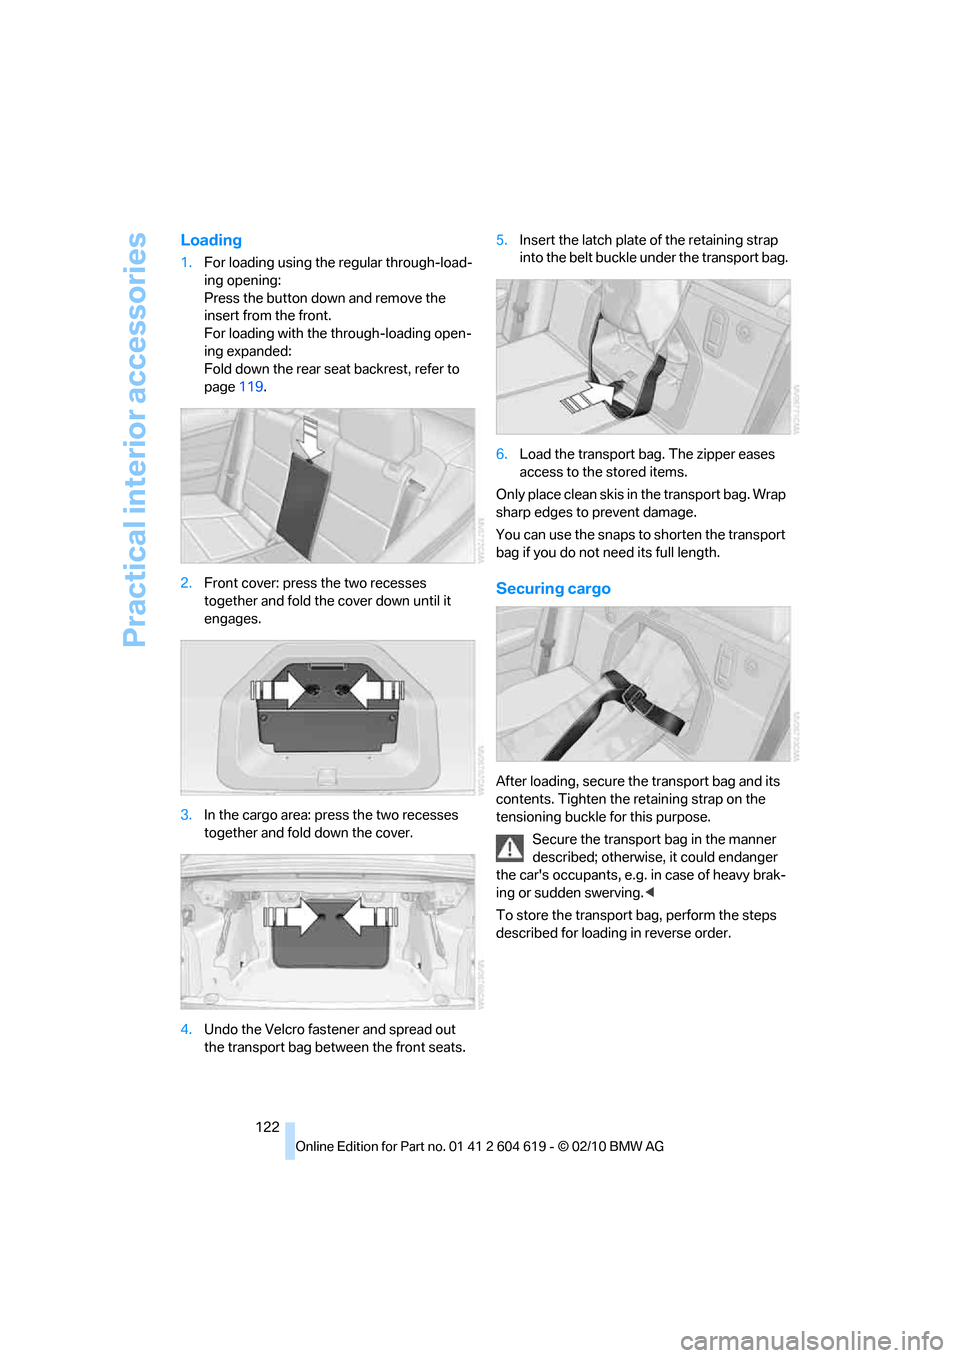
Loading
1.For loading using the regular through-load-
ing opening:
Press the button down and remove the
insert from the front.
For loading with the through-loading open-
ing expanded:
Fold down the rear seat backrest, refer to
page119.
2.Front cover: press the two recesses
together and fold the cover down until it
engages.
3.In the cargo area: press the two recesses
together and fold down the cover.
4.Undo the Velcro fastener and spread out
the transport bag between the front seats.5.Insert the latch plate of the retaining strap
into the belt buckle under the transport bag.
6.Load the transport bag. The zipper eases
access to the stored items.
Only place clean skis in the transport bag. Wrap
sharp edges to prevent damage.
You can use the snaps to shorten the transport
bag if you do not need its full length.
Securing cargo
After loading, secure the transport bag and its
contents. Tighten the retaining strap on the
tensioning buckle for this purpose.
Secure the transport bag in the manner
described; otherwise, it could endanger
the car's occupants, e.g. in case of heavy brak-
ing or sudden swerving.<
To store the transport bag, perform the steps
described for loading in reverse order.
Page 129 of 278
Driving tips
127Reference
At a glance
Controls
Communications
Navigation
Entertainment
Mobility
Drive defensively
Avoid unnecessary acceleration and braking
maneuvers. To do so, keep an adequate dis-
tance between you and the vehicle in front of
you. A defensive and smooth driving style
keeps fuel consumption down.
Avoid high engine speeds
Only use first gear when setting off. In second
and higher gears, accelerate without hesitation
or pauses. When accelerating, shift up before
reaching high engine speeds.
When you reach the desired speed, shift into
the highest applicable gear and drive with the
engine speed as low as possible and at a con-
stant speed.
As a rule: driving at low engine speeds lowers
fuel consumption and reduces wear.
Coasting
When approaching a red light, take your foot off
the accelerator and coast to a stop in the high-
est applicable gear.
On a downhill slope, take your foot off the accel-
erator and coast in a suitable gear.
The fuel supply is interrupted when coasting.
Switch off the engine during lengthy
stops
Switch off the engine when stopping for lengthy
periods, e.g. at traffic lights, railroad crossings
or in traffic congestions. You achieve fuel sav-
ings even if standing time is as short as approx.
4 seconds.
Switch off functions you do not need at
the moment
Functions such as the air conditioner, seat
heating or rear window defroster draw large
amounts of power and consume additional fuel.
Especially in city traffic and in stop and go driv-
ing they have a considerable impact. Therefore,
switch these functions off when they are not
really needed.
Have the vehicle serviced
Have the vehicle serviced regularly to achieve
good economy and a long vehicle life. BMW
recommends having the vehicle serviced at a
BMW center. Also note the BMW service sys-
tem, refer to page227.
General driving notes
Close the trunk lid
Operate the vehicle only when the trunk
lid is closed. Otherwise, exhaust fumes
could enter the interior of the vehicle.<
If the vehicle must be driven with the trunk lid
open:
1.Close all windows and the glass roof.
2.Greatly increase the air volume of the auto-
matic climate control system, refer to
page108.
Hot exhaust system
In all vehicles, extremely high tempera-
tures are generated in the exhaust sys-
tem. Do not remove the heat shields installed
adjacent to various sections of the exhaust sys-
tem, and never apply undercoating to them.
When driving, standing at idle and while park-
ing, take care to avoid possible contact
between the hot exhaust system and any highly
flammable materials such as hay, leaves, grass,
etc. Such contact could lead to a fire, with the
risk of serious personal injuries and property
damage. Do not touch hot exhaust tail pipes.
Otherwise, there is a risk of burns.<
Hydroplaning
When driving on wet or slushy roads,
reduce road speed. If you do not, a wedge
of water can form between tires and road sur-
face. This situation, known as hydroplaning,
means that the tire can completely lose contact
with the road surface, so that neither the car can
be steered nor the brake be properly applied.<
The risk of hydroplaning increases with declin-
ing tread depth on the tires, refer also to Mini-
mum tread depth on page219.
Page 130 of 278
Things to remember when driving
128
Driving through water
Drive through water on the road only if it is
not deeper than 1 ft/30 cm, and then only
at walking speed at the most. Otherwise, the
vehicle's engine, the electrical systems and the
transmission may be damaged.<
Use the parking brake on inclines
On inclines, do not hold the vehicle for a
lengthy period using the clutch; use the
parking brake instead. Otherwise, greater
clutch wear will result.<
For more information about the drive-off assis-
tant, refer to page92.
Braking safely
Your BMW is equipped with ABS as a standard
feature. Applying the brakes fully is the most
effective way of braking in situations in which
this is necessary. Since the vehicle maintains
steering responsiveness, you can still avoid
possible obstacles with a minimum of steering
effort.
Pulsation of the brake pedal, combined with
sounds from the hydraulic circuits, indicate that
ABS is in its active mode.
Driving in wet conditions
When roads are wet or there is heavy rain,
briefly exert gentle pressure on the brake pedal
every few miles. Monitor traffic conditions to
ensure that this maneuver does not endanger
other road users. The heat generated in this
process helps dry the pads and rotors to ensure
that full braking efficiency will then be available
when you need it.
Hills
To prevent overheating and the resulting
reduced efficiency of the brake system,
drive long or steep downhill gradients in the
gear in which the least braking is required. Even
light but consistent brake pressure can lead to
high temperatures, brake wear and possibly
even brake failure.
sary. This strategy helps you avoid placing
excessive loads on the brake system. Down-
shifting in manual mode of the automatic trans-
mission, refer to page59.
Sports automatic transmission with dou-
ble clutch: never drive with the transmis-
sion in neutral or with the engine switched off;
otherwise, there will be no engine braking
action and no power assistance to the brakes
and steering.
Manual transmission: never drive with the
clutch held down, with the transmission in neu-
tral or with the engine switched off; otherwise,
engine braking action will not be present or
there will be no power assistance to the brakes
or steering.
Never allow floor mats, carpets or any other
objects to protrude into the area around the
pedals; otherwise, pedal function could be
impaired.<
Corrosion on brake rotors
When the vehicle is driven only occasionally,
during extended periods when the vehicle is not
used at all, and in operating conditions where
brake applications are less frequent, there is an
increased tendency for corrosion to form on
rotors, while contaminants accumulate on the
brake pads. This occurs because the minimum
pressure which must be exerted by the pads
during brake applications to clean the rotors is
not reached.
Should corrosion form on the brake rotors, the
brakes will tend to respond with a pulsating
effect that even extended application will fail to
cure.
When the vehicle is parked
Condensation forms while the automatic cli-
mate control is in operation, and then exits
under the vehicle. Traces of condensed water
under the vehicle are therefore normal.
Page 143 of 278
Navigation
Driving tips
141Reference
At a glance
Controls
Communications
Entertainment
Mobility
Specifying the street
If the system cannot recognize a street, it dis-
plays a street name in the vicinity or the coordi-
nates of the destination.
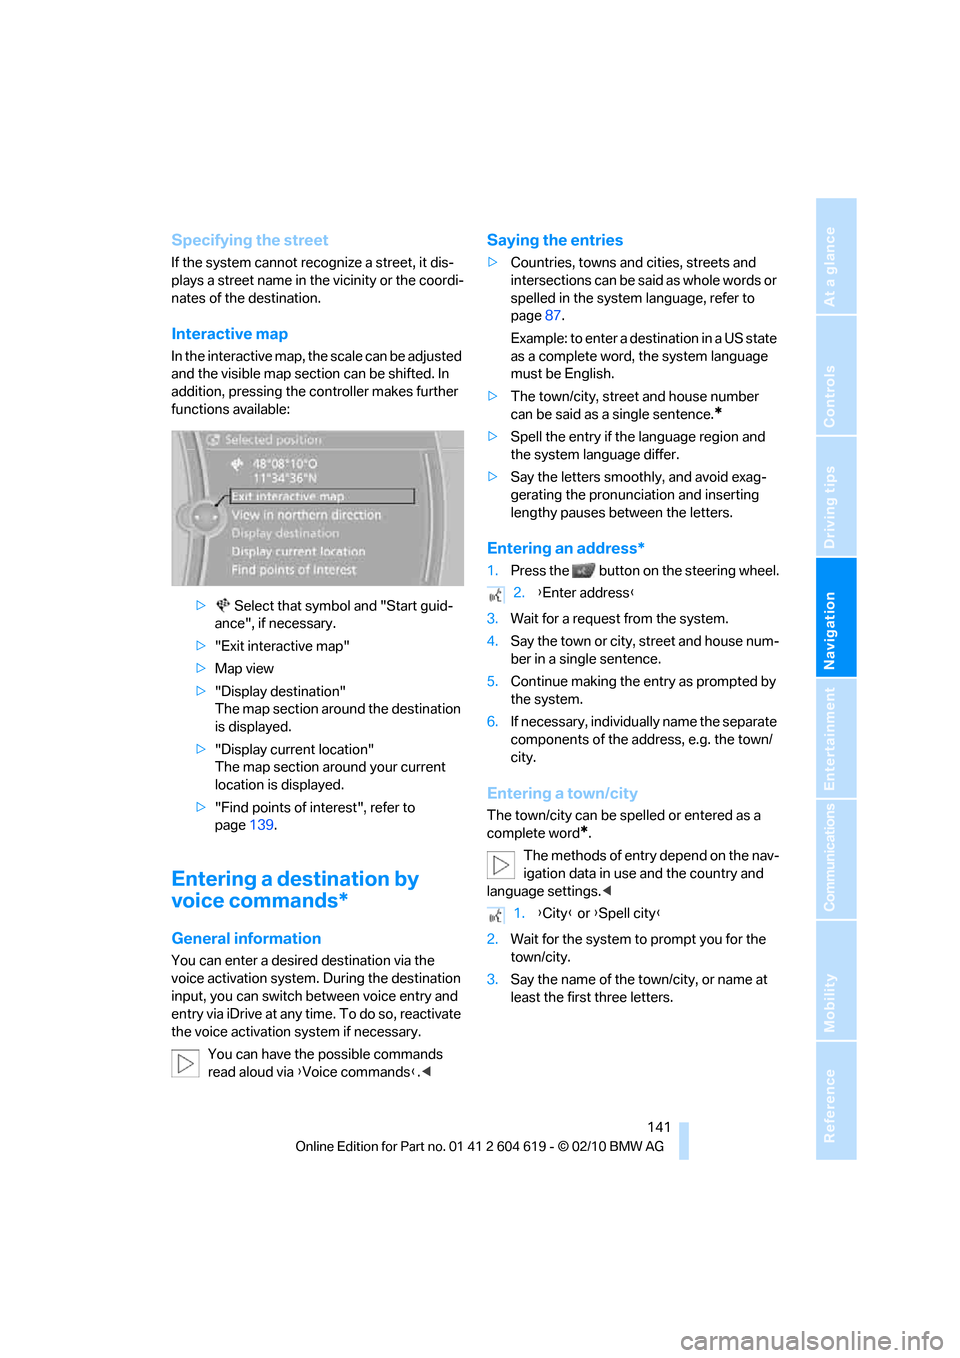
Interactive map
In the interactive map, the scale can be adjusted
and the visible map section can be shifted. In
addition, pressing the controller makes further
functions available:
> Select that symbol and "Start guid-
ance", if necessary.
>"Exit interactive map"
>Map view
>"Display destination"
The map section around the destination
is displayed.
>"Display current location"
The map section around your current
location is displayed.
>"Find points of interest", refer to
page139.
Entering a destination by
voice commands*
General information
You can enter a desired destination via the
voice activation system. During the destination
input, you can switch between voice entry and
entry via iDrive at any time. To do so, reactivate
the voice activation system if necessary.
You can have the possible commands
read aloud via {Voice commands}.<
Saying the entries
>Countries, towns and cities, streets and
intersections can be said as whole words or
spelled in the system language, refer to
page87.
Example: to enter a destination in a US state
as a complete word, the system language
must be English.
>The town/city, street and house number
can be said as a single sentence.
*
>Spell the entry if the language region and
the system language differ.
>Say the letters smoothly, and avoid exag-
gerating the pronunciation and inserting
lengthy pauses between the letters.
Entering an address*
1.Press the button on the steering wheel.
3.Wait for a request from the system.
4.Say the town or city, street and house num-
ber in a single sentence.
5.Continue making the entry as prompted by
the system.
6.If necessary, individually name the separate
components of the address, e.g. the town/
city.
Entering a town/city
The town/city can be spelled or entered as a
complete word
*.
The methods of entry depend on the nav-
igation data in use and the country and
language settings.<
2.Wait for the system to prompt you for the
town/city.
3.Say the name of the town/city, or name at
least the first three letters.
2.{Enter address}
1.{City} or {Spell city}
Page 147 of 278
Navigation
Driving tips
145Reference
At a glance
Controls
Communications
Entertainment
Mobility
5.Select additional route criteria, if desired.
Where possible, the selected criteria will be
avoided on the route.
>Avoid highways where possible:
"Avoid highways"
>Avoid toll roads where possible:
"Avoid toll roads"
>Avoid ferries where possible:
"Avoid ferries"
The setting applies to the current route and to
the planning of future routes.
Dynamic destination guidance
"Dynamic guidance" is switched on:
The route is automatically changed in the event
of traffic obstructions. The system does not
point out traffic obstructions along the original
route.
Depending on the type of road and the nature
and length of the traffic obstruction, the route
can also be calculated so that you travel
through the traffic obstruction.
Activating Dynamic destination
guidance
1."Navigation"
2.Open "Options".
3."Dynamic guidance"
If the "Avoid highways", "Avoid toll roads"
or "Avoid ferries" route criteria are
selected, route calculation may take consider-
ably longer.<
Route
General information
Depending on the equipment in your vehicle,
various views of the route are available during
destination guidance.
>List of streets and towns/cities
>Map view, refer to page146
Displaying a list of the streets or towns/
cities on the route
When destination guidance is started, a list of
the streets and towns/cities on the route is dis-
played. The driving distances and traffic bulle-
tins are displayed for each route section.
1."Navigation"
2."Route information"
3.Highlight a section.
The section is displayed in the preview map.
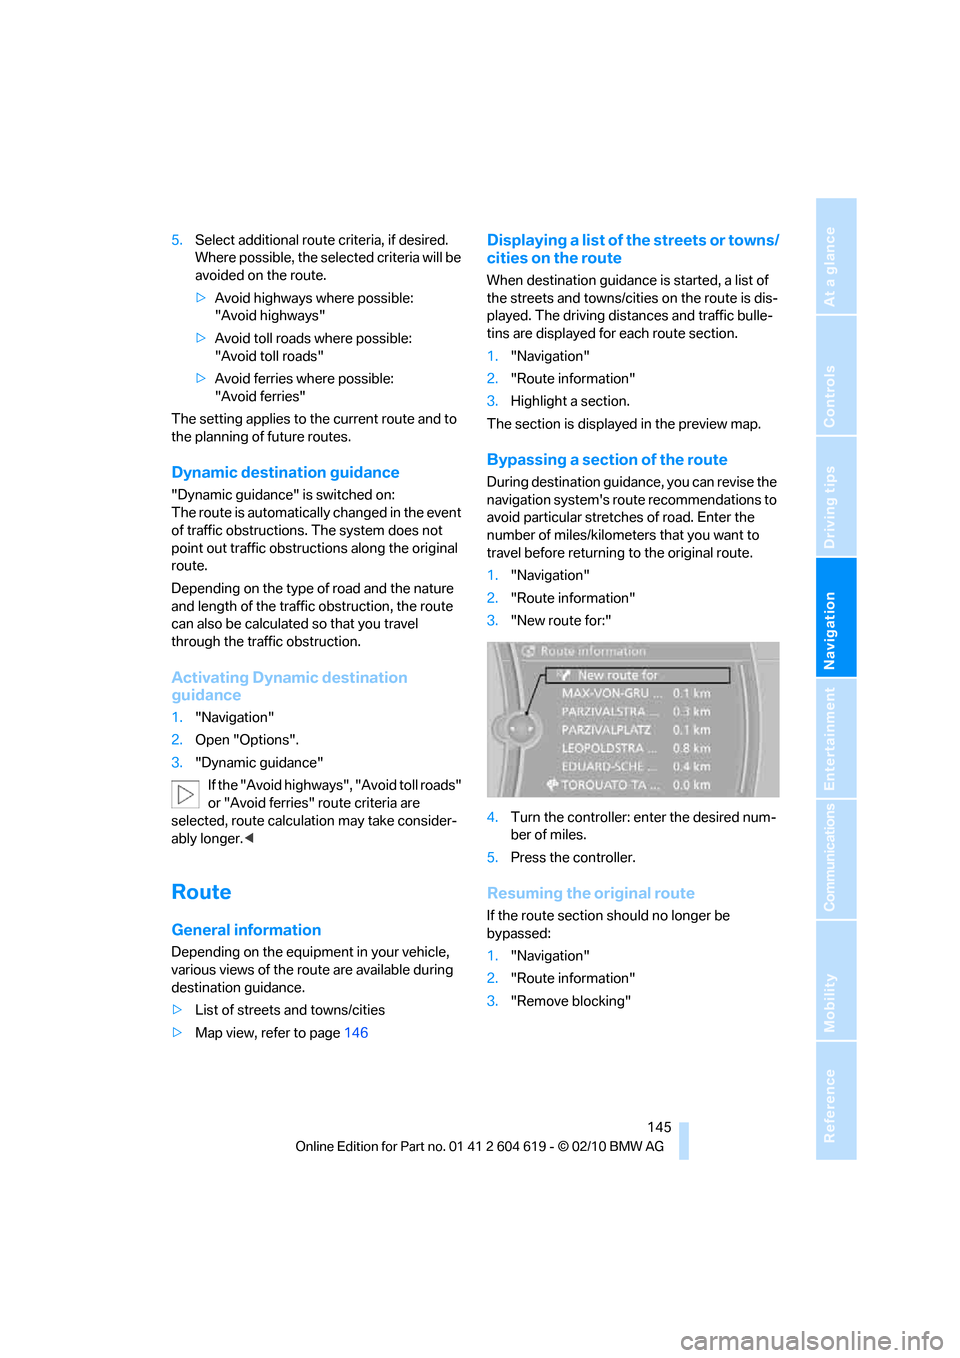
Bypassing a section of the route
During destination guidance, you can revise the
navigation system's route recommendations to
avoid particular stretches of road. Enter the
number of miles/kilometers that you want to
travel before returning to the original route.
1."Navigation"
2."Route information"
3."New route for:"
4.Turn the controller: enter the desired num-
ber of miles.
5.Press the controller.
Resuming the original route
If the route section should no longer be
bypassed:
1."Navigation"
2."Route information"
3."Remove blocking"
Page 151 of 278
Navigation
Driving tips
149Reference
At a glance
Controls
Communications
Entertainment
Mobility
Traffic bulletins in a list
A list of the traffic bulletins can be opened via
the menu or map view.
Opening traffic bulletins
1."Navigation"
2."Map"
3.Move the controller to the left, if necessary.
4.Select the symbol: "Traffic Info"
First, the traffic bulletins on the planned
route are displayed. The traffic bulletins are
sorted in the order of their distance from the
current vehicle position.
5.Select a traffic bulletin.
Additional information can be displayed for
some traffic bulletins:
1.Select the symbol.
2.Additional information is displayed.
3.To exit from the menu:
Move the controller to the left.
Traffic bulletins in the map
When the traffic bulletin map is activated, the
Control Display changes to a grayscale display.
This enables a better view of the traffic bulle-
tins. The day/night mode is disregarded in this
setting. The symbols for the special destina-
tions are no longer displayed.
1."Navigation"
2."Map"
3.Open "Options".
4."Settings"
5."Traffic conditions/gray map"
Symbols in the map view
Depending on the scale of the map and the
location of the traffic obstruction along the
route, the symbols for the traffic obstructions
are displayed.
Additional information in the map view
Depending on the map scale, a traffic obstruc-
tion's length, direction and impact are displayed
on the map using triangles or gray bars along
the calculated route. The colors displayed
depend on the information transmitted by the
traffic information service.
>Red: traffic jam
>Orange: stop-and-go traffic
>Yellow: heavy traffic
>Green: traffic flowing freely
>Gray: general traffic information, e.g. con-
struction zone
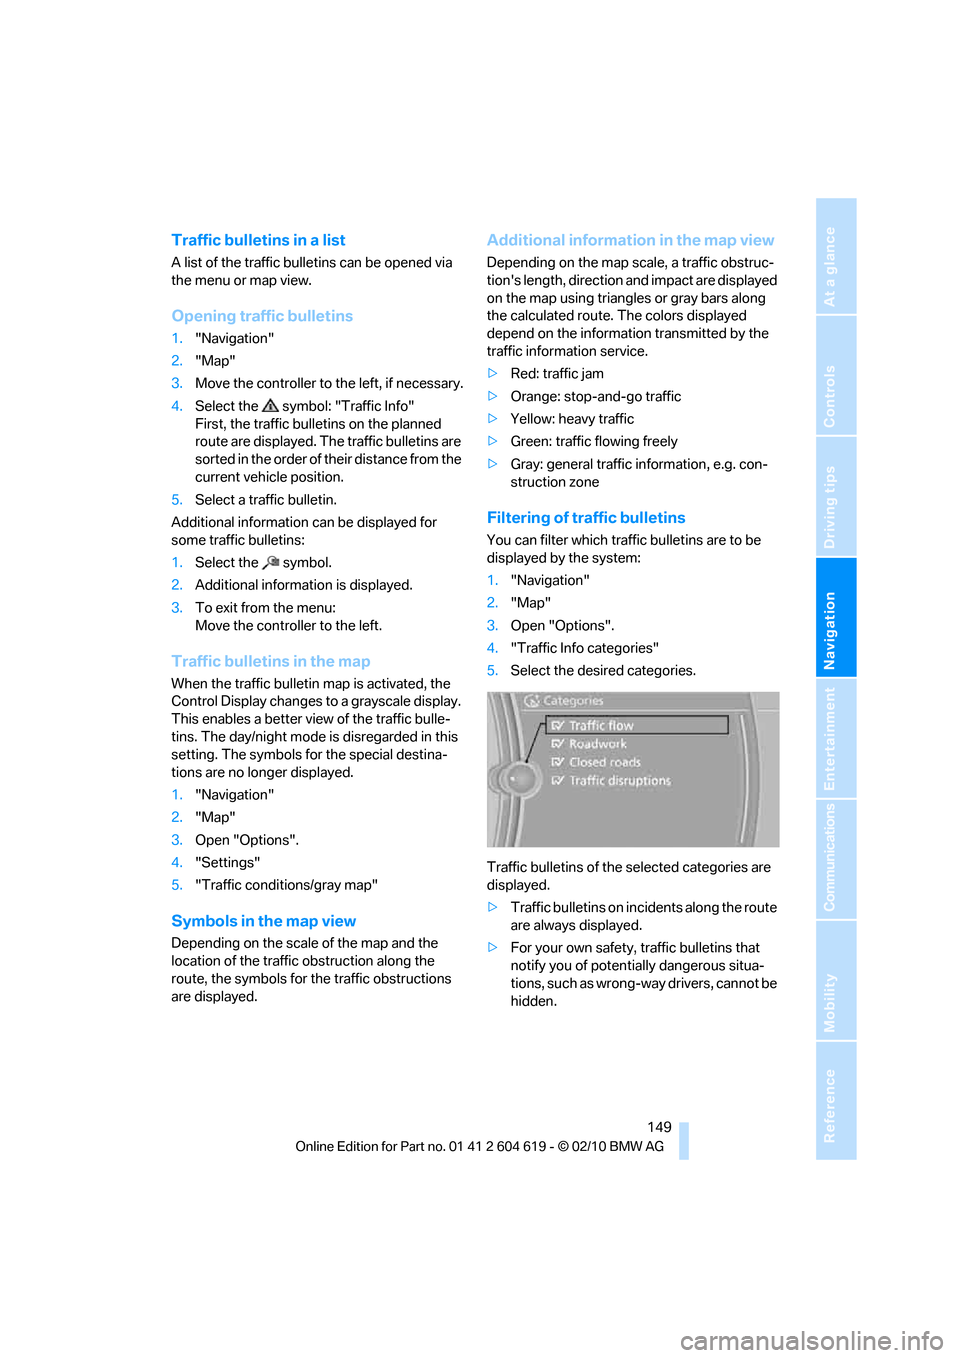
Filtering of traffic bulletins
You can filter which traffic bulletins are to be
displayed by the system:
1."Navigation"
2."Map"
3.Open "Options".
4."Traffic Info categories"
5.Select the desired categories.
Traffic bulletins of the selected categories are
displayed.
>Traffic bulletins on incidents along the route
are always displayed.
>For your own safety, traffic bulletins that
notify you of potentially dangerous situa-
tions, such as wrong-way drivers, cannot be
hidden.