2011 BMW 328I COUPE Tire
[x] Cancel search: TirePage 5 of 278

Reference
At a glance
Controls
Driving tips
Communications
Navigation
Entertainment
Mobility
Contents
The quickest way to find special topics is to
consult the index, refer to page258.
Using this Owner's Manual
4Notes
7Reporting safety defects
At a glance
10Cockpit
16iDrive
21Letters and numbers
22Voice activation system
Controls
26Opening and closing
42Adjustments
52Transporting children safely
55Driving
75Controls overview
88Technology for driving comfort and
safety
101Lamps
106Climate
111Practical interior accessories
Driving tips
126Things to remember when driving
Navigation
134Navigation system
135Destination entry
144Destination guidance
151What to do if …
Entertainment
154On/off and tone
157Radio
160Satellite radio
165CD/DVD player and CD changer
172Music collection
177External devices
Communications
184Telephone
196Contacts
198BMW Assist
Mobility
206Refueling
208Wheels and tires
222Under the hood
227Maintenance
229Care
233Replacing components
238Giving and receiving assistance
Reference
246Technical data
251Short commands for the voice activation
system
258Everything from A to Z
Page 7 of 278

5Reference
At a glance
Controls
Driving tips
Communications
Navigation
Entertainment
Mobility
The individual vehicle
When you ordered your BMW, you chose vari-
ous items of equipment. This Owner's Manual
describes the entire array of options and equip-
ment available with a specific BMW model.
Please bear in mind that the manual may con-
tain information on accessories and equipment
that you have not specified for your own vehicle.
Sections describing options and special equip-
ment are marked by asterisks
* to assist you in
identifying possible differences between the
descriptions in this manual and your own vehi-
cle's equipment.
If equipment in your BMW is not described in
this Owner's Manual, please refer to the accom-
panying Supplementary Owner's Manuals.
Editorial notice
BMW pursues a policy of continuous, ongoing
development that is conceived to ensure that
our vehicles continue to embody the highest
quality and safety standards combined with
advanced, state-of-the-art technology. For this
reason, it is possible in exceptional cases that
features described in this Owner's Manual
could differ from those on your vehicle.
For your own safety
Maintenance and repair
Advanced technology, e.g. the use of
modern materials and powerful electron-
ics, requires specially adapted maintenance
and repair methods. You should therefore have
the corresponding work on your vehicle per-
formed only by your BMW center or at a work-
shop that works according to BMW repair pro-
cedures with correspondingly trained
personnel. If this work is not carried out prop-
erly, there is a danger of subsequent damage
and related safety hazards.<
Parts and accessories
For your own safety, use genuine parts
and accessories approved by BMW.
When you purchase accessories tested and
approved by BMW and Original BMW Parts, you
simultaneously acquire the assurance that they
have been thoroughly tested by BMW to ensure
optimum performance when installed on your
vehicle.
BMW warrants these parts to be free from
defects in material and workmanship.
BMW will not accept any liability for damage
resulting from installation of parts and accesso-
ries not approved by BMW.
BMW cannot test every product made by other
manufacturers to verify if it can be used on a
BMW safely and without risk to either the vehi-
cle, its operation, or its occupants.
Original BMW Parts, BMW Accessories and
other products approved by BMW, together
with professional advice on using these items,
are available from all BMW centers.
Installation and operation of accessories not
approved by BMW, such as alarms, radios,
amplifiers, radar detectors, wheels, suspension
components, brake dust shields, telephones,
including operation of any mobile phone from
within the vehicle without using an externally
mounted antenna, or transceiver equipment, for
instance, CBs, walkie-talkies, ham radio or sim-
ilar accessories, may cause extensive damage
to the vehicle, compromise its safety, interfere
with the vehicle's electrical system or affect the
validity of the BMW Limited Warranty. See your
BMW center for additional information.<
Maintenance, replacement, or repair of
the emission control devices and sys-
tems may be performed by any automotive
repair establishment or individual using any
certified automotive part.<
Page 13 of 278

At a glance
11Reference
Controls
Driving tips
Communications
Navigation
Entertainment
Mobility
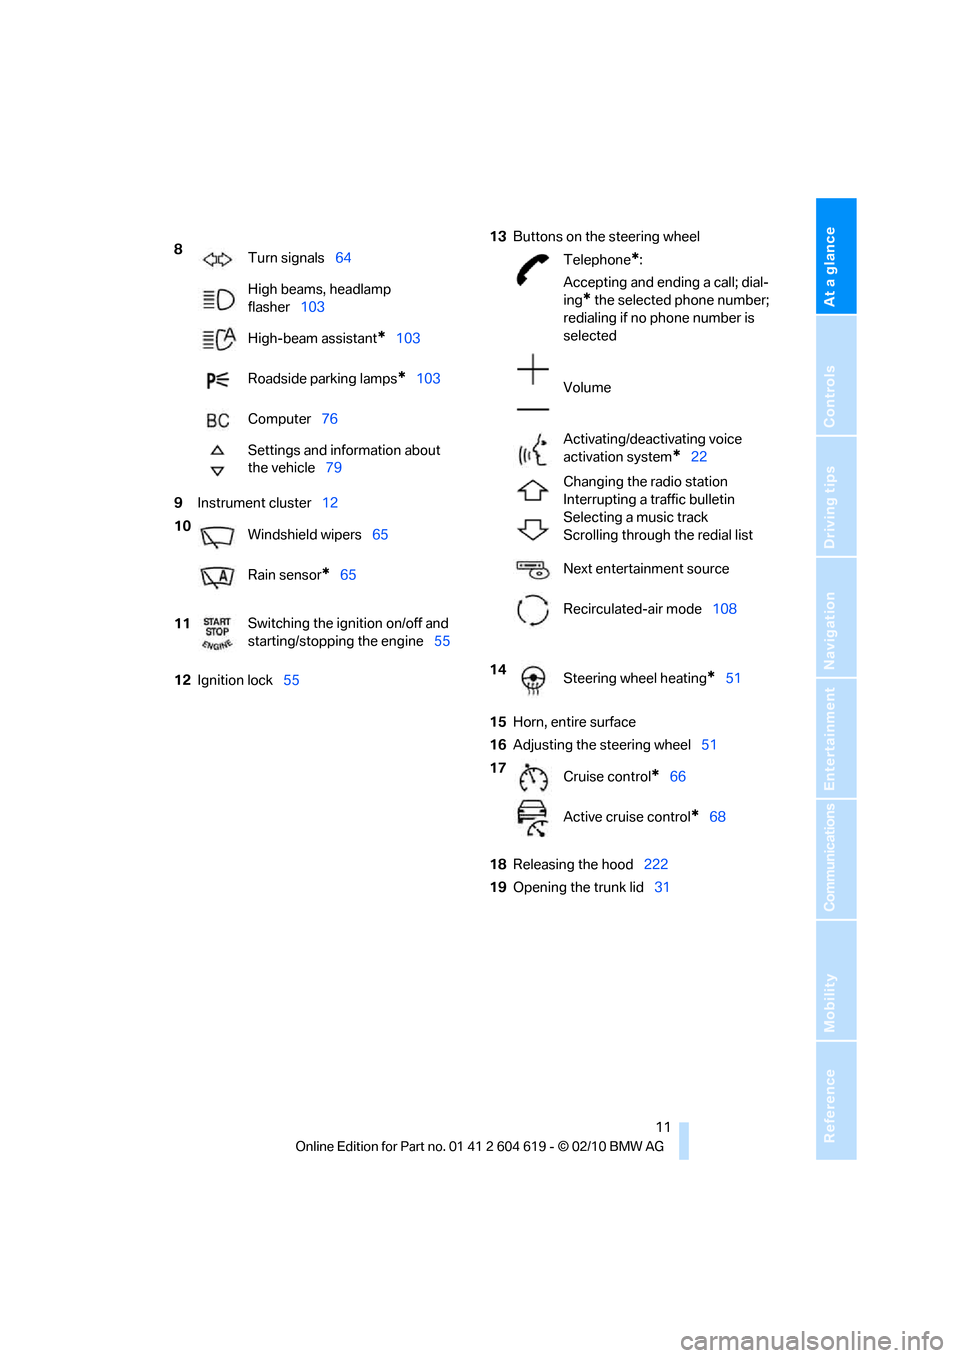
9Instrument cluster12
12Ignition lock5513Buttons on the steering wheel
15Horn, entire surface
16Adjusting the steering wheel51
18Releasing the hood222
19Opening the trunk lid31 8
Turn signals64
High beams, headlamp
flasher103
High-beam assistant
*103
Roadside parking lamps
*103
Computer76
Settings and information about
the vehicle79
10
Windshield wipers65
Rain sensor
*65
11Switching the ignition on/off and
starting/stopping the engine55
Telephone*:
Accepting and ending a call; dial-
ing
* the selected phone number;
redialing if no phone number is
selected
Volume
Activating/deactivating voice
activation system
*22
Changing the radio station
Interrupting a traffic bulletin
Selecting a music track
Scrolling through the redial list
Next entertainment source
Recirculated-air mode108
14
Steering wheel heating
*51
17
Cruise control
*66
Active cruise control
*68
Page 30 of 278

Opening and closing
28
Setting unlocking characteristics
You can set whether only the driver's door or
the entire vehicle is to be unlocked when the
button is pressed for the first time.
1."Settings"
2."Door locks"
3."Unlock button"
4.Select a menu item:
>"All doors"
Press the button once to unlock the
entire vehicle.
>"Driver's door only"
Pressing the button once unlocks
the driver's door and fuel filler flap.
Press the button twice to unlock the
entire vehicle.
5.Press the controller.
Coupe: convenient opening
Hold the button down.
The windows and the glass roof
* are opened.
Convertible: convenient opening*
When you are close to the vehicle, the remote
control for Comfort Access can be used to open
the retractable hardtop.
Hold the button down.
The windows and the retractable hardtop are
opened if the doors are closed.
If you continue pressing the button, the win-
dows move up.
Watch during the opening process to
ensure that no one is injured. Releasing
the button interrupts the opening process.<
Locking
Press the button.
Convertible: convenient closing*
When you are close to the vehicle, the remote
control for Comfort Access can be used to
close the retractable hardtop and the windows.
Hold the button down.
The retractable hardtop and the windows are
closed.
Watch during the closing process to
ensure that no one is injured. Releasing
the button interrupts the closing process.<
Switching on interior lamps
While the car is locked:
Press the button.
You can also use this function to locate your
vehicle in parking garages etc.
Unlocking the trunk lid
Press the button for approx. 1 second.
The trunk lid opens a short distance, regardless
of whether it was locked or unlocked.
The trunk lid swings back and up when
opened. Ensure that there is sufficient
clearance. To avoid locking yourself out by
accident, do not place the remote control in the
cargo area. A previously locked trunk lid is
locked again after closing.
Before and after each trip, check that the trunk
lid has not been inadvertently unlocked.<
Convertible: convenient loading*
When you are close to the vehicle, the remote
control for Comfort Access can be used to par-
tially raise the open hardtop for more conve-
nient loading of the cargo area.
1.Briefly press the button and, within one
second, press again and hold until the
retractable hardtop stops in an intermediate
position. The trunk lid opens slightly.
2.Open the trunk lid, press the cargo area
partition upward and stow the cargo in the
cargo area.
Page 49 of 278

Controls
47Reference
At a glance
Driving tips
Communications
Navigation
Entertainment
Mobility
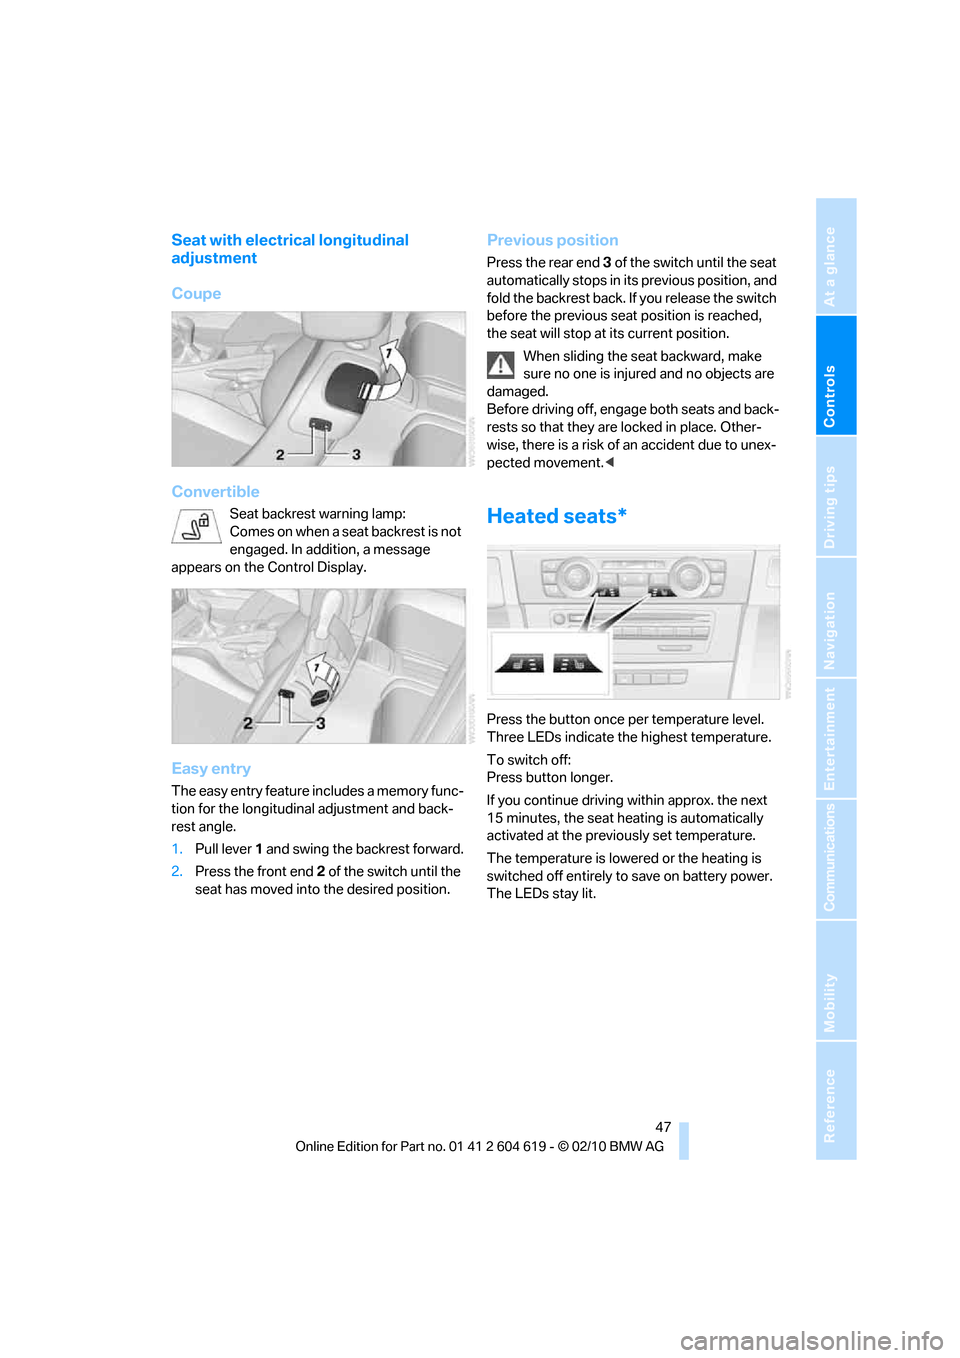
Seat with electrical longitudinal
adjustment
Coupe
Convertible
Seat backrest warning lamp:
Comes on when a seat backrest is not
engaged. In addition, a message
appears on the Control Display.
Easy entry
The easy entry feature includes a memory func-
tion for the longitudinal adjustment and back-
rest angle.
1.Pull lever 1 and swing the backrest forward.
2.Press the front end 2 of the switch until the
seat has moved into the desired position.
Previous position
Press the rear end 3 of the switch until the seat
automatically stops in its previous position, and
fold the backrest back. If you release the switch
before the previous seat position is reached,
the seat will stop at its current position.
When sliding the seat backward, make
sure no one is injured and no objects are
damaged.
Before driving off, engage both seats and back-
rests so that they are locked in place. Other-
wise, there is a risk of an accident due to unex-
pected movement.<
Heated seats*
Press the button once per temperature level.
Three LEDs indicate the highest temperature.
To switch off:
Press button longer.
If you continue driving within approx. the next
15 minutes, the seat heating is automatically
activated at the previously set temperature.
The temperature is lowered or the heating is
switched off entirely to save on battery power.
The LEDs stay lit.
Page 94 of 278

Technology for driving comfort and safety
92
Drive-off assistant
The drive-off assistant enables you to drive off
smoothly on uphill gradients. It is not necessary
to use the parking brake for this.
1.Hold the car in place by depressing the
brake.
2.Release the brake and drive off without
delay.
The drive-off assistant holds the car in
place for approx. 2 seconds after the
brake is released. Drive off without delay after
releasing the brake. Otherwise, the drive-off
assistant will no longer hold the car in place
after approx. 2 seconds and the car will start to
roll backwards.<
Flat Tire Monitor FTM*
The concept
The system does not measure the actual infla-
tion pressure in the tires.
The system detects a tire pressure loss due to
speed comparisons among the individual
wheels as you drive.
In the event of pressure loss, the rolling circum-
ference changes and, thus, the rotating speed
of the affected wheel. The system detects this
and reports it as a flat tire.
Functional requirement
The system has to have been initialized at the
correct inflation pressure; otherwise, a reliable
reporting of a flat tire is not assured.
Each time a tire inflation pressure has been cor-
rected or a wheel or tire has been changed,
reinitialize the system.
System limitations
It is impossible to provide advance warn-
ing of sudden, severe tire damage caused
by outside influences.<
The system will not detect a natural, uniform
pressure loss in all four tires. Therefore you
should check the inflation pressure regularly.
In the following situations, the system could be
delayed or malfunction:
>System has not been initialized
>Driving on snowy or slippery road surface
>Performance-oriented style of driving: slip
in the drive wheels, high lateral acceleration
>Driving with snow chains
*
Status display
The current status of the Flat Tire Monitor can
be displayed on the Control Display, e.g.
whether or not the FTM is active.
1."Vehicle Info"
2."Vehicle status"
3."Flat Tire Monitor"
The status is displayed.
Page 95 of 278

Controls
93Reference
At a glance
Driving tips
Communications
Navigation
Entertainment
Mobility
Initialization
In the initialization, the set inflation pressures
are adopted as reference values for the detec-
tion of a flat tire. The initialization is begun by
confirmation of the inflation pressures.
Do not initialize the system while snow chains
are attached.
1."Vehicle Info"
2."Vehicle status"
3."Reset"
4.Start the engine – do not drive away.
5.Start the initialization using "Reset".
6.Start driving.
The initialization is completed during driv-
ing, which can be interrupted at any time.
When driving resumes, the initialization is con-
tinued automatically.<
Indication of a flat tire
The warning lamps come on in yellow
and red. A message appears on the
Control Display. In addition, an
acoustic signal sounds. There is a flat
tire or substantial loss of tire pressure.
What to do in case of a flat tire
Run-flat tires
With a damaged tire, is possible to continue
driving at speeds of up to 50 mph/80 km/h.
Do not continue driving if the vehicle is
not equipped with run-flat tires, refer to
page220; continued driving could result in a
severe accident.<
When continuing to drive with a damaged tire:
1.Avoid sudden braking and steering maneu-
vers.
2.Do not exceed a speed of 50 mph/80 km/h.
3.At the next opportunity, check the air pres-
sure in all four tires.
If all four tires are inflated to the cor-
rect pressures, the Flat Tire Monitor
might not have been initialized. The system
must then be initialized.<
Possible travel distance with complete tire
pressure loss:
>With a light load:
1 to 2 persons without luggage:
Approx. 155 miles/250 km
>With a medium load:
2 persons, cargo area full, or 4 persons
without luggage:
Approx. 94 miles/150 km
>With a full load:
4 persons, cargo area full:
Approx. 30 miles/50 km
Drive cautiously and do not exceed
a speed of 50 mph/80 km/h.
When there is a tire pressure loss, the handling
characteristics change, e.g. there will be
reduced directional stability during braking,
braking distances will be longer, and self-steer-
ing response will change.<
Vibrations or loud noises during driving
may indicate the final failure of the tire.
Reduce your speed and bring the vehicle to a
stop; otherwise, tire components may become
detached, which could result in an accident.
Do not continue driving; instead, contact your
BMW center.<
Page 96 of 278

Technology for driving comfort and safety
94
Tire Pressure Monitor TPM*
The concept
Check the inflation pressure in the four installed
tires. The system notifies you if there is a signif-
icant loss of pressure in one or more tires.
Functional requirement
The system has to have been reset at the cor-
rect inflation pressure; otherwise, a reliable
reporting of a flat tire is not assured.
Always use wheels with TPM electronics to
assure a trouble-free function of the system.
Each time a tire inflation pressure has
been corrected or a wheel or tire has been
changed, reset the system.<
System limitations
It is impossible to provide advance warn-
ing of sudden, severe tire damage caused
by outside influences.<
The system does not function correctly if it has
not been reset. For example, a flat tire may be
indicated even though the tire inflation pres-
sures are correct.
The system is inactive and cannot indicate a flat
tire:
>when a wheel without TPM electronics is
installed.
>when other systems or devices that use the
same radio frequency interfere with TPM.
Status display
The current status of the TPM Tire Pressure
Monitor can be displayed on the Control Dis-
play, e.g. whether or not the TPM is active.
1."Vehicle Info"
2."Vehicle status"
3."Tire Pressure Monitor - TPM"
The status is displayed.
Status indicator on the Control Display
The color of the tires represents the status of
the tires and the system.
A change in the inflation pressure during driving
is taken into account.
A correction is only needed if TPM indicates it.
Green
The inflation pressure corresponds to the
desired state.
"TPM active" appears on the Control Display.
One wheel yellow
There is a flat tire or substantial loss of tire pres-
sure in the indicated tire.
All wheels yellow
>There is a flat tire or substantial loss of tire
pressure in several tires.
>The system was not reset after a wheel
change and will thus issue warnings at the
last initialized inflation pressures.