2011 BMW 3 SERIES phone
[x] Cancel search: phonePage 179 of 325

Lines in the map
Streets and routes are displayed in different col‐
ors and styles depending on their classification.
Dashed lines represent railways and ferry con‐
nections. Country borders are indicated by thin
lines.
Traffic obstructions
Small triangles along the planned route indicate
route sections with traffic obstructions, depend‐
ing on the map scale. The direction of the trian‐
gles indicates the direction of the obstruction.
The traffic signs indicate the significance of the
obstruction.
▷Red traffic sign: the obstruction affects the
planned route or direction.
▷Gray traffic sign: the obstruction does not
affect the planned route or direction.
Traffic bulletins, refer to page 180.
Planned route
After destination guidance is started, the plan‐
ned route is displayed on the map.
Status fields
Show/hide: press the controller.
▷Upper status field: time, telephone, and en‐
tertainment details.
▷Lower status field: symbol for active desti‐
nation guidance, status of traffic bulletins,
time of arrival, and distance to destination.
Function bar
The following functions are available in the func‐
tion bar:
Symbol Function
Start/end destination guidance.
Switch spoken instructions on/
off.
Change the route criteria.
Symbol Function
Search for a special destination.
Display traffic bulletins.
Interactive map.
Set the map view.
Change the scale.
To change to the function bar, move the con‐
troller to the left.
Changing the map section
"Interactive map"
▷To shift the map: move the controller in the
required direction.
▷To shift the map diagonally: move the con‐
troller in the required direction and turn it.
Changing the scale
1. Select the symbol.
2.To change the scale: turn the controller.
Automatically scaled map scale
In the map view facing north, turn the controller
in any direction until the AUTO scale is dis‐
played. The map shows the entire route be‐
tween the current location and the destination.
Settings for the map view
The settings are stored for the remote control
currently in use.
1."Navigation"
2."Map"
3."Options" Open.
4."Settings"
Set the map view.
▷"Day/night mode"
Select and create the necessary settings
depending on the light conditions.
Seite 179
Navigation systemNavigation
179Online Edition for Part no. 01 40 2 608 633 - 11 09 490
Page 189 of 325
Multi-channel playback,
surround
Choose between stereo and multi-channel play‐
back, surround.
Setting multi-channel playback,
surround
1."CD/Multimedia", "Radio" or "Settings"
2."Tone"
3."L7 Surround"
When surround is activated, multi-channel play‐
back is simulated when a stereo audio track is
played.
LOGIC7 and LOGIC7 logo are registered trade‐
marks of Lexicon, Inc., a Harman International
Group company.
Volume
▷"Speed volume": speed-dependent volume
control.
▷"PDC": volume of the PDC signal compared
to the entertainment sound output.
▷"Gong": volume of the signal, e. g., the safety
belt reminder, compared to the entertain‐
ment sound output.
▷"Microphone": volume of the microphone
during a phone call.
▷"Loudspeak.": volume of the loudspeakers
during a phone call.
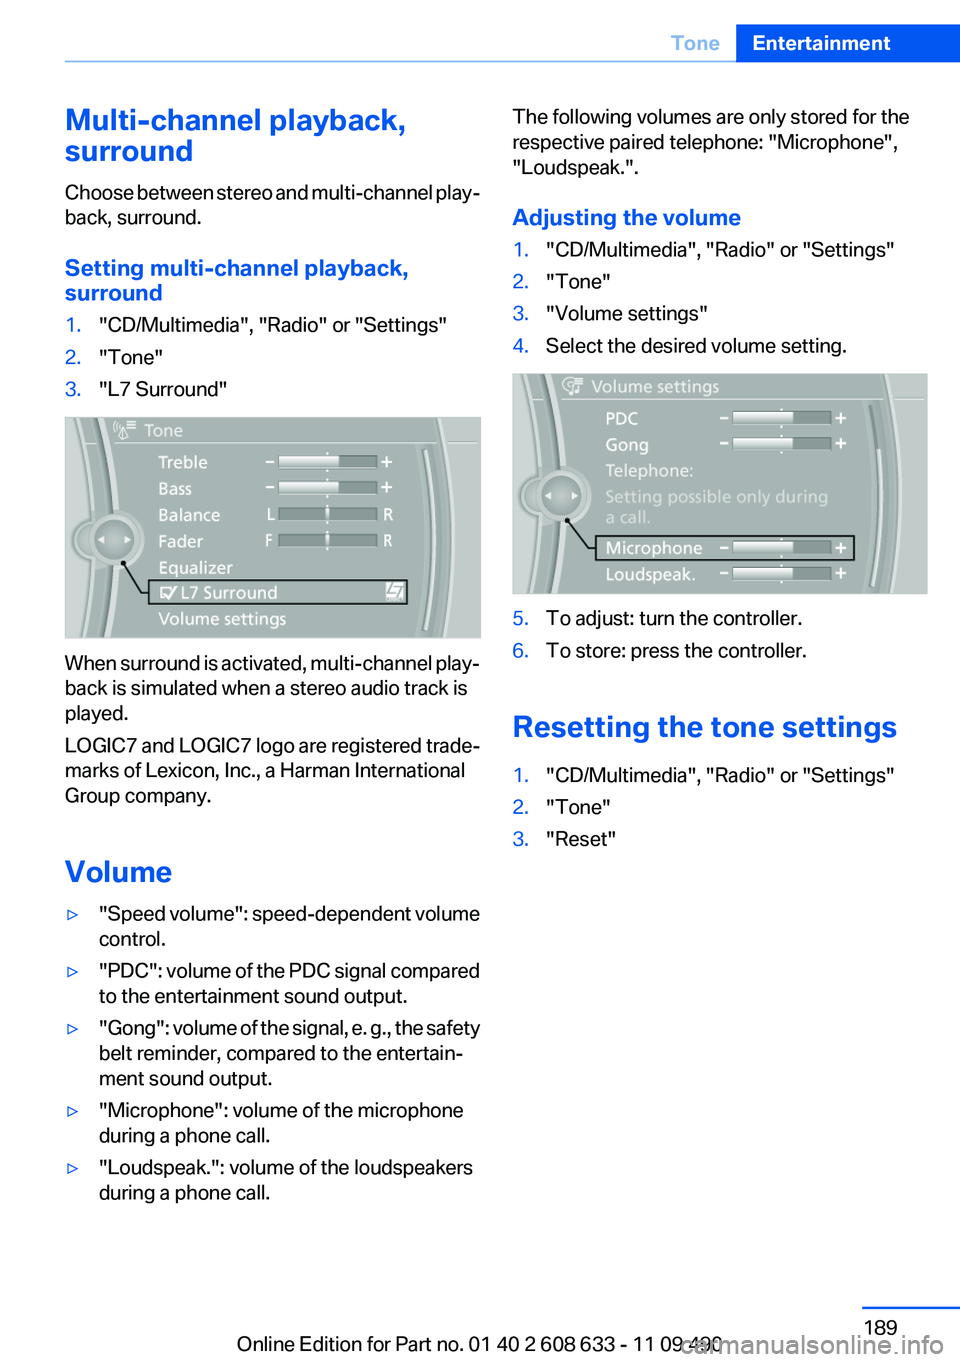
The following volumes are only stored for the
respective paired telephone: "Microphone",
"Loudspeak.".
Adjusting the volume
1."CD/Multimedia", "Radio" or "Settings"
2."Tone"
3."Volume settings"
4.Select the desired volume setting.
5.To adjust: turn the controller.
6.To store: press the controller.
Resetting the tone settings
1."CD/Multimedia", "Radio" or "Settings"
2."Tone"
3."Reset"
Seite 189
ToneEntertainment
189Online Edition for Part no. 01 40 2 608 633 - 11 09 490
Page 192 of 325

Activating/deactivating digital radio
reception
1."Radio"
2."FM" or "AM"
3."Options" Open.
4."HD Radio Reception"
The setting is stored for the remote control cur‐
rently in use.
This symbol is displayed in the status line
when the audio signal is digital.
When setting a station with a digital signal, it may
take a few seconds before the station plays in
HD quality.
In areas in which the station is not continuously
received in digital mode, the playback switches
between analog and digital reception. In this
case, switch off digital radio reception.
Displaying additional information
Some stations broadcast additional information
on the current track, such as the name of the ar‐
tist.
1.Select the desired station.
2."Options" Open.
3."Station info"
Selecting a substation
This symbol indicates that a main station also
broadcasts additional substations. The station
name of the main station ends in HD1. Station
names of the substations end in HD2, HD3, etc.
1.Select the desired station.
2.Press the controller.
3.Select the substation.
When reception is poor, the substation is muted.
Satellite radio
General information
The channels are offered in predefined pack‐
ages. The packages must be enabled by tele‐
phone.
Navigation bar overview
Symbol Function
Change the list view.
Select the category.
Direct channel entry
Timeshift
Open the My Favorites category/
open a favorite.
Manage the favorites.
Traffic Jump
With navigation system: the functions of the
navigation bar symbols can also be stored on the
programmable memory buttons, refer to
page 21.
They are stored.
Managing a subscription
To be able to enable or unsubscribe from the
channels, you must have reception. It is usually
at its best when you have an unobstructed view
of the sky. The channel name is displayed in the
status line.
Enabling channels
The Unsubscribed Channels category contains
all disabled channels.
1."Radio"
2."Satellite radio"
Seite 192
EntertainmentRadio
192Online Edition for Part no. 01 40 2 608 633 - 11 09 490
Page 193 of 325

3. "Category"
4.Select the Unsubscribed Channels cate‐
gory.
5.Select the desired channel.
The phone number and an electronic serial
number, ESN, are displayed.
6.Call the phone number to have the channel
enabled.
You can unsubscribe from the channels again
via this phone number.
Unsubscribing from channels
1."Radio"
2."Satellite radio"
3."Options" Open.
4."Manage subscription"
5.The phone number and an electronic serial
number, ESN, are displayed.
6.Call Sirius to unsubscribe from the chan‐
nels.
Selecting channels
You can only listen to enabled channels.
The selected channel is stored for the remote
control currently in use.
Via iDrive
1."Radio"
2."Satellite radio"
3.Select "All channels" or the desired cate‐
gory.
4.Select the desired channel.
Via the buttons on the center console
Press the button.
The next channel is selected.
Seite 193
RadioEntertainment
193Online Edition for Part no. 01 40 2 608 633 - 11 09 490
Page 195 of 325

Timeshift menu
Symbol Function
Go to the live broadcast
Playback/pause
Next track
Previous track
Fast forward
Reverse
Automatic timeshift deactivated/ac‐
tivated
Automatic timeshift
When the function is activated, audio playback
is stopped automatically in the event of:
▷Incoming and outgoing telephone calls.
▷Activation of the voice activation system.
▷Muting.
The audio playback then continues with a time
delay.
To activate:
1."Radio"
2."Satellite radio"
3. "Replay - Time shift"
4. "Automatic time shift"
To deactivate: "Automatic time shift".
Storing favorites
Up to 30 favorites can be stored in the favorites
list. Available favorites are artist, track, game,
league, and team.
Storing the artist, track, or game
It is only possible to store favorites that are cur‐
rently being broadcast. The channel information
must be available.
1."Radio"
2."Satellite radio"
3.If necessary, open "All channels" or the de‐
sired category.
4.Select the desired channel.
5.Press the controller again.
6.Select the artist, track, or game.
Storing the league or team
Leagues or teams can be added to the favorites
from a selection list.
1."Radio"
2."Satellite radio"
3. "Manage favorites"
4."Add sports information"
5.Select the league.
6.Select "Add all teams" or the desired team.
Opening the favorites
If an activated favorite is played back, the fol‐
lowing message appears for approx. 20 sec‐
onds: "Favorite alert!".
"Favorites"
Select the symbol while the message is shown.
Seite 195
RadioEntertainment
195Online Edition for Part no. 01 40 2 608 633 - 11 09 490
Page 197 of 325

Stored stations
General information
It is possible to store up to 40 stations.
Calling up a station
1."Radio"
2."Presets"
3.Select the desired station.
Storing a station
The station currently selected is stored.
1."Radio"
2."Presets"
3."Store station"
4.Select the desired memory location.
The list of stored stations is stored for the re‐
mote control currently in use.
With navigation system and telephone: The sta‐
tions can also be stored on the programmable
memory buttons, refer to page 21.
Without navigation system and
telephone: On radio station buttons
1.Select the desired station.
2. Press the desired button for more
than 2 seconds.
In order to call up a stored station, briefly press
corresponding button.
Deleting a station
1."Radio"
2."Presets"
3.Select the desired station.
4."Options" Open.
5."Delete entry"
Seite 197
RadioEntertainment
197Online Edition for Part no. 01 40 2 608 633 - 11 09 490
Page 206 of 325

4. Select the symbol for the CD/DVD player.
5."Store in vehicle"
The music collection is displayed and the first
track of the CD/DVD is played back. During the
storage process, the tracks are played in se‐
quence.
Observe the following during the storage proc‐
ess:
Do not switch to the CD/DVD player and do not
remove the CD/DVD from the CD/DVD player as
this will interrupt the storage process. You can
switch to the other audio sources without inter‐
rupting the storage process. Tracks from the
current CD/DVD that have already been stored
can be called up.
Interrupting storage
1."CD/Multimedia"
2."CD/DVD"
3."Storing..."
4."Cancel storing"
The storage process is interrupted and can be
continued at any time.
Continuing the storage process
1."CD/Multimedia"
2."CD/DVD"
3. Select the symbol for the CD/DVD player.
4."Continue storing"
Storage of the CD/DVD continues at the begin‐
ning of the track at which storage was inter‐
rupted.
Album information
During storage, information such as the name of
the artist is stored with the track, if this informa‐
tion is available in the vehicle database or on the
CD.
To update the database, contact your service
center.
Storing from a USB device
To store music, a suitable device must be con‐
nected to the USB interface in the glove com‐
partment.
▷Suitable devices: USB mass storage devi‐
ces, such as USB flash drives or MP3 players
with a USB interface.
▷Unsuitable devices: USB hard drives, USB
hubs, USB memory card readers with mul‐
tiple inserts, Apple iPod/iPhone. Music from
the Apple iPod/iPhone can be played via the
AUX-IN port in the center armrest.
▷File systems: popular file systems for USB
devices are supported. FAT 32 is the rec‐
ommended format.
1.Connect the USB device to the USB inter‐
face in the glove compartment, refer to
page 149.
2."CD/Multimedia"
3."Music collection"
4."Options" Open.
Seite 206
EntertainmentCD/multimedia
206Online Edition for Part no. 01 40 2 608 633 - 11 09 490
Page 210 of 325

Deleting the music collection
1."CD/Multimedia"
2."Music collection"
3.Open "Options".
4."Delete music collection"
External devices
At a glance
Symbol Meaning
AUX-IN port
USB audio interface
Mobile phone audio interface
Bluetooth audio
AUX-IN port
At a glance
▷For connecting audio devices, e.g., MP3
player. The sound is output on the vehicle
loudspeakers.
▷Recommendation: use medium tone and
volume settings on the audio device. The
tone depends on the quality of the audio
files.
Connecting
The AUX-IN port is located in the center armrest.
Connect the headphones or line-out connector
of the device to the jack plug.
Playback
1.Connect the audio device, switch it on and
select a track on the audio device.
2."CD/Multimedia"
3.If necessary. "External devices".
4. "AUX front"
The sound is played back on the vehicle loud‐
speakers.
Volume
The volume of the sound output is dependent
on the audio device. If this volume differs mark‐
edly from the volume of the other audio sources,
it is advisable to adjust the volumes.
Adjusting the volume
1."CD/Multimedia"
2.If necessary. "External devices".
3. "AUX front"
4."Volume"
5.Turn the controller until the desired volume
is set and press the controller.
USB audio interface/mobile phone
audio interface
At a glance
It is possible to connect external audio devices.
Operation can be performed via iDrive. The
sound is output on the vehicle loudspeakers.
Seite 210
EntertainmentCD/multimedia
210Online Edition for Part no. 01 40 2 608 633 - 11 09 490