2011 BMW 3 SERIES audio
[x] Cancel search: audioPage 17 of 325

2.Press.
3.Move in four directions.
Buttons on controller
Press the button Function
MENUOpen the main menu.
RADIOOpens the Radio menu.
MEDIAOpens the CD/Multimedia
menu.
NAVOpens the Navigation
menu.
TELOpens the Telephone
menu.
BACKDisplays the previous
panel.
OPTION Opens the Options menu.
Controller without navigation system
Select menu items and create settings.
1.Turn.
2.Press.
3.Move in two directions.
Buttons on controller
Press the button Function
MENUOpen the main menu.
AudioOpen audio menu last lis‐
tened to, switch between
audio menus.
TELOpens the Telephone
menu.
Seite 17
iDriveAt a glance
17Online Edition for Part no. 01 40 2 608 633 - 11 09 490
Page 20 of 325

5.Turn the controller until "Time:" is high‐
lighted, and then press the controller.
6.Turn the controller to set the hours and
press the controller.
7.Turn the controller to set the minutes and
press the controller.
Status information
Status field
The following information is displayed in the sta‐
tus field at the top right:
▷Time.
▷Current entertainment source.
▷Sound output, on/off.
▷Wireless network reception strength.
▷Telephone status.
▷Traffic bulletin reception.
Status field symbols
The symbols are grouped as follows.
Radio symbols
Symbol Meaning
Satellite radio is switched on.
Telephone symbols
Symbol Meaning
Incoming or outgoing call.
Missed call.
Wireless network reception
strength Symbol flashes: searching
for network.
Wireless network is not available.
Bluetooth is switched on.
Roaming is active.
Text message was received.
Check the SIM card.
SIM card is blocked.
SIM card is missing.
Enter the PIN.
Entertainment symbols
Symbol Meaning
CD/DVD player.
Music collection.
Gracenote® database.
AUX-IN port.
USB audio interface/mobile phone
audio interface.
USB audio interface.
Mobile phone audio interface.
Additional symbols
Symbol Meaning
Spoken instructions are switched off.
Seite 20
At a glanceiDrive
20Online Edition for Part no. 01 40 2 608 633 - 11 09 490
Page 24 of 325

respective of which menu item is currently se‐
lected, e.g., ›Vehicle status‹.
List of short commands of the voice activation
system, refer to page 306.
Help dialog for the voice activation
system
Calling up help dialog: ›Help‹
Additional commands for the help dialog:
▷›Help with examples‹: information about the
current operating options and the most im‐
portant commands for them are announced.
▷›Help with voice activation‹: information
about the principle of operation for the voice
activation system is announced.
Example: playing back a CD
1.Switch on the Entertainment sound output
if necessary.
2. Press the button on the steering
wheel.
3.›C D and multimedia‹
The medium last played is played back.
4. Press the button on the steering
wheel.
5.›C D track ...‹ e.g., CD track 4.
Setting the voice dialog
You can set whether the system should use the
standard dialog or a shorter version.
In the shorter variant of the voice dialog, the an‐
nouncements from the system are issued in an
abbreviated form.
On the Control Display:
1."Settings"
2."Language/Units"
3."Speech mode:"
4.Select the setting.
Adjusting the volume
Turn the volume button while giving an instruc‐
tion until the desired volume is set.
▷The volume remains constant even if the
volume of other audio sources is changed.
▷The volume is stored for the remote control
currently in use.
Notes on Emergency
Requests
Do not use the voice activation system to initiate
an Emergency Request. In stressful situations,
the voice and vocal pitch can change. This can
unnecessarily delay the establishment of a tel‐
ephone connection.
Instead, use the SOS button, refer to
page 290, in the vicinity of the interior mirror.
Environmental conditions
▷Say the commands, numbers, and letters
smoothly and with normal volume, empha‐
sis, and speed.
▷Always say commands in the language of
the voice activation system.
▷When selecting a radio station, use the com‐
mon pronunciation of the station name:
Seite 24
At a glanceVoice activation system
24Online Edition for Part no. 01 40 2 608 633 - 11 09 490
Page 33 of 325

Using the guest profile
The guest profile can be used to make individual
settings without affecting the three Personal
Profiles.
This can be useful for drivers who are using the
vehicle temporarily and do not have their own
profile.
1."Settings"
2."Profiles"
3.The current profile is selected.
4.Open "Guest".
5.Create the settings.
Note: the guest profile cannot be renamed.
Display profile list during start
The profile list can be displayed during each
start for selecting the desired profile.
1."Settings"
2."Profiles"
3."Options" Open.
4."Display user list at startup"
Personal Profile settings
The following functions and settings can be
stored in a profile.
More information on the settings can be found
under:
▷Active Cruise Control: collision warning.
▷Exterior mirror position.
▷CD/Multimedia: audio source listened to
last.
▷Driving Experience Switch: sport program
▷Driver's seat position: automatically re‐
trieved after unlocking.
▷Programmable memory buttons: assign‐
ment.
▷Head-up Display: selection, brightness, po‐
sition and rotation of the display.
▷Headlamp courtesy delay feature: time set‐
ting.
▷Tone: tone settings.
▷Automatic climate control/Automatic cli‐
mate control with enhanced features: set‐
tings.
▷Navigation: map views, route criteria, voice
output on/off.
▷Park Distance Control PDC: adjusting the
signal tone volume.
▷Radio: stored stations, station listened to
last, special settings.
▷Backup camera: selection of functions and
type of display.
▷Side View: selection of the display type.
▷Language on the Control Display.
▷Lane departure warning: last setting, on/off.
▷Active Blind Spot Detection: last setting, on/
off.
▷Triple turn signal activation.
▷Daytime running lights: current setting.
▷Locking the vehicle: after a brief period or
after starting to drive.
Central locking system
The concept
The central locking system becomes active
when the driver's door is closed.
The system simultaneously engages and re‐
leases the locks on the following:
▷Doors.
▷Trunk lid.
▷Fuel filler flap.
Operating from the outside
▷Via the remote control.
▷Via the door handles of the driver's and front
passenger doors.
Seite 33
Opening and closingControls
33Online Edition for Part no. 01 40 2 608 633 - 11 09 490
Page 80 of 325

System limits
Personal judgment
The system cannot serve as a substitute
for the driver's personal judgment of the traffic
situation.
The system assists the driver and does not re‐
place the human eye.◀
The system may not be fully functional and may
provide incorrect information in the following
situations:
▷In heavy fog, rain or snowfall.
▷When signs are concealed by objects.
▷When driving very close to the vehicle in
front of you.
▷When driving toward bright lights.
▷When the windshield behind the interior
rearview mirror is fogged over, dirty or cov‐
ered by a sticker, etc.
▷In the event of incorrect detection by the
camera.
▷If the speed limits stored in the navigation
system are incorrect.
▷In areas not covered by the navigation sys‐
tem.
▷When roads differ from the navigation, e.g.
due to changes in the road network.
▷When passing buses or trucks with a speed
sticker.
▷If the traffic signs are non-conforming.
▷During the calibration process of the camera
immediately after vehicle shipment.
Camera
The camera is located near the base of the mir‐
ror.
Keep windshield clean and clear in the area in
front of the interior rear view mirror.
Selection lists in the
instrument cluster
The concept
The following can be displayed or operated us‐
ing the buttons and the thumbwheel on the
steering wheel and the display in the instrument
cluster:
▷Current audio source.
▷Programs of the Driving Experience Switch.
▷Redial on telephone.
▷Activation of the voice activation system.
Display
Instrument cluster
Seite 80
ControlsDisplays
80Online Edition for Part no. 01 40 2 608 633 - 11 09 490
Page 150 of 325

Connection for an external audio
device
This can be used to connect an external audio
device, such as an MP3 player.
▷AUX-IN port, refer to page 210.
▷USB audio interface, refer to page 210.
Storage compartment in the
rear
Storage compartment is located in the rear cen‐
ter console.
Cupholders
Notes
Shatter-proof containers and no hot
drinks
Use light and shatter-proof containers and do
not transport hot drinks. Otherwise, there is the
increased danger of injury in an accident.◀
Unsuitable containers
Do not forcefully push unsuitable contain‐
ers into the cupholders. This may result in dam‐
age.◀
Front
Storage tray for front cupholders
The cupholder with the storage tray can be used
for additional storage. To do this, place the stor‐
age tray in the cupholder.
Only use the storage tray for small objects, such
as keys or the remote control.
When not in use, stow the storage tray in the
glove compartment net. Insert the storage tray
into the net so that the top surface faces up.
Note the trapezoidal shape of the net and tray.
Rear
In the center armrest.
Pull the center armrest forward at the strap.
To open: press the button.
To close: push both covers back in, one after the
other.
Pushing back the covers
Push back the covers before folding up the
center armrest; otherwise, the cupholder could
become damaged.◀
Seite 150
ControlsStorage compartments
150Online Edition for Part no. 01 40 2 608 633 - 11 09 490
Page 188 of 325

Tone
Vehicle equipment
All standard, country-specific and optional
equipment that is offered in the model series is
described in this chapter. Therefore, equipment
is also described that is not available in a vehicle,
e. g., because of the selected optional equip‐
ment or country variant. This also applies for
safety-related functions and systems.
General information
The sound settings are stored for the remote
control currently in use.
Treble, bass, balance, and
fader
▷"Treble": treble adjustment.
▷"Bass": depth adjustment.
▷"Balance": left/right volume distribution.
▷"Fader": front/rear volume distribution.
Setting treble, bass, balance, and fader
1."CD/Multimedia", "Radio" or "Settings"
2."Tone"
3.Select the desired tone settings.
4.To adjust: turn the controller.
5.To store: press the controller.
Equalizer
Setting for individual audio frequency ranges.
Adjusting the equalizer
1."CD/Multimedia", "Radio" or "Settings"
2."Tone"
3."Equalizer"
4.Select the desired setting.
5.To adjust: turn the controller.
6.To store: press the controller.
Seite 188
EntertainmentTone
188Online Edition for Part no. 01 40 2 608 633 - 11 09 490
Page 189 of 325
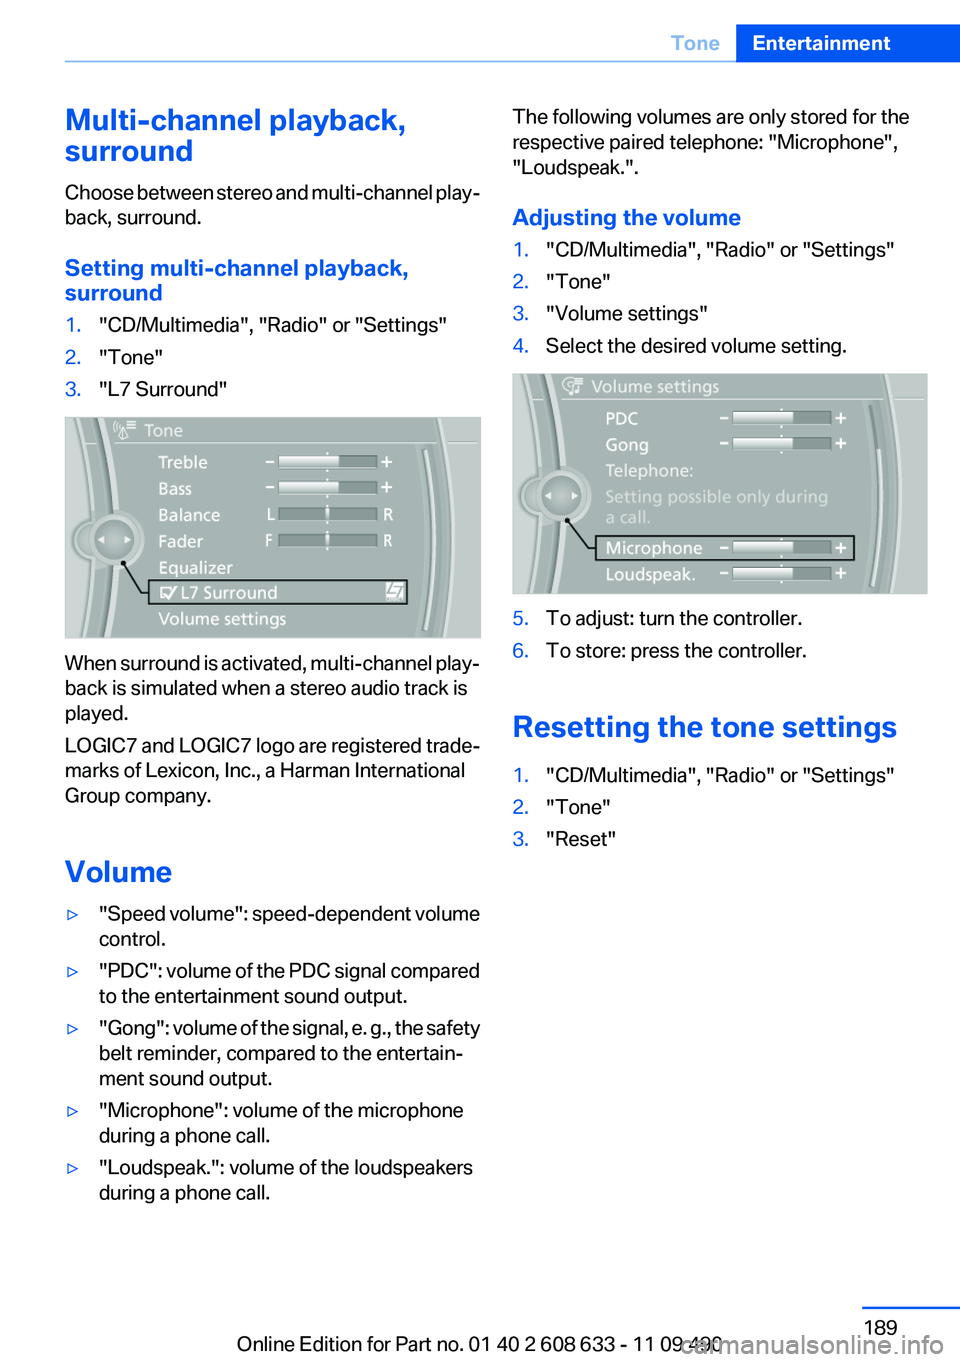
Multi-channel playback,
surround
Choose between stereo and multi-channel play‐
back, surround.
Setting multi-channel playback,
surround
1."CD/Multimedia", "Radio" or "Settings"
2."Tone"
3."L7 Surround"
When surround is activated, multi-channel play‐
back is simulated when a stereo audio track is
played.
LOGIC7 and LOGIC7 logo are registered trade‐
marks of Lexicon, Inc., a Harman International
Group company.
Volume
▷"Speed volume": speed-dependent volume
control.
▷"PDC": volume of the PDC signal compared
to the entertainment sound output.
▷"Gong": volume of the signal, e. g., the safety
belt reminder, compared to the entertain‐
ment sound output.
▷"Microphone": volume of the microphone
during a phone call.
▷"Loudspeak.": volume of the loudspeakers
during a phone call.
The following volumes are only stored for the
respective paired telephone: "Microphone",
"Loudspeak.".
Adjusting the volume
1."CD/Multimedia", "Radio" or "Settings"
2."Tone"
3."Volume settings"
4.Select the desired volume setting.
5.To adjust: turn the controller.
6.To store: press the controller.
Resetting the tone settings
1."CD/Multimedia", "Radio" or "Settings"
2."Tone"
3."Reset"
Seite 189
ToneEntertainment
189Online Edition for Part no. 01 40 2 608 633 - 11 09 490