2011 BMW 135I COUPE turn signal bulb
[x] Cancel search: turn signal bulbPage 66 of 256

Driving
64
Launch Control
Launch Control enables an optimum accelera-
tion when starting off on a road surface with
good traction.
Do not use Launch Control too often; oth-
erwise, the powerful stresses on the vehi-
cle will lead to premature component wear.<
Launch Control is ready for use when the
engine is at operating temperature, i.e. after
uninterrupted travel of at least 6.2 miles/10 km.
1.With the engine running, step on the brake
with your left foot.
2.Activate Dynamic Traction Control (DTC),
refer to page, 82.
3.Activate Driving dynamics control, refer to
page62.
4.With the vehicle stationary, activate the
manual mode and select 1
stgear.
5.With your right foot, push the accelerator
pedal past the resistance point. The accel-
eration speed is adjusted. A flag symbol
appears in the instrument cluster.
6.When you release the brake pedal, the vehi-
cle accelerates. Keep the accelerator pedal
floored.
7.The upshifting occurs automatically as long
as you keep the accelerator pedal pressed
past the resistance point.
Launch Control will be ready for use again after
you drive a certain distance.
Launch Control is not available for use during
the break-in phase, refer to page112.
To maintain driving stability, keep DSC
activated whenever possible.<
Turn signals/
headlamp flasher
1High beams
2Headlamp flasher
3Turn signals
Using turn signals
Press the lever beyond the resistance point.
To turn off manually, press the lever to the
resistance point.
Unusually rapid flashing of the indicator
lamp and the turn signals indicates that
one of the turn signal bulbs has failed.<
Indicating a turn briefly
Press the lever as far as the resistance point for
as long as you wish to indicate a turn.
Triple turn signal activation
Press the lever as far as the resistance point.
The turn signals flash three times.
You can activate or deactivate this function.
1."Settings"
2."Lighting"
3."Triple turn signal"
Page 217 of 256

Mobility
215Reference
At a glance
Controls
Driving tips
Communications
Navigation
Entertainment
Xenon headlamps
Parking lamps, roadside parking
lamps, daytime running lights
H8 bulb, 35 watts
The figure shows the right-hand headlamp.
1.Remove the headlamp cover.
2.Turn the bulb, see arrow, and remove it.
3.Pull off the connector and replace the bulb.
4.Attach the connector, insert the bulb and
turn it all the way in the opposite direction.
5.Attach the headlamp cover.
Corner-illuminating lamps
H3 bulb, 55 watts
The figure shows the right-hand headlamp.
1.Remove the top headlamp cover, using the
screwdriver to push the detents to one side.
2.Turn the bulb holder, see arrow, and
remove it.3.Slide the bulb out of the holder and pull off
the connector.
4.Replace the bulb and attach the connector.
5.Insert the bulb holder and turn it all the way
in the opposite direction.
6.Attach the headlamp cover.
Turn signals, front
PY21W bulb, 21 watts
The turn signal bulb can be changed via a cover
in the wheel arch.
1.Turn the respective wheel inwards.
2.Using a coin, turn both locks of the cover all
the way to the left, arrows 1, and remove the
cover.
3.Turn the bulb holder to the left and remove
it, arrow2.
4.Apply gentle pressure to the bulb while
turning it to the right for removal and
replacement.
5.Insert the bulb holder and lock it by turning
it to the right.
6.Attach the cover by positioning the bottom
edge first and then turning both locks all the
way to the right.
Page 218 of 256

Replacing components
216
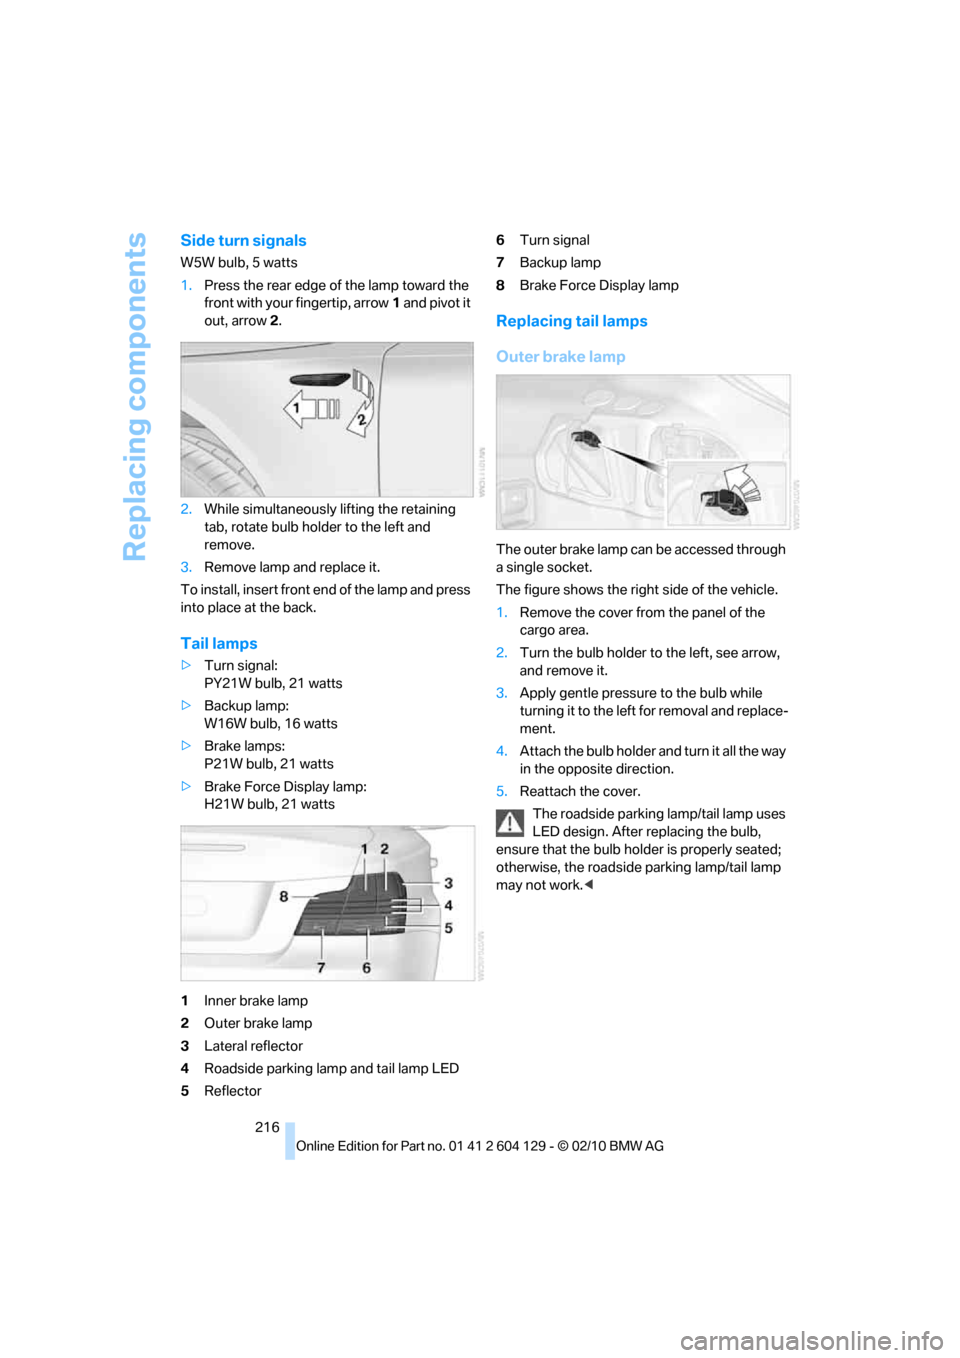
Side turn signals
W5W bulb, 5 watts
1.Press the rear edge of the lamp toward the
front with your fingertip, arrow1 and pivot it
out, arrow2.
2.While simultaneously lifting the retaining
tab, rotate bulb holder to the left and
remove.
3.Remove lamp and replace it.
To install, insert front end of the lamp and press
into place at the back.
Tail lamps
>Turn signal:
PY21W bulb, 21 watts
>Backup lamp:
W16W bulb, 16 watts
>Brake lamps:
P21W bulb, 21 watts
>Brake Force Display lamp:
H21W bulb, 21 watts
1Inner brake lamp
2Outer brake lamp
3Lateral reflector
4Roadside parking lamp and tail lamp LED
5Reflector6Turn signal
7Backup lamp
8Brake Force Display lamp
Replacing tail lamps
Outer brake lamp
The outer brake lamp can be accessed through
a single socket.
The figure shows the right side of the vehicle.
1.Remove the cover from the panel of the
cargo area.
2.Turn the bulb holder to the left, see arrow,
and remove it.
3.Apply gentle pressure to the bulb while
turning it to the left for removal and replace-
ment.
4.Attach the bulb holder and turn it all the way
in the opposite direction.
5.Reattach the cover.
The roadside parking lamp/tail lamp uses
LED design. After replacing the bulb,
ensure that the bulb holder is properly seated;
otherwise, the roadside parking lamp/tail lamp
may not work.<
Page 219 of 256

Mobility
217Reference
At a glance
Controls
Driving tips
Communications
Navigation
Entertainment
Inner brake lamp, turn signal, backup
lamp and Brake Force Display lamp
The bulbs are integrated in a single bulb holder.
1.Remove the cover from the panel of the
cargo area.
2.Detach the bulb holder by pressing
together the clips, see arrows, and remove
it.
3.Brake lamps and turn signal: apply gentle
pressure to the bulb while turning it to the
left for removal and replacement.
4.Backup lamp: pull the bulb out of the socket
and replace it.
5.Attach the bulb holder and let it snap into
place.
6.Reattach the cover.
License plate lamps and center brake
lamp
These lamps use LED technology for operation.
In the event of a malfunction, please contact
your BMW center or a workshop that works
according to BMW repair procedures with cor-
respondingly trained personnel.
Changing wheels
Your BMW comes with run-flat tires as standard
equipment. This eliminates the need to change
a wheel immediately in the event of a puncture.
For information on continuing to drive with a
damaged tire, refer to Indication of a flat tire on
page83.
The symbol identifying run-flat tires is a circle
with the letters RSC on the sidewall, refer to
Run-flat tires, page200.When mounting new tires or changing over
from summer to winter tires and vice versa,
mount run-flat tires for your own safety. In the
event of a flat, no spare wheel is available. Your
BMW center will be glad to advise you. Refer
also to New wheels and tires, page200.
The tools for changing wheels are avail-
able as optional accessories from your
BMW center.<
Jack mounting points
The jacking points are at the positions shown in
the illustration.
Vehicle battery
Battery care
The battery is 100 % maintenance-free, the
electrolyte will last for the life of the battery
when the vehicle is operated in a temperate cli-
mate. Your BMW center will be glad to advise in
all matters concerning the battery.
Replacing the battery
Use only vehicle battery types that are
approved by the manufacturer of your
vehicle; otherwise, the vehicle may be damaged
or some functions may become partly or com-
pletely unavailable.<
After replacing the battery, have it paired with
the vehicle at your BMW center so that all con-
venience functions are completely available.
Page 252 of 256

Everything from A to Z
250 Town/city, for navigation121
Tow rope222
Tow-starting221
TPM, refer to Tire Pressure
Monitor84
Track
– selecting on CD151
Traction control, refer to
Dynamic Stability Control
DSC81
Traffic bulletins
– categories135
Traffic bulletins, filtering135
Traffic bulletins for
navigation133
– display in map view135
– during destination
guidance135
Traffic jam
– displaying traffic
bulletins133
Transmission
– 7-gear Sports automatic
transmission with double
clutch60
– automatic transmission with
Steptronic57
– idle position61
– Launch Control64
– manually unlocking parking
lock63
– manual transmission57
– reverse gear61
Transporting children
safely52
Transport securing devices,
refer to Securing cargo116
Tread depth, refer to Minimum
tire tread199
Trip, deleting129
Trip, storing128
Trip-distance counter, refer to
Trip odometer68
Triple turn signal activation64
Trip odometer68Trips, changing129
Trunk, refer to Cargo area
Trunk lid31
– Comfort Access34
– emergency release31
– opening from outside31
– unlocking with remote
control28
Turning circle, refer to
Dimensions227
Turn signals64
– indicator lamp12
– replacing bulbs215
– triple turn signal64
Tying down loads, refer to
Cargo loading116
U
Underbody protection, refer to
Caring for your vehicle209
Uniform Tire Quality Grading/
UTQR198
Units
– average fuel
consumption72
Units of measure
– temperature72
Universal garage door opener,
refer to Integrated universal
remote control101
Unlatching, refer to
Unlocking27
Unlocking
– from inside30
– from outside27
– trunk lid34
– without remote control, refer
to Comfort Access33
Unlocking without a key, refer
to Comfort Access33
Updating the navigation
data120
USB audio interface163
V
VCD153
Vehicle
– battery217
– breaking in112
– cargo loading114
– decommissioning, refer to
Vehicle storage212
– dimensions227
– Identification Number, refer
to Engine compartment203
– parking56
– weight229
Vehicle jack217
Vehicle storage212
Ventilation99
– draft-free99
Ventilation when parked, refer
to Parked car ventilation99
Vents, refer to Ventilation99
Video menu153
Video playback153
Voice, refer to Destination
guidance through voice
instructions132
Voice-activated phone
book179
Voice commands
– overview22
– short commands231
– telephone177
Voice instructions from
navigation system132
– repeating132
– switching on/off132
– volume132
Volume140
– audio sources140
– fuel tank, refer to
Capacities230
– mobile phone173
– voice instructions132
Volume balance, tone
setting141