2011 BMW 135I COUPE parking lamps low-beam
[x] Cancel search: parking lamps low-beamPage 93 of 256

Controls
91Reference
At a glance
Driving tips
Communications
Navigation
Entertainment
Mobility
Lamps
Parking lamps/low beams
0Lamps off,
daytime running lights
1Parking lamps and daytime running lights
2Low beams,
welcome lamps
*
3Automatic headlamp control*, daytime run-
ning lights, welcome lamps
*, high-beam
assistant
*, adaptive light control*
When you open the driver's door with the igni-
tion switched off, the exterior lighting is auto-
matically switched off if the light switch is in
position 0, 2 or 3.
Switch on the parking lamps if necessary,
switch position 1.
Parking lamps
In switch position1, the front, rear and side
vehicle lighting is switched on. You can use the
parking lamps for parking.
The parking lamps will discharge the bat-
tery. Therefore, do not leave them on for
unduly long periods of time; otherwise, the bat-
tery might not have enough power to start the
engine. It is preferable to switch on the left-
hand or right-hand roadside parking lamps,
refer to page93.<
Low-beam headlamps
The low beams light up when the light switch is
in position 2 and the ignition is on.
Automatic headlamp control*
When the switch is in position3, the low beams
are switched on and off automatically depend-
ing on ambient light conditions, e.g. in a tunnel,
in twilight, or if there is precipitation. The adap-
tive light control
* is active. The LED next to the
symbol is illuminated when the low beams are
on. You can also activate the daytime running
lights, refer to page92. In the situations
described above, the lamps then automatically
switch from daytime running lights to low
beams.
The headlamps may also come on when the
sun is sitting low on a blue sky.
The low beams remain switched on inde-
pendent of the ambient lighting condi-
tions when you switch on the fog lamps
*.<
The automatic headlamp control cannot
serve as a substitute for your personal
judgment in determining when the lamps
should be switched on in response to ambient
lighting conditions. For example, the system
cannot detect fog or hazy weather. To avoid
safety risks, you should always switch on the
low-beam headlamps manually under these
conditions.<
Welcome lamps
If you leave the light switch in position 2 or 3
when you park the car, the parking lamps and
the interior lamps light up briefly when you
unlock the vehicle.
Activating/deactivating welcome
lamps
1."Settings"
2."Lighting"
Page 216 of 256

Replacing components
214
Xenon lamps*
These bulbs have a very long service life and are
highly unlikely to fail. If a xenon lamp fails never-
theless, switch on the fog lamps and continue
the journey with great care, provided that local
legislation does not prohibit this.
Have any work on the xenon lamp system,
including bulb replacements, performed
o n ly b y a BM W c e n t e r o r a w o r k s h o p t h a t w o r k s
according to BMW repair procedures with cor-
respondingly trained personnel. Otherwise, if
such work is carried out improperly, the high
voltage in the system presents the danger of
fatal injuries.<
Removing the headlamp cover
1.Pull the wire brackets over the notches, see
arrows, and fold to the side.
2.Fold away the headlamp cover.
Be careful when attaching the headlamp
cover and ensure that both wire brackets
are securely in place; otherwise, leaks could
occur and cause damage to the headlamp sys-
tem.<
Attach the headlamp cover in reverse order.
Halogen headlamps
Halogen low beams and high beams
H7 bulb, 55 watts
Always wear gloves and eye protection;
the atmosphere within the H7 bulb is
pressurized. Otherwise, there is a risk of injury if
the bulb is damaged.
2Low-beam headlamps
1.Remove the headlamp cover.
2.Fold down the holding bracket.
3.Remove and replace the bulb.
4.Reattach the bulb holder with the notch at
the top.
5.Fold the holding bracket back up and let it
snap into place.
6.Attach the headlamp cover.
Parking lamps, roadside parking lamps
W5W bulb, 5 watts
1.Remove the headlamp cover.
The figure shows the right-hand headlamp.
2.Pull out the bulb holder.
3.Remove and replace the bulb.
4.Reinsert the bulb holder.
5.Attach the headlamp cover.
Page 224 of 256
Giving and receiving assistance
222
Being towed
Make sure that the ignition is switched on,
refer to page55; otherwise, the low-beam
headlamps, tail lamps, turn signal indicators and
windshield wipers may be unavailable. Power
steering assistance is not available when the
engine is not running. Thus, braking and steer-
ing will require increased effort. Active steering
is not active and it will be necessary to turn the
steering wheel further.<
Manual transmission
Gearshift lever in neutral position.
Automatic transmission
Selector lever in position N.
Changing selector lever position, refer to
page58.
Do not exceed a towing speed of 45 mph/
70 km/h and a towing distance of
90 miles/150 km; otherwise, the automatic
transmission may be damaged.<
Sports automatic transmission with
double clutch
Make sure that the parking lock P is not
engaged; otherwise, the rear wheels are
immobilized.
When using the car wash function, refer to
page210, make sure that after approx.
30 minutes, the parking lock P is automatically
engaged and thus immobilizes the rear wheels.
In the event of an electrical malfunction or if the
vehicle must be towed for more than approx.
20 minutes, unlock the parking lock manually,
refer to page63.<
When towing, do not exceed a maximum
speed of 30 mph or 50 km/h and a maxi-
mum distance traveled of 30 miles/50 km; oth-
erwise, the transmission may be damaged.<
BMW recommends transporting the vehicle on
a tow truck with a flatbed or towing with the rear
axle raised.
Towing methods
Do not lift the vehicle by a tow fitting or
body and chassis parts; otherwise, dam-
age may result.<
With a tow bar
The towing vehicle must not be lighter
than the towed vehicle; otherwise, it may
be impossible to maintain control.<
The tow fittings used should be on the same
side on both vehicles. Should it prove impossi-
ble to avoid mounting the tow bar at an angle,
please observe the following:
>Clearance and maneuvering capability will
be sharply limited during cornering.
>The tow bar will generate lateral forces if it is
attached offset.
Attach the tow bar to the tow fittings only,
as attaching it to other parts of the vehicle
could result in damage.<
With a tow rope
When starting off in the towing vehicle, make
sure that the tow rope is taut.
To avoid jerking and the associated
stresses on vehicle components when
towing, always use nylon ropes or nylon straps.
Attach the tow rope to the tow fittings only, as
attaching it to other parts of the vehicle could
result in damage.<
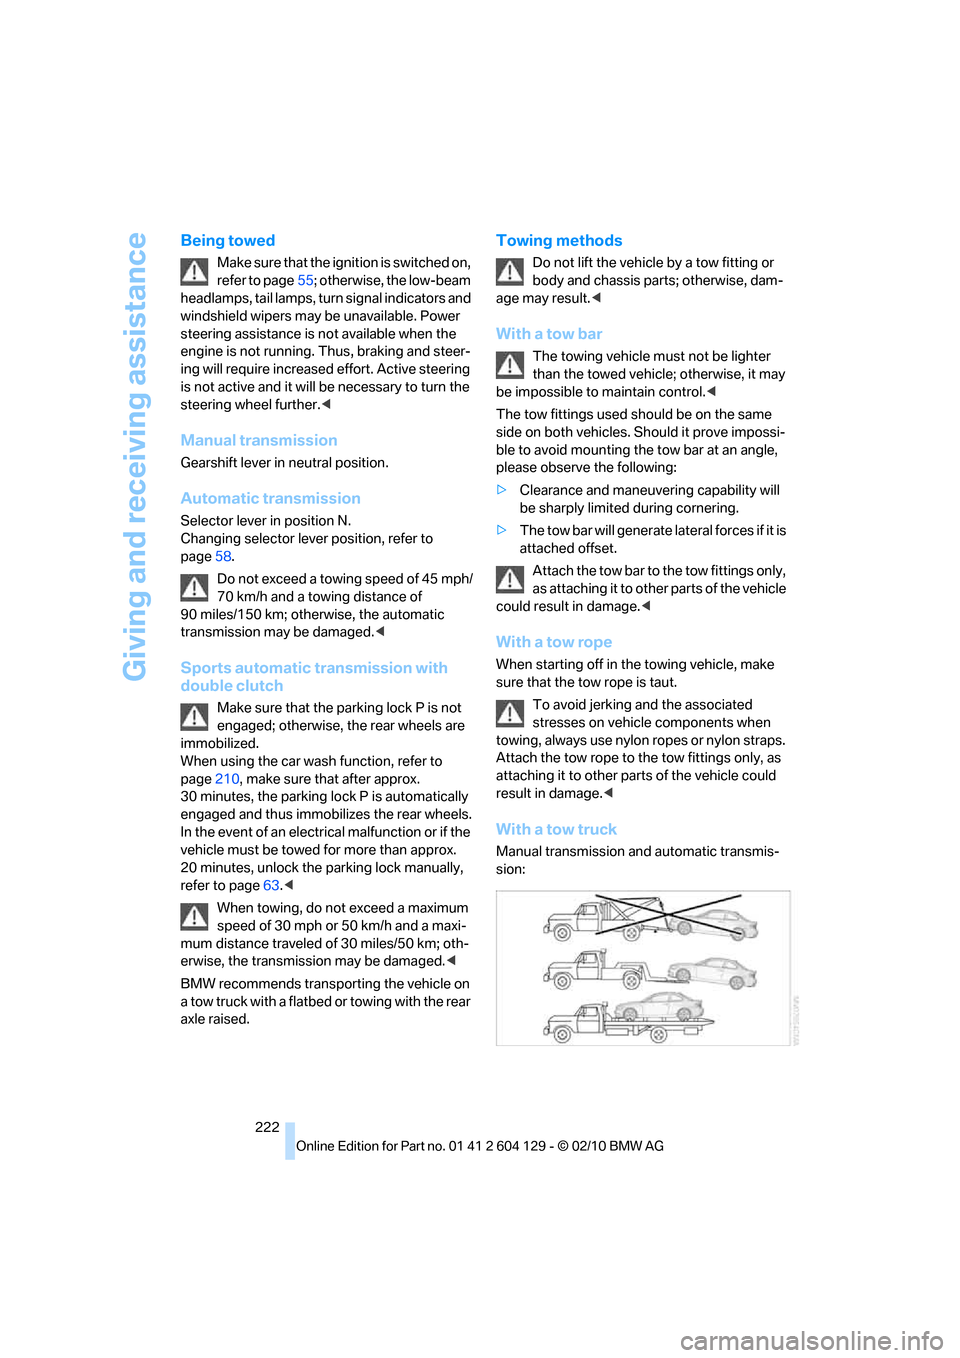
With a tow truck
Manual transmission and automatic transmis-
sion:
Page 246 of 256

Everything from A to Z
244 iDrive16
– adjusting brightness79
– changing date and time75
– changing language79
– menu guidance17
– operating principle16
– status information19
Ignition55
– switched off56
– switched on55
Ignition key, refer to
Integrated key/remote
control26
Ignition key position 1, refer to
Radio readiness55
Ignition key position 2, refer to
Ignition on55
Ignition lock55
Imprint2
Indicator and warning
lamps13
– Tire Pressure Monitor
TPM85
Individual settings, refer to
Personal Profile26
Inflation pressure, tires194
Inflation pressure monitoring,
refer to Tire Pressure
Monitor TPM84
Initializing
– compass, refer to
Calibrating104
– radio, refer to Station,
storing143
– refer to Setting the time and
date75
Initializing, Flat Tire Monitor
FTM83
Instructions for navigation
system, refer to Voice
instructions132
Instrument cluster12
Instrument combination, refer
to Instrument cluster12
Instrument lighting95
Integrated key26
Integrated universal remote
control101
Interactive map126Interior lamps95
– remote control28
Interior motion sensor33
Interior rearview mirror50
– automatic dimming
feature51
– compass103
Intermittent mode of the
wipers65
Intersection, entering,
navigation122
iPod, connecting, refer to
AUX-IN port163
iPod, connecting, refer to USB
audio interface163
J
Jacking points217
Jets, refer to Air vents96
Joystick, refer to iDrive16
Jumpering, refer to Jump-
starting220
Jump-starting220
K
Key, refer to Integrated key/
remote control26
Keyless go, refer to Comfort
Access33
Keyless opening and closing,
refer to Comfort Access33
Key Memory, refer to Personal
Profile26
Kickdown58
Knock control193
L
Lamps
– adaptive light control92
– interior lighting95
Lamps, refer to Parking lamps/
low beams91
Lamps and bulbs, replacing
bulbs213
Lashing eyes, refer to
Securing cargo116Last destinations124
LATCH child restraint fixing
system53
Launch Control64
Leather care211
LED Light-emitting
diodes213
Length, refer to
Dimensions227
License plate lamp, replacing
bulb217
Light
– instrument lighting95
– refer to High-beam
assistant93
Light-alloy wheels211
Light control
– refer to High-beam
assistant93
Light-emitting diodes
LED213
Lighter106
– socket106
Lighting
– lamps and bulbs213
– of instruments95
– of vehicle, refer to Lamps91
Light switch91
Limit, refer to Speed limit78
Load115
Load securing equipment,
refer to Securing cargo116
Lock buttons of doors, refer to
Locking30
Locking
– adjusting confirmation
signal28
– from inside30
– from outside28
– without remote control, refer
to Comfort Access33
Locking and unlocking doors
– from inside30
– from outside27
Low beam control, refer to
High-beam assistant93
Low-beam headlamps91
– automatic91
– replacing bulbs214