2011 BMW 135I COUPE door lock
[x] Cancel search: door lockPage 39 of 256
Controls
37Reference
At a glance
Driving tips
Communications
Navigation
Entertainment
Mobility
Opening, closing
>Press the switch backwards to the resis-
tance point.
The glass roof and the sliding visor open
together as long as you hold the switch in
this position.
>Press the switch backwards past the resis-
tance point.
The glass roof and the sliding visor open
automatically. Briefly press the switch again
to stop the opening movement.
You can close the glass roof in a similar manner
by pressing the switch forwards. The sliding
visor remains open and can be closed by hand.
For information on Convenient operation via the
remote control or the door lock, refer to page27
or30. For information on Convenient closing
with Comfort Access, refer to Locking on
page34.
After switching off the ignition
When the remote control is removed or the igni-
tion is switched off, you can still operate the roof
for approx. 1 minute as long as no door has
been opened.
Pinch protection system
If the glass roof encounters an obstruction dur-
ing closing from approximately the middle of
the opening in the roof, or during closing from
the raised position, the closing movement is
interrupted and the glass roof is opened again
slightly.
Despite the pinch protection system
check and clear the roof's travel path prior
to closing it; otherwise, the safety system might
fail to detect certain kinds of obstructions, such
as very thin objects, and the roof would con-
tinue closing.<
Closing without pinch protection
If there is an external danger, press the switch
forward past the resistance point and hold it
there. The roof closes without pinch protection.
Following interruptions in electrical
power supply
After a power failure, there is a possibility that
the glass roof can only be raised. The system
must be initialized. BMW recommends having
this work done by your BMW center.
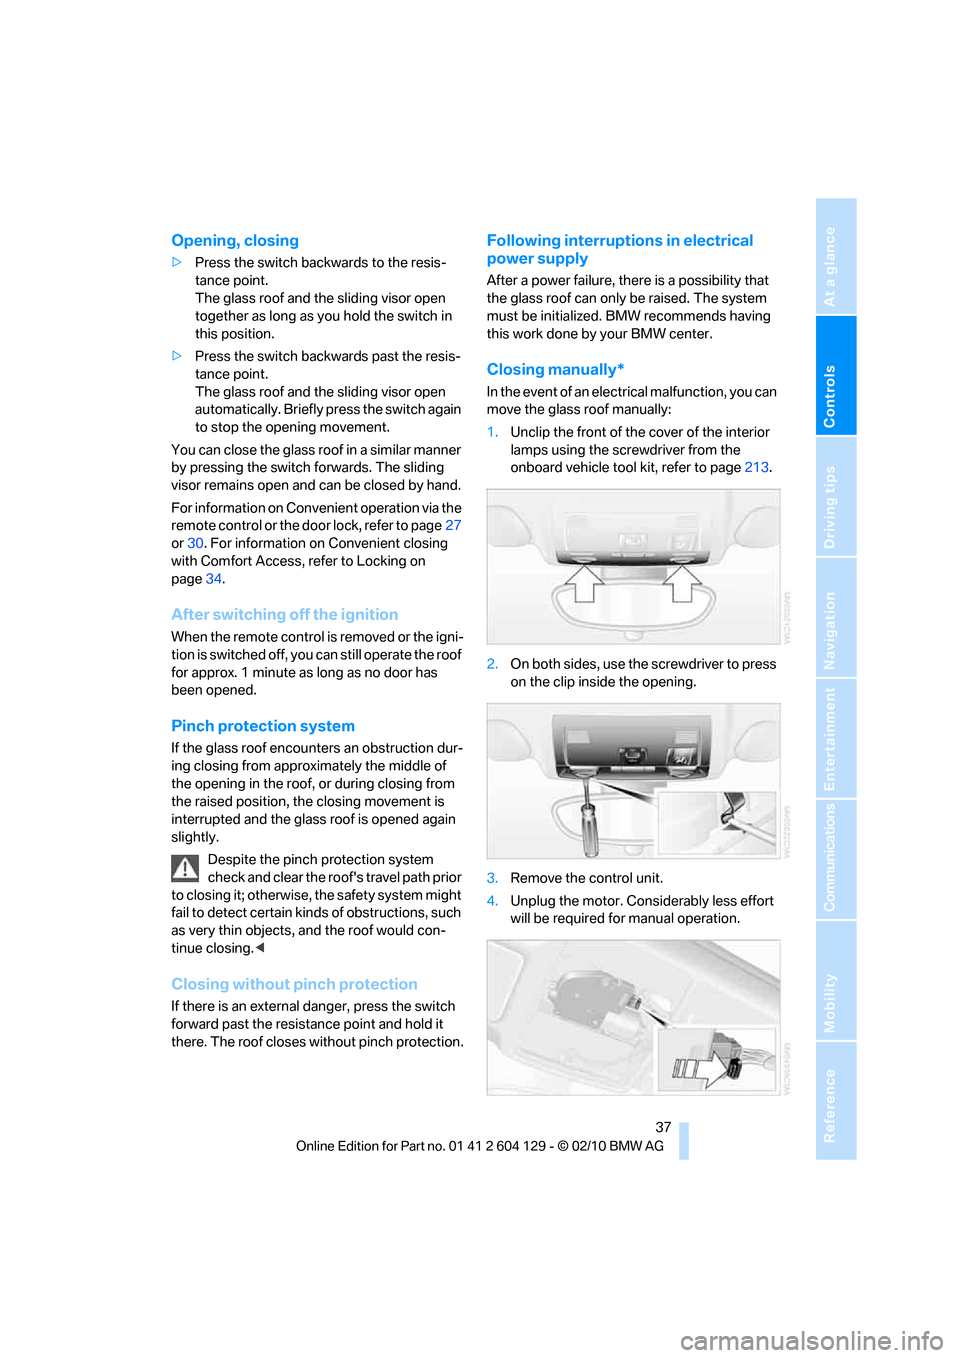
Closing manually*
In the event of an electrical malfunction, you can
move the glass roof manually:
1.Unclip the front of the cover of the interior
lamps using the screwdriver from the
onboard vehicle tool kit, refer to page213.
2.On both sides, use the screwdriver to press
on the clip inside the opening.
3.Remove the control unit.
4.Unplug the motor. Considerably less effort
will be required for manual operation.
Page 41 of 256
Controls
39Reference
At a glance
Driving tips
Communications
Navigation
Entertainment
Mobility
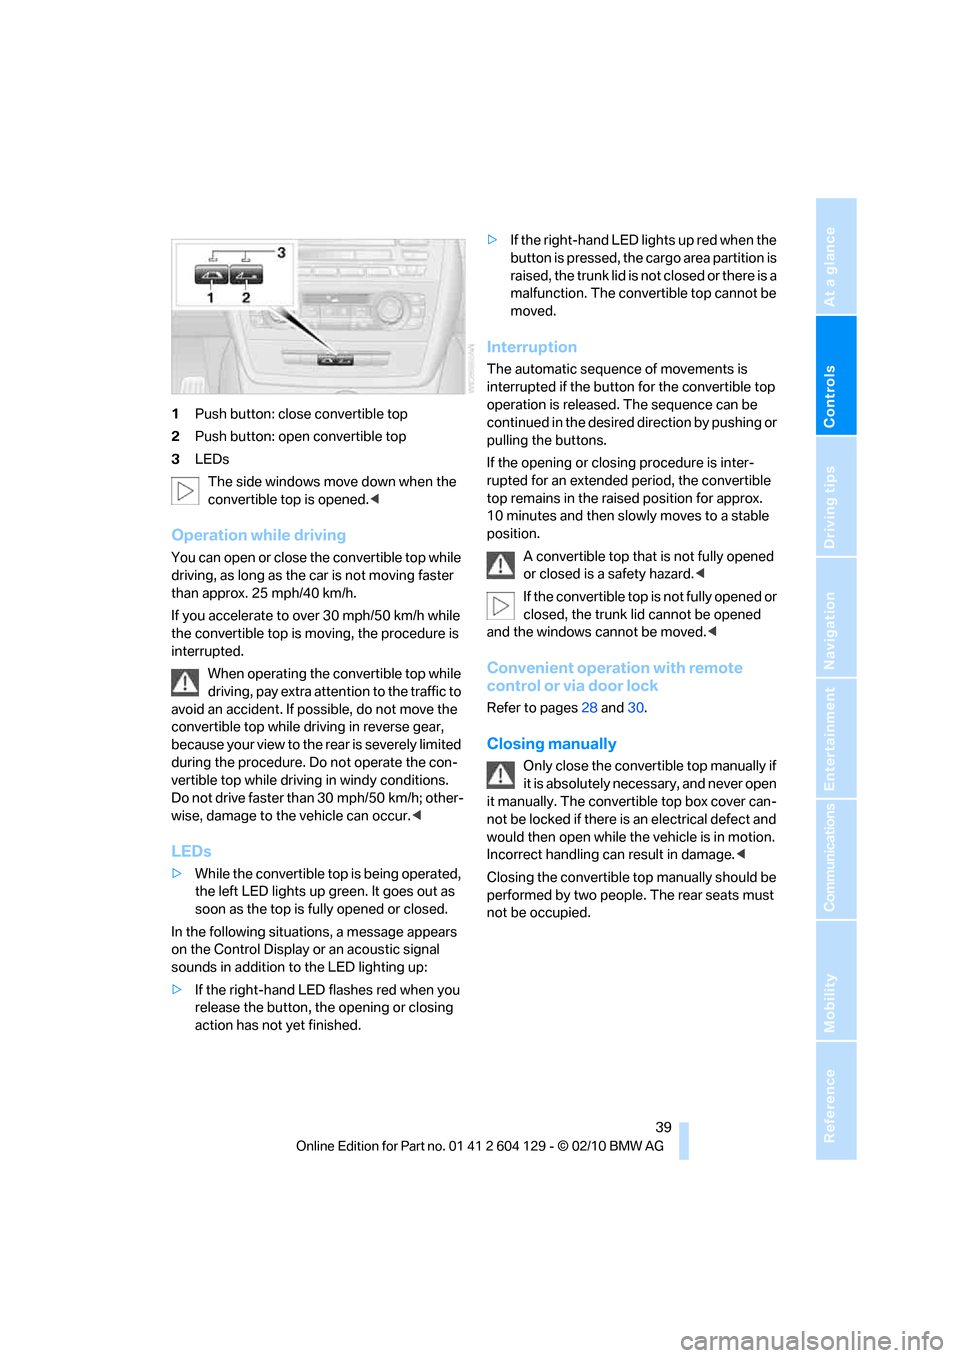
1Push button: close convertible top
2Push button: open convertible top
3LEDs
The side windows move down when the
convertible top is opened.<
Operation while driving
You can open or close the convertible top while
driving, as long as the car is not moving faster
than approx. 25 mph/40 km/h.
If you accelerate to over 30 mph/50 km/h while
the convertible top is moving, the procedure is
interrupted.
When operating the convertible top while
driving, pay extra attention to the traffic to
avoid an accident. If possible, do not move the
convertible top while driving in reverse gear,
b e c a u s e yo u r v ie w t o t h e r ea r is s e v e re ly li m i t ed
during the procedure. Do not operate the con-
vertible top while driving in windy conditions.
Do not drive faster than 30 mph/50 km/h; other-
wise, damage to the vehicle can occur.<
LEDs
>While the convertible top is being operated,
the left LED lights up green. It goes out as
soon as the top is fully opened or closed.
In the following situations, a message appears
on the Control Display or an acoustic signal
sounds in addition to the LED lighting up:
>If the right-hand LED flashes red when you
release the button, the opening or closing
action has not yet finished.>If the right-hand LED lights up red when the
button is pressed, the cargo area partition is
raised, the trunk lid is not closed or there is a
malfunction. The convertible top cannot be
moved.
Interruption
The automatic sequence of movements is
interrupted if the button for the convertible top
operation is released. The sequence can be
continued in the desired direction by pushing or
pulling the buttons.
If the opening or closing procedure is inter-
rupted for an extended period, the convertible
top remains in the raised position for approx.
10 minutes and then slowly moves to a stable
position.
A convertible top that is not fully opened
or closed is a safety hazard.<
If the convertible top is not fully opened or
closed, the trunk lid cannot be opened
and the windows cannot be moved.<
Convenient operation with remote
control or via door lock
Refer to pages28 and30.
Closing manually
Only close the convertible top manually if
it is absolutely necessary, and never open
it manually. The convertible top box cover can-
not be locked if there is an electrical defect and
would then open while the vehicle is in motion.
Incorrect handling can result in damage.<
Closing the convertible top manually should be
performed by two people. The rear seats must
not be occupied.
Page 50 of 256
Adjustments
48
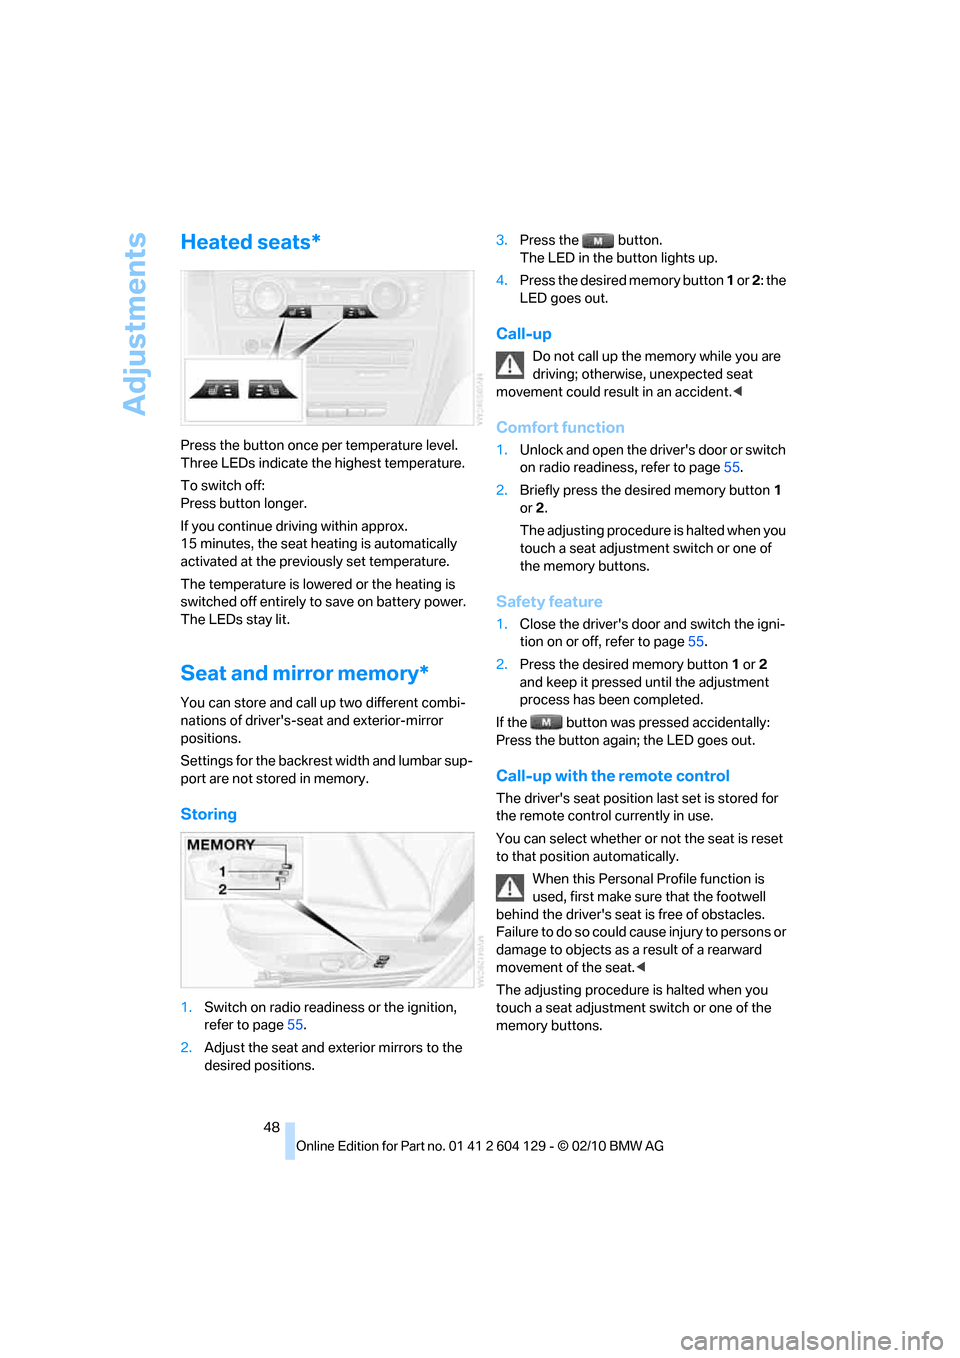
Heated seats*
Press the button once per temperature level.
Three LEDs indicate the highest temperature.
To switch off:
Press button longer.
If you continue driving within approx.
15 minutes, the seat heating is automatically
activated at the previously set temperature.
The temperature is lowered or the heating is
switched off entirely to save on battery power.
The LEDs stay lit.
Seat and mirror memory*
You can store and call up two different combi-
nations of driver's-seat and exterior-mirror
positions.
Settings for the backrest width and lumbar sup-
port are not stored in memory.
Storing
1.Switch on radio readiness or the ignition,
refer to page55.
2.Adjust the seat and exterior mirrors to the
desired positions.3.Press the button.
The LED in the button lights up.
4.Press the desired memory button 1 or 2: the
LED goes out.
Call-up
Do not call up the memory while you are
driving; otherwise, unexpected seat
movement could result in an accident.<
Comfort function
1.Unlock and open the driver's door or switch
on radio readiness, refer to page55.
2.Briefly press the desired memory button1
or 2.
The adjusting procedure is halted when you
touch a seat adjustment switch or one of
the memory buttons.
Safety feature
1.Close the driver's door and switch the igni-
tion on or off, refer to page55.
2.Press the desired memory button1 or2
and keep it pressed until the adjustment
process has been completed.
If the button was pressed accidentally:
Press the button again; the LED goes out.
Call-up with the remote control
The driver's seat position last set is stored for
the remote control currently in use.
You can select whether or not the seat is reset
to that position automatically.
When this Personal Profile function is
used, first make sure that the footwell
behind the driver's seat is free of obstacles.
Failure to do so could cause injury to persons or
damage to objects as a result of a rearward
movement of the seat.<
The adjusting procedure is halted when you
touch a seat adjustment switch or one of the
memory buttons.
Page 51 of 256
Controls
49Reference
At a glance
Driving tips
Communications
Navigation
Entertainment
Mobility
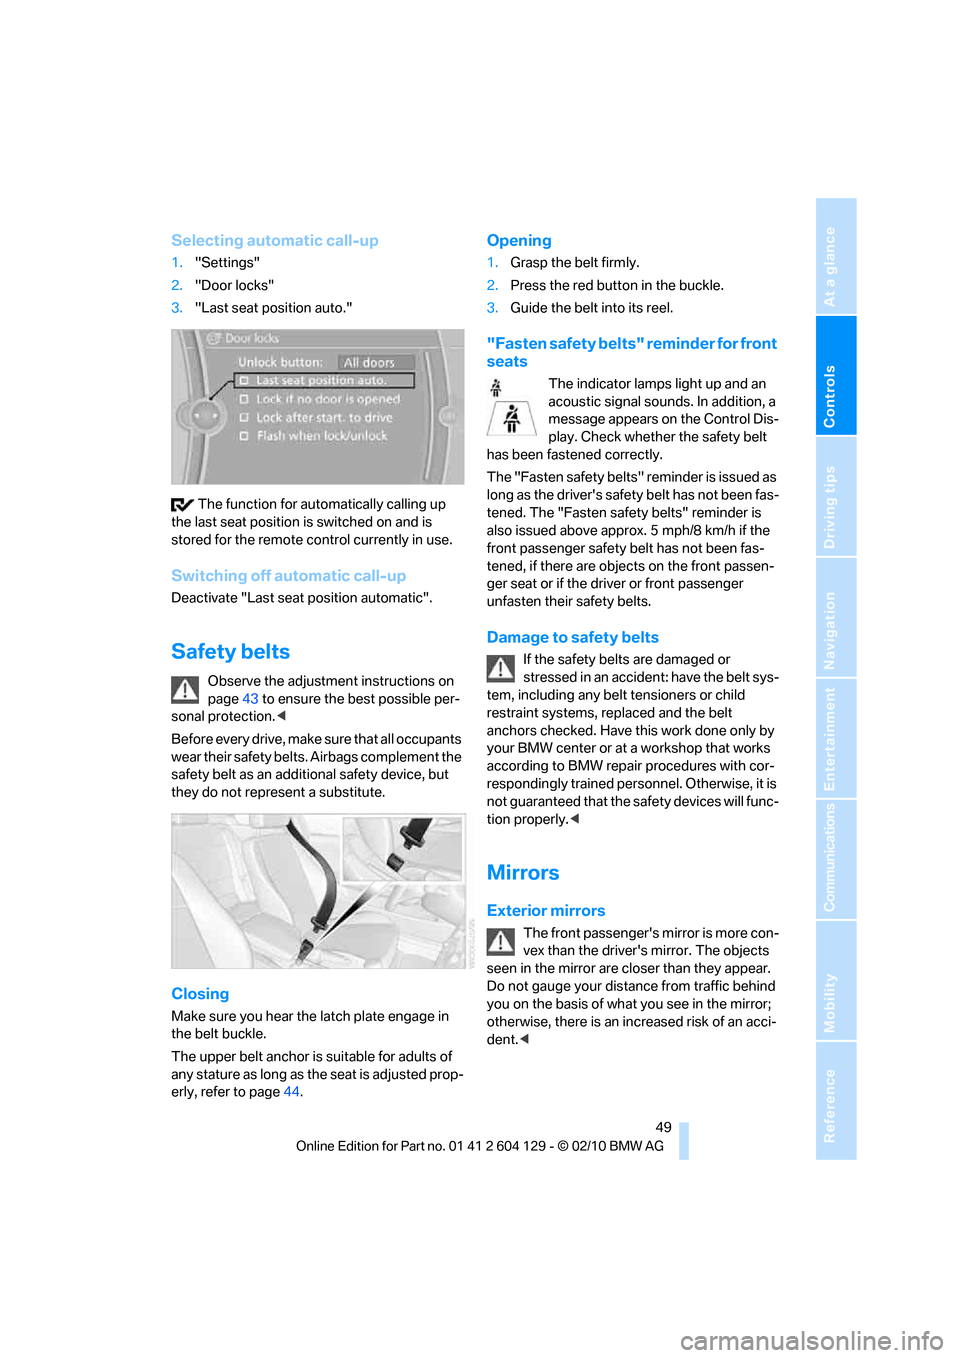
Selecting automatic call-up
1."Settings"
2."Door locks"
3."Last seat position auto."
The function for automatically calling up
the last seat position is switched on and is
stored for the remote control currently in use.
Switching off automatic call-up
Deactivate "Last seat position automatic".
Safety belts
Observe the adjustment instructions on
page43 to ensure the best possible per-
sonal protection.<
Before every drive, make sure that all occupants
wear their safety belts. Airbags complement the
safety belt as an additional safety device, but
they do not represent a substitute.
Closing
Make sure you hear the latch plate engage in
the belt buckle.
The upper belt anchor is suitable for adults of
any stature as long as the seat is adjusted prop-
erly, refer to page44.
Opening
1.Grasp the belt firmly.
2.Press the red button in the buckle.
3.Guide the belt into its reel.
"Fasten safety belts" reminder for front
seats
The indicator lamps light up and an
acoustic signal sounds. In addition, a
message appears on the Control Dis-
play. Check whether the safety belt
has been fastened correctly.
The "Fa sten safety belts " reminder is iss ued a s
long as the driver's safety belt has not been fas-
tened. The "Fasten safety belts" reminder is
also issued above approx. 5 mph/8 km/h if the
front passenger safety belt has not been fas-
tened, if there are objects on the front passen-
ger seat or if the driver or front passenger
unfasten their safety belts.
Damage to safety belts
If the safety belts are damaged or
stressed in an accident: have the belt sys-
tem, including any belt tensioners or child
restraint systems, replaced and the belt
anchors checked. Have this work done only by
your BMW center or at a workshop that works
according to BMW repair procedures with cor-
respondingly trained personnel. Otherwise, it is
not guaranteed that the safety devices will func-
tion properly.<
Mirrors
Exterior mirrors
The front passenger's mirror is more con-
vex than the driver's mirror. The objects
seen in the mirror are closer than they appear.
Do not gauge your distance from traffic behind
you on the basis of what you see in the mirror;
otherwise, there is an increased risk of an acci-
dent.<
Page 57 of 256

Controls
55Reference
At a glance
Driving tips
Communications
Navigation
Entertainment
Mobility
Driving
Ignition lock
Insert the remote control into the
ignition lock
Insert the remote control all the way into the
ignition lock.
>Radio readiness is switched on.
Individual electrical consumers can operate.
Comfort Access*
If the car is equipped with Comfort Access, only
insert the remote control into the ignition lock
under special circumstances, refer to page33.
Removing the remote control from the
ignition lock
Do not forcibly pull the remote control out
of the ignition lock as this may cause
damage.<
Before removing the remote control, push it all
the way in to release the locking mechanism.
>The ignition is switched off if it was on.
Automatic transmission
You cannot take out the remote control unless
the selector lever is in the P position: interlock.
Start/stop button
Pressing the start/stop button switches radio
readiness or the ignition on or off.
Manual transmission If you press the
start/stop button and depress the clutch,
the engine starts.
Automatic transmission and Sports automatic
transmission with double clutch: if you press
the start/stop button and depress the brake
pedal, the engine starts.<
Radio readiness
Individual electrical consumers can operate.
The time and the outside temperature are dis-
played in the instrument cluster.
Radio readiness is switched off automatically:
>When the remote control is removed from
the ignition lock
>In cars with Comfort Access
*, by touching
the surface above the door lock, refer to
Locking on page34
Ignition on
All electrical consumers can operate. The
odometer and trip odometer are displayed in
the instrument cluster.
When the engine is off, please switch off
the ignition and any unnecessary electri-
cal consumers in order to preserve the bat-
tery.<
Page 63 of 256
Controls
61Reference
At a glance
Driving tips
Communications
Navigation
Entertainment
Mobility
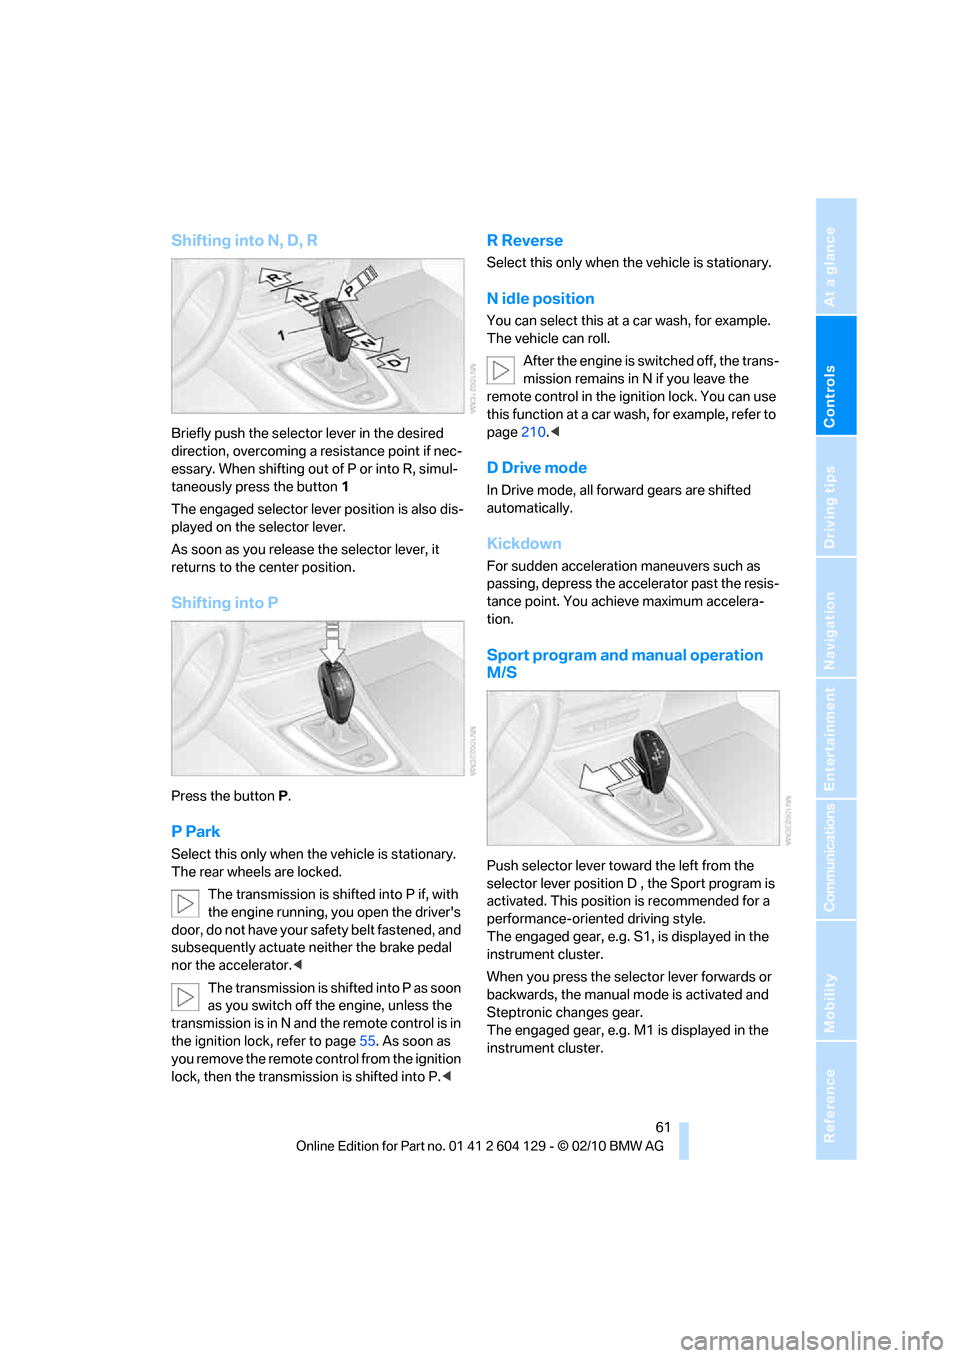
Shifting into N, D, R
Briefly push the selector lever in the desired
direction, overcoming a resistance point if nec-
essary. When shifting out of P or into R, simul-
taneously press the button 1
The engaged selector lever position is also dis-
played on the selector lever.
As soon as you release the selector lever, it
returns to the center position.
Shifting into P
Press the button P.
P Park
Select this only when the vehicle is stationary.
The rear wheels are locked.
The transmission is shifted into P if, with
the engine running, you open the driver's
door, do not have your safety belt fastened, and
subsequently actuate neither the brake pedal
nor the accelerator.<
The transmission is shifted into P as soon
as you switch off the engine, unless the
transmission is in N and the remote control is in
the ignition lock, refer to page55. As soon as
you remove the remote control from the ignition
lock, then the transmission is shifted into P.<
R Reverse
Select this only when the vehicle is stationary.
N idle position
You can select this at a car wash, for example.
The vehicle can roll.
After the engine is switched off, the trans-
mission remains in N if you leave the
remote control in the ignition lock. You can use
this function at a car wash, for example, refer to
page210.<
D Drive mode
In Drive mode, all forward gears are shifted
automatically.
Kickdown
For sudden acceleration maneuvers such as
passing, depress the accelerator past the resis-
tance point. You achieve maximum accelera-
tion.
Sport program and manual operation
M/S
Push selector lever toward the left from the
selector lever position D , the Sport program is
activated. This position is recommended for a
performance-oriented driving style.
The engaged gear, e.g. S1, is displayed in the
instrument cluster.
When you press the selector lever forwards or
backwards, the manual mode is activated and
Steptronic changes gear.
The engaged gear, e.g. M1 is displayed in the
instrument cluster.
Page 93 of 256

Controls
91Reference
At a glance
Driving tips
Communications
Navigation
Entertainment
Mobility
Lamps
Parking lamps/low beams
0Lamps off,
daytime running lights
1Parking lamps and daytime running lights
2Low beams,
welcome lamps
*
3Automatic headlamp control*, daytime run-
ning lights, welcome lamps
*, high-beam
assistant
*, adaptive light control*
When you open the driver's door with the igni-
tion switched off, the exterior lighting is auto-
matically switched off if the light switch is in
position 0, 2 or 3.
Switch on the parking lamps if necessary,
switch position 1.
Parking lamps
In switch position1, the front, rear and side
vehicle lighting is switched on. You can use the
parking lamps for parking.
The parking lamps will discharge the bat-
tery. Therefore, do not leave them on for
unduly long periods of time; otherwise, the bat-
tery might not have enough power to start the
engine. It is preferable to switch on the left-
hand or right-hand roadside parking lamps,
refer to page93.<
Low-beam headlamps
The low beams light up when the light switch is
in position 2 and the ignition is on.
Automatic headlamp control*
When the switch is in position3, the low beams
are switched on and off automatically depend-
ing on ambient light conditions, e.g. in a tunnel,
in twilight, or if there is precipitation. The adap-
tive light control
* is active. The LED next to the
symbol is illuminated when the low beams are
on. You can also activate the daytime running
lights, refer to page92. In the situations
described above, the lamps then automatically
switch from daytime running lights to low
beams.
The headlamps may also come on when the
sun is sitting low on a blue sky.
The low beams remain switched on inde-
pendent of the ambient lighting condi-
tions when you switch on the fog lamps
*.<
The automatic headlamp control cannot
serve as a substitute for your personal
judgment in determining when the lamps
should be switched on in response to ambient
lighting conditions. For example, the system
cannot detect fog or hazy weather. To avoid
safety risks, you should always switch on the
low-beam headlamps manually under these
conditions.<
Welcome lamps
If you leave the light switch in position 2 or 3
when you park the car, the parking lamps and
the interior lamps light up briefly when you
unlock the vehicle.
Activating/deactivating welcome
lamps
1."Settings"
2."Lighting"
Page 186 of 256
BMW Assist
184
BMW Assist
BMW Assist*
BMW Assist provides a number of different ser-
vices. For example, the position data of the
vehicle can be transmitted to the BMW Assist
Response Center when an Emergency
Request
* is sent.
Many BMW Assist services depend on the con-
tract individually agreed upon.
After your contract has expired, the BMW
Assist system will be deactivated by the BMW
Assist Response Center without you having to
visit a BMW center. After the BMW Assist sys-
tem has been deactivated, no BMW Assist ser-
vices will be available. The BMW Assist system
can be reactivated by a BMW center after a new
contract has been signed.
Requirements
>The installed BMW Assist system is logged
in to a wireless communications network.
This network must be capable of transmit-
ting the services.
>To transmit position data, the vehicle must
be able to determine its current position.
>To activate and update BMW Assist, a GPS
signal must be available.
>The BMW Assist service contract was
signed with your BMW center or with the
BMW Assist Response Center. The service
must have been fully enabled.
>BMW Assist is activated.
Services offered
>Emergency Request: when you press the
SOS button, a connection to the BMW
Assist Response Center is established. The
BMW Assist Response Center then speaks
with you and takes further steps to help you.
>Automatic Collision Notification: under cer-
tain conditions, a connection to the BMW
Assist Response Center is established after
a serious accident. If possible, the BMW Assist Response Center then speaks with
you and takes further steps to help you.
>Enhanced Roadside Assistance: BMW
Roadside Assistance
* can be contacted if
assistance is needed in the event of a
breakdown. If possible, the vehicle data and
position data are transmitted during this
call.
>Customer Relations: connection to Cus-
tomer Relations for information on all
aspects of your vehicle.
>TeleService: data on your vehicle's service
status or required inspections are transmit-
ted to your BMW center, either automati-
cally before a service due date or when you
request a BMW service appointment.
>Remote Door Unlock: the BMW Assist
Response Center provides assistance if, for
example, the remote control is not available
and the vehicle needs to be opened.
>Stolen Vehicle Recovery: after you report to
the police that your vehicle was stolen, the
BMW Assist Response Center can deter-
mine its position.
>In addition, the optional Convenience Plan
offers a concierge service and information
on route planning, the traffic situation and
weather. Using Critical Calling, a limited
number of calls can be made via the BMW
Assist Response Center, for example if the
mobile phone is not available or discharged.
Press the SOS button to contact the BMW
Assist Response Center.
*