2011 BMW 135I CONVERTIBLE manual top
[x] Cancel search: manual topPage 5 of 256

Reference
At a glance
Controls
Driving tips
Communications
Navigation
Entertainment
Mobility
Contents
The quickest way to find special topics is to
consult the index, refer to page238.
Using this Owner's Manual
4Notes
7Reporting safety defects
At a glance
10Dashboard
16iDrive
21Letters and numbers
22Voice activation system
Controls
26Opening and closing
43Adjustments
52Transporting children safely
55Driving
68Controls overview
80Technology for driving comfort and
safety
91Lamps
96Climate
101Practical interior accessories
Driving tips
112Things to remember when driving
Navigation
120Navigation system
121Destination entry
130Destination guidance
137What to do if …
Entertainment
140On/off and tone
143Radio
146Satellite radio
151CD/DVD player and CD changer
158Music collection
163External devices
Communications
170Telephone
182Contacts
184BMW Assist
Mobility
192Refueling
194Wheels and tires
202Under the hood
207Maintenance
209Care
213Replacing components
219Giving and receiving assistance
Reference
226Technical data
231Short commands for the voice activation
system
238Everything from A to Z
Page 6 of 256
Notes
4
Notes
Using this Owner's Manual
We have tried to make all the information in this
Owner's Manual easy to find. The fastest way to
find specific topics is to refer to the detailed
index at the back of the manual. If you wish to
gain an initial overview of your vehicle, you will
find this in the first chapter.
Should you sell your BMW some day, please
remember to hand over the Owner's Manual as
well; it is an important component of your vehi-
cle.
Additional sources of information
Should you have any other questions, your
BMW center will be glad to advise you at any
time.
Information on BMW, e.g. on technical aspects,
can also be found on the Internet at
www.bmwusa.com.
Symbols used
Indicates precautions that must be fol-
lowed precisely in order to avoid the pos-
sibility of personal injury and serious damage to
the vehicle.
Indicates information that will assist you
in gaining the optimum benefit from your
vehicle and enable you to care more effectively
for your vehicle.
Refers to measures that can be taken to
help protect the environment.
*Indicates special equipment, country-spe-
cific equipment and optional accessories, as
well as equipment and functions not yet avail-
able at the time of printing.
"..." Identifies Control Display texts used to
select individual functions.
{...} Verbal instructions to use with the voice
activation system.
{{...}} Identifies the answers generated by the
voice activation system.
Symbols on vehicle components
Indicates that you should consult the rel-
evant section of this Owner's Manual for
information on a particular part or assembly.
Page 32 of 256

Opening and closing
30
Convenient operation*
Coupe: if the vehicle is equipped with an alarm
system
* or Comfort Access*, you can also
operate the windows and glass roof
* via the
door lock.
Convertible: you can operate the windows and
convertible top via the door lock.
Hold the key in the position for unlocking or
locking.
During each closing procedure, and when
opening the convertible top, watch the
process and ensure that no one becomes
trapped. Releasing the key stops the opera-
tion.<
Manual operation
In the event of an electrical malfunction, you can
lock and unlock the driver's door by turning the
integrated key to the corresponding limit posi-
tions in the door lock.
Opening and closing:
From inside
This button serves to unlock or lock doors and
the trunk lid, but does not activate the anti-theft
system. The fuel filler flap remains unlocked.
Automatic locking
You can also set the situations in which the car
locks:
1."Settings"
2."Door locks"3.Select the desired function:
>"Lock if no door is opened"
The central locking system locks after a
short time if no door has been opened.
>"Lock after start. to drive"
The central locking system locks the
vehicle as soon as you start to drive.
The function is switched on and is stored
for the remote control currently in use.
Unlocking and opening doors
>Either unlock the doors together using the
button for the central locking system and
then pull the door handle above the armrest
or
>pull on the door handle of each door twice:
the first time unlocks the door, the second
time opens it.
Locking
>Use the central locking button to lock all of
the doors simultaneously, or
>press down the safety lock button of a door.
To prevent you from being locked out, the
open driver's door cannot be locked using
the lock button.
Persons or animals in a parked vehicle
could lock the doors from the inside. You
should therefore take the remote control with
you when you leave the vehicle so that the latter
can be opened from outside.<
Page 39 of 256
Controls
37Reference
At a glance
Driving tips
Communications
Navigation
Entertainment
Mobility
Opening, closing
>Press the switch backwards to the resis-
tance point.
The glass roof and the sliding visor open
together as long as you hold the switch in
this position.
>Press the switch backwards past the resis-
tance point.
The glass roof and the sliding visor open
automatically. Briefly press the switch again
to stop the opening movement.
You can close the glass roof in a similar manner
by pressing the switch forwards. The sliding
visor remains open and can be closed by hand.
For information on Convenient operation via the
remote control or the door lock, refer to page27
or30. For information on Convenient closing
with Comfort Access, refer to Locking on
page34.
After switching off the ignition
When the remote control is removed or the igni-
tion is switched off, you can still operate the roof
for approx. 1 minute as long as no door has
been opened.
Pinch protection system
If the glass roof encounters an obstruction dur-
ing closing from approximately the middle of
the opening in the roof, or during closing from
the raised position, the closing movement is
interrupted and the glass roof is opened again
slightly.
Despite the pinch protection system
check and clear the roof's travel path prior
to closing it; otherwise, the safety system might
fail to detect certain kinds of obstructions, such
as very thin objects, and the roof would con-
tinue closing.<
Closing without pinch protection
If there is an external danger, press the switch
forward past the resistance point and hold it
there. The roof closes without pinch protection.
Following interruptions in electrical
power supply
After a power failure, there is a possibility that
the glass roof can only be raised. The system
must be initialized. BMW recommends having
this work done by your BMW center.
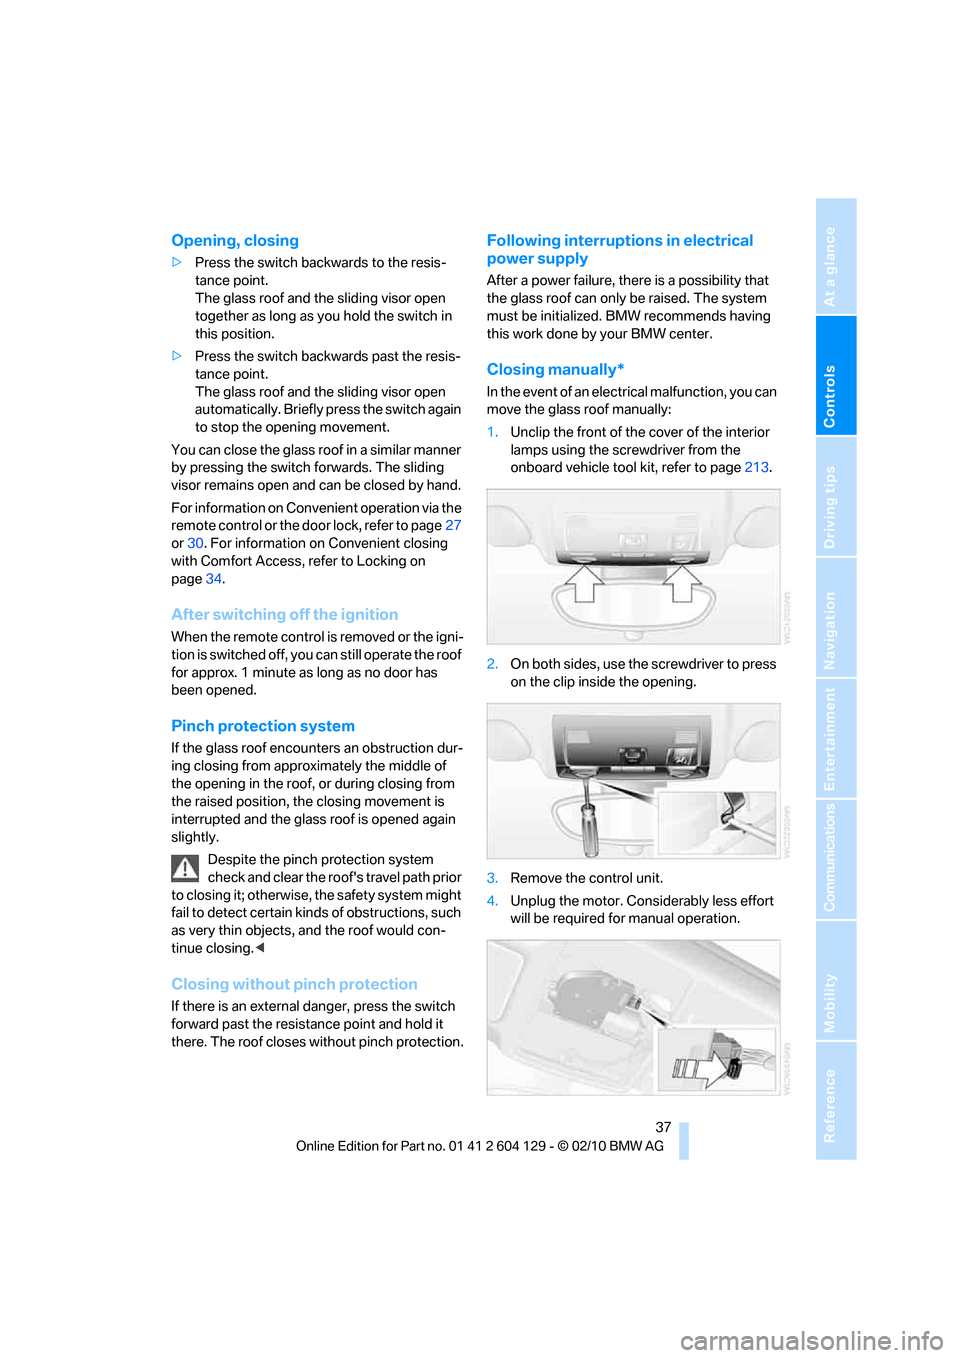
Closing manually*
In the event of an electrical malfunction, you can
move the glass roof manually:
1.Unclip the front of the cover of the interior
lamps using the screwdriver from the
onboard vehicle tool kit, refer to page213.
2.On both sides, use the screwdriver to press
on the clip inside the opening.
3.Remove the control unit.
4.Unplug the motor. Considerably less effort
will be required for manual operation.
Page 41 of 256
Controls
39Reference
At a glance
Driving tips
Communications
Navigation
Entertainment
Mobility
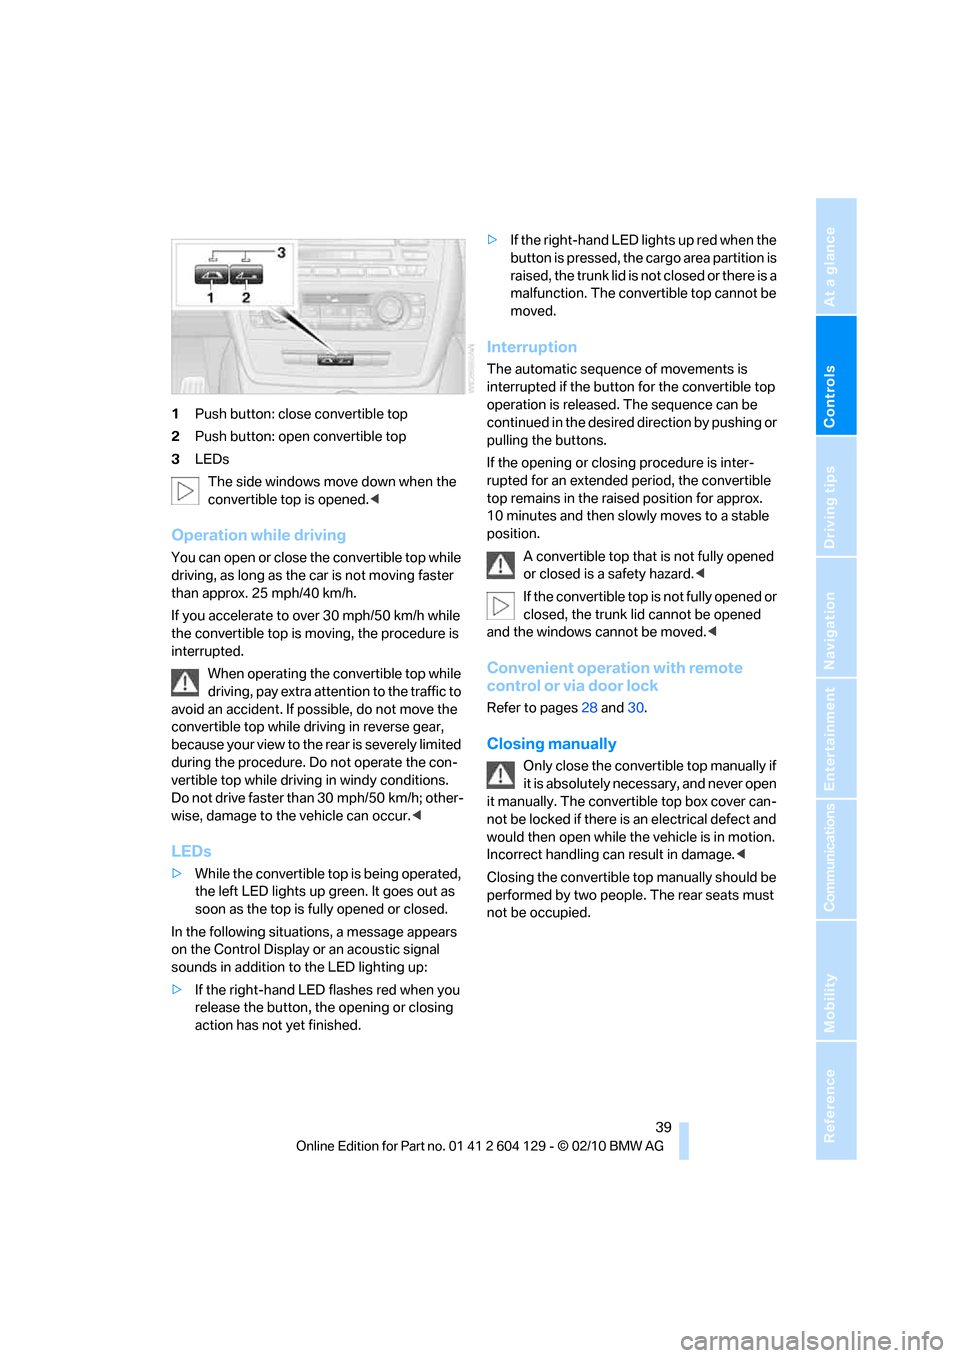
1Push button: close convertible top
2Push button: open convertible top
3LEDs
The side windows move down when the
convertible top is opened.<
Operation while driving
You can open or close the convertible top while
driving, as long as the car is not moving faster
than approx. 25 mph/40 km/h.
If you accelerate to over 30 mph/50 km/h while
the convertible top is moving, the procedure is
interrupted.
When operating the convertible top while
driving, pay extra attention to the traffic to
avoid an accident. If possible, do not move the
convertible top while driving in reverse gear,
b e c a u s e yo u r v ie w t o t h e r ea r is s e v e re ly li m i t ed
during the procedure. Do not operate the con-
vertible top while driving in windy conditions.
Do not drive faster than 30 mph/50 km/h; other-
wise, damage to the vehicle can occur.<
LEDs
>While the convertible top is being operated,
the left LED lights up green. It goes out as
soon as the top is fully opened or closed.
In the following situations, a message appears
on the Control Display or an acoustic signal
sounds in addition to the LED lighting up:
>If the right-hand LED flashes red when you
release the button, the opening or closing
action has not yet finished.>If the right-hand LED lights up red when the
button is pressed, the cargo area partition is
raised, the trunk lid is not closed or there is a
malfunction. The convertible top cannot be
moved.
Interruption
The automatic sequence of movements is
interrupted if the button for the convertible top
operation is released. The sequence can be
continued in the desired direction by pushing or
pulling the buttons.
If the opening or closing procedure is inter-
rupted for an extended period, the convertible
top remains in the raised position for approx.
10 minutes and then slowly moves to a stable
position.
A convertible top that is not fully opened
or closed is a safety hazard.<
If the convertible top is not fully opened or
closed, the trunk lid cannot be opened
and the windows cannot be moved.<
Convenient operation with remote
control or via door lock
Refer to pages28 and30.
Closing manually
Only close the convertible top manually if
it is absolutely necessary, and never open
it manually. The convertible top box cover can-
not be locked if there is an electrical defect and
would then open while the vehicle is in motion.
Incorrect handling can result in damage.<
Closing the convertible top manually should be
performed by two people. The rear seats must
not be occupied.
Page 42 of 256
Opening and closing
40
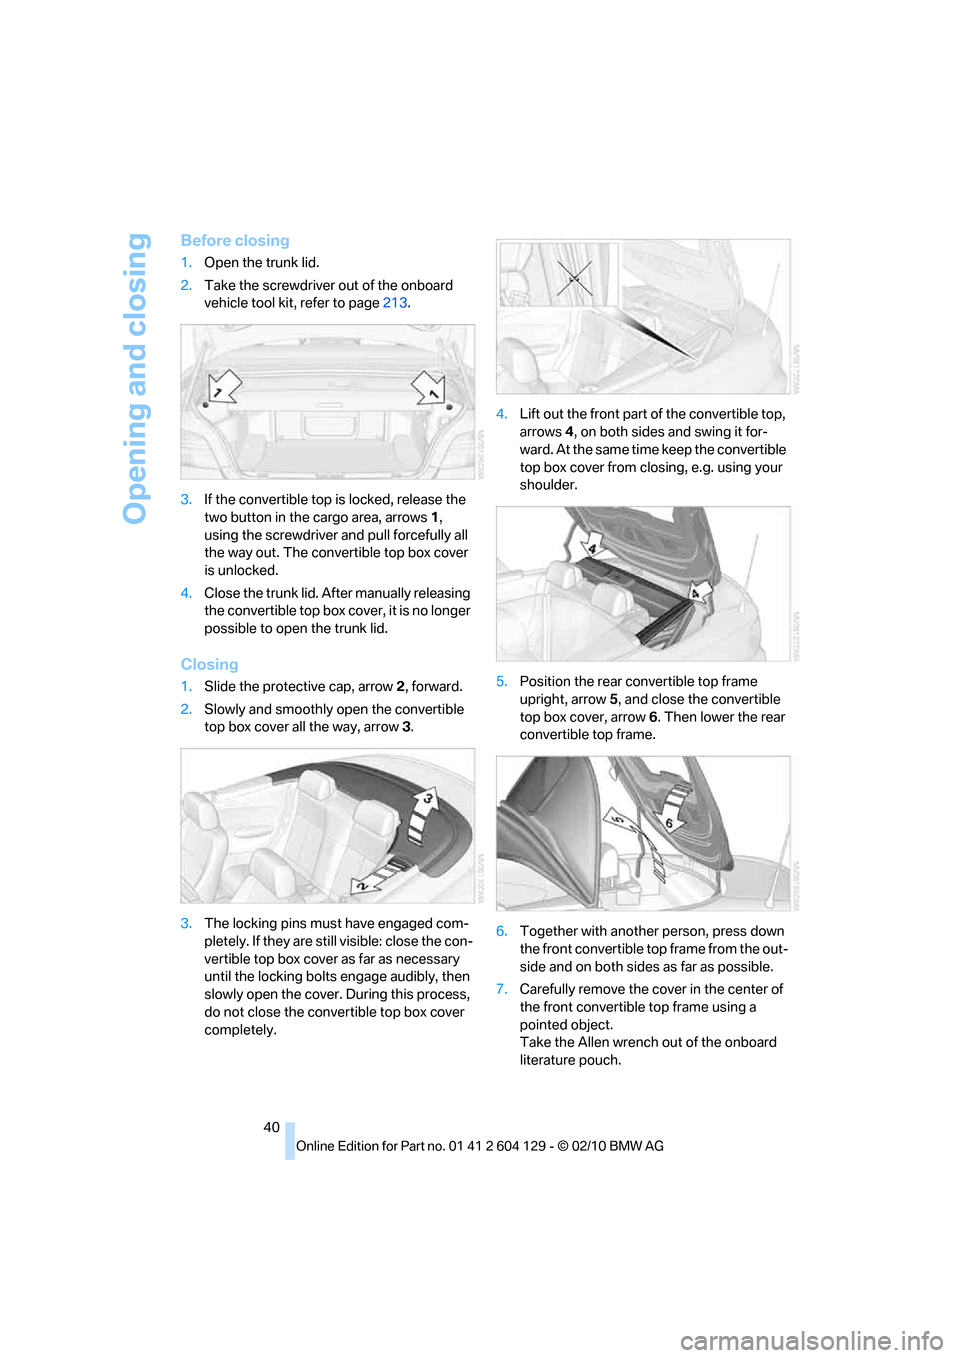
Before closing
1.Open the trunk lid.
2.Take the screwdriver out of the onboard
vehicle tool kit, refer to page213.
3.If the convertible top is locked, release the
two button in the cargo area, arrows1,
using the screwdriver and pull forcefully all
the way out. The convertible top box cover
is unlocked.
4.Close the trunk lid. After manually releasing
the convertible top box cover, it is no longer
possible to open the trunk lid.
Closing
1.Slide the protective cap, arrow2, forward.
2.Slowly and smoothly open the convertible
top box cover all the way, arrow3.
3.The locking pins must have engaged com-
pletely. If they are still visible: close the con-
vertible top box cover as far as necessary
until the locking bolts engage audibly, then
slowly open the cover. During this process,
do not close the convertible top box cover
completely.4.Lift out the front part of the convertible top,
arrows 4, on both sides and swing it for-
ward. At the same time keep the convertible
top box cover from closing, e.g. using your
shoulder.
5.Position the rear convertible top frame
upright, arrow5, and close the convertible
top box cover, arrow6. Then lower the rear
convertible top frame.
6.Together with another person, press down
the front convertible top frame from the out-
side and on both sides as far as possible.
7.Carefully remove the cover in the center of
the front convertible top frame using a
pointed object.
Take the Allen wrench out of the onboard
literature pouch.
Page 47 of 256
Controls
45Reference
At a glance
Driving tips
Communications
Navigation
Entertainment
Mobility
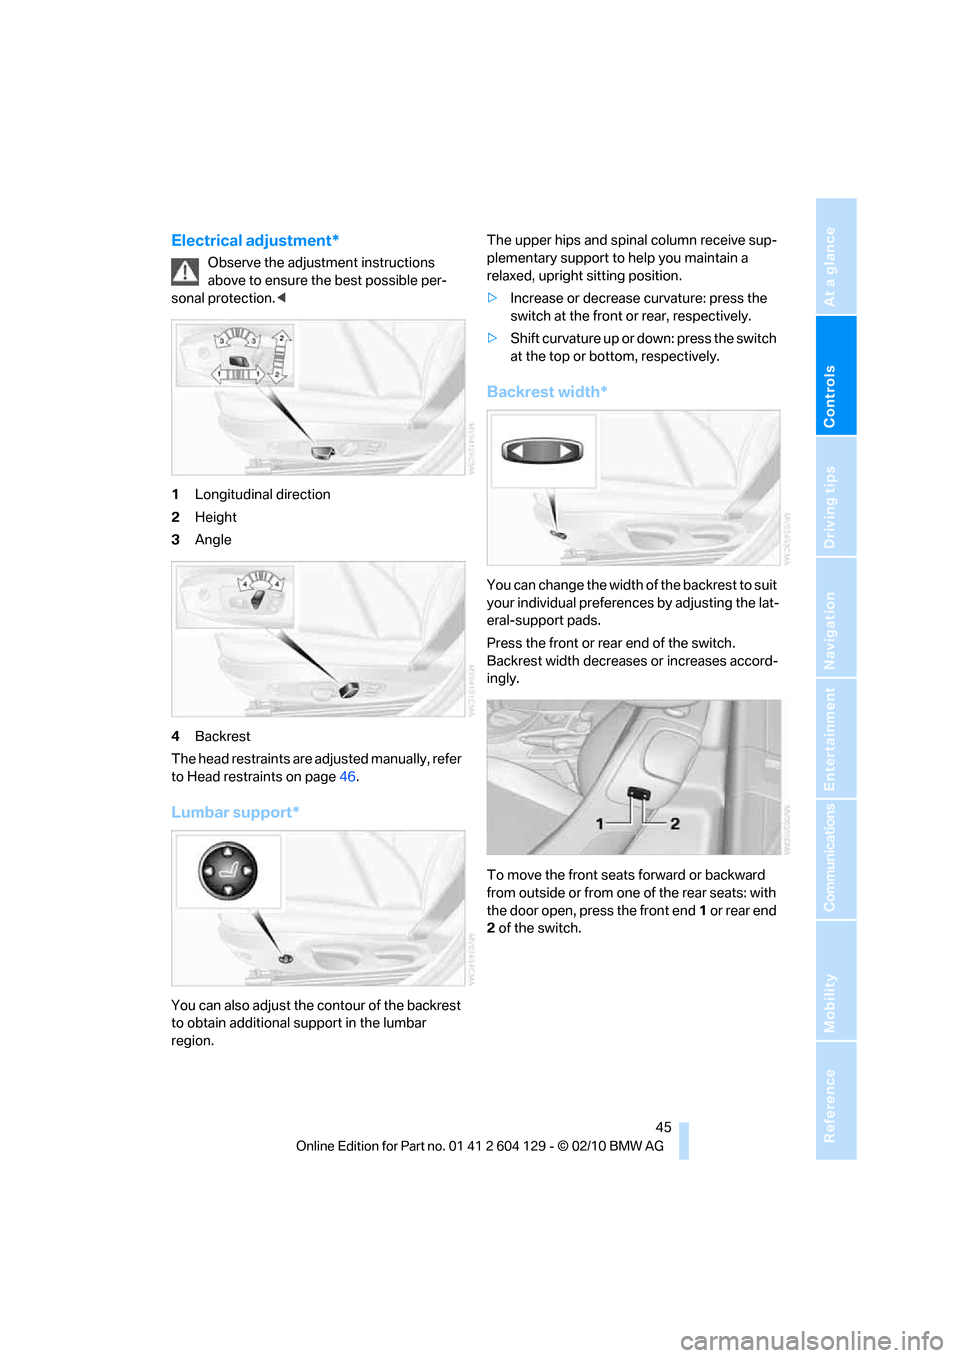
Electrical adjustment*
Observe the adjustment instructions
above to ensure the best possible per-
sonal protection.<
1Longitudinal direction
2Height
3Angle
4Backrest
The head restraints are adjusted manually, refer
to Head restraints on page46.
Lumbar support*
You can also adjust the contour of the backrest
to obtain additional support in the lumbar
region.The upper hips and spinal column receive sup-
plementary support to help you maintain a
relaxed, upright sitting position.
>Increase or decrease curvature: press the
switch at the front or rear, respectively.
>Shift curvature up or down: press the switch
at the top or bottom, respectively.
Backrest width*
You can change the width of the backrest to suit
your individual preferences by adjusting the lat-
eral-support pads.
Press the front or rear end of the switch.
Backrest width decreases or increases accord-
ingly.
To move the front seats forward or backward
from outside or from one of the rear seats: with
the door open, press the front end 1 or rear end
2 of the switch.
Page 49 of 256
Controls
47Reference
At a glance
Driving tips
Communications
Navigation
Entertainment
Mobility
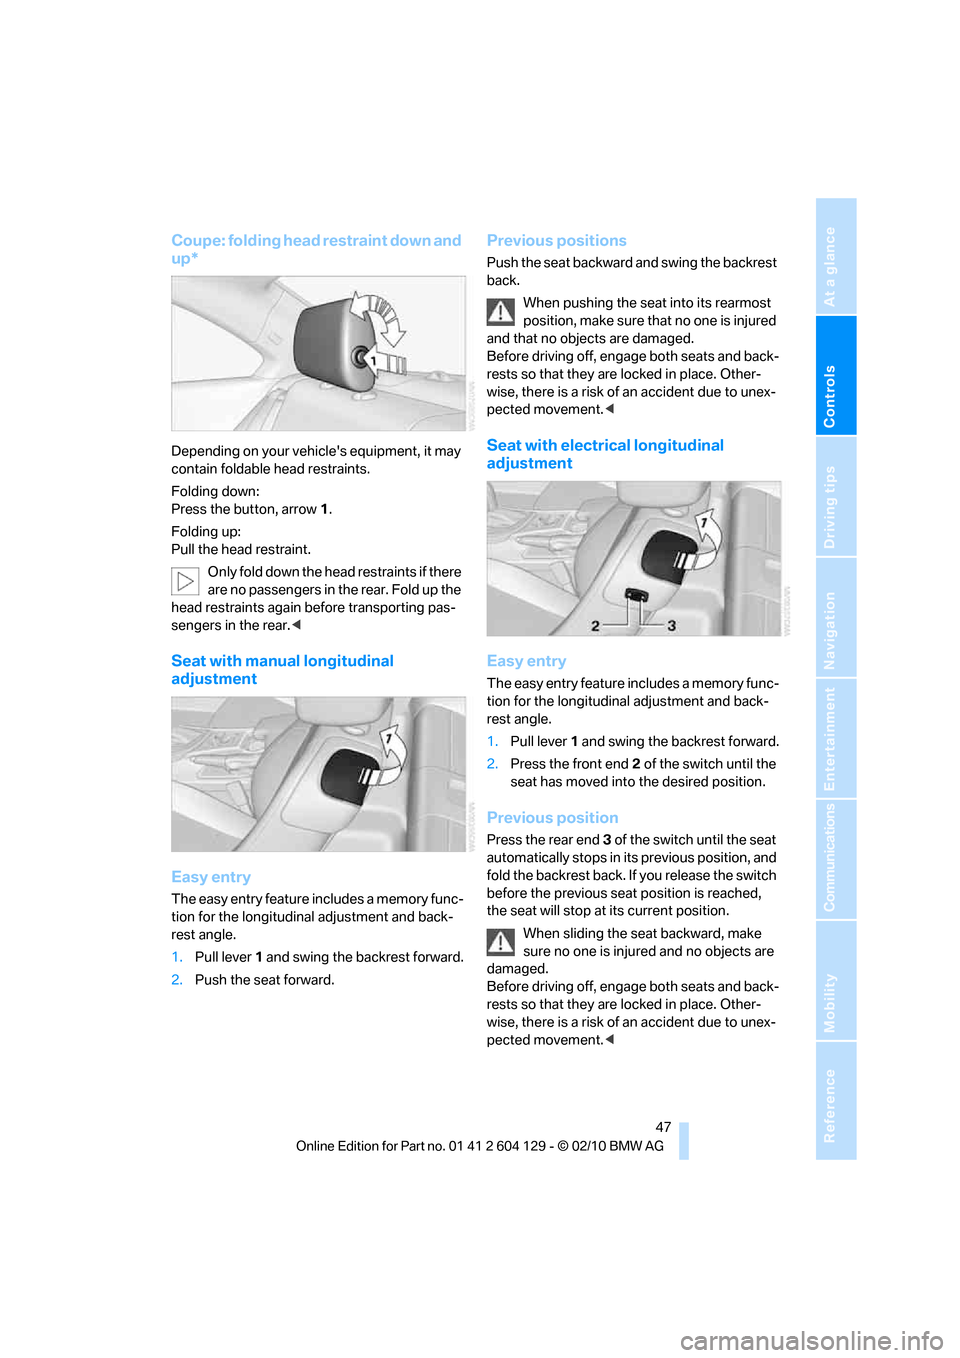
Coupe: folding head restraint down and
up*
Depending on your vehicle's equipment, it may
contain foldable head restraints.
Folding down:
Press the button, arrow1.
Folding up:
Pull the head restraint.
O n l y f o l d d o w n t h e h e a d r e s t r a i n t s i f t h e r e
are no passengers in the rear. Fold up the
head restraints again before transporting pas-
sengers in the rear.<
Seat with manual longitudinal
adjustment
Easy entry
The easy entry feature includes a memory func-
tion for the longitudinal adjustment and back-
rest angle.
1.Pull lever 1 and swing the backrest forward.
2.Push the seat forward.
Previous positions
Push the seat backward and swing the backrest
back.
When pushing the seat into its rearmost
position, make sure that no one is injured
and that no objects are damaged.
Before driving off, engage both seats and back-
rests so that they are locked in place. Other-
wise, there is a risk of an accident due to unex-
pected movement.<
Seat with electrical longitudinal
adjustment
Easy entry
The easy entry feature includes a memory func-
tion for the longitudinal adjustment and back-
rest angle.
1.Pull lever 1 and swing the backrest forward.
2.Press the front end 2 of the switch until the
seat has moved into the desired position.
Previous position
Press the rear end 3 of the switch until the seat
automatically stops in its previous position, and
fold the backrest back. If you release the switch
before the previous seat position is reached,
the seat will stop at its current position.
When sliding the seat backward, make
sure no one is injured and no objects are
damaged.
Before driving off, engage both seats and back-
rests so that they are locked in place. Other-
wise, there is a risk of an accident due to unex-
pected movement.<