2011 BMW 128I COUPE trunk
[x] Cancel search: trunkPage 36 of 256

Opening and closing
34
Unlocking
Grasp the handle on the driver's or front pas-
senger door completely, arrow 1. This corre-
sponds to pressing the button.
Locking
Touch the surface, arrow 2, with your finger for
approx. 1 second. This corresponds to pressing
the button.
To preserve the battery, please make
sure that the ignition and all electrical
consumers are switched off before locking the
vehicle.<
Coupe: convenient closing
For Convenient closing, keep your finger on the
surface, arrow 2.
Convertible: window and convertible
top operation
With the ignition at radio readiness or beyond,
you can open and close the windows and the
convertible top when a remote control is
located inside the vehicle.
Unlocking the trunk lid separately
Press the button on the outside of the trunk lid.
This corresponds to pressing the button.
If the vehicle detects that a remote con-
trol has been accidentally left inside the
locked vehicle after the trunk lid is closed, the
lid will reopen. The hazard warning flashers
flash and a signal
* sounds.<
Switching on radio readiness
Radio readiness is switched on by pressing the
start/stop button, refer to page55.Do not depress the brake or the clutch;
otherwise, the engine will start immedi-
ately.<
Starting the engine
You can start the engine or switch on the igni-
tion when a remote control is inside the vehicle.
It is not necessary to insert a remote control into
the ignition lock, refer to page55.
Switching off the engine in cars with
automatic transmission
The engine can only be switched off when the
selector lever is in position P, refer to page56.
To switch the engine off when the selector lever
is in position N, the remote control must be in
the ignition lock.
Malfunctions
Comfort Access may malfunction due to local
radio waves. If this happens, open and close the
vehicle via the buttons on the remote control or
using the integrated key. To start the engine
afterward, insert the remote control into the
ignition lock.
Warning lamps
The warning lamp in the instrument
cluster lights up when you attempt to
start the engine: the engine cannot
be started. The remote control is not inside the
vehicle or is malfunctioning. Take the remote
control with you inside the vehicle or have it
checked. If necessary, insert another remote
control into the ignition lock.
The warning lamp in the instrument
cluster lights up while the engine is
running: the remote control is no
longer inside the vehicle. After the engine is
switched off, the engine can only be restarted
within approx. 10 seconds.
The indicator lamp in the instrument
cluster comes on and a message
appears on the Control Display:
replace the battery in the remote control.
Page 40 of 256
Opening and closing
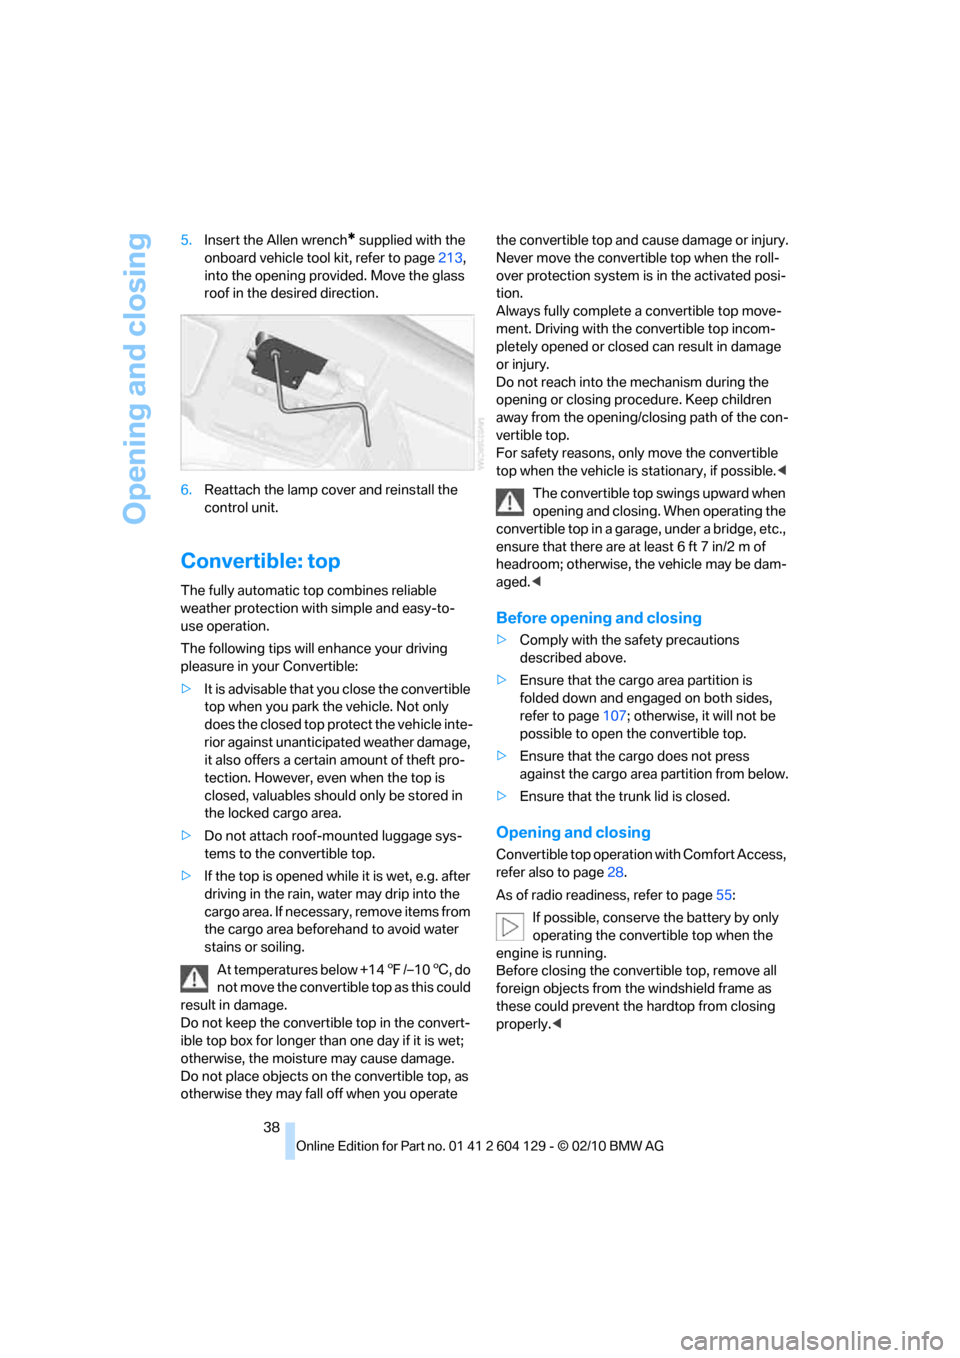
38 5.Insert the Allen wrench
* supplied with the
onboard vehicle tool kit, refer to page213,
into the opening provided. Move the glass
roof in the desired direction.
6.Reattach the lamp cover and reinstall the
control unit.
Convertible: top
The fully automatic top combines reliable
weather protection with simple and easy-to-
use operation.
The following tips will enhance your driving
pleasure in your Convertible:
>It is advisable that you close the convertible
top when you park the vehicle. Not only
does the closed top protect the vehicle inte-
rior against unanticipated weather damage,
it also offers a certain amount of theft pro-
tection. However, even when the top is
closed, valuables should only be stored in
the locked cargo area.
>Do not attach roof-mounted luggage sys-
tems to the convertible top.
>If the top is opened while it is wet, e.g. after
driving in the rain, water may drip into the
cargo area. If necessary, remove items from
the cargo area beforehand to avoid water
stains or soiling.
At temperatures below +147/–106, do
not move the convertible top as this could
result in damage.
Do not keep the convertible top in the convert-
ible top box for longer than one day if it is wet;
otherwise, the moisture may cause damage.
Do not place objects on the convertible top, as
otherwise they may fall off when you operate the convertible top and cause damage or injury.
Never move the convertible top when the roll-
over protection system is in the activated posi-
tion.
Always fully complete a convertible top move-
ment. Driving with the convertible top incom-
pletely opened or closed can result in damage
or injury.
Do not reach into the mechanism during the
opening or closing procedure. Keep children
away from the opening/closing path of the con-
vertible top.
For safety reasons, only move the convertible
top when the vehicle is stationary, if possible.<
The convertible top swings upward when
opening and closing. When operating the
convertible top in a garage, under a bridge, etc.,
ensure that there are at least 6 ft 7 in/2 m of
headroom; otherwise, the vehicle may be dam-
aged.<
Before opening and closing
>Comply with the safety precautions
described above.
>Ensure that the cargo area partition is
folded down and engaged on both sides,
refer to page107; otherwise, it will not be
possible to open the convertible top.
>Ensure that the cargo does not press
against the cargo area partition from below.
>Ensure that the trunk lid is closed.
Opening and closing
Convertible top operation with Comfort Access,
refer also to page28.
As of radio readiness, refer to page55:
If possible, conserve the battery by only
operating the convertible top when the
engine is running.
Before closing the convertible top, remove all
foreign objects from the windshield frame as
these could prevent the hardtop from closing
properly.<
Page 41 of 256
Controls
39Reference
At a glance
Driving tips
Communications
Navigation
Entertainment
Mobility
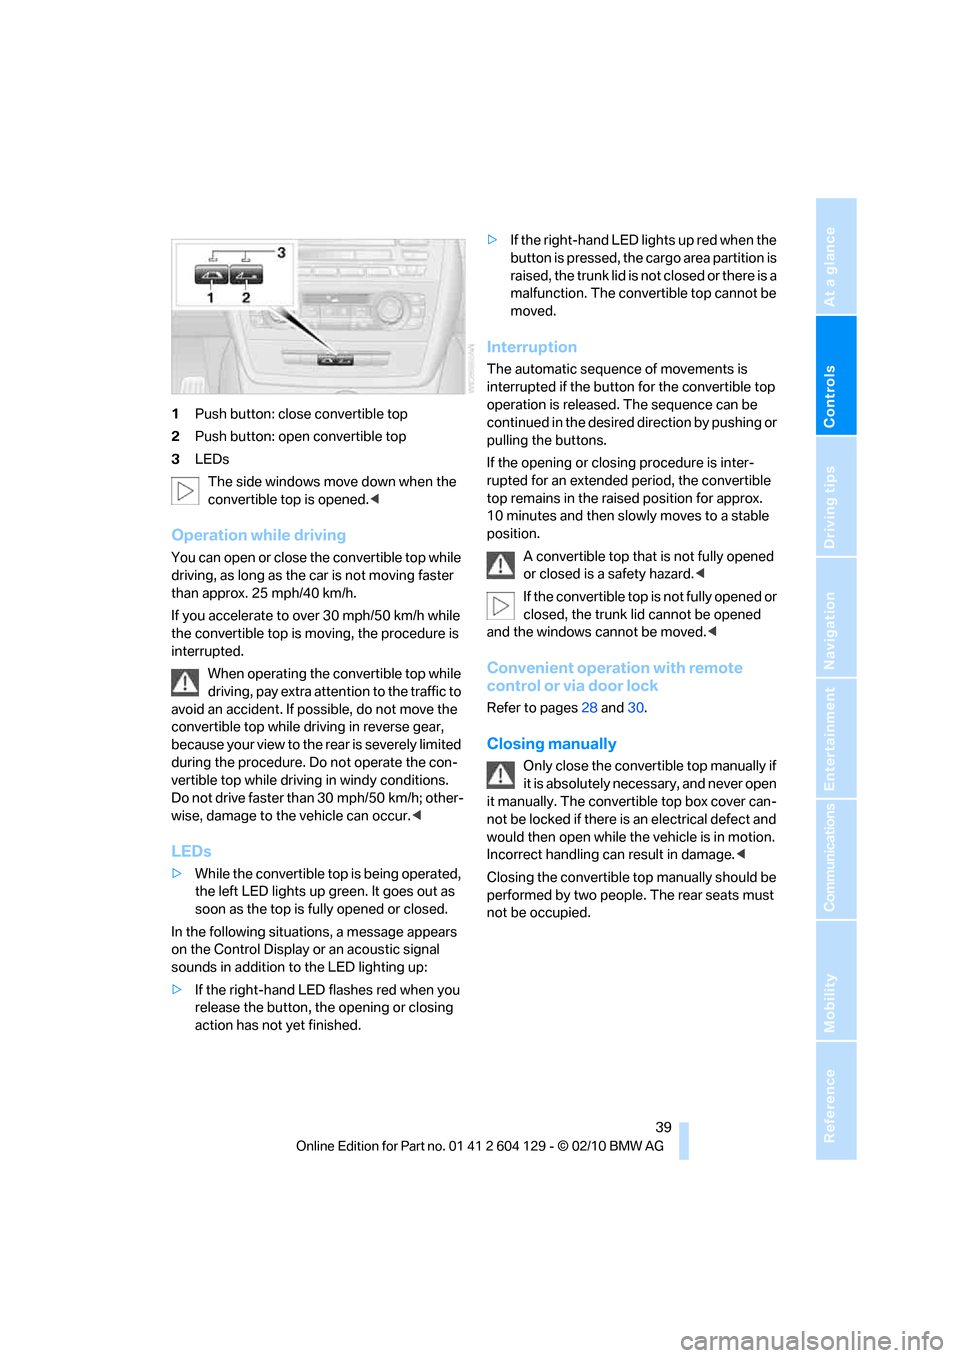
1Push button: close convertible top
2Push button: open convertible top
3LEDs
The side windows move down when the
convertible top is opened.<
Operation while driving
You can open or close the convertible top while
driving, as long as the car is not moving faster
than approx. 25 mph/40 km/h.
If you accelerate to over 30 mph/50 km/h while
the convertible top is moving, the procedure is
interrupted.
When operating the convertible top while
driving, pay extra attention to the traffic to
avoid an accident. If possible, do not move the
convertible top while driving in reverse gear,
b e c a u s e yo u r v ie w t o t h e r ea r is s e v e re ly li m i t ed
during the procedure. Do not operate the con-
vertible top while driving in windy conditions.
Do not drive faster than 30 mph/50 km/h; other-
wise, damage to the vehicle can occur.<
LEDs
>While the convertible top is being operated,
the left LED lights up green. It goes out as
soon as the top is fully opened or closed.
In the following situations, a message appears
on the Control Display or an acoustic signal
sounds in addition to the LED lighting up:
>If the right-hand LED flashes red when you
release the button, the opening or closing
action has not yet finished.>If the right-hand LED lights up red when the
button is pressed, the cargo area partition is
raised, the trunk lid is not closed or there is a
malfunction. The convertible top cannot be
moved.
Interruption
The automatic sequence of movements is
interrupted if the button for the convertible top
operation is released. The sequence can be
continued in the desired direction by pushing or
pulling the buttons.
If the opening or closing procedure is inter-
rupted for an extended period, the convertible
top remains in the raised position for approx.
10 minutes and then slowly moves to a stable
position.
A convertible top that is not fully opened
or closed is a safety hazard.<
If the convertible top is not fully opened or
closed, the trunk lid cannot be opened
and the windows cannot be moved.<
Convenient operation with remote
control or via door lock
Refer to pages28 and30.
Closing manually
Only close the convertible top manually if
it is absolutely necessary, and never open
it manually. The convertible top box cover can-
not be locked if there is an electrical defect and
would then open while the vehicle is in motion.
Incorrect handling can result in damage.<
Closing the convertible top manually should be
performed by two people. The rear seats must
not be occupied.
Page 42 of 256
Opening and closing
40
Before closing
1.Open the trunk lid.
2.Take the screwdriver out of the onboard
vehicle tool kit, refer to page213.
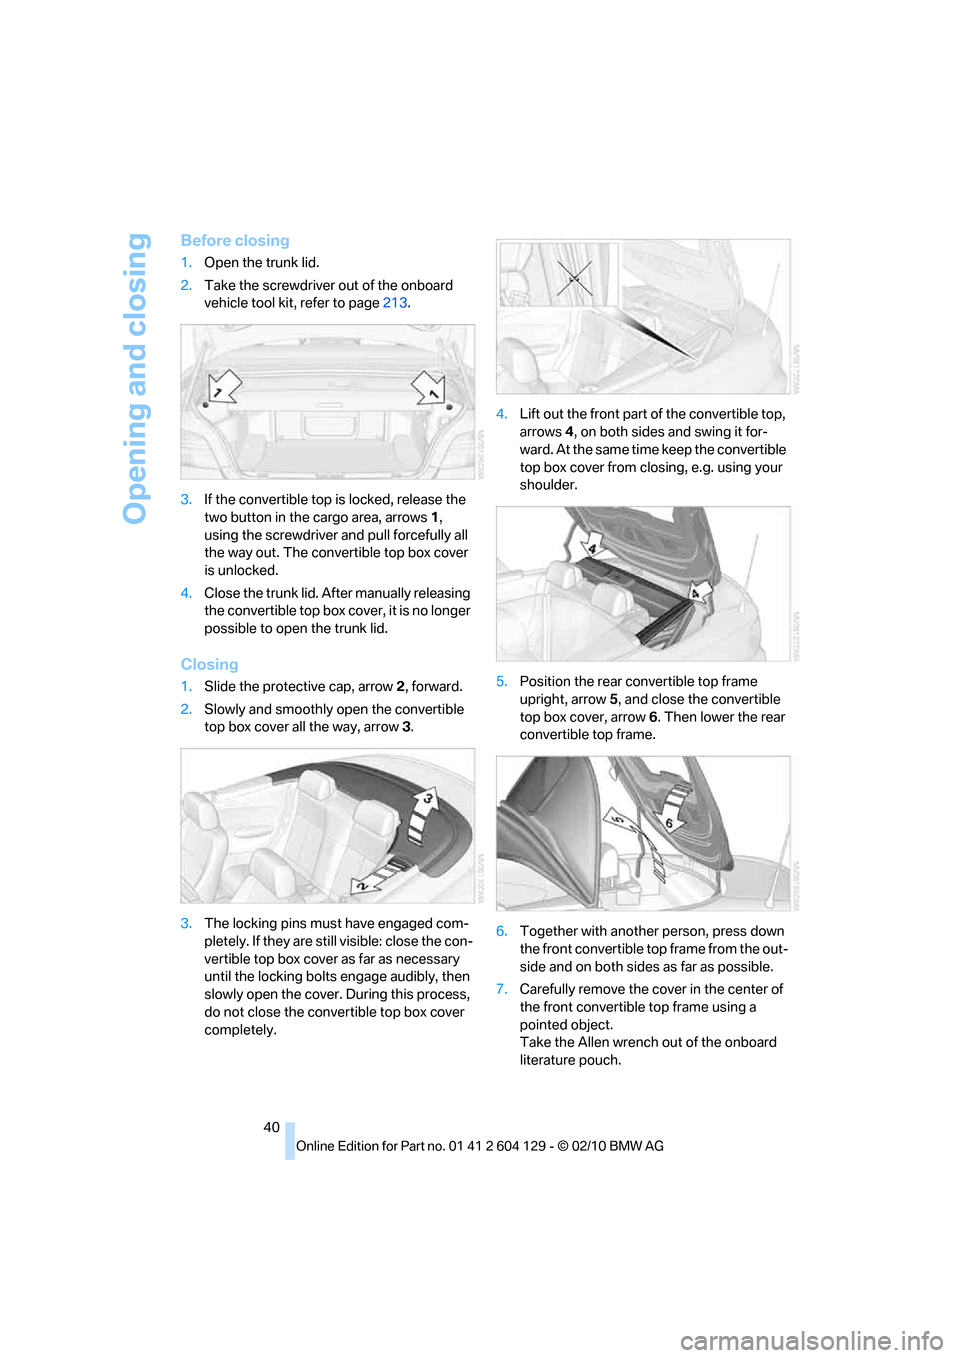
3.If the convertible top is locked, release the
two button in the cargo area, arrows1,
using the screwdriver and pull forcefully all
the way out. The convertible top box cover
is unlocked.
4.Close the trunk lid. After manually releasing
the convertible top box cover, it is no longer
possible to open the trunk lid.
Closing
1.Slide the protective cap, arrow2, forward.
2.Slowly and smoothly open the convertible
top box cover all the way, arrow3.
3.The locking pins must have engaged com-
pletely. If they are still visible: close the con-
vertible top box cover as far as necessary
until the locking bolts engage audibly, then
slowly open the cover. During this process,
do not close the convertible top box cover
completely.4.Lift out the front part of the convertible top,
arrows 4, on both sides and swing it for-
ward. At the same time keep the convertible
top box cover from closing, e.g. using your
shoulder.
5.Position the rear convertible top frame
upright, arrow5, and close the convertible
top box cover, arrow6. Then lower the rear
convertible top frame.
6.Together with another person, press down
the front convertible top frame from the out-
side and on both sides as far as possible.
7.Carefully remove the cover in the center of
the front convertible top frame using a
pointed object.
Take the Allen wrench out of the onboard
literature pouch.
Page 115 of 256
Driving tips
113Reference
At a glance
Controls
Communications
Navigation
Entertainment
Mobility
Drive defensively
Avoid unnecessary acceleration and braking
maneuvers. To do so, keep an adequate dis-
tance between you and the vehicle in front of
you. A defensive and smooth driving style
keeps fuel consumption down.
Avoid high engine speeds
Only use first gear when setting off. In second
and higher gears, accelerate without hesitation
or pauses. When accelerating, shift up before
reaching high engine speeds.
When you reach the desired speed, shift into
the highest applicable gear and drive with the
engine speed as low as possible and at a con-
stant speed.
As a rule: driving at low engine speeds lowers
fuel consumption and reduces wear.
Coasting
When approaching a red light, take your foot off
the accelerator and coast to a stop in the high-
est applicable gear.
O n a d o w n h il l s lo p e , t a k e y o u r f o o t o f f t h e a c c el -
erator and coast in a suitable gear.
The fuel supply is interrupted when coasting.
Switch off the engine during lengthy
stops
Switch off the engine when stopping for lengthy
periods, e.g. at traffic lights, railroad crossings
or in traffic congestions. You achieve fuel sav-
ings even if standing time is as short as approx.
4 seconds.
Switch off functions you do not need at
the moment
Functions such as the air conditioner, seat
heating or rear window defroster draw large
amounts of power and consume additional fuel.
Especially in city traffic and in stop-and-go driv-
ing they have a considerable impact. Therefore,
switch these functions off when they are not
really needed.
Have the vehicle serviced
Have the vehicle serviced regularly to achieve
good economy and a long vehicle life. BMW
recommends having the vehicle serviced at a
BMW center. Also note the BMW service sys-
tem, refer to page207.
General driving notes
Close the trunk lid
Operate the vehicle only when the trunk
lid is closed. Otherwise, exhaust fumes
could enter the interior of the vehicle.<
If the vehicle must be driven with the trunk lid
open:
1.Close all windows and the glass roof.
2.Greatly increase the air volume of the auto-
matic climate control system, refer to
page98.
Hot exhaust system
In all vehicles, extremely high tempera-
tures are generated in the exhaust sys-
tem. Do not remove the heat shields installed in
its vicinity, and never apply undercoating to
them. When driving, standing at idle and while
parking, take care to avoid possible contact
between the hot exhaust system and any highly
flammable materials such as hay, leaves, grass,
etc. Such contact could lead to a fire, with the
risk of serious personal injuries and property
damage. Do not touch hot exhaust tail pipes.
Otherwise, there is a risk of burns.<
Hydroplaning
When driving on wet or slushy roads,
reduce road speed. If you do not, a wedge
of water can form between tires and road sur-
face. This situation, known as hydroplaning,
means that the tire can completely lose contact
with the road surface, so that neither the car can
be steered nor the brake be properly applied.<
The risk of hydroplaning increases with declin-
ing tread depth on the tires, refer also to Mini-
mum tread depth on page199.
Page 118 of 256
Things to remember when driving
116 >For very heavy cargo when the rear seat is
not occupied, secure each safety belt in the
opposite buckle.
Securing cargo
>Secure smaller and lighter items using
retaining straps
*, a cargo area net* or draw
straps
*.
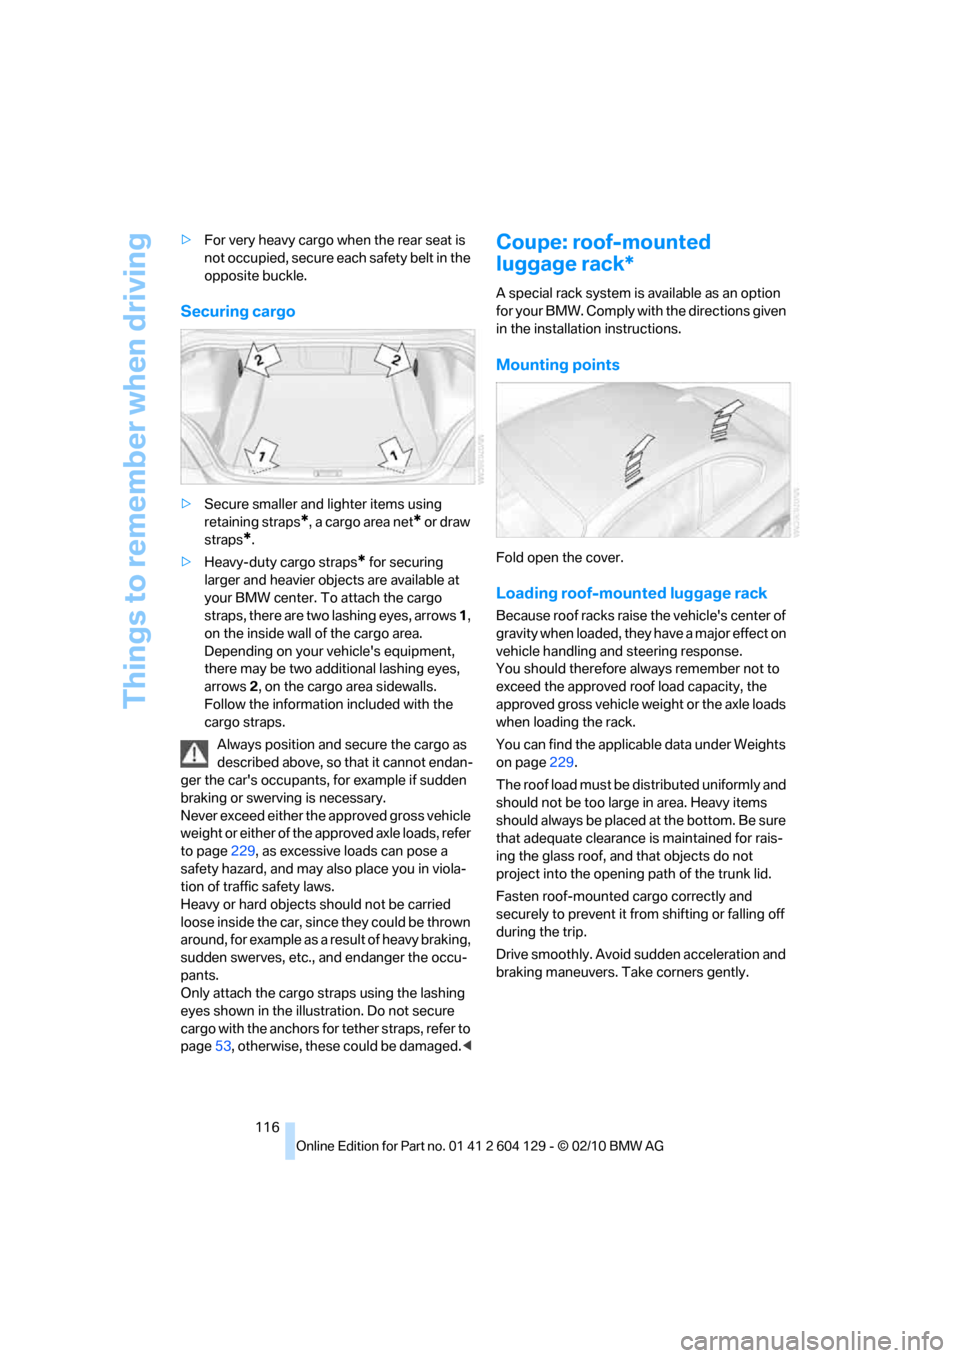
>Heavy-duty cargo straps
* for securing
larger and heavier objects are available at
your BMW center. To attach the cargo
straps, there are two lashing eyes, arrows 1,
on the inside wall of the cargo area.
Depending on your vehicle's equipment,
there may be two additional lashing eyes,
arrows2, on the cargo area sidewalls.
Follow the information included with the
cargo straps.
Always position and secure the cargo as
described above, so that it cannot endan-
ger the car's occupants, for example if sudden
braking or swerving is necessary.
Never exceed either the approved gross vehicle
weight or either of the approved axle loads, refer
to page229, as excessive loads can pose a
safety hazard, and may also place you in viola-
tion of traffic safety laws.
Heavy or hard objects should not be carried
loose inside the car, since they could be thrown
around, for example as a result of heavy braking,
sudden swerves, etc., and endanger the occu-
pants.
Only attach the cargo straps using the lashing
eyes shown in the illustration. Do not secure
cargo with the anchors for tether straps, refer to
page53, otherwise, these could be damaged.<
Coupe: roof-mounted
luggage rack*
A special rack system is available as an option
f o r y o u r B M W . C o m p l y w i t h t h e d i r e c t i o n s g i v e n
in the installation instructions.
Mounting points
Fold open the cover.
Loading roof-mounted luggage rack
Because roof racks raise the vehicle's center of
gravity when loaded, they have a major effect on
vehicle handling and steering response.
You should therefore always remember not to
exceed the approved roof load capacity, the
approved gross vehicle weight or the axle loads
when loading the rack.
You can find the applicable data under Weights
on page229.
The roof load must be distributed uniformly and
should not be too large in area. Heavy items
should always be placed at the bottom. Be sure
that adequate clearance is maintained for rais-
ing the glass roof, and that objects do not
project into the opening path of the trunk lid.
Fasten roof-mounted cargo correctly and
securely to prevent it from shifting or falling off
during the trip.
Drive smoothly. Avoid sudden acceleration and
braking maneuvers. Take corners gently.
Page 222 of 256

Giving and receiving assistance
220 The first aid pouch is located on the right-hand
side of the cargo area in a storage area.
Warning triangle*
The warning triangle is located in a holder in the
trunk lid. Press the tabs to take it out.
Jump-starting
If the car's own battery is flat, your BMW's
engine can be started by connecting two
jumper cables to another vehicle's battery. You
can also use the same method to help start
another vehicle. Only use jumper cables with
fully-insulated clamp handles.
Do not touch any electrically live parts
when the engine is running, or a fatal acci-
dent may occur. Carefully adhere to the follow-
ing sequence, both to prevent damage to one or
both vehicles, and to guard against possible
personal injuries.<
Preparation
1.Check whether the battery of the other
vehicle has a voltage of 12 volts and
approximately the same capacitance in Ah.
This information can be found on the bat-
tery.
2.Switch off the engine of the assisting vehi-
cle.
3.Switch off any consumers in both vehicles.
There must not be any contact between
the bodies of the two vehicles; otherwise,
there is a danger of shorting.<
Connecting jumper cables
Connect the jumper cables in the correct
order to prevent sparking at the battery,
which could cause injury.<
Your BMW has a jump-starting connection in
the engine compartment which acts as the bat-
tery's positive terminal, refer also to the Engine
compartment overview on page203. The cap is
marked with +.
1.Pull the cap of the BMW jump-starting con-
nection up to remove.
2.Attach one terminal clamp of the plus/+
jumper cable to the positive terminal of the
battery or a starting-aid terminal of the vehi-
cle providing assistance.
3.Attach the second terminal clamp of the
plus/+ jumper cable to the positive terminal
of the battery or a starting-aid terminal of
the vehicle to be started.
4.Attach one terminal clamp of the minus/–
jumper cable to the negative terminal of the
battery or to an engine or body ground of
the assisting vehicle.
Page 241 of 256

Reference 239
At a glance
Controls
Driving tips
Communications
Navigation
Entertainment
Mobility
B
Backrests, refer to Seats44
Backrest width adjustment45
Back seats, refer to Rear seats
– adjusting head restraints46
Backup lamp, replacing
bulb216
Bag for skis, refer to Ski
bag107
Band-aids, refer to First aid
pouch219
Bar, refer to Tow-starting,
towing away222
Base plate for telephone or
mobile phone
– refer to Snap-in adapter180
Bass, tone setting140
Battery217
– charging218
– disposal35,218
– jump-starting220
– replacing217
– temporary power failure218
Battery for mobile phone181
Battery renewal
– remote control for vehicle35
Being towed222
Belts, refer to Safety belts49
Belt tensioner, refer to Safety
belts49
Beverage holders, refer to
Cupholders105
Blower, refer to Air volume98
Bluetooth, activating/
deactivating172
BMW
– car shampoo210
BMW Assist184
BMW Maintenance
System207
BMW Search186
Bottle holders, refer to
Cupholders105
Brake Assist, refer to Dynamic
Brake Control81
Brake fluid
– service requirements72
Brake Force Display87Brake lamps
– Brake Force Display87
– replacing bulb216
Brake pads, breaking in112
Brake rotors114
– brakes112
– breaking in112
Brakes
– ABS81
– BMW Maintenance
System207
– braking safely114
– breaking in112
– parking brake57
– service requirements72
Brake system112
– BMW Maintenance
System207
– breaking in112
– disc brakes114
Breakdown services, refer to
Roadside Assistance219
Breaking in the clutch112
Break-in period112
Bulb changing, refer to Lamps
and bulbs213
Bulbs, changing213
Button for starting the
engine55
Buttons on the steering
wheel11
C
California Proposition 65
warning6
Call
– accepting173
– ending174
– rejecting174
Calling, refer to Phone
numbers, dialing174
Calling, refer to Telephone
owner's manual
Can holders, refer to
Cupholders105
Capacities230
Capacity of the cargo area229Car battery, refer to Vehicle
battery217
Car care, refer to Care209
Care209
– automatic car washes209
– care products209
– carpets212
– CD/DVD drives212
– chrome parts211
– convertible top210
– displays212
– exterior209
– fine wood parts212
– headlamps210
– high-pressure washer210
– interior211
– leather211
– light-alloy wheels211
– paintwork211
– plastic parts212
– rubber seals211
– safety belts212
– sensors and cameras212
– upholstery and cloth
trim211
– washing the car
manually210
– windows210
Cargo, securing116
Cargo area
– capacity229
– Comfort Access34
– enlarging, refer to Through-
loading system106
– lamp, refer to Interior
lamps95
– lid, refer to Trunk lid31
– opening from outside31
Cargo area lid, refer to Trunk
lid31
Cargo area net, refer to
Securing cargo116
Cargo loading115
– securing cargo
116
– stowing cargo115
– vehicle114
Car jack
– jacking points217