Page 8 of 517

ꭧ1:
ꭧ 2:
ꭧ 3: On models without navigation system.
On models with navigation system.
HomeLink
®buttons (P. 303)
Moonroof Switch (P. 144)
Front Ceiling Light Switch (P. 151)
INSTRUMENT PANEL
INDICATORS (P. 63)
GAUGES (P. 73)
DRIVER'S FRONT AIRBAG
(P. 10, 26)
DRIVING POSITION
MEMORY SYSTEM
(P. 148)
POWER DOOR LOCK
MASTER SWITCH
(P. 126)
POWER WINDOW
SWITCHES
(P. 142)
FUEL FILL DOOR
RELEASE HANDLE
(P. 353) PARKING BRAKE PEDAL
(P. 150) AUTOMATIC TRANSMISSION
(P. 376)
HOOD RELEASE HANDLE
(P. 355) AUDIO SYSTEM
ꭧ
1
(P. 174) CEILING CONSOLE
ꭧ
3
MIRROR CONTROL
AUTO BUTTON
(P. 146)
PASSENGER'S
FRONT AIRBAG
(P. 10, 26)
CLIMATE CONTROL
SYSTEM
(P. 164) POWER DOOR LOCK
MASTER SWITCH
(P. 126)
POWER WINDOW
SWITCH
(P. 142)
AUDIO SYSTEM
ꭧ 2
(P. 216)
ACCESSORY POWER
SOCKET (P. 157)
Vehicle with navigation system is shown. REARVIEW MONITOR
ꭧ
1
(P. 348)
USB ADAPTER CABLE
(P. 199, 207, 263, 274)
CONTINUED
Your Vehicle at a Glance
3
Your Vehicle at a Glance
10/06/08 17:42:32 11 ACURA RDX MMC North America Owner's M 50 31STK640 enu
Page 67 of 517
ꭧ1: On models without navigation system.
ꭧ 2: On models with navigation system.
ꭧ 3: HomeLink
®Buttons (P. 303)
Moonroof Switch (P. 144)
Front Ceiling Light Switch (P. 151)
INSTRUMENT PANEL
INDICATORS (P. 63)
GAUGES (P. 73)
DRIVING POSITION
MEMORY SYSTEM
(P. 148)
POWER DOOR LOCK
MASTER SWITCH
(P. 126) POWER WINDOW
SWITCHES
(P. 142)
HOOD RELEASE
HANDLE
(P. 355) FUEL FILL DOOR
RELEASE HANDLE
(P. 353) PARKING BRAKE
PEDAL (P. 150)
AUTOMATIC
TRANSMISSION
(P. 376) ACCESSORY POWER
SOCKET
(P. 157)
AUDIO SYSTEM
ꭧ
1
(P. 174) CEILING CONSOLE
ꭧ
3MIRROR CONTROL
AUTO BUTTON (P. 146)
CLIMATE CONTROL
SYSTEM
(P. 164)AUDIO SYSTEM
ꭧ 2
(P. 216)
POWER DOOR LOCK
MASTER SWITCH
(P. 126)
POWER WINDOW
SWITCH
(P. 142)
REARVIEW MONITOR
ꭧ
1
(P. 348)
Vehicle with navigation system is shown. USB ADAPTER CABLE
(P. 199, 207, 263, 274)
Control Locations6210/06/08 17:42:32 11 ACURA RDX MMC North America Owner's M 50 31STK640 enu
Page 140 of 517
Head RestraintsSee page 15 for important safetyinformation and a warning aboutimproperly positioning head restraints.Your vehicle is equipped with head
restraints in all seating positions to
help protect you and your
passengers from the likelihood of
whiplash and other injuries.
They are most effective when you
adjust them so the center of the back
of the occupant's head rests against
the center of the restraint.
Adjusting the Head RestraintThe front and rear head restraints
adjust for height. You need both
hands to adjust the restraint. Do not
attempt to adjust it while driving. To
raise it, pull upward. To lower the
restraint, push the release button and
push the restraint down.Front CUSHION
LEGS SEAT BACK RELEASE BUTTON
CONTINUED
Seats
135
Instruments and Controls
10/06/08 17:42:32 11 ACURA RDX MMC North America Owner's M 50 31STK640 enu
Page 360 of 517

Turn the engine off, and confirm the
fuel fill cap is installed. If it is, loosen
it, then retighten it until it clicks at
least once. When you can restart the
engine, the message appears again.
The message goes off after several
days of normal driving once you
tighten or replace the fuel fill cap. To
scroll to another message, press the
INFO (
/
) button.
If the system still detects a leak in
your vehicle's evaporative emissions
system, the malfunction indicator
lamp (MIL) comes on. If the fuel fill
cap was not already tightened, turn
the engine off, and check or
retighten the fuel fill cap until it
clicks at least once. The MIL should
go off after several days of normal
driving once the cap is tightened or
replaced. If the MIL does not go off,
have your vehicle inspected by a
dealer. For more information, see
page 466. Opening and Closing the Hood
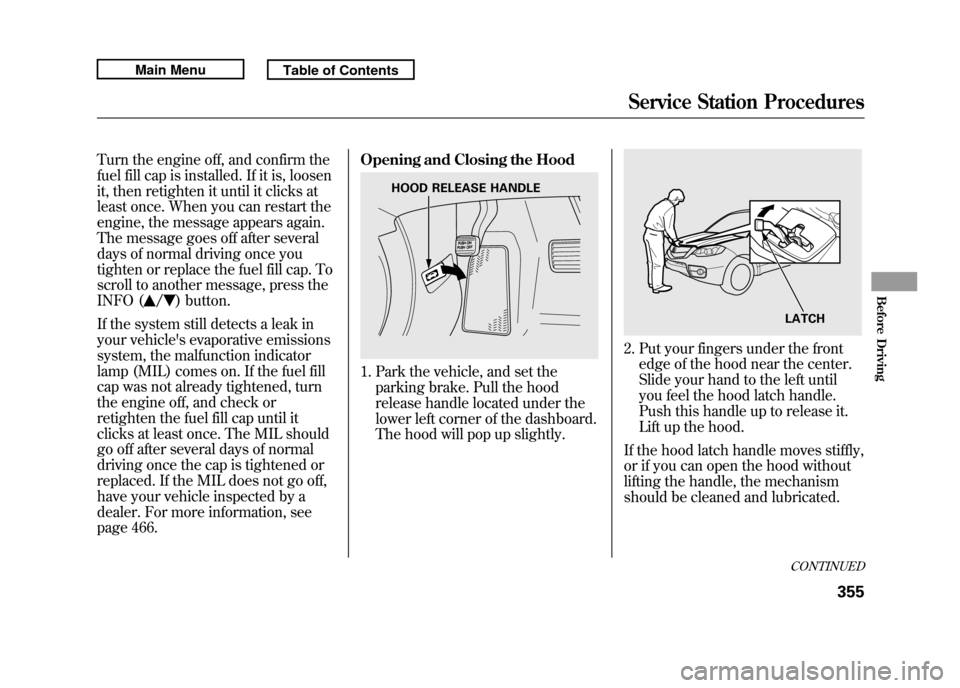
1. Park the vehicle, and set the
parking brake. Pull the hood
release handle located under the
lower left corner of the dashboard.
The hood will pop up slightly.
2. Put your fingers under the frontedge of the hood near the center.
Slide your hand to the left until
you feel the hood latch handle.
Push this handle up to release it.
Lift up the hood.
If the hood latch handle moves stiffly,
or if you can open the hood without
lifting the handle, the mechanism
should be cleaned and lubricated.
HOOD RELEASE HANDLE
LATCHCONTINUED
Service Station Procedures
355
Before Driving
10/06/08 17:42:32 11 ACURA RDX MMC North America Owner's M 50 31STK640 enu
Page 445 of 517
Check the condition of the wiper
blades at least every six months.
Replace them if you find signs of
cracking in the rubber, areas that are
getting hard, or if they leave streaks
and unwiped areas when used.
To replace a front wiper blade:
1. Raise each wiper arm off thewindshield, lifting the driver's side
first, then the passenger's side.Do not open the hood when the wiper
arms are raised, or you will damage the
hood and the wiper arms.
2. Disconnect the blade assemblyfrom the wiper arm:
●Press and hold the lock tab.●Slide the blade assembly toward
the lock tab until it releases
from the wiper arm.
When replacing a wiper blade,
make sure not to drop the wiper
blade or wiper arm down on the
windshield.
WIPER ARMS
Wiper Blades44010/06/08 17:42:32 11 ACURA RDX MMC North America Owner's M 50 31STK640 enu