2011.5 PEUGEOT 3008 ECO mode
[x] Cancel search: ECO modePage 3 of 328
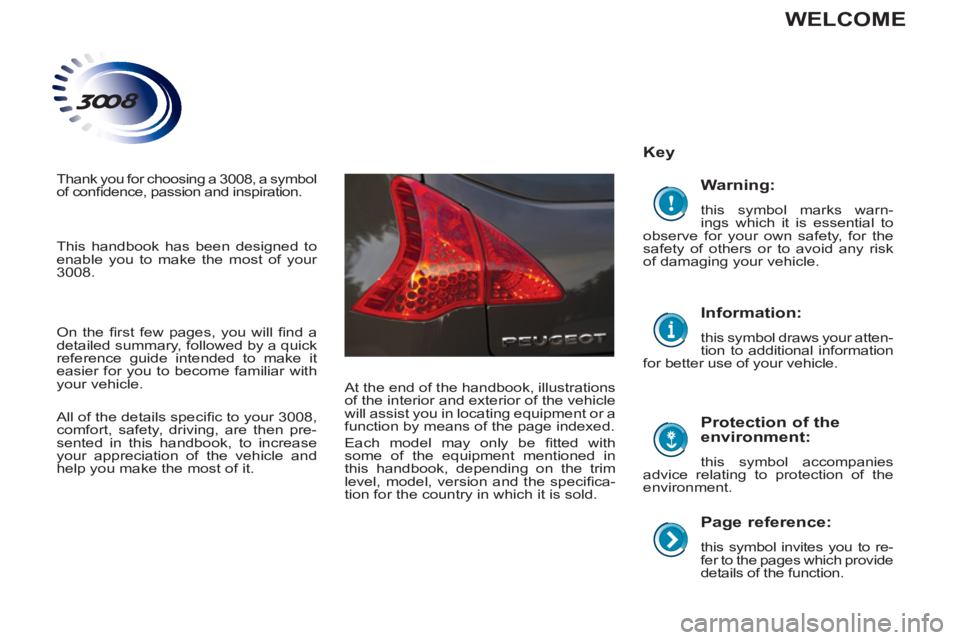
Page reference:
this symbol invites you to re-
fer to the pages which provide
details of the function.
Key
Protection of the
environment:
this symbol accompanies
advice relating to protection of the
environment.
Information:
this symbol draws your atten-
tion to additional information
for better use of your vehicle.
Warning:
this symbol marks warn-
ings which it is essential to
observe for your own safety, for the
safety of others or to avoid any risk
of damaging your vehicle.
WELCOME
Thank you for choosing a 3008, a symbol
of confi dence, passion and inspiration.
This handbook has been designed to
enable you to make the most of your
3008.
On the fi rst few pages, you will fi nd a
detailed summary, followed by a quick
reference guide intended to make it
easier for you to become familiar with
your vehicle.
All of the details specifi c to your 3008,
comfort, safety, driving, are then pre-
sented in this handbook, to increase
your appreciation of the vehicle and
help you make the most of it. At the end of the handbook, illustrations
of the interior and exterior of the vehicle
will assist you in locating equipment or a
function by means of the page indexed.
Each model may only be fi tted with
some of the equipment mentioned in
this handbook, depending on the trim
level, model, version and the specifi ca-
tion for the country in which it is sold.
Page 5 of 328

CONTENTS
ALPHABETICAL
INDEX 315-319 DRIVING 137-165
CHECKS 166-173PRACTICAL
INFORMATION 174-204
TECHNICAL
DATA 205-212AUDIO EQUIPMENT
and TELEMATICS 213-314
Electric parking brake 137
Hill start assist 142
Head-up display 145
Distance alert 147
Speed limiter 149
Cruise control 151
Manual gearbox 153
Gear efficiency indicator 153
6-speed electronic gear control
gearbox 154
Automatic gearbox 158
Stop & Start 161
Parking sensors 164
Bonnet 167
Running out of fuel (Diesel) 168
Petrol engines 169
Diesel engines 170
Checking levels 171
Checks 172Temporary puncture repair kit 174
Changing a wheel 180
Changing a bulb 185
Changing a fuse 190
12 V Battery 197
Energy economy mode 199
Changing a wiper blade 200
Towing the vehicle 200
Towing a trailer 202
Fitting roof bars 203
Very cold climate screen 203
Accessories 204
Petrol engines 205
Petrol weights 206
Diesel engines 207
Diesel weights 208
Dimensions 210
Identification markings 211Emergency or assistance 213
Peugeot Connect Media 217
Peugeot Connect Navigation
(RNEG) 261
Peugeot Connect Sound (RD5) 293
VISUAL
SEARCH 320-324
Page 17 of 328
15
FAMILIARISATION
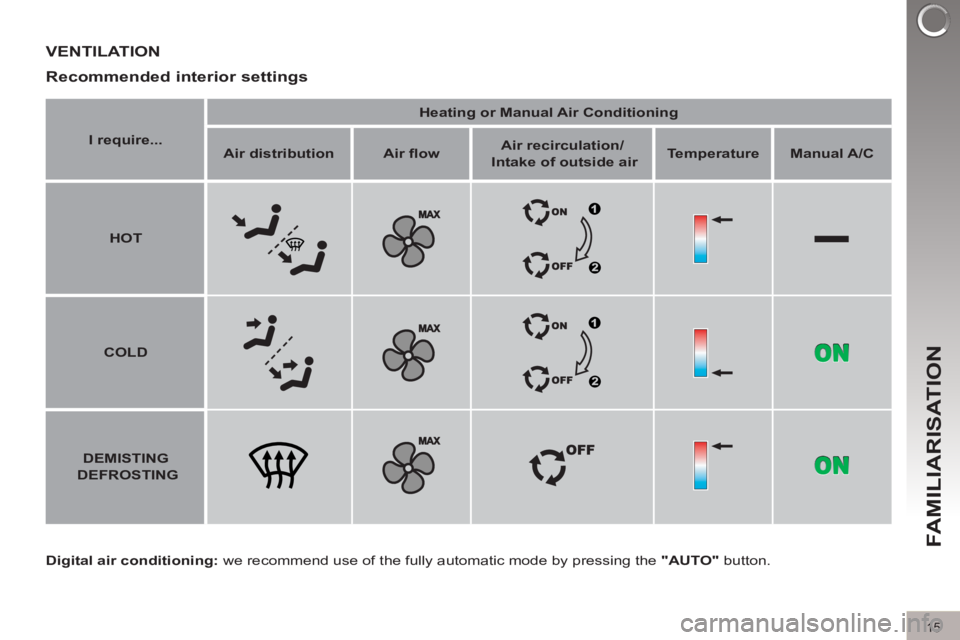
VENTILATION
Digital air conditioning:
we recommend use of the fully automatic mode by pressing the "AUTO"
button.
Recommended interior settings
I require...
Heating or Manual Air Conditioning
Air distribution
Air fl ow
Air recirculation/
Intake of outside air
Temperature
Manual A/C
HOT
COLD
DEMISTING
DEFROSTING
Page 22 of 328
20
FAMILIARISATION
Before refuelling or doing any-
thing under the bonnet, you
must switch off the ignition us-
ing the key.
DRIVING SAFELY
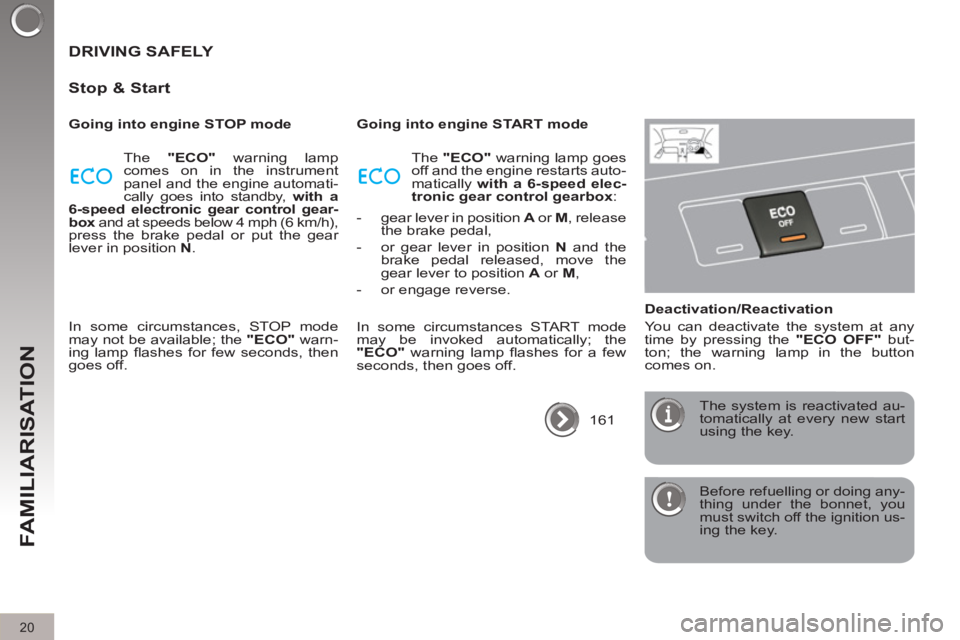
Stop & Start
Going into engine STOP mode
The "ECO"
warning lamp
comes on in the instrument
panel and the engine automati-
cally goes into standby, with a
6-speed electronic gear control gear-
box
and at speeds below 4 mph (6 km/h),
press the brake pedal or put the gear
lever in position N
.
Going into engine START mode
Deactivation/Reactivation
You can deactivate the system at any
time by pressing the "ECO OFF"
but-
ton; the warning lamp in the button
comes on.
161 The system is reactivated au-
tomatically at every new start
using the key. The "ECO"
warning lamp goes
off and the engine restarts auto-
matically with a 6-speed elec-
tronic gear control gearbox
:
- gear lever in position A
or M
, release
the brake pedal,
- or gear lever in position N
and the
brake pedal released, move the
gear lever to position A
or M
,
- or engage reverse.
In some circumstances, STOP mode
may not be available; the "ECO"
warn-
ing lamp fl ashes for few seconds, then
goes off. In some circumstances START mode
may be invoked automatically; the
"ECO"
warning lamp fl ashes for a few
seconds, then goes off.
Page 25 of 328
23
FAMILIARISATION
DRIVING SAFELY
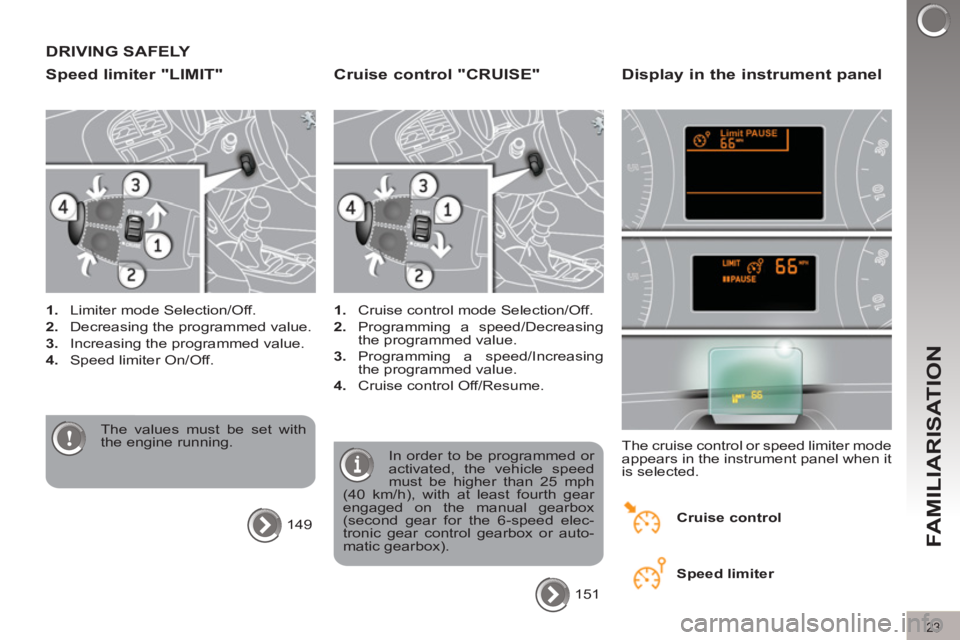
Speed limiter "LIMIT"
1.
Limiter mode Selection/Off.
2.
Decreasing the programmed value.
3.
Increasing the programmed value.
4.
Speed limiter On/Off.
The values must be set with
the engine running.
149
Cruise control "CRUISE"
1.
Cruise control mode Selection/Off.
2.
Programming a speed/Decreasing
the programmed value.
3.
Programming a speed/Increasing
the programmed value.
4.
Cruise control Off/Resume.
In order to be programmed or
activated, the vehicle speed
must be higher than 25 mph
(40 km/h), with at least fourth gear
engaged on the manual gearbox
(second gear for the 6-speed elec-
tronic gear control gearbox or auto-
matic gearbox).
151
Display in the instrument panel
The cruise control or speed limiter mode
appears in the instrument panel when it
is selected.
Cruise control
Speed limiter
Page 31 of 328
29
INSTRUMENTS and CONTROLS
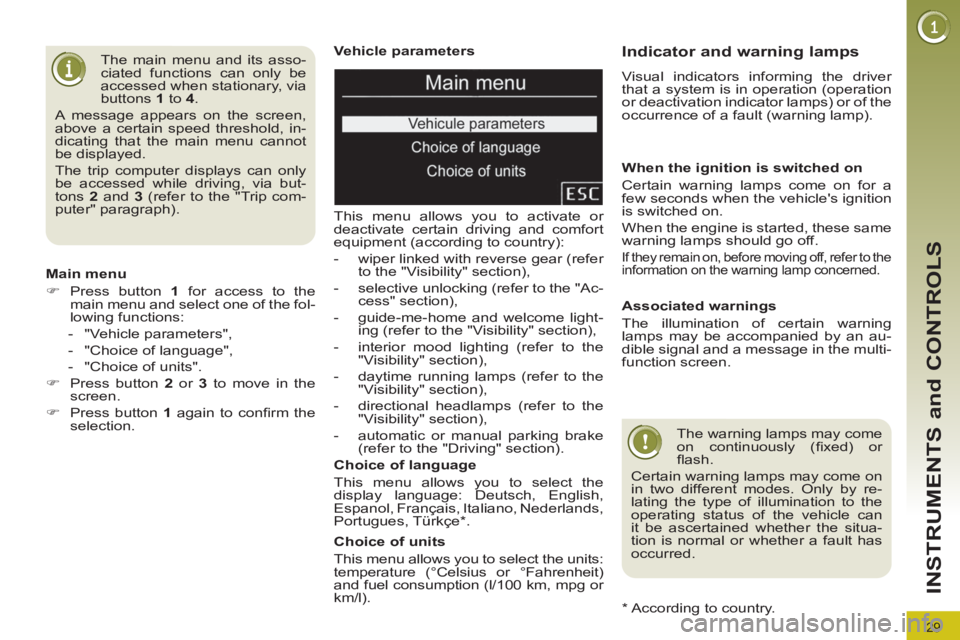
Vehicle parameters
This menu allows you to activate or
deactivate certain driving and comfort
equipment (according to country):
- wiper linked with reverse gear (refer
to the "Visibility" section),
- selective unlocking (refer to the "Ac-
cess" section),
- guide-me-home and welcome light-
ing (refer to the "Visibility" section),
- interior mood lighting (refer to the
"Visibility" section),
- daytime running lamps (refer to the
"Visibility" section),
- directional headlamps (refer to the
"Visibility" section),
- automatic or manual parking brake
(refer to the "Driving" section).
Choice of units
This menu allows you to select the units:
temperature (°Celsius or °Fahrenheit)
and fuel consumption (l/100 km, mpg or
km/l).
Choice of language
This menu allows you to select the
display language: Deutsch, English,
Espanol, Français, Italiano, Nederlands,
Portugues, Türkçe * .
The main menu and its asso-
ciated functions can only be
accessed when stationary, via
buttons 1
to 4
.
A message appears on the screen,
above a certain speed threshold, in-
dicating that the main menu cannot
be displayed.
The trip computer displays can only
be accessed while driving, via but-
tons 2
and 3
(refer to the "Trip com-
puter" paragraph).
Main menu
�)
Press button 1
for access to the
main menu and select one of the fol-
lowing functions:
- "Vehicle parameters",
- "Choice of language",
- "Choice of units".
�)
Press button 2
or 3
to move in the
screen.
�)
Press button 1
again to confi rm the
selection.
*
According to country.
Indicator and warning lamps
Visual indicators informing the driver
that a system is in operation (operation
or deactivation indicator lamps) or of the
occurrence of a fault (warning lamp).
When the ignition is switched on
Certain warning lamps come on for a
few seconds when the vehicle's ignition
is switched on.
When the engine is started, these same
warning lamps should go off.
If they remain on, before moving off, refer to the
information on the warning lamp concerned.
Associated warnings
The illumination of certain warning
lamps may be accompanied by an au-
dible signal and a message in the multi-
function screen.
The warning lamps may come
on continuously (fi xed) or
fl ash.
Certain warning lamps may come on
in two different modes. Only by re-
lating the type of illumination to the
operating status of the vehicle can
it be ascertained whether the situa-
tion is normal or whether a fault has
occurred.
Page 33 of 328
31
INSTRUMENTS and CONTROLS
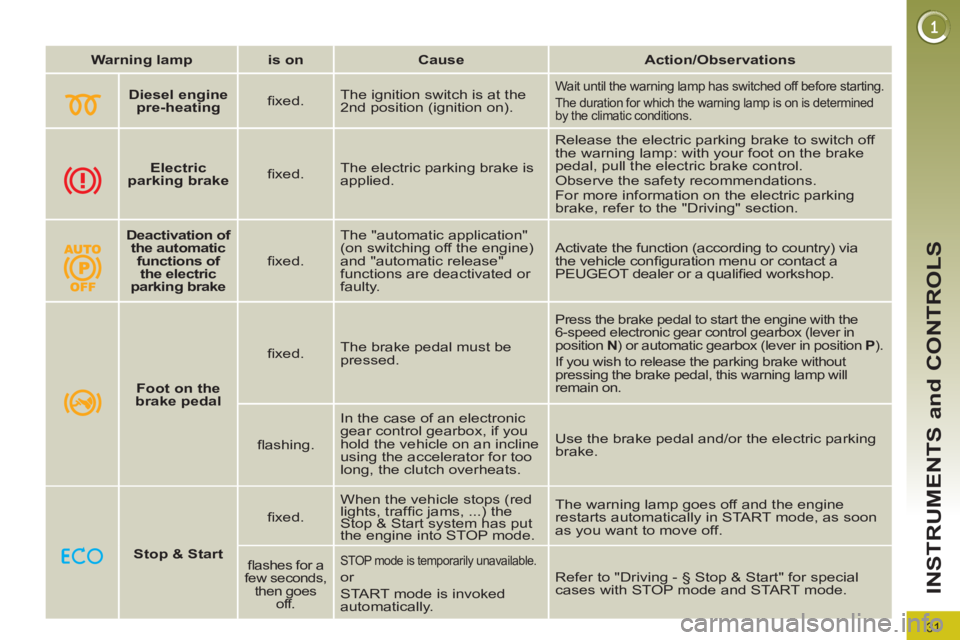
Warning lamp
is on
Cause
Action/Observations
Diesel engine
pre-heating
fi xed. The ignition switch is at the
2nd position (ignition on). Wait until the warning lamp has switched off before starting.
The duration for which the warning lamp is on is determined
by the climatic conditions.
Electric
parking brake
fi xed. The electric parking brake is
applied. Release the electric parking brake to switch off
the warning lamp: with your foot on the brake
pedal, pull the electric brake control.
Observe the safety recommendations.
For more information on the electric parking
brake, refer to the "Driving" section.
Deactivation of
the automatic
functions of
the electric
parking brake
fi xed. The "automatic application"
(on switching off the engine)
and "automatic release"
functions are deactivated or
faulty. Activate the function (according to country) via
the vehicle confi guration menu or contact a
PEUGEOT dealer or a qualifi ed workshop.
Foot on the
brake pedal
fi xed. The brake pedal must be
pressed.
Press the brake pedal to start the engine with the
6-speed electronic gear control gearbox (lever in
position N
) or automatic gearbox (lever in position P
).
If you wish to release the parking brake without
pressing the brake pedal, this warning lamp will
remain on.
fl ashing. In the case of an electronic
gear control gearbox, if you
hold the vehicle on an incline
using the accelerator for too
long, the clutch overheats. Use the brake pedal and/or the electric parking
brake.
Stop & Start
fi xed. When the vehicle stops (red
lights, traffi c jams, ...) the
Stop & Start system has put
the engine into STOP mode. The warning lamp goes off and the engine
restarts automatically in START mode, as soon
as you want to move off.
fl ashes for a
few seconds,
then goes
off.
STOP mode is temporarily unavailable.
or
START mode is invoked
automatically. Refer to "Driving - § Stop & Start" for special
cases with STOP mode and START mode.
Page 43 of 328
41
INSTRUMENTS and CONTROLS
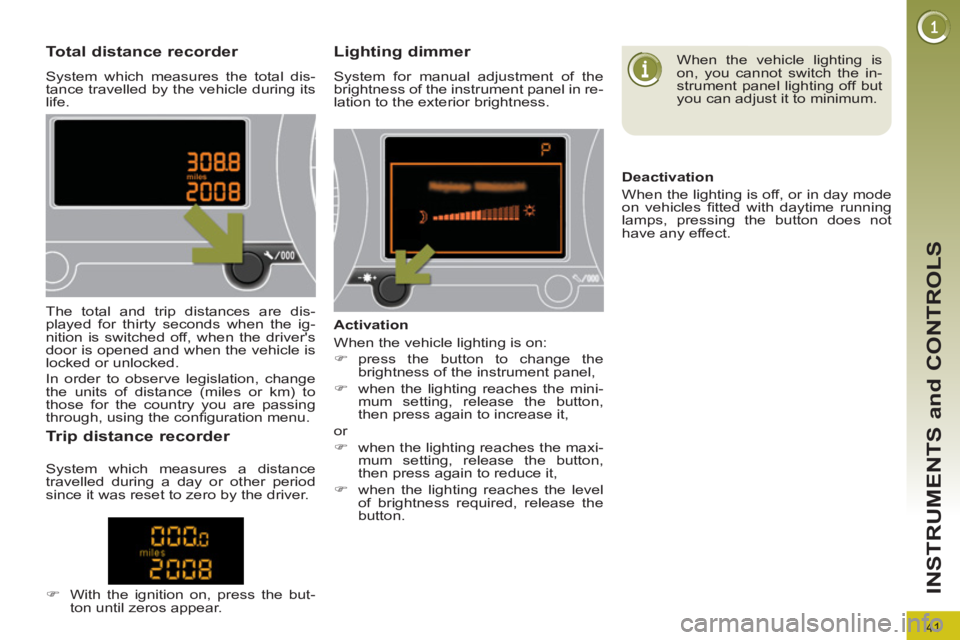
Total distance recorder
System which measures the total dis-
tance travelled by the vehicle during its
life.
Lighting dimmer
System for manual adjustment of the
brightness of the instrument panel in re-
lation to the exterior brightness.
The total and trip distances are dis-
played for thirty seconds when the ig-
nition is switched off, when the driver's
door is opened and when the vehicle is
locked or unlocked.
In order to observe legislation, change
the units of distance (miles or km) to
those for the country you are passing
through, using the confi guration menu.
Trip distance recorder
Activation
When the vehicle lighting is on:
�)
press the button to change the
brightness of the instrument panel,
�)
when the lighting reaches the mini-
mum setting, release the button,
then press again to increase it,
or
�)
when the lighting reaches the maxi-
mum setting, release the button,
then press again to reduce it,
�)
when the lighting reaches the level
of brightness required, release the
button.
When the vehicle lighting is
on, you cannot switch the in-
strument panel lighting off but
you can adjust it to minimum.
Deactivation
When the lighting is off, or in day mode
on vehicles fi tted with daytime running
lamps, pressing the button does not
have any effect.
System which measures a distance
travelled during a day or other period
since it was reset to zero by the driver.
�)
With the ignition on, press the but-
ton until zeros appear.