2011.5 PEUGEOT 3008 wheel
[x] Cancel search: wheelPage 184 of 328

182
PRACTICAL INFORMATION
Access to the spare wheel *
The spare wheel is installed in the boot
under the fl oor.
Depending on country, the spare wheel
may be steel, alloy or of the "space-
saver" type.
To gain access to it, refer to the paragraph
"Access to the tools" on the previous
page.
Taking out the wheel
�)
Unscrew the yellow central bolt.
�)
Raise the spare wheel towards you
from the rear.
�)
Take the wheel out of the boot.
Putting the wheel back in place
�)
Put the wheel back in its housing.
�)
Unscrew the yellow central bolt by a
few turns then put it in place in the
centre of the wheel.
�)
Tighten fully until the central bolt
clicks to retain the wheel correctly.
�)
Put the box back in place in the cen-
tre of the wheel and clip it.
�)
Put the polystyrene storage box
back in place.
Tyre under-infl ation
detection
The spare wheel is not fi tted
with a sensor. The punctured wheel
must be repaired by a PEUGEOT
dealer or a qualifi ed workshop.
*
Depending on destination country.
Page 185 of 328
183
PRACTICAL INFORMATION
Parking the vehicle
Immobilise the vehicle where
it does not block traffi c: the
ground must be level, stable and
non-slippery ground.
Apply the parking brake unless it
has been programmed to automatic
mode, switch off the ignition and en-
gage fi rst gear * to lock the wheels.
Check that the braking warning lamp
and the P
warning lamp on the park-
ing brake control come on.
If necessary, place a chock under the
wheel diagonally opposite the wheel
to be changed.
The occupants must get out of the ve-
hicle and wait where they are safe.
Never go underneath a vehicle raised
using a jack; use an axle stand.
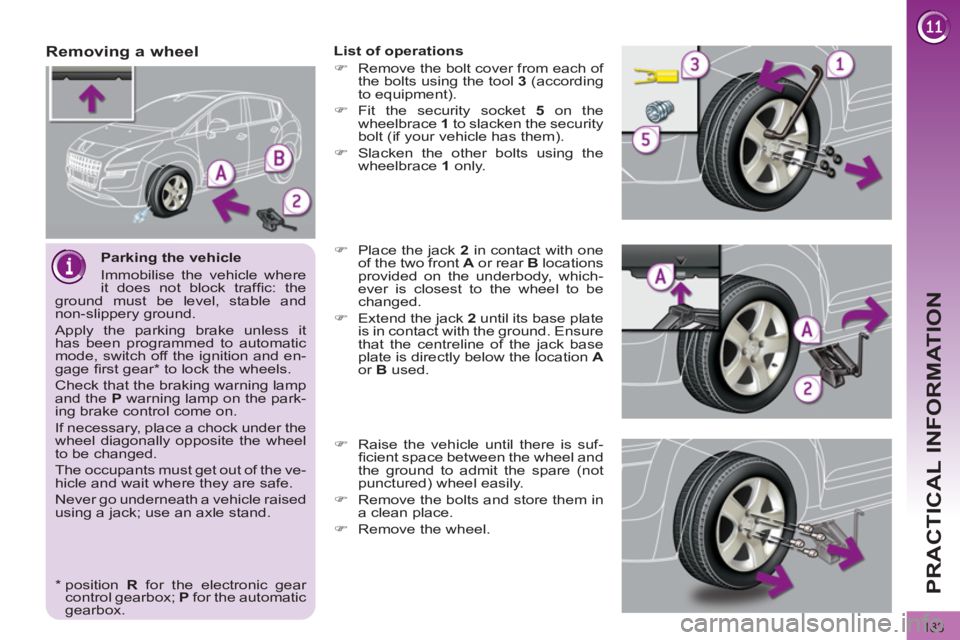
Removing a wheel
List of operations
�)
Remove the bolt cover from each of
the bolts using the tool 3
(according
to equipment).
�)
Fit the security socket 5
on the
wheelbrace 1
to slacken the security
bolt (if your vehicle has them).
�)
Slacken the other bolts using the
wheelbrace 1
only.
�)
Place the jack 2
in contact with one
of the two front A
or rear B
locations
provided on the underbody, which-
ever is closest to the wheel to be
changed.
�)
Extend the jack 2
until its base plate
is in contact with the ground. Ensure
that the centreline of the jack base
plate is directly below the location A
or B
used.
�)
Raise the vehicle until there is suf-
fi cient space between the wheel and
the ground to admit the spare (not
punctured) wheel easily.
�)
Remove the bolts and store them in
a clean place.
�)
Remove the wheel.
*
position R
for the electronic gear
control gearbox; P
for the automatic
gearbox.
Page 186 of 328
184
PRACTICAL INFORMATION
Fitting the "space-saver"
spare wheel
If your vehicle is fi tted with al-
loy wheels, when tightening the bolts
on fi tting it is normal to notice that the
washers do not come into contact
with the "space-saver" spare wheel.
The wheel is secured by the conical
contact of each bolt.
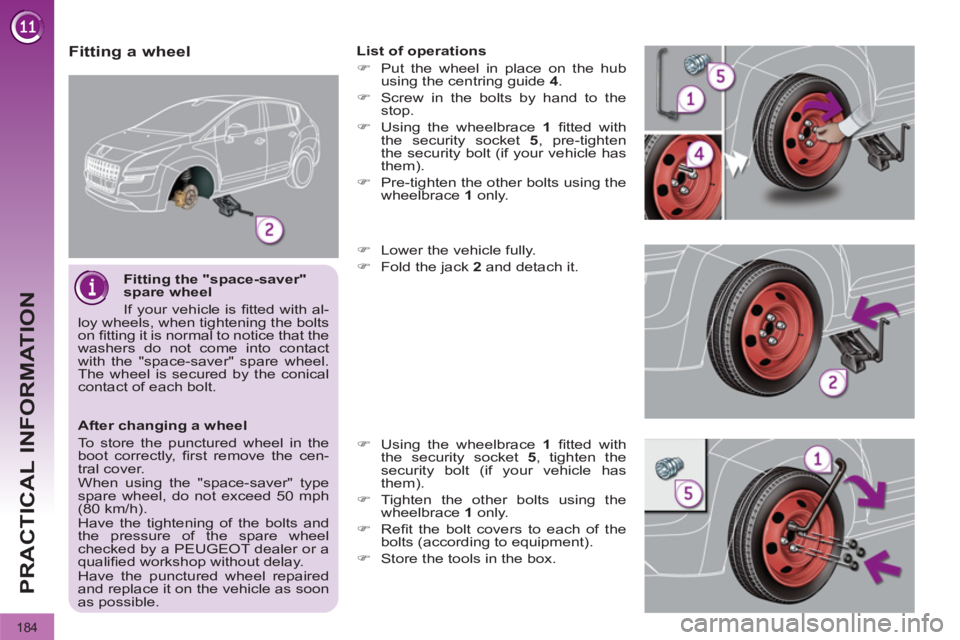
Fitting a wheel
List of operations
�)
Put the wheel in place on the hub
using the centring guide 4
.
�)
Screw in the bolts by hand to the
stop.
�)
Using the wheelbrace 1
fi tted with
the security socket 5
, pre-tighten
the security bolt (if your vehicle has
them).
�)
Pre-tighten the other bolts using the
wheelbrace 1
only.
�)
Lower the vehicle fully.
�)
Fold the jack 2
and detach it.
�)
Using the wheelbrace 1
fi tted with
the security socket 5
, tighten the
security bolt (if your vehicle has
them).
�)
Tighten the other bolts using the
wheelbrace 1
only.
�)
Refi t the bolt covers to each of the
bolts (according to equipment).
�)
Store the tools in the box.
After changing a wheel
To store the punctured wheel in the
boot correctly, fi rst remove the cen-
tral cover.
When using the "space-saver" type
spare wheel, do not exceed 50 mph
(80 km/h).
Have the tightening of the bolts and
the pressure of the spare wheel
checked by a PEUGEOT dealer or a
qualifi ed workshop without delay.
Have the punctured wheel repaired
and replace it on the vehicle as soon
as possible.
Page 203 of 328
201
PRACTICAL INFORMATION
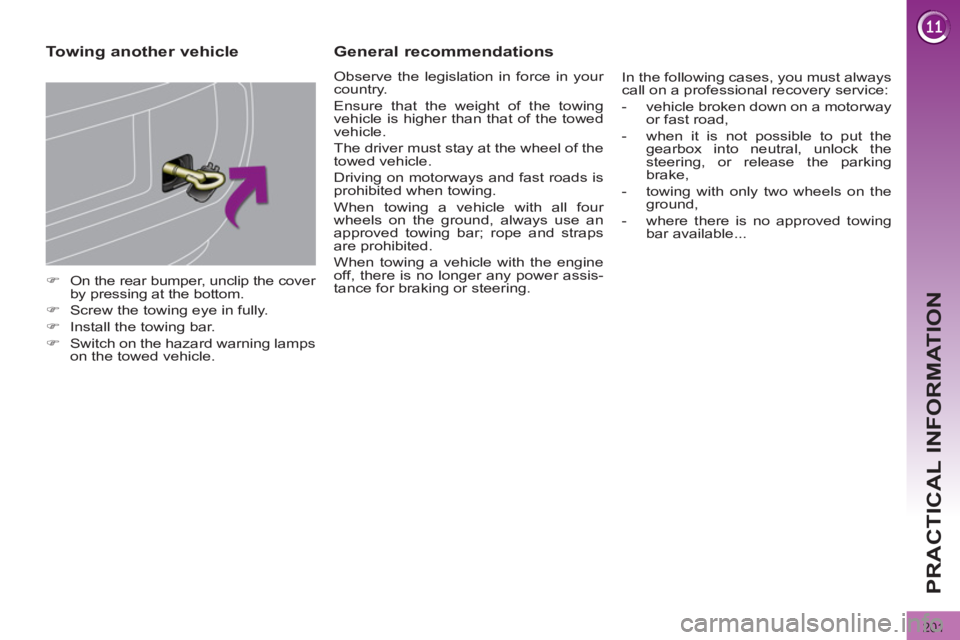
�)
On the rear bumper, unclip the cover
by pressing at the bottom.
�)
Screw the towing eye in fully.
�)
Install the towing bar.
�)
Switch on the hazard warning lamps
on the towed vehicle.
Towing another vehicle
General recommendations
Observe the legislation in force in your
country.
Ensure that the weight of the towing
vehicle is higher than that of the towed
vehicle.
The driver must stay at the wheel of the
towed vehicle.
Driving on motorways and fast roads is
prohibited when towing.
When towing a vehicle with all four
wheels on the ground, always use an
approved towing bar; rope and straps
are prohibited.
When towing a vehicle with the engine
off, there is no longer any power assis-
tance for braking or steering. In the following cases, you must always
call on a professional recovery service:
- vehicle broken down on a motorway
or fast road,
- when it is not possible to put the
gearbox into neutral, unlock the
steering, or release the parking
brake,
- towing with only two wheels on the
ground,
- where there is no approved towing
bar available...
Page 206 of 328

204
PRACTICAL INFORMATION
Installation of radio
communication
transmitters
Before installing any after-market ra-
dio communication transmitter, you
can contact a PEUGEOT dealer for
the specifi cation of transmitters which
can be fi tted (frequency, maximum
power, aerial position, specifi c instal-
lation requirements), in line with the
Vehicle Electromagnetic Compatibility
Directive (2004/104/EC).
*
To avoid any risk of jamming of the
pedals:
- ensure that the mat is positioned
and secured correctly,
- never fi t one mat on top of another.
ACCESSORIES
A wide range of accessories and genu-
ine parts is available from the PEUGEOT
dealer network.
These accessories and parts have been
tested and approved for reliability and
safety.
They are all adapted to your vehicle and
benefi t from PEUGEOT's recommendation
and warranty.
"Transport solutions":
For leisure pursuits: roof bars, bicycle
carrier on towbar, bicycle carrier on roof
bars, ski carrier, roof box, booster seats
and child seats, side blinds, under shelf
storage.
Trailer towbar, which must be fi tted by a
PEUGEOT dealer.
You can also obtain cleaning and main-
tenance products (exterior and interior),
products for topping up (screenwash
fl uid...) and refi lls (sealant cartridge
for the temporary puncture repair kit...)
from PEUGEOT dealers.
Depending on the legislation
in force in the country, it may
be compulsory to have a high
visibility safety vest, warning triangle
and spare bulbs and fuses available
in the vehicle.
The fi tting of electrical equip-
ment or accessories which
are not recommended by
PEUGEOT may result in a failure of
your vehicle's electronic system and
excessive electrical consumption.
Please note this precaution. You are
advised to contact a PEUGEOT rep-
resentative to be shown the range
of recommended equipment and ac-
cessories.
"Style":
seat covers compatible with lateral air-
bags, leather gear lever knob, foglamps,
door defl ectors, spoiler, styling strips,
alloy wheels, trims, chrome-plated door
handle shells.
"Safety and security":
anti-theft alarm, window etching, wheel
security bolts, fi rst aid kit, breathalyzer,
warning triangle, high visibility vest, sto-
len vehicle tracking system, dog guard,
snow chains.
"Protection":
mats * , boot tray, luggage net, coat
hanger fi xed on head restraint, stainless
steel or carbon fi bre style door sills.
"Multimedia":
audio systems, amplifi ers, satellite navi-
gation systems, Bluetooth hands-free
system, CD changer, speakers, DVD
player, USB Box, front and rear parking
sensors, additional Bluetooth wireless
headphones, Bluetooth audio head-
phones mains charger.
Page 213 of 328
211
TECHNICAL DATA
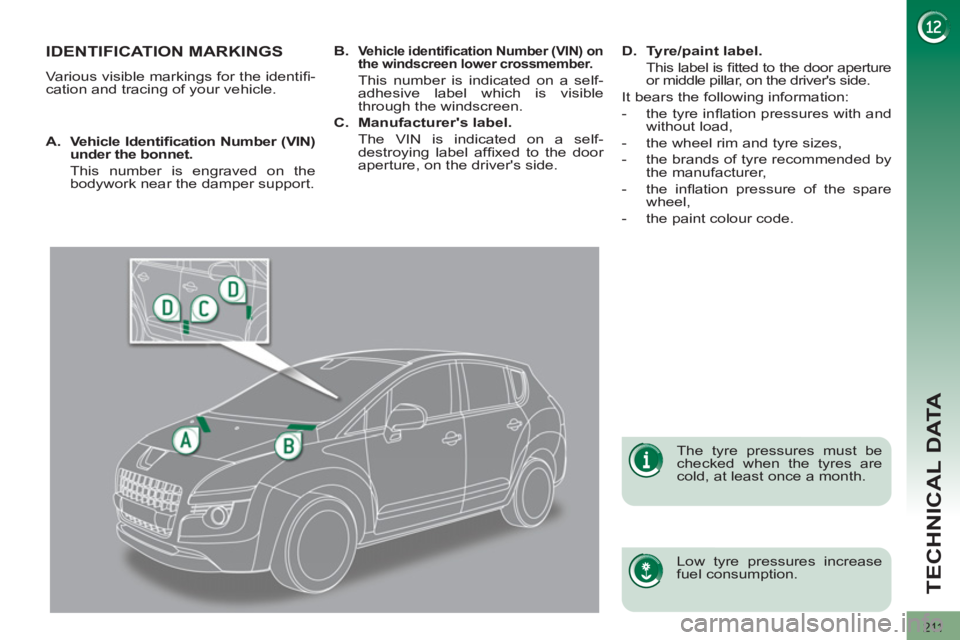
IDENTIFICATION MARKINGS
Various visible markings for the identifi -
cation and tracing of your vehicle.
Low tyre pressures increase
fuel consumption.
The tyre pressures must be
checked when the tyres are
cold, at least once a month.
A.
Vehicle Identifi cation Number (VIN)
under the bonnet.
This number is engraved on the
bodywork near the damper support.
B.
Vehicle identifi cation Number (VIN) on
the windscreen lower crossmember.
This number is indicated on a self-
adhesive label which is visible
through the windscreen.
C.
Manufacturer's label.
The VIN is indicated on a self-
destroying label affi xed to the door
aperture, on the driver's side.
D.
Tyre/paint label.
This label is fi tted to the door aperture
or middle pillar, on the driver's side.
It bears the following information:
- the tyre infl ation pressures with and
without load,
- the wheel rim and tyre sizes,
- the brands of tyre recommended by
the manufacturer,
- the infl ation pressure of the spare
wheel,
- the paint colour code.
Page 306 of 328
304
06
1
2
1
2
1
OK
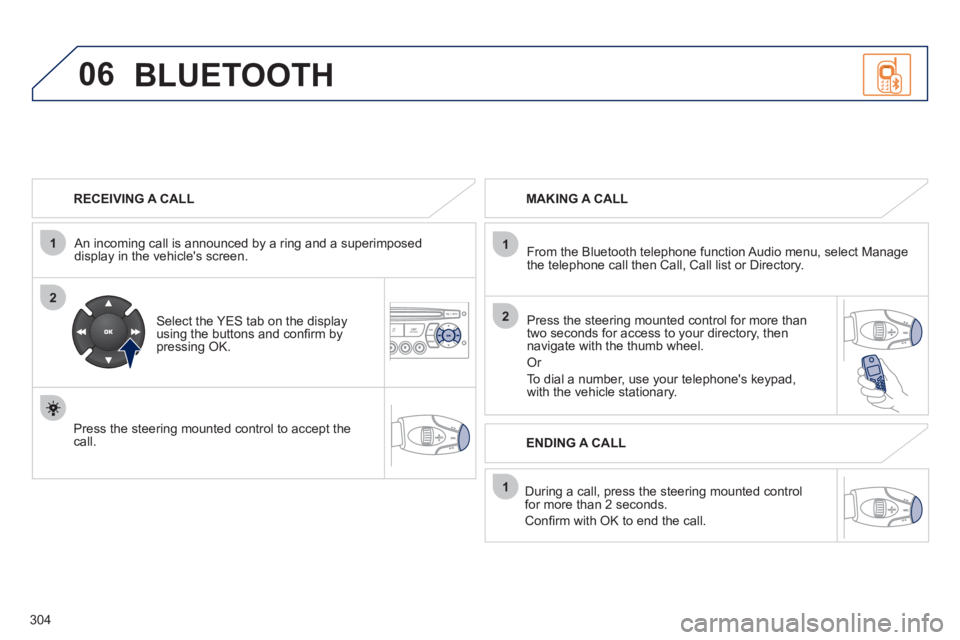
RECEIVING A CALL
An incoming call is announced by a ring and a superimposed
display in the vehicle's screen.
Select the YES tab on the display
using the buttons and confi rm by
pressing OK.
Press the steering mounted control to accept the
call.
MAKING A CALL
From the Bluetooth telephone function Audio menu, select Manage
the telephone call then Call, Call list or Directory.
Press the steering mounted control for more than
two seconds for access to your directory, then
navigate with the thumb wheel.
Or
To dial a number, use your telephone's keypad,
with the vehicle stationary.
During a call, press the steering mounted control
for more than 2 seconds.
Confi rm with OK to end the call.
ENDING A CALL
BLUETOOTH
Page 317 of 328
A
CB
D
315
ALPHABETICAL INDEX
Accessories ................................204
Accessory socket,
12 V ........................ 100, 102, 109
Adjusting headlamps ..............92, 93
Adjusting head restraints ..............67
Adjusting seat
belt height ........................130, 131
Adjusting the steering
wheel .........................................73
Airbags .........................................36
Airbags, curtain...................135, 136
Airbags, front ......................133, 136
Airbags, lateral....................135, 136
Air conditioning .............................25
Air conditioning, digital............59, 62
Air conditioning,
manual .................................59, 60
Air fi lter .......................................172
Air fl ow ..........................................25
Air vents........................................58
Alarm ............................................79
Anti-pinch..............................81, 106
Anti-theft .......................................76
Armrest .......................................100
Armrest, front ..............................102
Armrest, rear ...............................105
Assistance call ............................214
Audible warning ..........................124
Audio/video sockets....................244
Audio streaming (Bluetooth) .......305
Automatic illumination
of headlamps .......................89, 92
Automatic operation of hazard
warning lamps .........................124
Automatic rain sensitive
windscreen wipers ...............94, 96
Auxiliary
socket ............. 244, 280, 300, 302Capacity, fuel tank ........................87
CD MP3 ..............................279, 299
Central locking ........................75, 84
Changing a bulb ........ 185, 188, 189
Changing a fuse .........................190
Changing a wheel ...............180, 182
Changing a wiper blade ........96, 200
Changing the date ..... 250, 284, 307
Changing the remote
control battery ............................77
Changing the time ..... 250, 284, 307
Checking levels ..................171, 172
Checking the engine oil level ........40
Checking tyre pressures
(using the kit) ...........................174
Checks............... 169, 170, 172, 173
Child lock ....................................123
Children ...................... 118, 121, 122Child seats ................................. 113
Child seats,
conventional .................... 116, 118
Closing the boot................75, 85, 86
Closing the doors....................75, 83
Cold climate screen ....................203
Colour screen,
retractable ......................49, 51, 53
Connectors,
audio ....... 101, 102, 280, 300, 302
Control for panoramic
sunroof blind ............................106
Coolant level .........................37, 171
Coolant temperature indicator ......37
Courtesy lamps.............................97
Courtesy mirror ...........................101
Cruise control .............................151
Cup holder ..................................100 Battery ................................172, 197
Battery, charging .........................197
Battery, remote control ...........77, 78
Blind for panoramic sunroof........106
Bluetooth (hands-
free) ......... 245-247, 281, 282, 303
Bluetooth
(telephone) ...... 245-247, 281, 282
Bonnet ........................................167
Bonnet stay.................................167
Boot fl oor, adjustable .................. 111
Boot lamp ............................. 99, 112
Boot lid..........................................86
Brake discs .................................173
Brake lamps................................188
Brake pads .................................173
Brakes ........................................173
Date (setting) ..... 250, 284, 306, 307
Daytime
running lamps ........... 91, 185, 187
Deactivating the passenger
airbag .......................................133
Deadlocking ..................................75
Defrosting ...............................60, 61
Demisting......................................60
Dials and gauges ..........................27
Diesel additive level ....................172
Dimensions .................................210
Dipped beam ............... 89, 185, 186
Dipstick .................................40, 171
Directional lighting ........................93
Direction indicators .... 124, 185, 188
Distance alert..............................147
Doors ............................................83
Doors emergency control .............85
Door trays ...................................100
Dynamic emergency braking ......140