Page 54 of 108

PERIODIC MAINTENANCE AND ADJUSTMENT
6-3
6
EAU1770C
General maintenance and lubrication chart NO. ITEM CHECK OR MAINTENANCE JOBODOMETER READING
ANNUAL
CHECK 1000 km
(600 mi)10000 km
(6000 mi)20000 km
(12000 mi)30000 km
(18000 mi)40000 km
(24000 mi)
1*Air filter elementReplace.√
2ClutchCheck operation.
Adjust.√√√√√
3*Front brakeCheck operation, fluid level and
vehicle for fluid leakage.√√√√√√
Replace brake pads. Whenever worn to the limit
4*Rear brakeCheck operation, fluid level and
vehicle for fluid leakage.√√√√√√
Replace brake pads. Whenever worn to the limit
5*Brake hosesCheck for cracks or damage.√√√√√
Replace. Every 4 years
6*WheelsCheck runout and for damage.√√√√
7*TiresCheck tread depth and for dam-
age.
Replace if necessary.
Check air pressure.
Correct if necessary.√√√√√
8*Wheel bearingsCheck bearing for looseness or
damage.√√√√
9*SwingarmCheck operation and for exces-
sive play.√√√√
Lubricate with lithium-soap-based
grease.Every 50000 km (30000 mi)
U13SE2E0.book Page 3 Tuesday, August 4, 2009 4:01 PM
Page 55 of 108

PERIODIC MAINTENANCE AND ADJUSTMENT
6-4
6
10 Drive chainCheck chain slack, alignment and
condition.
Adjust and lubricate chain with a
special O-ring chain lubricant
thoroughly. Every 800 km (500 mi) and after washing the motorcycle, riding in the rain or
riding in wet areas
11*Steering bearingsCheck bearing play and steering
for roughness.√√√√√
Lubricate with lithium-soap-based
grease.Every 20000 km (12000 mi)
12*Chassis fastenersMake sure that all nuts, bolts and
screws are properly tightened.√√√√√
13Brake lever pivot
shaftLubricate with silicone grease.√√√√√
14Brake pedal pivot
shaftLubricate with lithium-soap-based
grease.√√√√√
15Clutch lever pivot
shaftLubricate with lithium-soap-based
grease.√√√√√
16Shift pedal pivot
shaftLubricate with lithium-soap-based
grease.√√√√√
17 SidestandCheck operation.
Lubricate.√√√√√
18*Sidestand switchCheck operation.√√√√√√
19*Front forkCheck operation and for oil leak-
age.√√√√
20*Shock absorber as-
semblyCheck operation and shock ab-
sorber for oil leakage.√√√√ NO. ITEM CHECK OR MAINTENANCE JOBODOMETER READING
ANNUAL
CHECK 1000 km
(600 mi)10000 km
(6000 mi)20000 km
(12000 mi)30000 km
(18000 mi)40000 km
(24000 mi)
U13SE2E0.book Page 4 Tuesday, August 4, 2009 4:01 PM
Page 56 of 108
PERIODIC MAINTENANCE AND ADJUSTMENT
6-5
6
21*Rear suspension re-
lay arm and con-
necting arm
pivoting pointsCheck operation.√√√√
22 Engine oilChange.
Check oil level and vehicle for oil
leakage.√√√√√√
23Engine oil filter car-
tridgeReplace.√√√
24*Cooling systemCheck coolant level and vehicle
for coolant leakage.√√√√√
Change. Every 3 years
25*Front and rear brake
switchesCheck operation.√√√√√√
26Moving parts and
cablesLubricate.√√√√√
27*Throttle grip hous-
ing and cableCheck operation and free play.
Adjust the throttle cable free play
if necessary.
Lubricate the throttle grip housing
and cable.√√√√√
28*Lights, signals and
switchesCheck operation.
Adjust headlight beam.√√√√√√ NO. ITEM CHECK OR MAINTENANCE JOBODOMETER READING
ANNUAL
CHECK 1000 km
(600 mi)10000 km
(6000 mi)20000 km
(12000 mi)30000 km
(18000 mi)40000 km
(24000 mi)U13SE2E0.book Page 5 Tuesday, August 4, 2009 4:01 PM
Page 57 of 108
PERIODIC MAINTENANCE AND ADJUSTMENT
6-6
6
EAU18680
TIP�
Air filter
This model’s air filter is equipped with a disposable oil-coated paper element, which must not be cleaned with com-
pressed air to avoid damaging it.
The air filter element needs to be replaced more frequently when riding in unusually wet or dusty areas.
�
Hydraulic brake service
Regularly check and, if necessary, correct the brake fluid level.
Every two years replace the internal components of the brake master cylinders and calipers, and change the brake
fluid.
Replace the brake hoses every four years and if cracked or damaged.
U13SE2E0.book Page 6 Tuesday, August 4, 2009 4:01 PM
Page 71 of 108
PERIODIC MAINTENANCE AND ADJUSTMENT
6-20
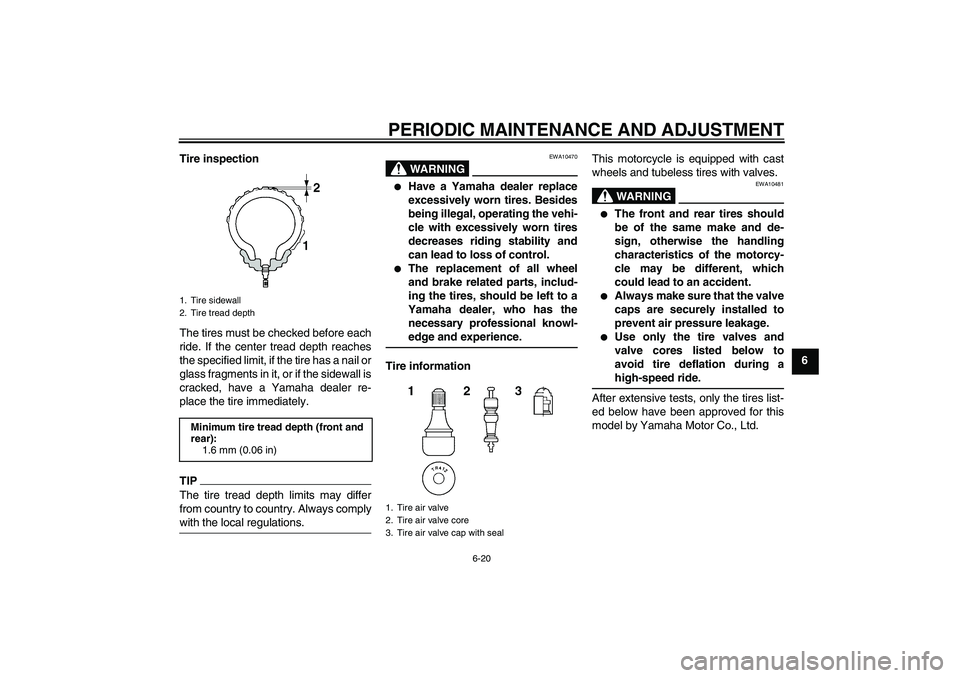
6 Tire inspection
The tires must be checked before each
ride. If the center tread depth reaches
the specified limit, if the tire has a nail or
glass fragments in it, or if the sidewall is
cracked, have a Yamaha dealer re-
place the tire immediately.
TIPThe tire tread depth limits may differ
from country to country. Always comply
with the local regulations.
WARNING
EWA10470
�
Have a Yamaha dealer replace
excessively worn tires. Besides
being illegal, operating the vehi-
cle with excessively worn tires
decreases riding stability and
can lead to loss of control.
�
The replacement of all wheel
and brake related parts, includ-
ing the tires, should be left to a
Yamaha dealer, who has the
necessary professional knowl-
edge and experience.
Tire informationThis motorcycle is equipped with cast
wheels and tubeless tires with valves.
WARNING
EWA10481
�
The front and rear tires should
be of the same make and de-
sign, otherwise the handling
characteristics of the motorcy-
cle may be different, which
could lead to an accident.
�
Always make sure that the valve
caps are securely installed to
prevent air pressure leakage.
�
Use only the tire valves and
valve cores listed below to
avoid tire deflation during a
high-speed ride.
After extensive tests, only the tires list-
ed below have been approved for this
model by Yamaha Motor Co., Ltd.
1. Tire sidewall
2. Tire tread depthMinimum tire tread depth (front and
rear):
1.6 mm (0.06 in)
1. Tire air valve
2. Tire air valve core
3. Tire air valve cap with seal
U13SE2E0.book Page 20 Tuesday, August 4, 2009 4:01 PM
Page 74 of 108

PERIODIC MAINTENANCE AND ADJUSTMENT
6-23
6
EAU22273
Brake light switches The brake light, which is activated by
the brake pedal and brake lever, should
come on just before braking takes ef-
fect. If necessary, adjust the rear brake
light switch as follows, but the front
brake light switch should be adjusted
by a Yamaha dealer.
Turn the rear brake light switch adjust-
ing nut while holding the rear brake light
switch in place. To make the brake light
come on earlier, turn the adjusting nut
in direction (a). To make the brake light
come on later, turn the adjusting nut in
direction (b).
EAU22392
Checking the front and rear
brake pads The front and rear brake pads must be
checked for wear at the intervals spec-
ified in the periodic maintenance and
lubrication chart.
EAU36890
Front brake pads
Each front brake pad is provided with
wear indicators, which allows you to
check the brake pad wear without hav-
ing to disassemble the brake. To check
the brake pad wear, check the position
of the wear indicators while applying
the brake. If a brake pad has worn tothe point that a wear indicator almost
touches the brake disc, have a Yamaha
dealer replace the brake pads as a set.
EAU46291
Rear brake pads
Each rear brake pad is provided with
wear indicator grooves, which allow
you to check the brake pad wear with-
out having to disassemble the brake.
To check the brake pad wear, check
the wear indicator grooves. If a brake
pad has worn to the point that a wear
indicator groove almost appears, have
a Yamaha dealer replace the brake
pads as a set.
1. Rear brake light switch
2. Rear brake light switch adjusting nut
2
(b) (a)
1
1
1. Brake pad wear indicator
1. Brake pad wear indicator groove
1
1
U13SE2E0.book Page 23 Tuesday, August 4, 2009 4:01 PM
Page 75 of 108

PERIODIC MAINTENANCE AND ADJUSTMENT
6-24
6
EAU22580
Checking the brake fluid level Front brake
Rear brake
Insufficient brake fluid may allow air to
enter the brake system, possibly caus-
ing it to become ineffective.Before riding, check that the brake fluid
is above the minimum level mark and
replenish if necessary. A low brake fluid
level may indicate worn brake pads
and/or brake system leakage. If the
brake fluid level is low, be sure to check
the brake pads for wear and the brake
system for leakage.
Observe these precautions:
�
When checking the fluid level,
make sure that the top of the brake
fluid reservoir is level.
�
Use only the recommended quality
brake fluid, otherwise the rubber
seals may deteriorate, causing
leakage and poor braking perfor-
mance.
�
Refill with the same type of brake
fluid. Mixing fluids may result in a
harmful chemical reaction and
lead to poor braking performance.
�
Be careful that water does not en-
ter the brake fluid reservoir when
refilling. Water will significantly
lower the boiling point of the fluid
and may result in vapor lock.
�
Brake fluid may deteriorate paint-
ed surfaces or plastic parts. Al-
ways clean up spilled fluid
immediately.
�
As the brake pads wear, it is nor-
mal for the brake fluid level to grad-
ually go down. However, if the
brake fluid level goes down sud-
denly, have a Yamaha dealer
check the cause.
1. Minimum level mark
1. Minimum level mark
Recommended brake fluid:
DOT 4
U13SE2E0.book Page 24 Tuesday, August 4, 2009 4:01 PM
Page 76 of 108

PERIODIC MAINTENANCE AND ADJUSTMENT
6-25
6
EAU22731
Changing the brake fluid Have a Yamaha dealer change the
brake fluid at the intervals specified in
the TIP after the periodic maintenance
and lubrication chart. In addition, have
the oil seals of the master cylinders and
calipers as well as the brake hoses re-
placed at the intervals listed below or
whenever they are damaged or leak-
ing.�
Oil seals: Replace every two
years.
�
Brake hoses: Replace every four
years.
EAU22760
Drive chain slack The drive chain slack should be
checked before each ride and adjusted
if necessary.
EAU22773
To check the drive chain slack
1. Place the motorcycle on the side-
stand.TIPWhen checking and adjusting the drive
chain slack, there should be no weight
on the motorcycle.2. Shift the transmission into the neu-
tral position.
3. Move the rear wheel by pushing
the motorcycle to locate the tight-
est portion of the drive chain, and
then measure the drive chain slack
as shown.4. If the drive chain slack is incorrect,
adjust it as follows.
EAU39055
To adjust the drive chain slack
1. Loosen the axle nut and the lock-
nut on each side of the swingarm.
Drive chain slack:
30.0–45.0 mm (1.18–1.77 in)
1. Drive chain slack
U13SE2E0.book Page 25 Tuesday, August 4, 2009 4:01 PM

