Page 37 of 100

1
2
3
4
5
6
7
8
9
10
FOR YOUR SAFETY – PRE-OPERATION CHECKS
5-3
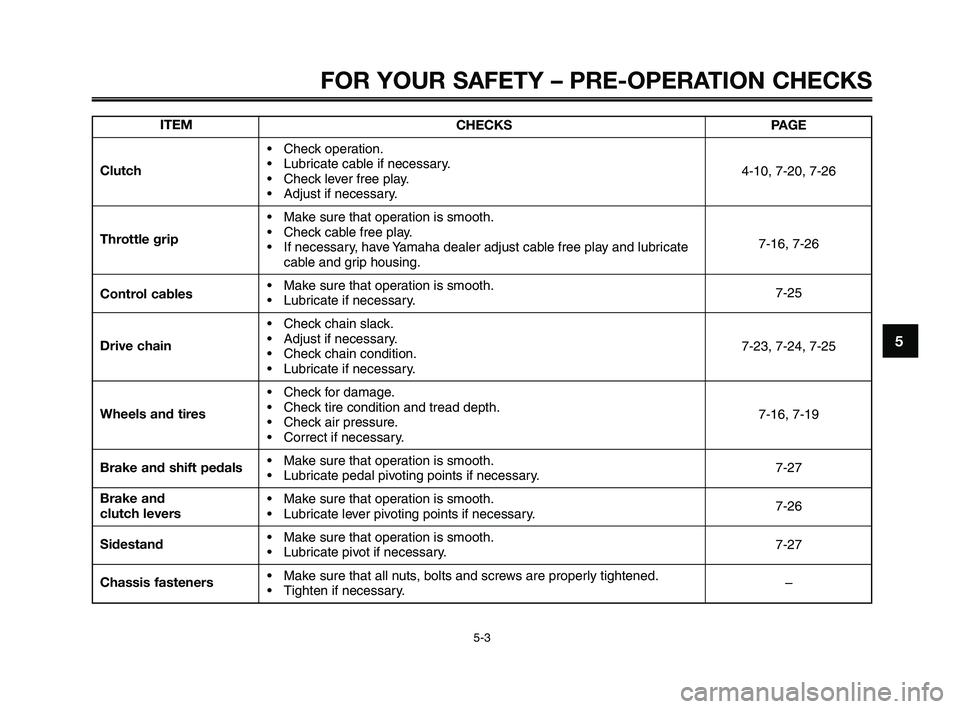
ITEM
Clutch
Throttle grip
Control cables
Drive chain
Wheels and tires
Brake and shift pedals
Brake and
clutch levers
Sidestand
Chassis fastenersCHECKS
Check operation.
Lubricate cable if necessary.
Check lever free play.
Adjust if necessary.
Make sure that operation is smooth.
Check cable free play.
If necessary, have Yamaha dealer adjust cable free play and lubricate
cable and grip housing.
Make sure that operation is smooth.
Lubricate if necessary.
Check chain slack.
Adjust if necessary.
Check chain condition.
Lubricate if necessary.
Check for damage.
Check tire condition and tread depth.
Check air pressure.
Correct if necessary.
Make sure that operation is smooth.
Lubricate pedal pivoting points if necessary.
Make sure that operation is smooth.
Lubricate lever pivoting points if necessary.
Make sure that operation is smooth.
Lubricate pivot if necessary.
Make sure that all nuts, bolts and screws are properly tightened.
Tighten if necessary.PAGE
4-10, 7-20, 7-26
7-16, 7-26
7-25
7-23, 7-24, 7-25
7-16, 7-19
7-27
7-26
7-27
–
XT660Z 05-07 ING-AUS:MY03 04-06 ING 11-05-2009 10:09 Pagina 3
Page 78 of 100

PERIODIC MAINTENANCE AND ADJUSTMENT
7-36
1
2
3
4
5
6
7
8
9
10
To service the rear wheel
Raise the rear wheel off the ground by
using a motorcycle stand or, if a mo-
torcycle stand is not available, by plac-
ing a jack either under each side of the
frame in front of the rear wheel or un-
der each side of the swingarm.EAU24360
Front wheelEAUB1440To remove the front wheel
EWA10820
WARNING0
●It is advisable to have a Yama-
ha dealer service the wheel.
●Securely support the motorcy-
cle so that there is no danger of
it falling over.
1. Wheel axle
2. Brake caliper bolts
A. Front wheel axle pinch bolt
B. Front wheel axle pinch bolt
A
2
B
1
EAU24350
Supporting the motorcycle
Since this model is not equipped with
a centerstand, follow these precau-
tions when removing the front and rear
wheel or performing other mainte-
nance requiring the motorcycle to
stand upright. Check that the motorcy-
cle is in a stable and level position be-
fore starting any maintenance. A
strong wooden box can be placed un-
der the engine for added stability.
To service the front wheel
1. Stabilize the rear of the motorcy-
cle by using a motorcycle stand
or, if an additional motorcycle
stand is not available, by placing a
jack under the frame in front of the
rear wheel.
2. Raise the front wheel off the
ground by using a motorcycle
stand.
XT660Z 05-07 ING-AUS:MY03 04-06 ING 11-05-2009 10:10 Pagina 7-36
Page 79 of 100

1
2
3
4
5
6
7
8
9
10
PERIODIC MAINTENANCE AND ADJUSTMENT
7-37
1. Loosen the front wheel axle pinch
bolts, the wheel axle and the
brake caliper bolts.
2. Lift the front wheel off the ground
according to the procedure on
page 7-36.
3. Remove the brake caliper on
each side by removing the bolts.
ECA11050
NOTICE
Do not apply the brake after the
brake calipers have been removed,
otherwise the brake pads will be
forced shut.
4. Pull the wheel axle out, and then
remove the wheel.
EAUB1470
To install the front wheel
1. Lift the wheel up between the fork
legs.
2. Insert the wheel axle.
3. Install the brake calipers by in-
stalling the bolts.
TIP
Make sure that there is enough space
between the brake pads before in-
stalling the brake calipers onto the
brake discs.
4. Lower the front wheel so that it is
on the ground.
5. Tighten the wheel axle and the
brake caliper bolts to the specified
torques.
ECAB0060
NOTICE
Be sure the right brake disc is posi-
tioned exactly in the middle of the
caliper pads to prevent any brake
drag. Tap the side of the right fork
leg to position the disc correctly.
Tightening torques:
Wheel axle:
60 Nm (6.0 m·kgf, 44 ft·lbf)
Front wheel axle pinch bolt:
18 Nm (1.8 m·kgf, 13 ft·lbf)
Brake caliper bolt:
40 Nm (4.0 m·kgf, 29 ft·lbf)
6. Tighten wheel axle pinch bolt A,
and then pinch bolt B to the spec-
ified torque.
7. Retighten pinch bolt A to the
specified torque.
8. Apply the front brake several
times, and then while holding the
brake lever in, push down hard on
the handlebar several times to
check for proper fork operation.
XT660Z 05-07 ING-AUS:MY03 04-06 ING 11-05-2009 10:10 Pagina 7-37
Page 80 of 100

PERIODIC MAINTENANCE AND ADJUSTMENT
7-38
1
2
3
4
5
6
7
8
9
10
TIP
●If the drive chain is difficult to re-
move, remove the wheel axle first,
and then lift the wheel upward
enough to remove the drive chain
from the rear sprocket.
●The drive chain cannot be disas-
sembled.
7. While supporting the brake
caliper bracket, pull the wheel
axle out, and then remove the
wheel. NOTICE: Do not apply
the brake after the wheel has
been removed together with
the brake disc, otherwise the
brake pads will be forced shut.
EAUB1450
To install the rear wheel
1. Install the wheel and the brake
caliper bracket by inserting the
wheel axle from the right-hand
side.
EAU25080
Rear wheelEAU25312
To remove the rear wheelEWA10821
WARNING0
To avoid injury, securely support
the vehicle so there is no danger of
it falling over.
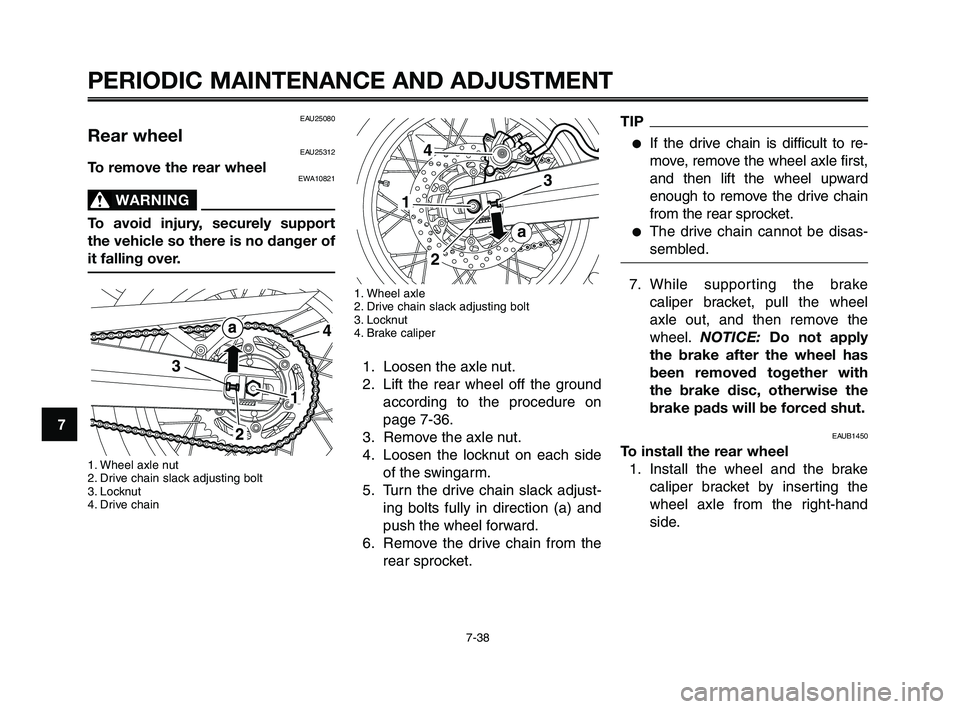
1. Wheel axle nut
2. Drive chain slack adjusting bolt
3. Locknut
4. Drive chain
3
4
1
1. Wheel axle
2. Drive chain slack adjusting bolt
3. Locknut
4. Brake caliper
1. Loosen the axle nut.
2. Lift the rear wheel off the ground
according to the procedure on
page 7-36.
3. Remove the axle nut.
4. Loosen the locknut on each side
of the swingarm.
5. Turn the drive chain slack adjust-
ing bolts fully in direction (a) and
push the wheel forward.
6. Remove the drive chain from the
rear sprocket.
4
3
1
2
a
XT660Z 05-07 ING-AUS:MY03 04-06 ING 11-05-2009 10:10 Pagina 7-38