2010 YAMAHA WR 450F check engine light
[x] Cancel search: check engine lightPage 129 of 230
5-26
VALVES AND VALVE SPRINGS
h. Press the valve through the valve
guide and onto the valve seat to
make a clear pattern.
i. Measure the valve seat width
again. If the valve seat width is out
of specification, reface and relap
the valve seat.
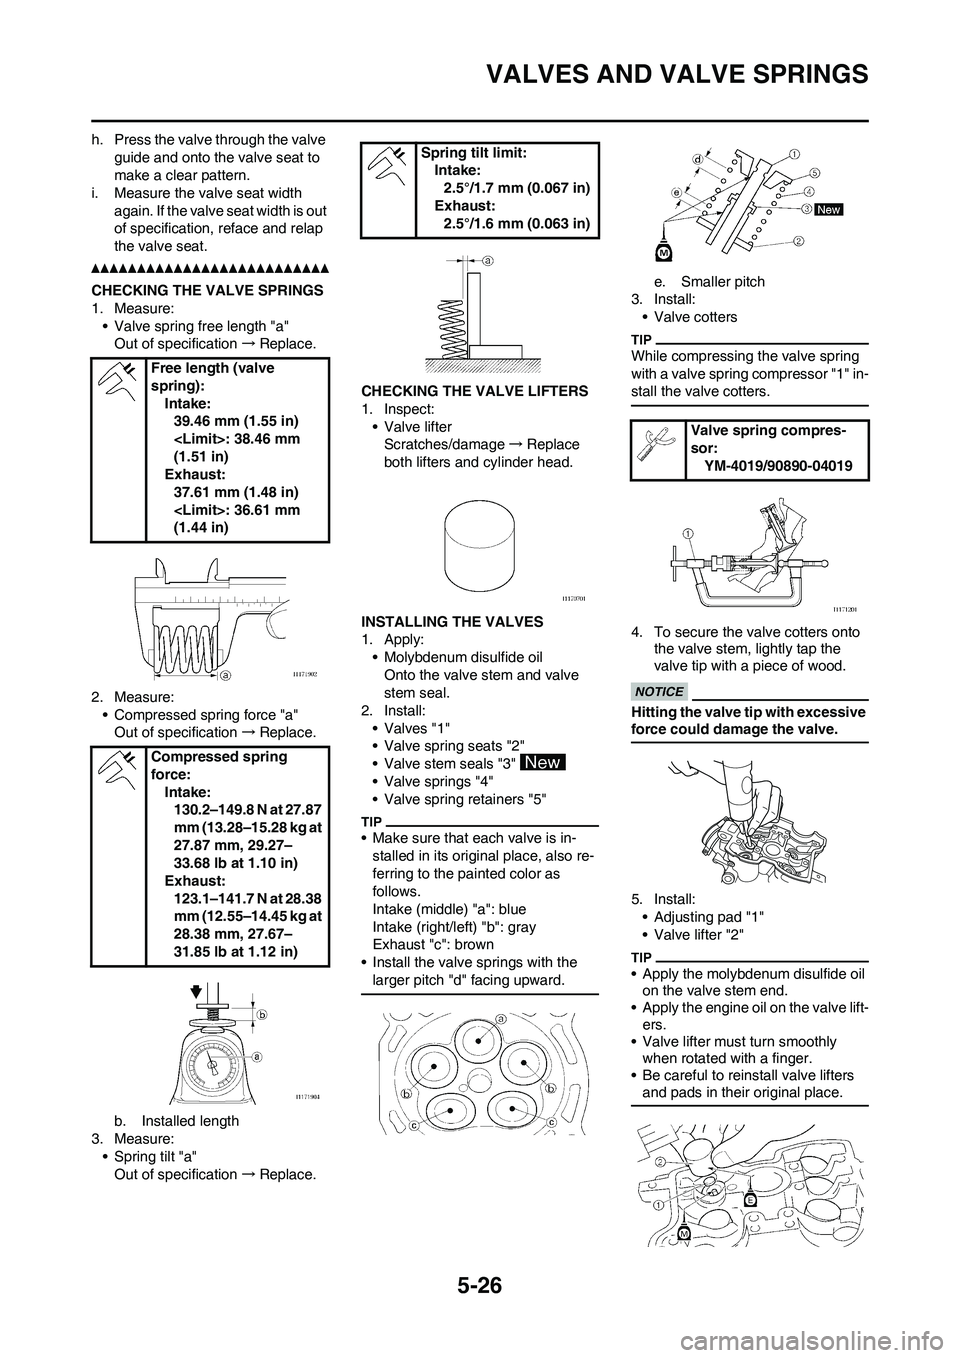
CHECKING THE VALVE SPRINGS
1. Measure:
• Valve spring free length "a"
Out of specification→Replace.
2. Measure:
• Compressed spring force "a"
Out of specification→Replace.
b. Installed length
3. Measure:
• Spring tilt "a"
Out of specification→Replace.CHECKING THE VALVE LIFTERS
1. Inspect:
• Valve lifter
Scratches/damage→Replace
both lifters and cylinder head.
INSTALLING THE VALVES
1. Apply:
• Molybdenum disulfide oil
Onto the valve stem and valve
stem seal.
2. Install:
• Valves "1"
• Valve spring seats "2"
• Valve stem seals "3"
• Valve springs "4"
• Valve spring retainers "5"
• Make sure that each valve is in-
stalled in its original place, also re-
ferring to the painted color as
follows.
Intake (middle) "a": blue
Intake (right/left) "b": gray
Exhaust "c": brown
• Install the valve springs with the
larger pitch "d" facing upward.
e. Smaller pitch
3. Install:
• Valve cotters
While compressing the valve spring
with a valve spring compressor "1" in-
stall the valve cotters.
4. To secure the valve cotters onto
the valve stem, lightly tap the
valve tip with a piece of wood.
Hitting the valve tip with excessive
force could damage the valve.
5. Install:
• Adjusting pad "1"
• Valve lifter "2"
• Apply the molybdenum disulfide oil
on the valve stem end.
• Apply the engine oil on the valve lift-
ers.
• Valve lifter must turn smoothly
when rotated with a finger.
• Be careful to reinstall valve lifters
and pads in their original place.
Free length (valve
spring):
Intake:
39.46 mm (1.55 in)
(1.51 in)
Exhaust:
37.61 mm (1.48 in)
(1.44 in)
Compressed spring
force:
Intake:
130.2–149.8 N at 27.87
mm (13.28–15.28 kg at
27.87 mm, 29.27–
33.68 lb at 1.10 in)
Exhaust:
123.1–141.7 N at 28.38
mm (12.55–14.45 kg at
28.38 mm, 27.67–
31.85 lb at 1.12 in)
Spring tilt limit:
Intake:
2.5°/1.7 mm (0.067 in)
Exhaust:
2.5°/1.6 mm (0.063 in)
Valve spring compres-
sor:
YM-4019/90890-04019
Page 163 of 230
5-60
CRANKCASE AND CRANKSHAFT
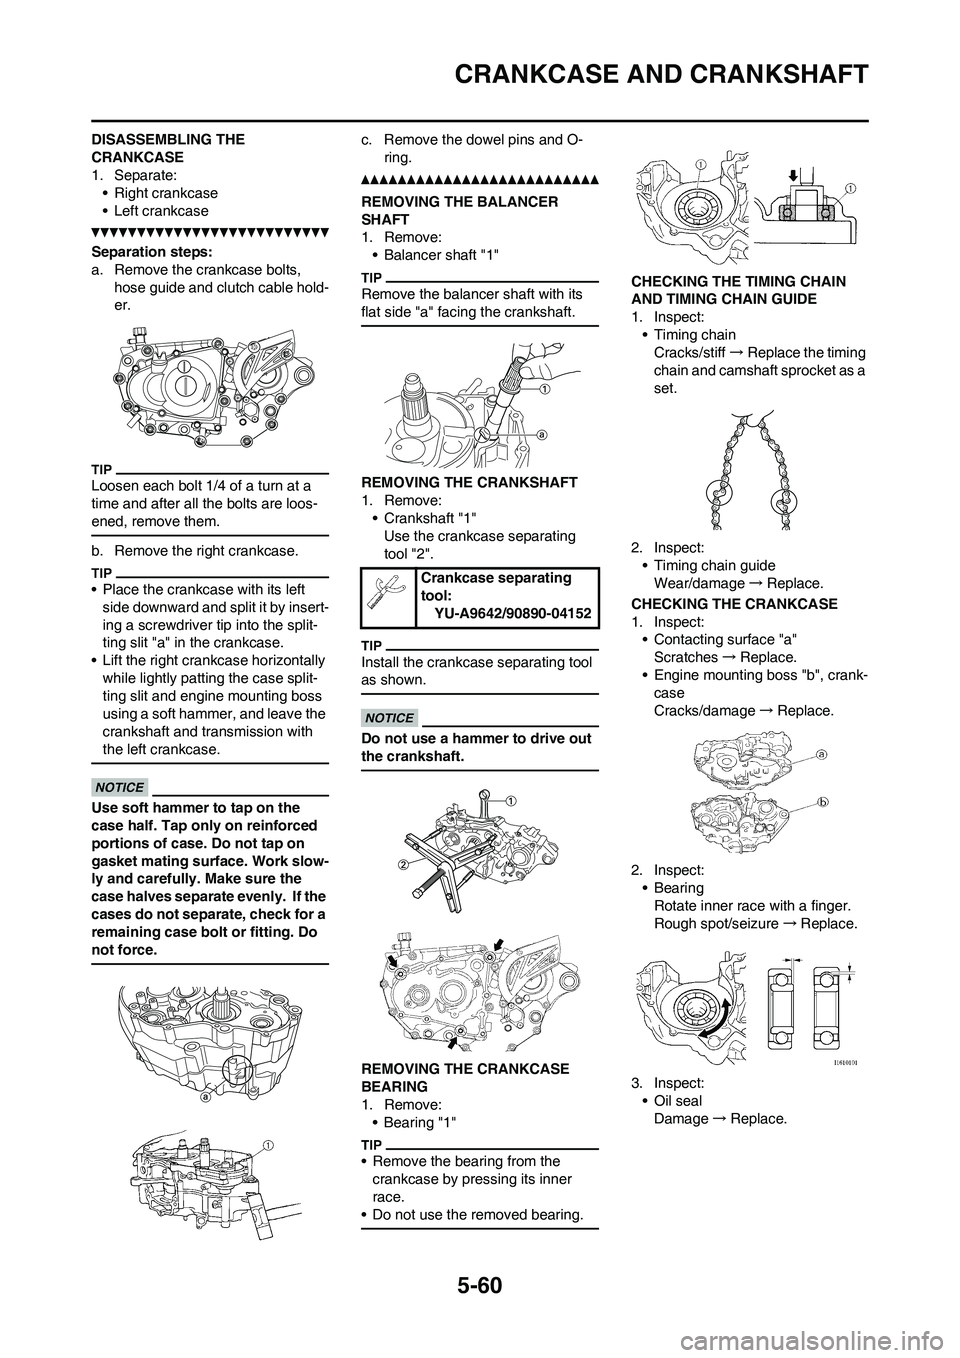
DISASSEMBLING THE
CRANKCASE
1. Separate:
• Right crankcase
• Left crankcase
Separation steps:
a. Remove the crankcase bolts,
hose guide and clutch cable hold-
er.
Loosen each bolt 1/4 of a turn at a
time and after all the bolts are loos-
ened, remove them.
b. Remove the right crankcase.
• Place the crankcase with its left
side downward and split it by insert-
ing a screwdriver tip into the split-
ting slit "a" in the crankcase.
• Lift the right crankcase horizontally
while lightly patting the case split-
ting slit and engine mounting boss
using a soft hammer, and leave the
crankshaft and transmission with
the left crankcase.
Use soft hammer to tap on the
case half. Tap only on reinforced
portions of case. Do not tap on
gasket mating surface. Work slow-
ly and carefully. Make sure the
case halves separate evenly. If the
cases do not separate, check for a
remaining case bolt or fitting. Do
not force.
c. Remove the dowel pins and O-
ring.
REMOVING THE BALANCER
SHAFT
1. Remove:
• Balancer shaft "1"
Remove the balancer shaft with its
flat side "a" facing the crankshaft.
REMOVING THE CRANKSHAFT
1. Remove:
• Crankshaft "1"
Use the crankcase separating
tool "2".
Install the crankcase separating tool
as shown.
Do not use a hammer to drive out
the crankshaft.
REMOVING THE CRANKCASE
BEARING
1. Remove:
•Bearing "1"
• Remove the bearing from the
crankcase by pressing its inner
race.
• Do not use the removed bearing.
CHECKING THE TIMING CHAIN
AND TIMING CHAIN GUIDE
1. Inspect:
• Timing chain
Cracks/stiff→Replace the timing
chain and camshaft sprocket as a
set.
2. Inspect:
• Timing chain guide
Wear/damage→Replace.
CHECKING THE CRANKCASE
1. Inspect:
• Contacting surface "a"
Scratches→Replace.
• Engine mounting boss "b", crank-
case
Cracks/damage→Replace.
2. Inspect:
• Bearing
Rotate inner race with a finger.
Rough spot/seizure→Replace.
3. Inspect:
• Oil seal
Damage→Replace.
Crankcase separating
tool:
YU-A9642/90890-04152
Page 165 of 230
5-62
CRANKCASE AND CRANKSHAFT
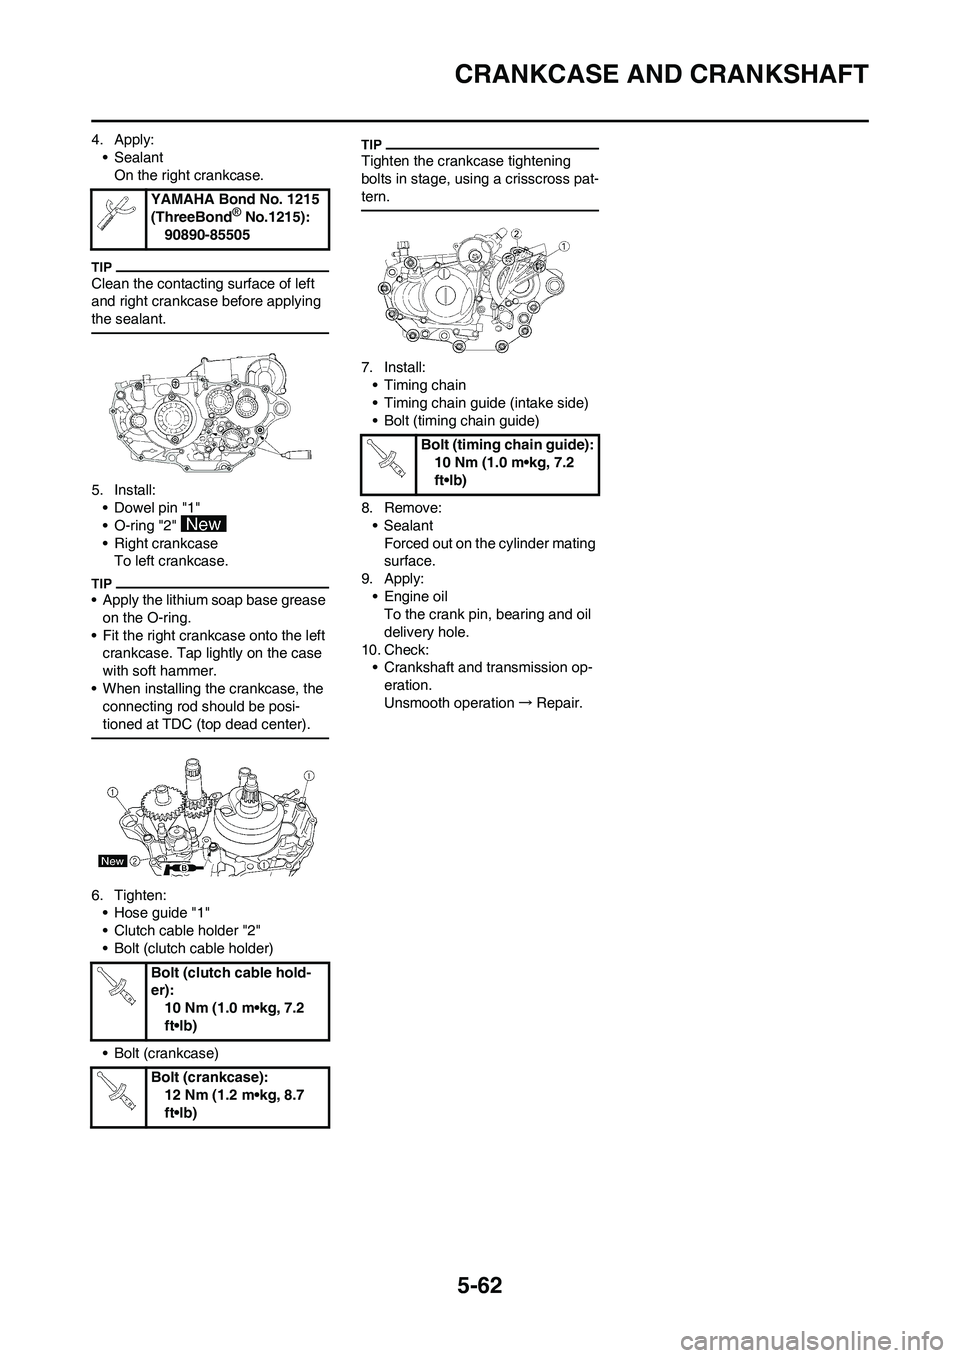
4. Apply:
• Sealant
On the right crankcase.
Clean the contacting surface of left
and right crankcase before applying
the sealant.
5. Install:
• Dowel pin "1"
• O-ring "2"
• Right crankcase
To left crankcase.
• Apply the lithium soap base grease
on the O-ring.
• Fit the right crankcase onto the left
crankcase. Tap lightly on the case
with soft hammer.
• When installing the crankcase, the
connecting rod should be posi-
tioned at TDC (top dead center).
6. Tighten:
• Hose guide "1"
• Clutch cable holder "2"
• Bolt (clutch cable holder)
• Bolt (crankcase)
Tighten the crankcase tightening
bolts in stage, using a crisscross pat-
tern.
7. Install:
• Timing chain
• Timing chain guide (intake side)
• Bolt (timing chain guide)
8. Remove:
• Sealant
Forced out on the cylinder mating
surface.
9. Apply:
• Engine oil
To the crank pin, bearing and oil
delivery hole.
10. Check:
• Crankshaft and transmission op-
eration.
Unsmooth operation→Repair. YAMAHA Bond No. 1215
(ThreeBond
® No.1215):
90890-85505
Bolt (clutch cable hold-
er):
10 Nm (1.0 m•kg, 7.2
ft•lb)
Bolt (crankcase):
12 Nm (1.2 m•kg, 8.7
ft•lb)
Bolt (timing chain guide):
10 Nm (1.0 m•kg, 7.2
ft•lb)
Page 212 of 230
7-4
IGNITION SYSTEM
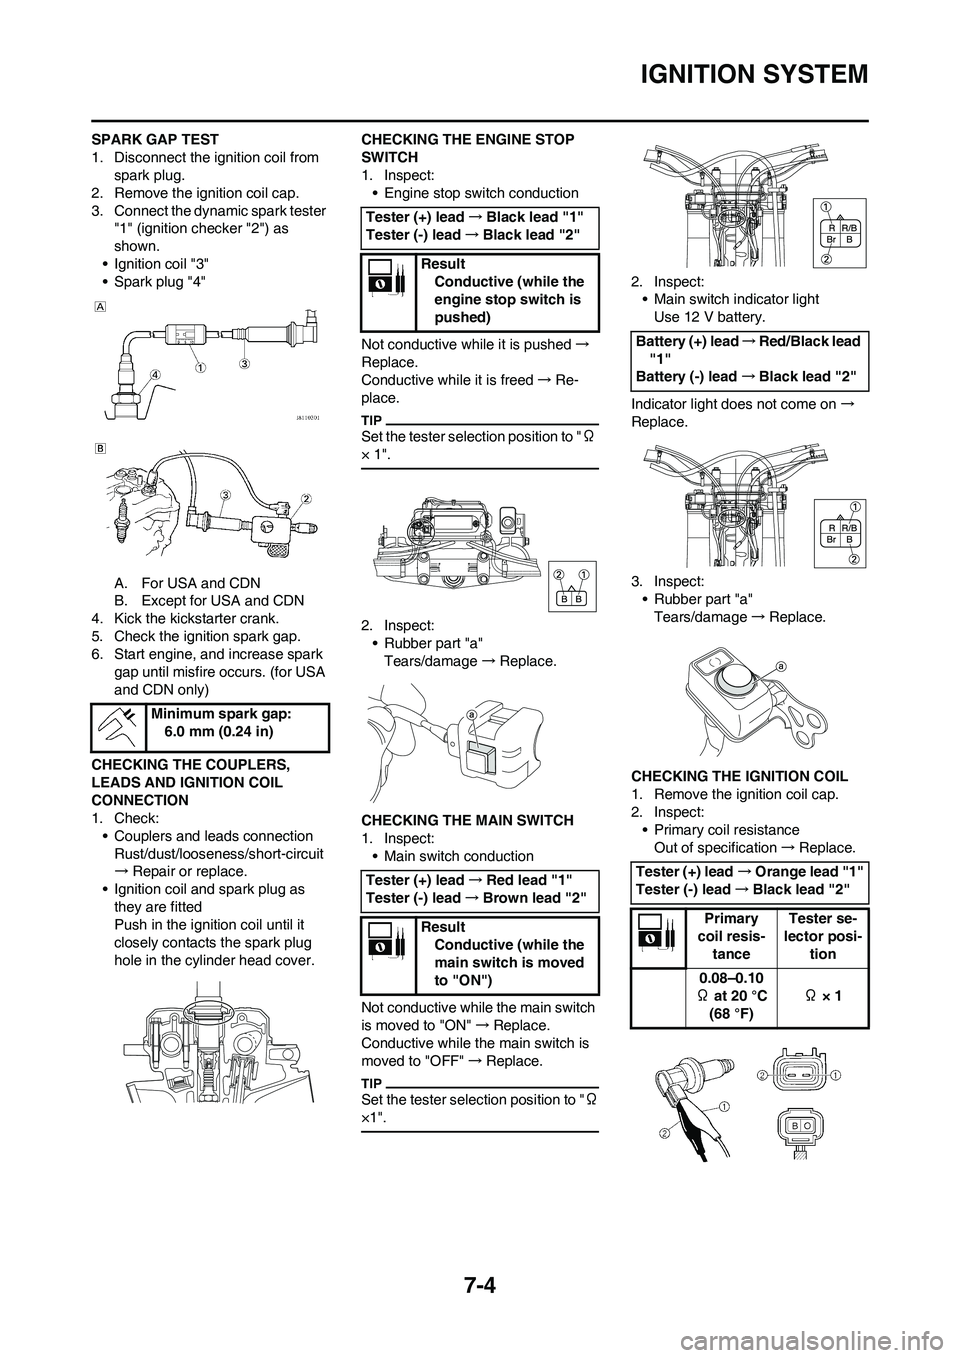
SPARK GAP TEST
1. Disconnect the ignition coil from
spark plug.
2. Remove the ignition coil cap.
3. Connect the dynamic spark tester
"1" (ignition checker "2") as
shown.
• Ignition coil "3"
• Spark plug "4"
A. For USA and CDN
B. Except for USA and CDN
4. Kick the kickstarter crank.
5. Check the ignition spark gap.
6. Start engine, and increase spark
gap until misfire occurs. (for USA
and CDN only)
CHECKING THE COUPLERS,
LEADS AND IGNITION COIL
CONNECTION
1. Check:
• Couplers and leads connection
Rust/dust/looseness/short-circuit
→Repair or replace.
• Ignition coil and spark plug as
they are fitted
Push in the ignition coil until it
closely contacts the spark plug
hole in the cylinder head cover.CHECKING THE ENGINE STOP
SWITCH
1. Inspect:
• Engine stop switch conduction
Not conductive while it is pushed→
Replace.
Conductive while it is freed→Re-
place.
Set the tester selection position to "Ω
× 1".
2. Inspect:
• Rubber part "a"
Tears/damage→ Replace.
CHECKING THE MAIN SWITCH
1. Inspect:
• Main switch conduction
Not conductive while the main switch
is moved to "ON"→Replace.
Conductive while the main switch is
moved to "OFF"→Replace.
Set the tester selection position to "Ω
×1".
2. Inspect:
• Main switch indicator light
Use 12 V battery.
Indicator light does not come on→
Replace.
3. Inspect:
• Rubber part "a"
Tears/damage→Replace.
CHECKING THE IGNITION COIL
1. Remove the ignition coil cap.
2. Inspect:
• Primary coil resistance
Out of specification→Replace. Minimum spark gap:
6.0 mm (0.24 in)
Tester (+) lead→Black lead "1"
Tester (-) lead→Black lead "2"
Result
Conductive (while the
engine stop switch is
pushed)
Tester (+) lead→Red lead "1"
Tester (-) lead→Brown lead "2"
Result
Conductive (while the
main switch is moved
to "ON")
Battery (+) lead→Red/Black lead
"1"
Battery (-) lead→Black lead "2"
Tester (+) lead→Orange lead "1"
Tester (-) lead→Black lead "2"
Primary
coil resis-
tanceTester se-
lector posi-
tion
0.08–0.10
Ω at 20 °C
(68 °F) Ω × 1
Page 227 of 230
7-19
LIGHTING SYSTEM
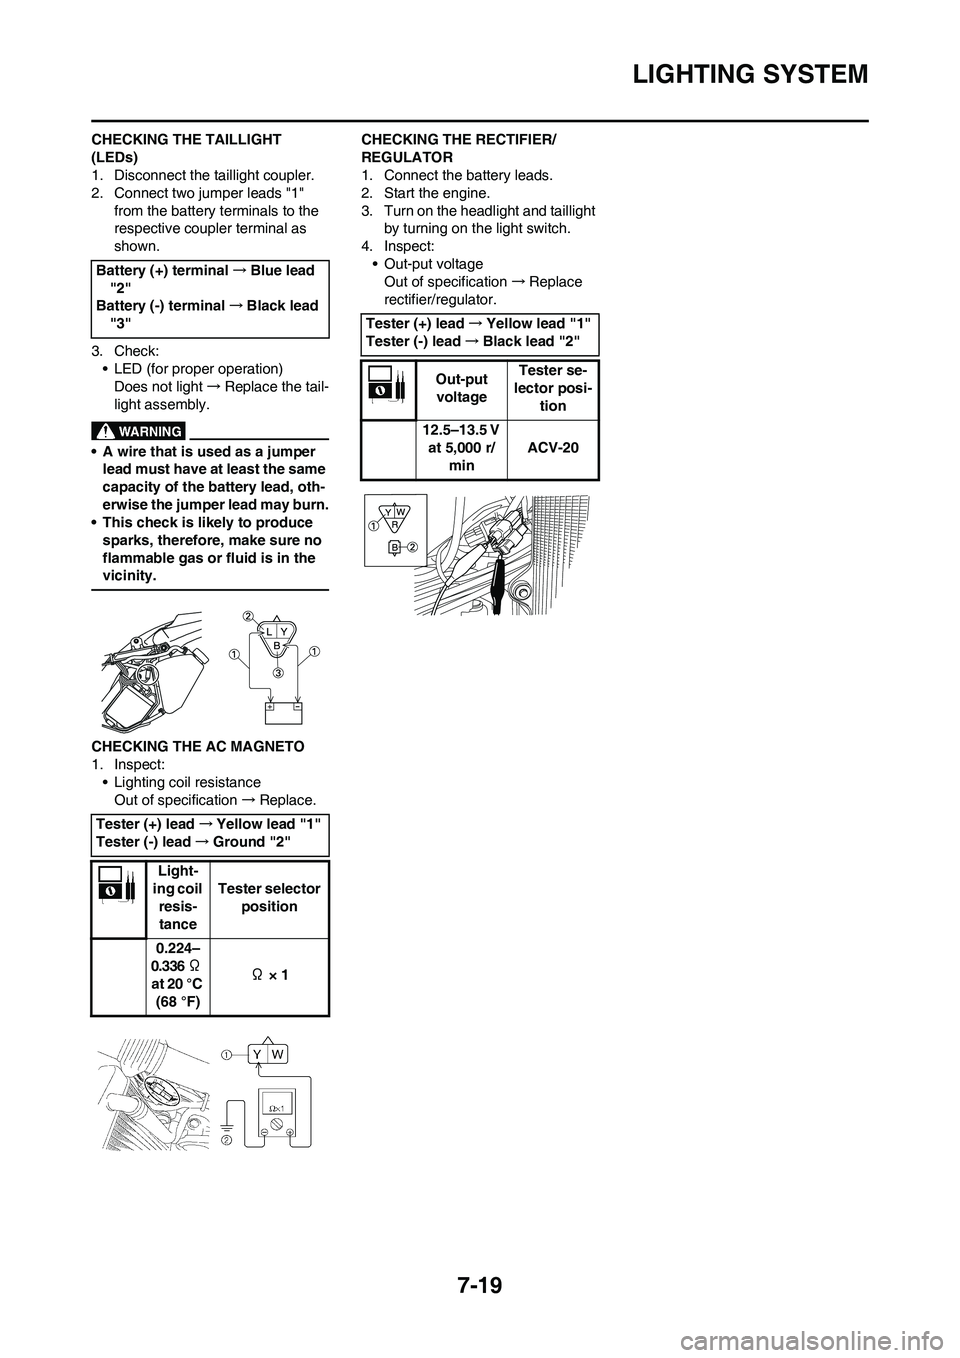
CHECKING THE TAILLIGHT
(LEDs)
1. Disconnect the taillight coupler.
2. Connect two jumper leads "1"
from the battery terminals to the
respective coupler terminal as
shown.
3. Check:
• LED (for proper operation)
Does not light→Replace the tail-
light assembly.
• A wire that is used as a jumper
lead must have at least the same
capacity of the battery lead, oth-
erwise the jumper lead may burn.
• This check is likely to produce
sparks, therefore, make sure no
flammable gas or fluid is in the
vicinity.
CHECKING THE AC MAGNETO
1. Inspect:
• Lighting coil resistance
Out of specification→Replace.CHECKING THE RECTIFIER/
REGULATOR
1. Connect the battery leads.
2. Start the engine.
3. Turn on the headlight and taillight
by turning on the light switch.
4. Inspect:
• Out-put voltage
Out of specification→Replace
rectifier/regulator. Battery (+) terminal→Blue lead
"2"
Battery (-) terminal→Black lead
"3"
Tester (+) lead→Yellow lead "1"
Tester (-) lead→Ground "2"
Light-
ing coil
resis-
tanceTester selector
position
0.224–
0.336 Ω
at 20 °C
(68 °F) Ω × 1
Tester (+) lead→Yellow lead "1"
Tester (-) lead→Black lead "2"
Out-put
voltageTester se-
lector posi-
tion
12.5–13.5 V
at 5,000 r/
minACV-20