Page 48 of 88

TIP
Make sure that the vehicle is positio-
ned straight up when checking the oil
level. A slight tilt to the side can result
in a false reading.
3. Remove the oil check bolt, and
then check the oil level.
TIP
The oil should be at the brim of the
check hole.
4. If the oil is below the brim of the
check hole, remove the oil filler
cap, add sufficient oil of the
recommended type to raise it to
the correct level, and then install
the oil filler cap.
5. Install the oil check bolt, and then
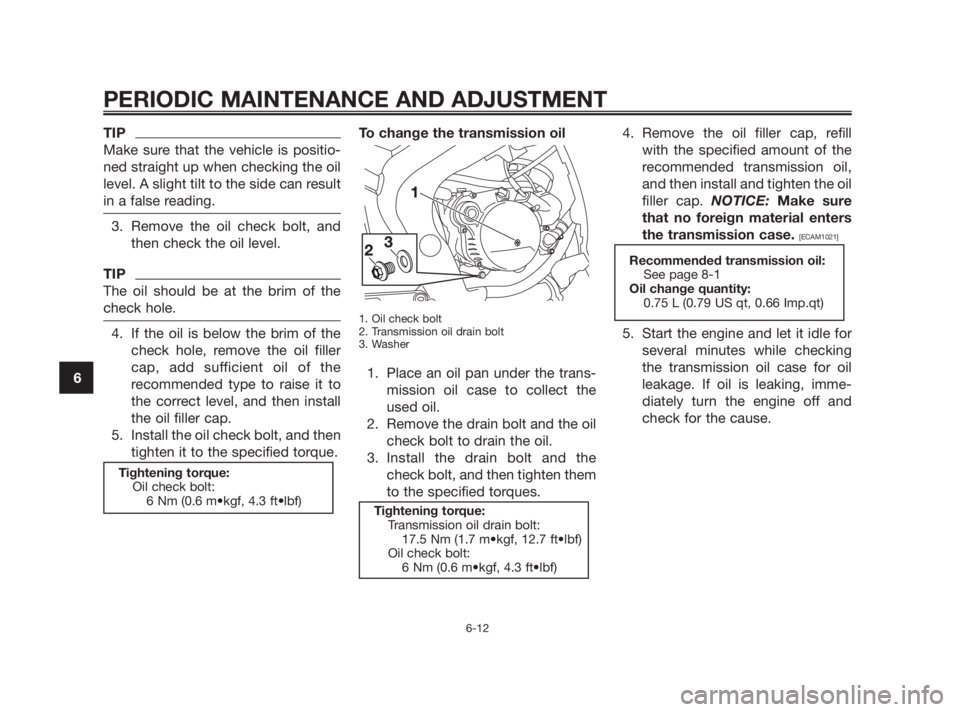
tighten it to the specified torque.To change the transmission oil
1. Oil check bolt
2. Transmission oil drain bolt
3. Washer
1. Place an oil pan under the trans-
mission oil case to collect the
used oil.
2. Remove the drain bolt and the oil
check bolt to drain the oil.
3. Install the drain bolt and the
check bolt, and then tighten them
to the specified torques.4. Remove the oil filler cap, refill
with the specified amount of the
recommended transmission oil,
and then install and tighten the oil
filler cap. NOTICE: Make sure
that no foreign material enters
the transmission case.
[ECAM1021]
5. Start the engine and let it idle for
several minutes while checking
the transmission oil case for oil
leakage. If oil is leaking, imme-
diately turn the engine off and
check for the cause.
Recommended transmission oil:
See page 8-1
Oil change quantity:
0.75 L (0.79 US qt, 0.66 Imp.qt)
Tightening torque:
Transmission oil drain bolt:
17.5 Nm (1.7 m•kgf, 12.7 ft•lbf)
Oil check bolt:
6 Nm (0.6 m•kgf, 4.3 ft•lbf)
Tightening torque:
Oil check bolt:
6 Nm (0.6 m•kgf, 4.3 ft•lbf)
PERIODIC MAINTENANCE AND ADJUSTMENT
6-12
6
5WX-F8199-E3 7/11/08 16:51 Página 48
Page 50 of 88

5. Install the panel.
EAUS1601
To change the coolant
1. Put the vehicle on a level surface
and let the engine cool if neces-
sary.
2. Remove cowling C and panel A.
(See page 6-8).
3. Place a container under the engi-
ne to collect the used coolant.
4. Remove the radiator cap retai-
ning bolt, radiator cap retainer
and radiator cap. WARNING!
Never attempt to remove the
radiator cap when the engine is
hot.
[EWA10381]
1. Radiator cap retaining bolt
2. Radiator cap
3. Radiator cap retainer
5. Remove the coolant drain bolt to
drain the cooling system.
1. Coolant drain bolt
6. Remove the coolant reservoir
cap.7. Disconnect the coolant reservoir
hose on the reservoir side and
drain the coolant from the reser-
voir.
1. Coolant reservoir
2. Coolant reservoir hose
8. After draining the coolant, tho-
roughly flush the cooling system
with clean tap water.
9. Replace the coolant drain bolt
washer if it is damaged, and then
tighten the coolant drain bolt to
the specified torque.
10. Connect the coolant reservoir
hose.
Tightening torque:
Coolant drain bolt:
9 Nm (0.9 m•kgf, 6.5 ft•lbf)
Coolant reservoir capacity (up to
the maximum level mark):
0.29 L (0.31 US qt, 0.26 Imp.qt)
PERIODIC MAINTENANCE AND ADJUSTMENT
6-14
6
5WX-F8199-E3 7/11/08 16:51 Página 50
Page 77 of 88

exhaust systems can be removed
through polishing.)
4. To prevent corrosion, it is recom-
mended to apply a corrosion pro-
tection spray on all metal, inclu-
ding chrome- and nickel-plated,
surfaces.
5. Use spray oil as a universal clea-
ner to remove any remaining dirt.
6. Touch up minor paint damage
caused by stones, etc.
7. Wax all painted surfaces.
8. Let the motorcycle dry comple-
tely before storing or covering it.
EWA11131
Contaminants on the brakes or
tires can cause loss of control.
●Make sure that there is no oil or
wax on the brakes or tires.
●If necessary, clean the brake
discs and brake linings with a
regular brake disc cleaner or
acetone, and wash the tires
with warm water and a mild
detergent. Before riding at hig-
her speeds, test the motorcy-cle’s braking performance and
cornering behavior.
ECA10800
●Apply spray oil and wax spa-
ringly and make sure to wipe
off any excess.
●Never apply oil or wax to any
rubber and plastic parts, but
treat them with a suitable care
product.
●Avoid using abrasive polishing
compounds as they will wear
away the paint.
TIP
●Consult a Yamaha dealer for
advice on what products to use.
●Washing, rainy weather or humid
climates can cause the headlight
lens to fog. Turning the headlight
on for a short period of time will
help remove the moisture from
the lens.
EAU37221
Storage
Short-term
Always store your motorcycle in a
cool, dry place and, if necessary, pro-
tect it against dust with a porous
cover.
ECA10810
●Storing the motorcycle in a
poorly ventilated room or cove-
ring it with a tarp, while it is still
wet, will allow water and humi-
dity to seep in and cause rust.
●To prevent corrosion, avoid
damp cellars, stables (because
of the presence of ammonia)
and areas where strong chemi-
cals are stored.
Long-term
Before storing your motorcycle for
several months:
1. Follow all the instructions in the
“Care” section of this chapter.
2. Turn the fuel cock lever to “OFF”.
3. Drain the carburetor float cham-
ber by loosening the drain bolt;
this will prevent fuel deposits
NOTICE
NOTICE
WARNING
MOTORCYCLE CARE AND STORAGE
7-3
7
5WX-F8199-E3 7/11/08 16:51 Página 77