Page 96 of 168

8-6
8
20 Differential gear oilChange.
Check ATV for oil leakage, and correct if neces-
sary.√√
21 Final gear oilChange.
Check ATV for oil leakage, and correct if neces-
sary.√√
22 Cooling systemCheck coolant level and ATV for coolant leakage,
and correct if necessary.√√√√√
Replace coolant. Every 2 years
23*Moving parts and
cablesLubricate.√√√√
24*Drive select lever
safety system cableCheck operation and adjust or replace if neces-
sary.√√√
25*Throttle lever hous-
ing and cableCheck operation and correct if necessary.
Check throttle cable free play and adjust if neces-
sary.
Lubricate throttle lever housing and cable.√√√√√
26*Front and rear brake
switchesCheck operation and correct if necessary.√√√√√
27*Lights and switchesCheck operation and correct if necessary.
Adjust headlight beams.√√√√√ NO. ITEMCHECK OR MAINTENANCE
JOBINITIAL EVERY
Whichev-
er comes
firstmonth136612
km
(mi)320
(200)1300
(800)2500
(1600)2500
(1600)5000
(3200)
hours 20 80 160 160 320U28P61E0.book Page 6 Wednesday, March 18, 2009 9:25 AM
Page 97 of 168
8-7
8
EBU23071TIP�Some maintenance items need more frequent service if you are riding in unusually wet, dusty, sandy or
muddy areas, or at full-throttle.�Hydraulic brake service
Regularly check and, if necessary, correct the brake fluid level.
Every two years replace the internal components of the brake master cylinders and calipers, and
change the brake fluid.
Replace the brake hoses every four years and if cracked or damaged.
U28P61E0.book Page 7 Wednesday, March 18, 2009 9:25 AM
Page 133 of 168

8-43
8
EBU24060Valve clearance The valve clearance changes with use, resulting in
improper air-fuel mixture and/or engine noise. To
prevent this from occurring, the valve clearance
must be adjusted by a Yamaha dealer at the inter-
vals specified in the periodic maintenance and lu-
brication chart.EBU24071Adjusting the drive select lever safety
system cable The drive select lever safety system cable stretch-
es with use, which can result in improper function.
Therefore, the safety system cable should be
checked and adjusted by a Yamaha dealer at the
intervals specified in the periodic maintenance and
lubrication chart.EBU29601Brakes Replacement of brake components requires pro-
fessional knowledge. Brake service should be per-
formed by a Yamaha dealer.
WARNING
EWB02571Operating with improperly serviced or adjust-
ed brakes could lead to a loss in braking ability
and an accident.EBU27470Checking the front and rear brake pads The front and rear brake pads must be checked for
wear at the intervals specified in the periodic main-
tenance and lubrication chart. Each brake pad is
provided with a wear indicator groove, which al-
lows you to check the brake pad wear without hav-
ing to disassemble the brake. If a brake pad has
worn to the point that the wear indicator groove has
almost disappeared, have a Yamaha dealer re-
place the brake pads as a set.TIPThe wheels need to be removed to check the
brake pads. (See page 8-61.)
U28P61E0.book Page 43 Wednesday, March 18, 2009 9:25 AM
Page 134 of 168
8-44
8Front brake
Rear brake
EBU27842Checking the rear brake hose protec-
tors The rear brake hoses protectors must be checked
for wear at the intervals specified in the periodic
maintenance and lubrication chart. Each brake
hose protector is provided with a wear indicator. If
a protector wears to the point that its indicator be-
comes visible, have a Yamaha dealer replace the
protector.TIPThe wheels need to be removed to check the
brake hose protectors. (See page 8-61.)
1. Wear indicator groove
1. Wear indicator grooveU28P61E0.book Page 44 Wednesday, March 18, 2009 9:25 AM
Page 135 of 168
8-45
8
EBU24251Checking the brake fluid level Insufficient brake fluid may allow air to enter the
brake system, possibly causing it to become inef-
fective.
Before riding, check that the brake fluid is above
the minimum level mark and replenish if neces-
sary. A low brake fluid level may indicate worn
brake pads and/or brake system leakage. If the
brake fluid level is low, be sure to check the brake
pads for wear and the brake system for leakage.Front brake
Rear brake1. Rear brake hose protector
2. Wear indicator
3. Protector is normal.
4. Protector is worn.
1. Minimum level mark
1. Minimum level mark
2WD
4WD
1
U28P61E0.book Page 45 Wednesday, March 18, 2009 9:25 AM
Page 136 of 168

8-46
8Observe these precautions:
�When checking the fluid level, make sure that
the top of the brake fluid reservoir is level.�Use only the recommended quality brake fluid,
otherwise the rubber seals may deteriorate,
causing leakage and poor braking performance.�Refill with the same type of brake fluid. Mixing
fluids may result in a harmful chemical reaction
and lead to poor braking performance.�Be careful that water does not enter the brake
fluid reservoir when refilling. Water will signifi-
cantly lower the boiling point of the fluid and may
result in vapor lock.�Brake fluid may deteriorate painted surfaces or
plastic parts. Always clean up spilled fluid imme-
diately.�As the brake pads wear, it is normal for the brake
fluid level to gradually go down. However, if the
brake fluid level goes down suddenly, have a
Yamaha dealer check the cause.
EBU24291Changing the brake fluid Have a Yamaha dealer change the brake fluid at
the intervals specified in the TIP after the periodic
maintenance and lubrication chart. In addition,
have the oil seals of the master cylinders and cali-
pers as well as the brake hoses replaced at the in-
tervals listed below or whenever they are damaged
or leaking.�Oil seals: Replace every two years.�Brake hoses: Replace every four years.EBU27772Checking the front and rear brake lever
free play The front and rear brake lever free play must be
checked at the intervals specified in the periodic
maintenance and lubrication chart. The brake le-
vers should have no free play as shown. If there is
free play, have a Yamaha dealer check the brake
system. Recommended brake fluid:
DOT 4
U28P61E0.book Page 46 Wednesday, March 18, 2009 9:25 AM
Page 137 of 168
8-47
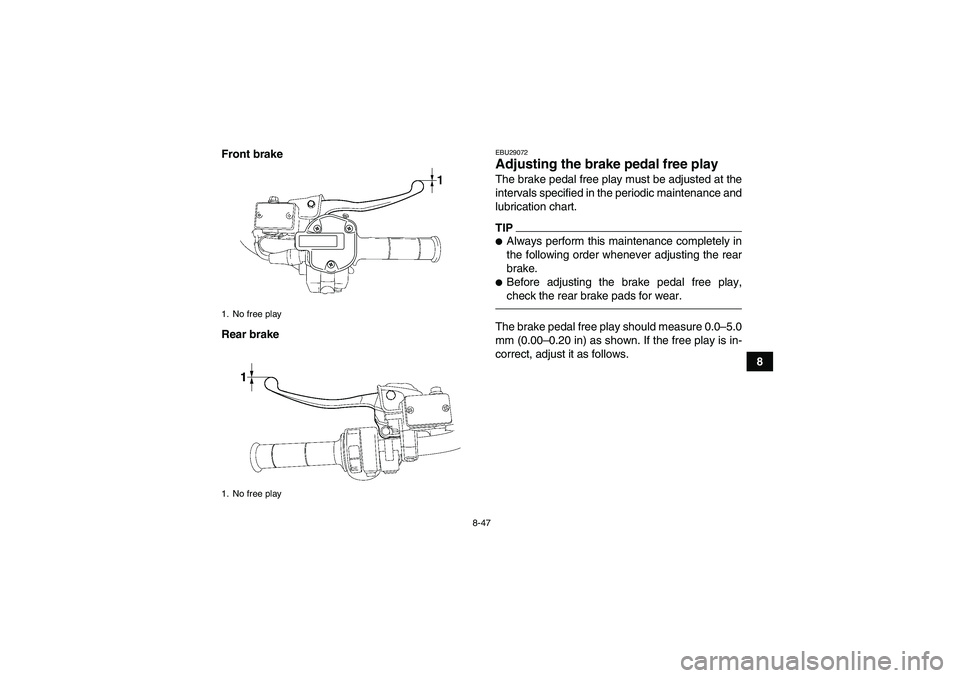
8 Front brake
Rear brake
EBU29072Adjusting the brake pedal free play The brake pedal free play must be adjusted at the
intervals specified in the periodic maintenance and
lubrication chart.TIP�Always perform this maintenance completely in
the following order whenever adjusting the rear
brake.�Before adjusting the brake pedal free play,
check the rear brake pads for wear.The brake pedal free play should measure 0.0–5.0
mm (0.00–0.20 in) as shown. If the free play is in-
correct, adjust it as follows.
1. No free play
1. No free playU28P61E0.book Page 47 Wednesday, March 18, 2009 9:25 AM
Page 138 of 168
8-48
81. Remove panel H. (See page 8-8.)
2. Loosen the locknut.
3. Turn the brake pedal free play adjusting nut in
direction (a) to increase the free play, and in
direction (b) to decrease it.4. Tighten the locknut.
5. After adjusting, there should be slight play at
the brake pedal cable joint as shown. If there
is no play, repeat steps 2 to 4.
1. Brake pedal free play
1. Locknut
2. Brake pedal free play adjusting nut
U28P61E0.book Page 48 Wednesday, March 18, 2009 9:25 AM


2. Loosen the locknut.
3. Turn the brake pedal free play adjusting nut in
direction (a) to increase the free play, and in
direction (b) to decrease it.4. Tight")