Page 41 of 140

5-1
5
EBU19201
PRE-OPERATION CHECKS
EBU19224Inspect your vehicle each time you use it to make sure the vehicle is in safe operating condition. Always
follow the inspection and maintenance procedures and schedules described in the Owner’s Manual.
WARNING
EWB00481Failure to inspect or maintain the vehicle properly increases the possibility of an accident or equip-
ment damage. Do not operate the vehicle if you find any problem. If a problem cannot be corrected
by the procedures provided in this manual, have the vehicle inspected by a Yamaha dealer.Before using this vehicle, check the following points:
ITEM ROUTINE PAGE
FuelCheck fuel level in fuel tank, and add recommended fuel if neces-
sary.
Check fuel line for leakage. Correct if necessary.4-8, 5-3
Engine oilCheck oil level in engine, and add recommended oil to specified lev-
el if necessary.
Check ATV for oil leakage. Correct if necessary.5-3, 8-11
Final gear oilCheck ATV for oil leakage. Correct if necessary. 5-3, 8-17
Front brakeCheck operation. If soft or spongy, have Yamaha dealer bleed hy-
draulic system.
Check brake pads for wear, and replace if necessary.
Check brake fluid level in reservoir, and add recommended brake
fluid to specified level if necessary.
Check hydraulic system for leakage. Correct if necessary.5-3, 8-27, 8-29, 8-30
U1P065E0.book Page 1 Monday, August 31, 2009 1:10 PM
Page 42 of 140

5-2
5
Rear brakeCheck operation, and correct if necessary.
Lubricate cable if necessary.
Check lever and pedal free play, and adjust if necessary.5-3, 8-27, 8-30
Throttle leverMake sure that operation is smooth. Lubricate cable and lever hous-
ing if necessary.
Check cable free play, and adjust if necessary.5-4, 8-26
Control cablesMake sure that operation is smooth. Lubricate if necessary. 8-35
Wheels and tiresCheck wheel condition, and replace if damaged.
Check tire condition and tread depth. Replace if necessary.
Check air pressure. Correct if necessary.5-4
Shift pedalMake sure that operation is smooth.
Correct if necessary.8-36
Brake pedal Make sure that operation is smooth. Lubricate pedal pivoting point if
necessary.8-36
Brake leversMake sure that operation is smooth. Lubricate lever pivoting points if
necessary.8-35
Chassis fastenersMake sure that all nuts, bolts and screws are properly tightened. 5-6
Instruments, lights and
switchesCheck operation, and correct if necessary. 5-6
BatteryCheck electrolyte level. Fill with distilled water if necessary. 5-6, 8-38 ITEM ROUTINE PAGEU1P065E0.book Page 2 Monday, August 31, 2009 1:10 PM
Page 43 of 140
EBU19560Engine oil Make sure that the engine oil is at the specified lev-
el. Add oil as necessary. (See page 8-1")
5-3
5
EBU19541Fuel Make sure that there is sufficient fuel in the tank.
(See page 4-8.)EBU19560Engine oil Make sure that the engine oil is at the specified lev-
el. Add oil as necessary. (See page 8-11.)EBU19590Final gear oil Make sure that the final gear oil is at the specified
level. Add oil as necessary. (See page 8-17.)EBU27671Front and rear brakes Brake levers and brake pedal�Check that there is no free play in the front brake
lever. If there is free play, have a Yamaha dealer
check the brake system.�Check for correct free play in the rear brake lever
and brake pedal. If the free play is incorrect, ad-
just it. (See page 8-30.)
�Check operation of the levers and pedal. They
should move smoothly and there should be a
firm feeling when the brake is applied. If not,
have a Yamaha dealer check them.
Brake fluid level (front brake)
Check the brake fluid level. Add fluid if necessary.
(See page 8-29.)
Brake fluid leakage (front brake)
Check to see if any brake fluid is leaking out of the
hose, joint or brake fluid reservoir of the front
brake. Apply the brake firmly for one minute. If the
lever moves slowly inward, there may be a leak in
the brake system. If there is any leakage, the brake
system should be checked by a Yamaha dealer.
Brake operation
Test the brakes at slow speed after starting out to
make sure they are working properly. If the brakes
do not provide proper braking performance, check
the brake pads and shoes for wear. (See page
8-27.)Recommended brake fluid:
DOT 4
U1P065E0.book Page 3 Monday, August 31, 2009 1:10 PM
Page 44 of 140

5-4
5
EBU19761Throttle lever Check the operation of the throttle lever. It must
open smoothly and spring back to the idle position
when released. Have a Yamaha dealer correct if
necessary.EBU19814Tires Check tire pressure regularly to make sure it is at
the recommended specifications. Also check for
wear and damage.
Tire pressure
Use the low-pressure tire gauge to check and ad-
just tire pressures when the tires are cold. Tire
pressures must be equal on both sides.
WARNING! Operation of this vehicle with im-
proper tire pressure may cause severe injury
or death from loss of control or rollover. Tire
pressure below the minimum specified could
also cause the tire to dislodge from the rim un-
der severe riding conditions.
[EWB02541]
Set tire
pressures to the following specifications:The low-pressure tire gauge is included as stan-
dard equipment. Make two measurements of the
tire pressure and use the second reading. Dust or
dirt in the gauge could cause the first reading to be
incorrect.Recommended tire pressure:
Fro nt
20.0 kPa (0.200 kgf/cm², 2.9 psi)
Rear
25.0 kPa (0.250 kgf/cm², 3.6 psi)
Minimum tire pressure:
Fro nt
17.0 kPa (0.170 kgf/cm², 2.5 psi)
Rear
22.0 kPa (0.220 kgf/cm², 3.2 psi)
Maximum tire seating pressure:
Fro nt
250 kPa (2.5 kgf/cm², 36 psi)
Rear
250 kPa (2.5 kgf/cm², 36 psi)
U1P065E0.book Page 4 Monday, August 31, 2009 1:10 PM
Page 45 of 140
5-5
5
Tire wear limit
When the tire groove decreases to 3 mm (0.12 in)
due to wear, replace the tire.Tire information
This ATV is equipped with tubeless tires with
valves.
WARNING
EWB02551Use of improper tires on this ATV may cause
loss of control, increasing your risk of an acci-
dent.After extensive tests, only the tires listed below
have been approved for this model by Yamaha
Motor Manufacturing Corporation of America.
1. Low-pressure tire gauge
1. Tire wear limit
U1P065E0.book Page 5 Monday, August 31, 2009 1:10 PM
Page 46 of 140
5-6
5
Aftermarket tires and rims
The tires and rims that came with your ATV were
designed to match the performance capabilities
and to provide the best combination of handling,
braking, and comfort. Other tires, rims, sizes, and
combinations may not be appropriate.
EBU19840Chassis fasteners Make sure that all nuts, bolts and screws are prop-
erly tightened.EBU19850Instruments, lights and switches Check that all instruments, lights and switches are
working properly. Correct if necessary.EBU19860Battery Check the fluid level in the battery. Fill with distilled
water if necessary. (See page 8-38.) Front:
Manufacturer/model:
YFM250Z CARLISLE/TRAIL WOLF
YFM25BZ MAXXIS/M905
Size:
AT22 x 7.00-10
Ty p e :
Tu b e l e s s
Rear:
Manufacturer/model:
YFM250Z CARLISLE/TRAIL WOLF
YFM25BZ MAXXIS/M906
Size:
AT22 x 10.00-10
Ty p e :
Tu b e l e s s
U1P065E0.book Page 6 Monday, August 31, 2009 1:10 PM
Page 47 of 140

6-1
6
EBU19880
OPERATION
EBU19901Read the Owner’s Manual carefully before riding
the ATV. If there is a control or function you do not
understand, ask your Yamaha dealer.
WARNING
EWB00631Read the Owner’s Manual carefully to become
familiar with all controls in order to help pre-
vent any loss of control, which could cause an
accident or injury.EBU19993Starting a cold engine NOTICEECB00150See the “Engine break-in” section on page 6-6
prior to operating the engine for the first time.1. Set the parking brake.
2. Turn the fuel cock to “ON”.
3. Turn the key to “ON” and the engine stop
switch to“”.4. Shift the transmission into neutral. The neutral
indicator light should come on. If the indicator
light does not come on, have a Yamaha deal-
er check the electrical circuit.
TIPThe engine can be started under the following con-
ditions:�The transmission is in neutral.�The rear brake lever is applied with the transmis-
sion in any gear. However, it is recommended to
shift into neutral before starting the engine.5. Use the starter (choke) in reference to the fig-
ure:
Position (1):
Cold engine start with ambient temperature
below 5 °C (40 °F).
Position (2):
Cold engine start with ambient temperature
between 0 °C (30 °F) and 30 °C (90 °F).
Position (3):
Cold engine start with ambient temperature
above 25 °C (80 °F).
U1P065E0.book Page 1 Monday, August 31, 2009 1:10 PM
Page 48 of 140
 position
6. Completely close the throttle lever and start
the engine by pushing the start switch.
NOTICE: For maximum engine life, never
accelerate hard when the eng")
6-2
6Ambient temp./starter (choke) position
6. Completely close the throttle lever and start
the engine by pushing the start switch.
NOTICE: For maximum engine life, never
accelerate hard when the engine is cold!
[ECB00162]
TIP�If the engine fails to start, release the start
switch, then push it again. Pause a few seconds
before the next attempt. Each cranking shouldbe as short as possible to preserve battery ener-
gy. Do not crank the engine more than 10 sec-
onds on each attempt.
�If the battery is discharged, pull the recoil starter
to start the engine.7. If the engine is started with the starter (choke)
in position (1), the starter (choke) should be
returned to position (2) to warm up the engine.
If the engine is started with the starter (choke)
in position (2), keep the starter (choke) in this
position to warm up the engine.
8. Continue warming up the engine until it idles
smoothly, then return the starter (choke) to
position (3) before riding.TIPThe engine is warm when it responds quickly to the
throttle with the starter (choke) turned off.EBU20291Starting a warm engine Follow the same procedure as for starting a cold
engine, with the exception that the starter (choke)
is not required when the engine is warm. Instead,
start the engine with the throttle slightly open.
1. Fully open
2. Half open
3. Closed
4. Starter (choke)U1P065E0.book Page 2 Monday, August 31, 2009 1:10 PM
 1
1 2
2 3
3 4
4 5
5 6
6 7
7 8
8 9
9 10
10 11
11 12
12 13
13 14
14 15
15 16
16 17
17 18
18 19
19 20
20 21
21 22
22 23
23 24
24 25
25 26
26 27
27 28
28 29
29 30
30 31
31 32
32 33
33 34
34 35
35 36
36 37
37 38
38 39
39 40
40 41
41 42
42 43
43 44
44 45
45 46
46 47
47 48
48 49
49 50
50 51
51 52
52 53
53 54
54 55
55 56
56 57
57 58
58 59
59 60
60 61
61 62
62 63
63 64
64 65
65 66
66 67
67 68
68 69
69 70
70 71
71 72
72 73
73 74
74 75
75 76
76 77
77 78
78 79
79 80
80 81
81 82
82 83
83 84
84 85
85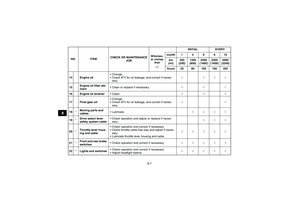 86
86 87
87 88
88 89
89 90
90 91
91 92
92 93
93 94
94 95
95 96
96 97
97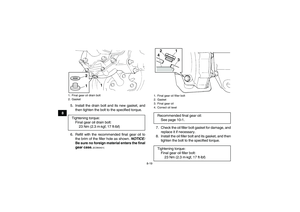 98
98 99
99 100
100 101
101 102
102 103
103 104
104 105
105 106
106 107
107 108
108 109
109 110
110 111
111 112
112 113
113 114
114 115
115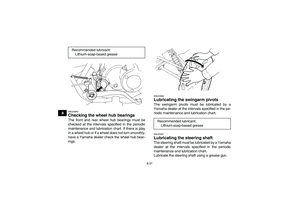 116
116 117
117 118
118 119
119 120
120 121
121 122
122 123
123 124
124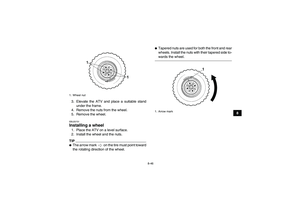 125
125 126
126 127
127 128
128 129
129 130
130 131
131 132
132 133
133 134
134 135
135 136
136 137
137 138
138 139
139
due to wear, replace the tire.Tire information
This ATV is equipped with tubeless tires with
valves.
WARNING
EWB02551Use of impro")
