Page 12 of 104
DESCRIPTION
2-1
2
EAU10410
Left view1. Front fork spring preload adjusting bolt (page 3-21)
2. Front fork compression damping force adjusting screw (page 3-21)
3. Air filter element (page 6-13)
4. Main fuse (page 6-29)
5. Fuel injection system fuse (page 6-29)
6. Storage compartment (FZ1-N) (page 3-21)
7. Passenger seat lock (page 3-19)
8. Shock absorber assembly spring preload adjusting ring (page 3-23)9. Shock absorber assembly rebound damping force adjusting screw
(page 3-23)
10.Shift pedal (page 3-14)
11.Idle adjusting screw (page 6-15)
12.Engine oil drain bolt (page 6-9)
13.Engine oil filter cartridge (page 6-9)U2D1E4E0.book Page 1 Tuesday, July 7, 2009 7:05 PM
Page 58 of 104

PERIODIC MAINTENANCE AND ADJUSTMENT
6-9
6
EAU19908
Engine oil and oil filter car-
tridge The engine oil level should be checked
before each ride. In addition, the oil
must be changed and the oil filter car-
tridge replaced at the intervals speci-
fied in the periodic maintenance and
lubrication chart.
To check the engine oil level
1. Place the vehicle on a level sur-
face and hold it in an upright posi-
tion. A slight tilt to the side can
result in a false reading.
2. Start the engine, warm it up for
several minutes, and then turn it
off.
3. Wait a few minutes until the oil set-
tles, and then check the oil level
through the check window located
at the bottom-right side of the
crankcase.TIPThe engine oil should be between the
minimum and maximum level marks.
4. If the engine oil is below the mini-
mum level mark, add sufficient oil
of the recommended type to raise
it to the correct level.
To change the engine oil (with or
without oil filter cartridge replace-
ment)
1. Place the vehicle on a level sur-
face.
2. Start the engine, warm it up for
several minutes, and then turn it
off.
3. Place an oil pan under the engine
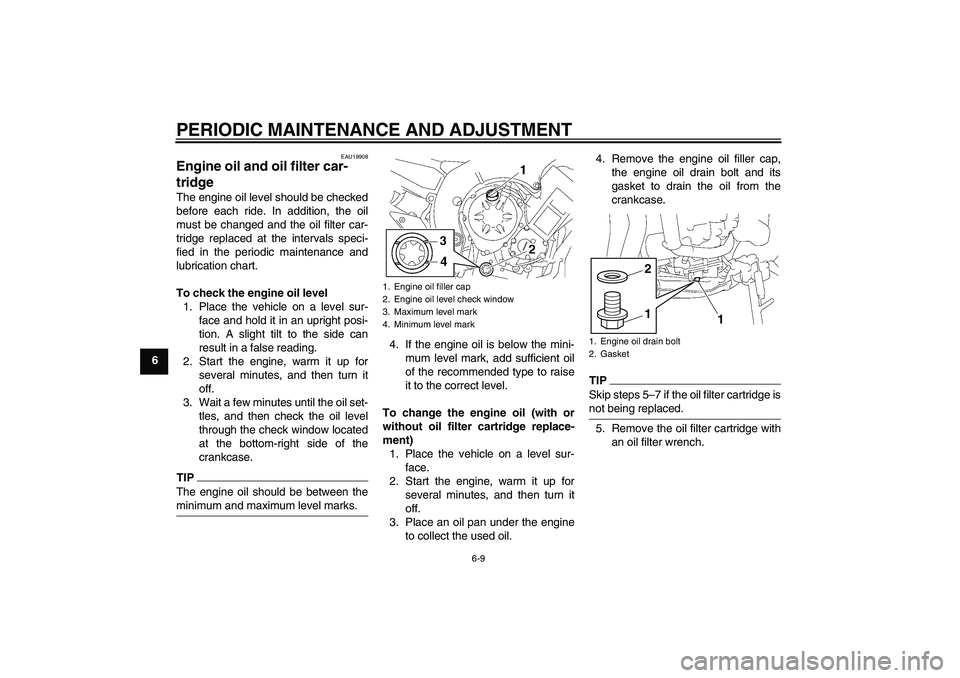
to collect the used oil.4. Remove the engine oil filler cap,
the engine oil drain bolt and its
gasket to drain the oil from the
crankcase.
TIPSkip steps 5–7 if the oil filter cartridge is
not being replaced.5. Remove the oil filter cartridge with
an oil filter wrench.
1. Engine oil filler cap
2. Engine oil level check window
3. Maximum level mark
4. Minimum level mark
1. Engine oil drain bolt
2. Gasket
1
1
2
U2D1E4E0.book Page 9 Tuesday, July 7, 2009 7:05 PM
Page 59 of 104
PERIODIC MAINTENANCE AND ADJUSTMENT
6-10
6
TIPAn oil filter wrench is available at a
Yamaha dealer.6. Apply a thin coat of clean engine
oil to the O-ring of the new oil filter
cartridge.
TIPMake sure that the O-ring is properly
seated.7. Install the new oil filter cartridge
with an oil filter wrench, and then
tighten it to the specified torque
with a torque wrench.8. Install the engine oil drain bolt and
its new gasket, and then tighten
the bolt to the specified torque.
9. Refill with the specified amount of
the recommended engine oil, and
then install and tighten the oil filler
cap.
1. Oil filter wrench
2. Oil filter cartridge
1. O-ring
1. Torque wrench
Tightening torque:
Oil filter cartridge:
17 Nm (1.7 m·kgf, 12 ft·lbf)
Tightening torque:
Engine oil drain bolt:
43 Nm (4.3 m·kgf, 31 ft·lbf)
U2D1E4E0.book Page 10 Tuesday, July 7, 2009 7:05 PM