Page 20 of 302

01 Safety
Supplemental Restraint System (SRS) 01
20
Front airbags
G018665
The front airbag systemThe front airbags supplement the three-point
seat belts. For these airbags to provide the
protection intended, seat belts must be worn
at all times.
The front airbag system includes gas genera-
tors surrounded by the airbags, and decelera-
tion sensors that activate the gas generators,
causing the airbags to be inflated with nitrogen
gas.
Location of the passenger's side front airbag
As the movement of the seats' occupants com-
presses the airbags, some of the gas is expel-
led at a controlled rate to provide better cush-
ioning. Both seat belt pretensioners also
deploy, minimizing seat belt slack. The entire
process, including inflation and deflation of the
airbags, takes approximately one fifth of a sec-
ond.
The location of the front airbags is indicated by
SRS AIRBAG embossed on the steering wheel
pad and above the glove compartment, and by
decals on both sun visors and on the front and
far right side of the dash.
The driver's side front airbag is folded and
located in the steering wheel hub.The passenger's side front airbag is folded
behind a panel located above the glove com-
partment.
WARNING
•The airbags in the vehicle are designed
to be a SUPPLEMENT to–not a replace-
ment for–the three-point seat belts. For
maximum protection, wear seat belts at
all times. Be aware that no system can
prevent all possible injuries that may
occur in an accident.
•Never drive a vehicle with a steering
wheel-mounted airbag with your hands
on the steering wheel pad/airbag hous-
ing.
•The front airbags are designed to help
prevent serious injury. Deployment
occurs very quickly and with consider-
able force. During normal deployment
and depending on variables such as
seating position, one may experience
abrasions, bruises, swellings, or other
injuries as a result from deployment of
one or both of the airbags.
•When installing any accessory equip-
ment, make sure that the front airbag
system is not damaged. Any interfer-
ence in the system could cause mal-
function.
Page 32 of 302
01 Safety
Whiplash Protection System – WHIPS 01
32
WARNING
•Boxes, suitcases, etc. wedged behind
the front seats could impede the func-
tion of the WHIPS system.
•If the rear seat backrests are folded
down, cargo must be secured to pre-
vent it from sliding forward against the
front seat backrests in the event of a
collision from the rear. This could inter-
fere with the action of the WHIPS sys-
tem.
G018567
WARNING
Any contact between the front seat backr-
ests and the folded rear seat or a rear-facing
child seat could impede the function of the
WHIPS system. If the rear seat is folded
down, the occupied front seats must be
adjusted forward so that they do not touch
the folded rear seat.
Page 81 of 302

03 Your driving environment
Seats
03
��
81 Front seats
Lumbar support: turn the control for firmer
or softer lumbar support.
Front-rear adjustment: lift the bar and
move the seat to the position of your
choice.
Raise/lower front edge of seat cushion,
pump up/down.
Backrest tilt: turn the control to adjust the
angle of the backrest.
Raise/lower the seat, pump up/down.
Control panel for power seat.
WARNING
•Do not adjust the seat while driving. The
seat should be adjusted so that the
brake pedal can be depressed fully. In
addition, position the seat as far rear-
ward as comfort and control allow.
•Check that the seat is securely locked
into position after adjusting.
Folding the front seat backrest
The front passenger seat backrest can be
folded to a horizontal position to make room for
a long load. Fold the backrest as follows:
Move the seat as far back as possible.
Adjust the backrest to an upright position.
Lift the catches (3 in the inset illustration)
on the rear of the backrest.
Without releasing the catches, push the
backrest forward.
Move the seat as far forward as possible
so that the head restraint slides under the
glove compartment.
WARNING
Cover sharp edges on the load to help pre-
vent injury to occupants. Secure the load to
help prevent shifting during sudden stops.
Page 84 of 302

03 Your driving environment
Seats
03
84
Rear seats
Folding down the rear seat backrests
The three sections of the rear seat backrest can
be folded down in different combinations to
make it easier to transport long objects.
•The left (driver's side) section can be folded
down separately.
•The center section can be folded down
separately.
•The right (passenger's side) section can be
folded down together with the center sec-
tion.
•All three sections can be folded down
together.
Release and lower the center head
restraint if the center and/or right section
of the backrest is to be lowered. The out-
board head restraints fold down automat-
ically.
Pull up the backrest release control on the
respective section(s) and fold the sec-
tion(s) down.
NOTE
It may be necessary to move the front seats
forward or put their backrests in a more
upright position before folding down the
rear seat backrests.
WARNING
•When the backrest(s) are returned to the
upright position, check that it is properly
locked in place. The red indicators
should not be visible.
•Return the outboard head restraints to
the upright position.
•Long loads should always be securely
anchored to help avoid injury in the
event of a sudden stop.
•Always turn the engine off and apply the
parking brake when loading/unloading
the vehicle.
•Place the transmission in the Park (P)
position to help prevent inadvertent
movement of the gear selector.
•On hot days, the temperature in the
vehicle interior can rise very quickly.
Exposure of people to these high tem-
peratures for even a short period of time
can cause heat-related injury or death.
Small children are particularly at risk.
Page 85 of 302

03 Your driving environment
Seats
03
��
85
Rear center head restraint
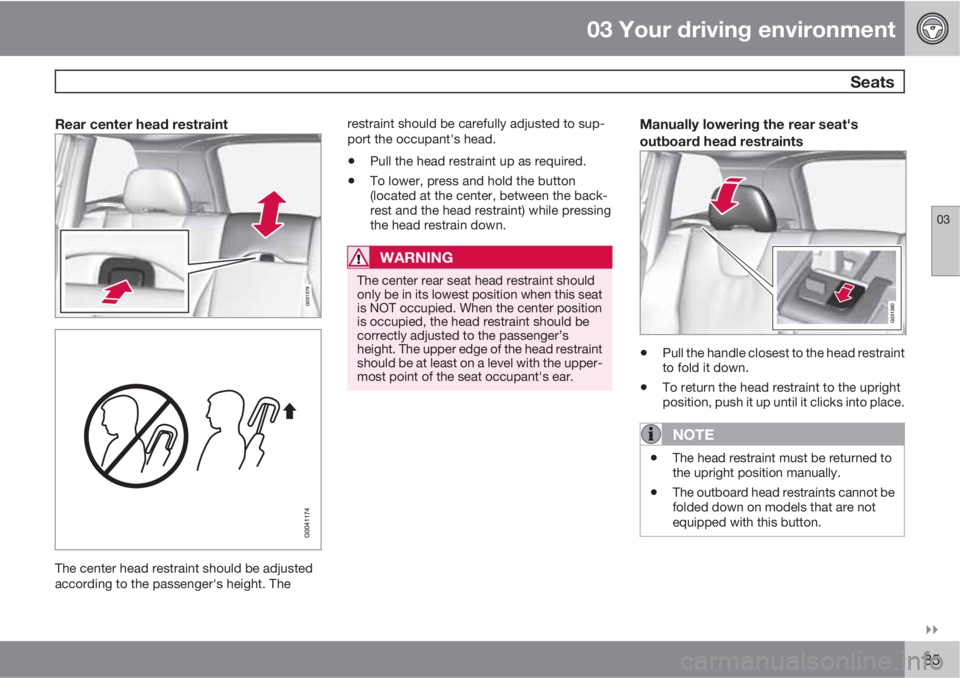
The center head restraint should be adjusted
according to the passenger's height. Therestraint should be carefully adjusted to sup-
port the occupant's head.
•Pull the head restraint up as required.
•To lower, press and hold the button
(located at the center, between the back-
rest and the head restraint) while pressing
the head restrain down.
WARNING
The center rear seat head restraint should
only be in its lowest position when this seat
is NOT occupied. When the center position
is occupied, the head restraint should be
correctly adjusted to the passenger’s
height. The upper edge of the head restraint
should be at least on a level with the upper-
most point of the seat occupant's ear.
Manually lowering the rear seat's
outboard head restraints
•Pull the handle closest to the head restraint
to fold it down.
•To return the head restraint to the upright
position, push it up until it clicks into place.
NOTE
•The head restraint must be returned to
the upright position manually.
•The outboard head restraints cannot be
folded down on models that are not
equipped with this button.
Page 86 of 302
03 Your driving environment
Seats
03
86
WARNING
For safety reasons, no one should be
allowed to sit in the outboard rear seat posi-
tions if the head restraints are folded down.
If these positions are occupied, the head
restraints should be in the upright (fixed)
position.
Page 217 of 302

05 During your trip
Cargo area
05
��
217
WARNING
•Be sure that the cargo net's upper
attachment hooks are properly inserted
in the brackets and that the lower straps
are correctly attached and pulled taut.
•A damaged cargo net should never be
used.
•Objects in the cargo area should be
securely anchored, even if the cargo net
is correctly installed and in use.
Mounting the cargo netThe cargo net is easiest to put in place through
one of the rear doors.
1. Fold out the cargo net and be sure that the
upper hinged rod is straight and locked in
position.
2. Insert one end of the rod into the front or
rear bracket (near the ceiling). Be sure that
the lock on the lower strap is facing toward
you.
3. Insert the other end of the rod in the oppo-
site bracket.
– Be sure to press the end hooks on the rod
as far forward as possible in the brackets.
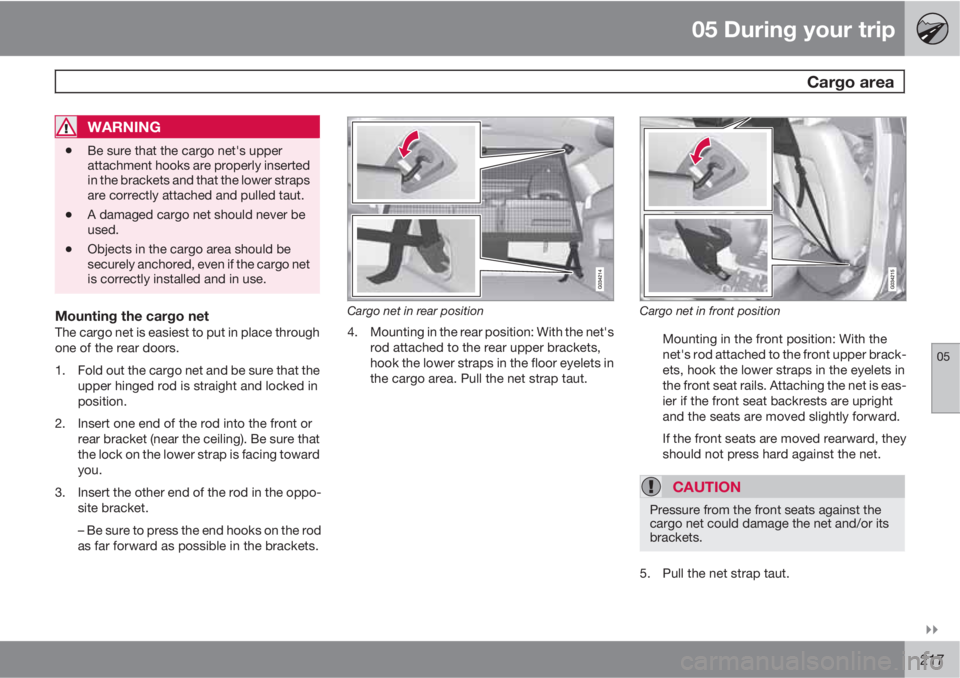
Cargo net in rear position
4. Mounting in the rear position: With the net's
rod attached to the rear upper brackets,
hook the lower straps in the floor eyelets in
the cargo area. Pull the net strap taut.
Cargo net in front position
Mounting in the front position: With the
net's rod attached to the front upper brack-
ets, hook the lower straps in the eyelets in
the front seat rails. Attaching the net is eas-
ier if the front seat backrests are upright
and the seats are moved slightly forward.
If the front seats are moved rearward, they
should not press hard against the net.
CAUTION
Pressure from the front seats against the
cargo net could damage the net and/or its
brackets.
5. Pull the net strap taut.
Page 243 of 302
06 Maintenance and specifications
Wiper blades and washer fluid
06
243
Replacing the tailgate wiper blade
G032770
1. Fold the wiper arm outward.
2. Grasp the inner section of wiper blade (at
the arrow).
3. Pull out the blade to release it from the
wiper arm.
4. Press the new wiper blade into place and
check that it seats securely.
5. Fold the wiper arm back toward the tailgate
window.
Filling washer fluid
Location of the washer fluid reservoir
The windshield and headlight washers share a
common reservoir.
The washer fluid reservoir is located on the
driver's side of the engine compartment. Dur-
ing cold weather, the reservoir should be filled
with windshield washer solvent containing
antifreeze. For capacities, see page 288.