2010 VOLKSWAGEN TRANSPORTER fuse box
[x] Cancel search: fuse boxPage 410 of 486

If and when
Practical tips
Frequently asked questions
If you suspect that a vehicle fault has arisen or your vehicle has been damaged, read and observe the following information before contacting a Volkswagen Commercial Vehicles dealership or
qualified workshop. You may also find useful infor-mation in the index under the headings "Things to note" or "Checklist".
To note Some possible causes Possible solution
Vehicle battery is discharged. -How to jump start =>page 443. -Recharge vehicle battery 362.
Engine does not start. The incorrect vehicle key is be-Use a valid vehicle key 36. ing used.
Fuel level is too low. Fill the tank 340.
Supplementary heating system Switch off the supplementary heating
Smoke is coming from the is running. system 332. wing. Supplementary heater is run-No solution 345. ning.
-Battery in the remote control -Replace the battery 36. Vehicle cannot be locked or key is flat. -Move closer to the vehicle. unlocked with the remote -Located too far away from the -Synchronise the vehicle key =>page 36. vehicle. control key. -Buttons were pressed outside -Lock or unlock the vehicle manually
the range. 413.
Cold engine. brake assist sys-Refer to the index under entries for Unusual noises. tems, supplementary heating "Noises". system.
Assist systems are active. Refer to the index under entries for "As-sist systems". Unusual handling. DSG® dual clutch gearbox is too Stop the vehicle immediately hot. 266.
Front seats cannot be ad-Vehicle battery is discharged. Recharge vehicle battery 362.
justed electrically. Fuse blown. Check fuse and replace as necessary 429.
The vehicle has no vehicle No direct solutions possible as it depends
jack, spare wheel or break-Equipment depends on type of on the equipment level. Contact a Volks-vehicle. wagen Commercial Vehicles dealership if down set. necessary 416.
-Windows or sliding roof are open. The interior monitoring sys--Item attached to the interior Remove any objects that could trigger a tem triggers a false alarm. mirror is moving. false alarm 44. -A mobile telephone is vibrating inside the vehicle.
Functions are not working Settings have been made in the Check and if necessary reset back to fac-as described in the owner's manual. Volkswagen information system. tory settings 24.
410 I If and when
Page 429 of 486
Test after driving for 10 minutes
r-'('n First read and observe the Introductory L-J,:.LI Information and safety warnings & on page 425.
Reconnect the tyre filler hose =>Fig. 302 ®and check the tyre pressure on the Tyre Pressure Loss Indicator®.
1.3 bar (19 psi /130 kPa) and lower:
• Do not drive on I The tyre cannot be sealed adequately with the breakdown set.
• Seek expert assistance => &.
1.4 bar (20 psi /140 kPa) and higher:
• Set the tyre pressure back to the correct value =>page 367.
• Resume your journey to the nearest qualified workshop. Do not exceed a maximum speed of 80 km/h (50 mph).
• The damaged tyre should be replaced at the qualified workshop.
Fuses
i:llJ Introduction
This chapter contains information on the following subjects:
Fuse box in the dash panel . . . . . . . . . . . . . . . 430
Fuses in the engine compartment . . . . . . . . . . 431 Changing a blown fuse ................... 431
At the time of print we are unable to provide an up-to-date overview of the locations of the fuses for the electrical consumers. This is because the vehi-cle is under constant development, because fuses are assigned differently depending on the vehicle equipment level and because several consumers may use a single fuse. You can get more informa-tion about the fuse layout from a Volkswagen Com-mercial Vehicles dealership.
Several electrical consumers could share a single fuse. Conversely, a single consumer could have more than one fuse.
Therefore fuses should only be replaced when the cause of the fault has been rectified. If a new fuse blows shortly after insertion, have the electrical system checked by a qualified workshop as soon as possible.
A WARNING
Driving with an unsealed tyre is dangerous as it can cause accidents and serious Injuries.
• Do not carry on driving if the tyre pressure Is 1.3 bar (19 psi /130 kPa) or lower.
• Seek expert assistance.
• Drink holder =>page 153
• Preparation for working in the engine compart-ment =>page 350
• Battery =>page 362
A WARNING
High voltages in the electrical system can cause electric shocks, serious burns and death.
• Never touch the electrical wiring of the ig-nition system.
• Avoid causing short circuits in the electri-cal system.
A WARNING
Using unsuitable or repaired fuses and bridg-ing an electrical circuit without fuses can cause a fire and serious injuries.
Practical tips I 429
Page 430 of 486
A WARNING (Continued)
• Never fit fuses that have a higher fuse pro-tection limit. Fuses must always be replaced by a new fuse with the same amp rating (same colour and markings) and size.
• Never repair a fuse.
• Never use a metal strip, paper clip or simi-lar objects to replace a fuse.
Fuse box in the dash panel
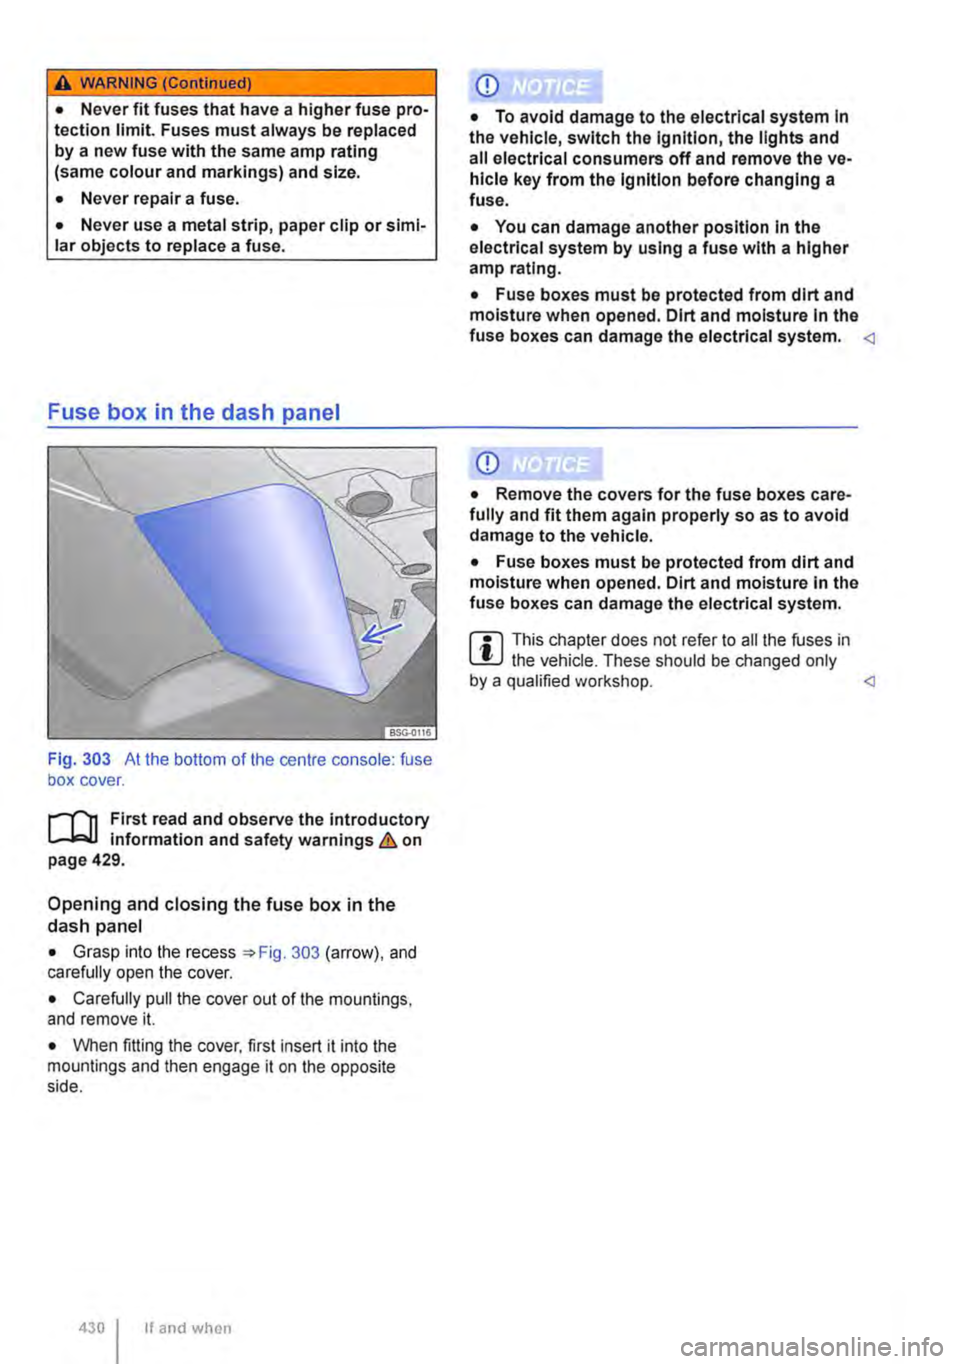
Fig. 303 At the bottom of the centre console: fuse box cover.
r-f"'n First read and observe the introductory information and safety warnings & on page 429.
Opening and closing the fuse box in the dash panel
• Grasp into the recess =>Fig. 303 (arrow), and carefully open the cover.
• Carefully pull the cover out of the mountings, and remove it.
• When fitting the cover. first insert it into the mountings and then engage it on the opposite side.
430 If and when
CD
• To avoid damage to the electrical system in the vehicle, switch the Ignition, the lights and all electrical consumers off and remove the ve-hicle key from the ignition before changing a fuse.
• You can damage another position In the electrical system by using a fuse with a higher amp rating.
• Fuse boxes must be protected from dirt and moisture when opened. Dirt and moisture In the fuse boxes can damage the electrical system. <1
CD
• Remove the covers for the fuse boxes care-fully and fit them again properly so as to avoid damage to the vehicle.
• Fuse boxes must be protected from dirt and moisture when opened. Dirt and moisture in the fuse boxes can damage the electrical system.
m This chapter does not refer to all the fuses in W the vehicle. These should be changed only by a qualified workshop. <1
Page 431 of 486
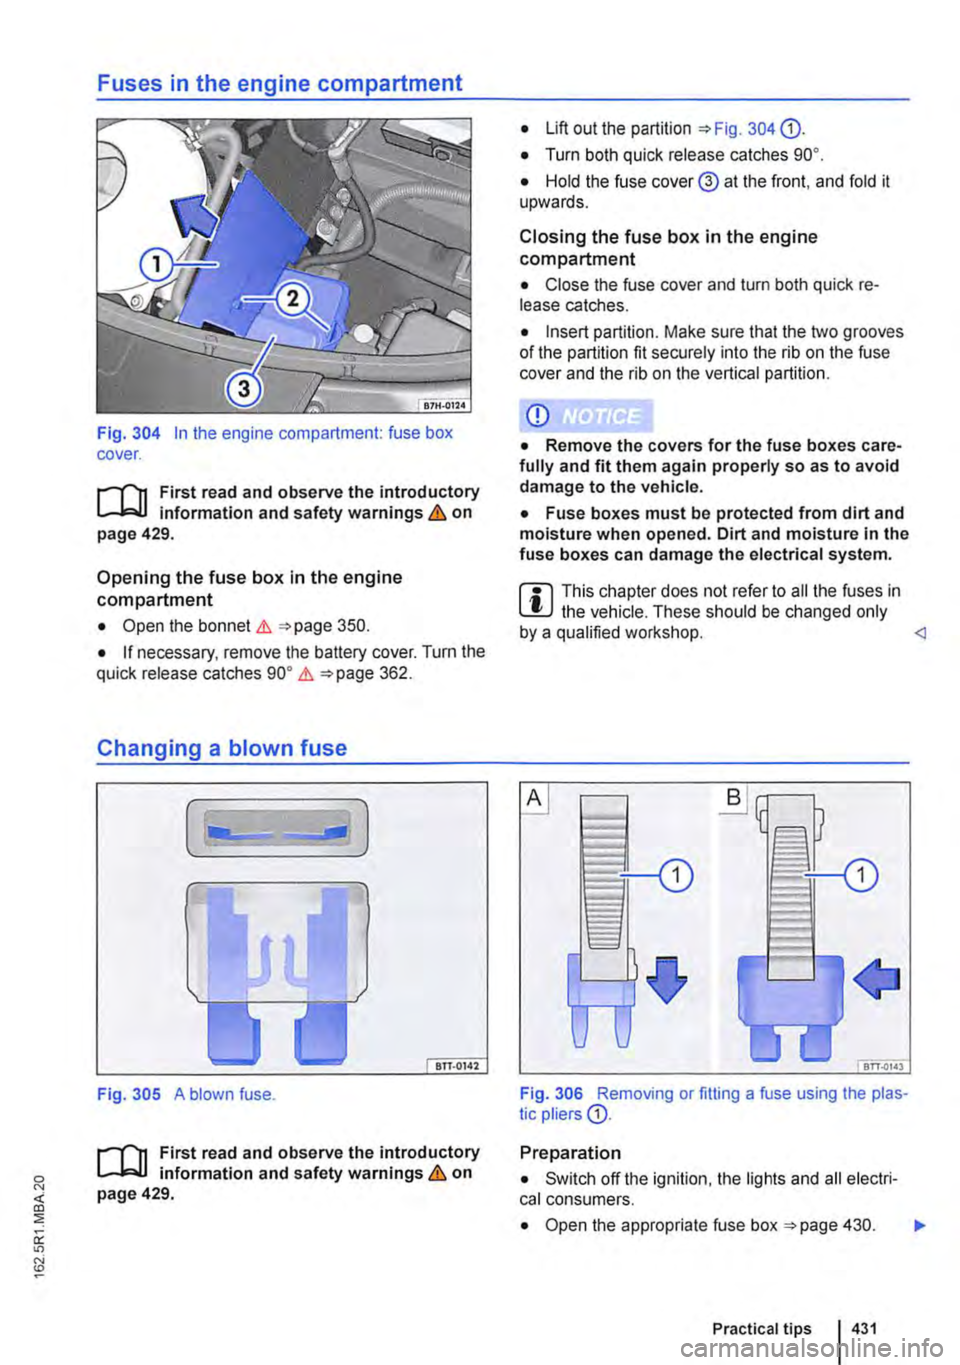
Fig. 304 In the engine compartment: fuse box cover.
;-('n First read and observe the introductory L-Jc.IJ information and safety warnings & on page 429.
Opening the fuse box in the engine compartment
• Open the bonnet .1. =<>page 350.
• If necessary, remove the battery cover. Turn the quick release catches go• .1. =<>page 362.
Changing a blown fuse
Fig. 305 A blown fuse.
;-('n First read and observe the introductory L-Jc.IJ information and safety warnings & on page 429.
• Lift out the partition =<>Fig. 304 0).
• Turn both quick release catches go•.
• Hold the fuse cover@ at the front. and fold it upwards.
Closing the fuse box in the engine compartment
• Close the fuse cover and turn both quick re-lease catches.
• Insert partition. Make sure that the two grooves of the partition fit securely into the rib on the fuse cover and the rib on the vertical partition.
CD
• Remove the covers for the fuse boxes care-fully and fit them again properly so as to avoid damage to the vehicle.
• Fuse boxes must be protected from dirt and moisture when opened. Dirt and moisture in the fuse boxes can damage the electrical system.
m This chapter does not refer to all the fuses in L!J the vehicle. These should be changed only by a qualified workshop.
Preparation
• Switch off the ignition, the lights and all electri-cal consumers.
• Open the appropriate fuse box =<>page 430. .,..
Practical tips I 431
Page 432 of 486

Detecting a blown fuse
If the metal strip is melted this indicates that the fuse has blown 305.
Shine a torch onto the fuse. This will help you to spot the blown fuse more easily.
Changing a fuse
• If applicable, take the plastic pliers 306 G) out of the fuse box cover.
• For small fuses. push the catch on G) from above 306
• For larger fuses, push the catch G) onto the fuse from the side 306@
Changing bulbs
o::n Introduction
This chapter contains information on the following subjects:
Indicator lamp . . . . . . . . . . . . . . . . . . . . . . . . . 433
Information on changing bulbs . 433 LED lights on the vehicle . . . . . . . . . 434
Changing bulbs in H4 halogen headlights 435
Changing bulbs in H7 halogen headlights . . . 437
Changing bulbs in the LED headlights . . . 438
Changing the bulbs in the fog light . . . . . . . . . 439 Changing the bulbs in the tail light cluster on vehicles with tailgate . . . . . . . . . . . . . . . . . . . . . 440
Changing the bulbs in the tail light cluster on vehicles with wing doors .................. 441
Changing the bulbs in the LED tail light cluster . . . . . . . . . . . . . . . . . . . . . . . . . 442 Changing the side turn signal bulbs . . . . . . . . 443
Changing the vehicle bulbs requires considerable technical skill. Therefore if you do not feel confi-dent with the procedure. Volkswagen Commercial Vehicles recommends having the bulbs changed by a Volkswagen Commercial Vehicles dealership or other professional assistance. You must contact a qualified workshop if other vehicle parts around the lights need to be removed or LED lights need to be replaced.
You should keep a box with spare light bulbs for the lights that ensure the vehicle is roadworthy in the vehicle at all times. Spare bulbs are available from Volkswagen Commercial Vehicles dealers. In some countries it is a legal requirement to have these spare bulbs in the vehicle.
lt may be illegal to drive with a defective bulb in the exterior lighting.
4321 If and when
• Pull out the blown fuse.
• If the fuse has blown, replace it with a new fuse of the same amp rating (same colour and same markings) and same size
• Replace the cover.
CD
You can damage another position In the electri-cal system by using a fuse with a higher amp rating.
You can change the following bulbs yourself:
• Bulbs of the halogen headlights.
• Turn signal bulb in the LED headlights.
• Bulbs in non-LED tail light cluster.
• Turn signal and reversing light bulb in the LED tail light cluster.
• Bulb of turn signal repeater.
• Bulb of fog lights.
All LED lights in the vehicle should always be changed by an expert.
Additional bulb specifications
Some bulbs in headlights or In tail light clusters might have factory specifications that are different to standard bulbs. The designation is inscribed on the bulb, either on the glass part or on the base.
Additional information and warnings:
• Exterior views 5
• Lights and vision 106
• Preparation for working In the engine compart-ment 350
• Vehicle toolkit 416
• Fuses 429
A WARNING
Accidents can occur If roads are not suffi-ciently Illuminated and other road users have difficulty seeing the vehicle, or cannot see it atall. 11>
Page 434 of 486
Checklist (Continued)
3. Turn the light switch to position o 106.
4. Shift the tu m signal lever to neutral 106.
5. With a DSG® dual clutch gearbox, move the selector lever to position P 260.
6. Manual gearbox: select a gear 263.
7. Stop the engine and remove the key from the ignition 257.
8. Switch off the orientation lighting 106.
9. Leave the defective bulbs to cool down.
10. Check to see if a fuse has blown 429.
11. Follow the instructions to change the affec-ted bulb Always use identical bulbs of the same type. The designation is inscribed on the bulb, either on the glass part or on the base.
12. Do not touch the glass part of the bulb with unprotected fingers. The heat of the bulb would cause the fingerprint to evaporate and condense on the renector. This will im-pair the brightness of the headlight.
LED lights on the vehicle
r--f'n First read and observe the introductory L-I=J.I information and safety warnings & on page 432.
Depending on the vehicle equipment, the following lights may be LED lights:
• Dipped beam, main beam, daytime running lights and side lights on vehicles with LED head-lights.
• Tail light, brake light and fog light on vehicles with LED tail lights.
• Number plate lights.
434 If and when
13. After changing the bulb, check to ensure that the bulb is working properly. If the bulb is not working properly, the bulb may not have been inserted properly or may have failed again, or the connector may have been inserted incorrectly.
14. Any time you change a bulb in the front of the vehicle, the headlight settings should be checked by a qualified workshop.
A WARNING
Ignoring any of the items on this important safety checklist can lead to accidents and se-vere Injuries.
• Always follow the instructions in the checklist and observe the general safety pro-cedures.
CD
Always take care when removing or fitting lights in order to prevent damage to the paint-work or to other vehicle parts. <1
Owners cannot replace the LEDs themselves. If some LEDs fail, this may be an indication that more elements are on the point of failure. If this happens, have the lights checked and replaced if necessary at a qualified workshop.
Page 472 of 486
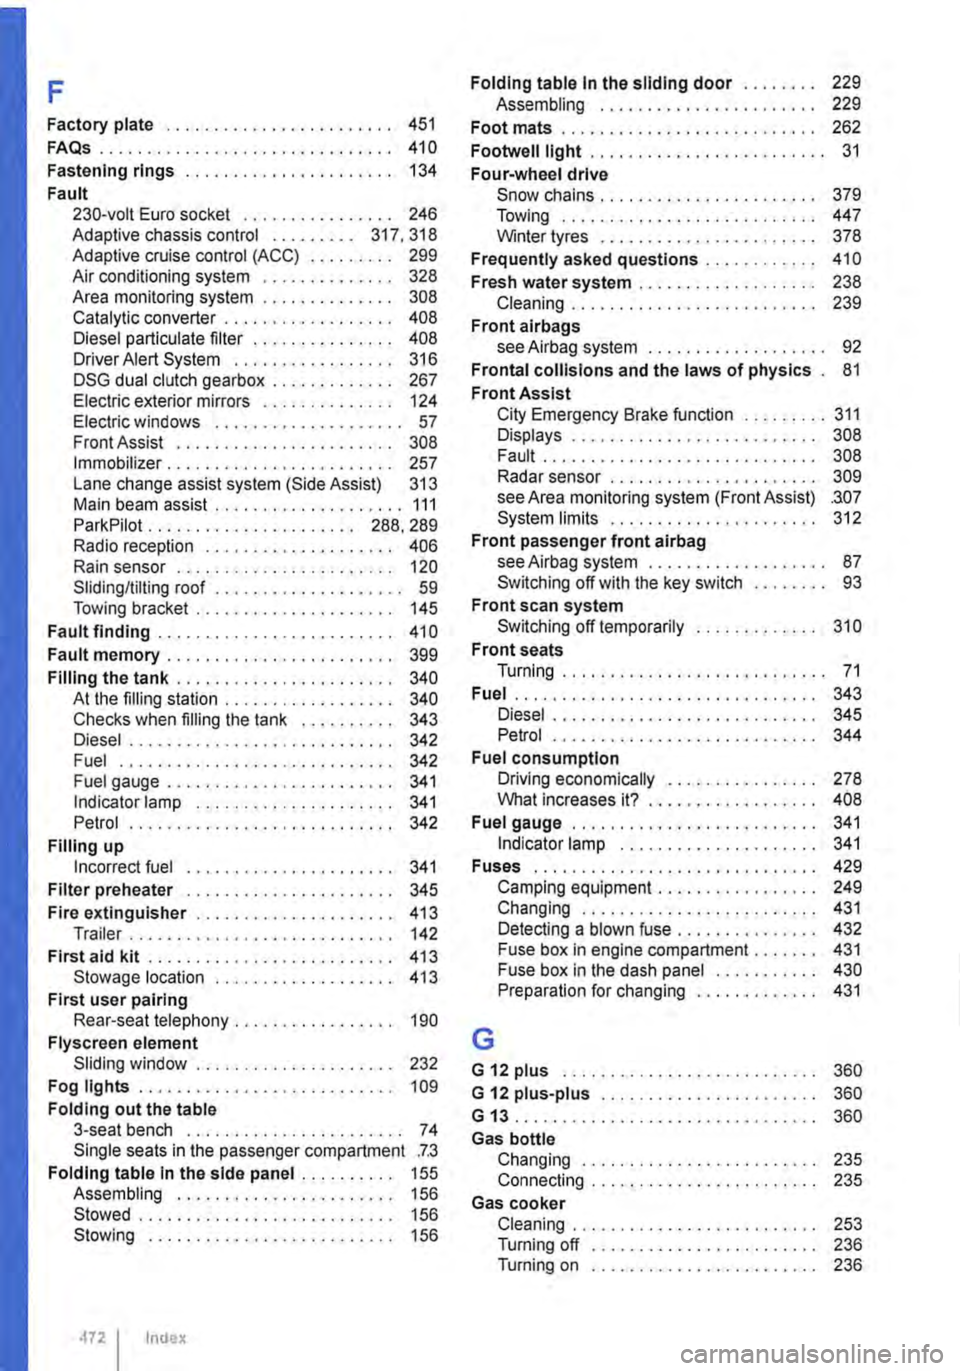
F
Factory plate . . . . . . . . . . . . . . . . . . . . . . . . 451
FAQs . . . . . . . . . . . . . . . . . . . . . . . . . . . . . . . 410
Fastening rings . . . . . . . . . . . . . . . . . . • . . . 134
Fault 230-volt Euro socket . . . . . . . . . . . . . . . . 246 Adaptive chassis control . . . . . . . . . 317, 318 Adaptive cruise control (ACC) . . . . . . . . . 299 Air conditioning system . . . . . . . . . . . . . . 328 Area monitoring system . . . . . . . . . . • . . . 308 Catalytic converter . . . . . . . . . . . . . . . . . . 408 Diesel particulate filter . . . . . . . . . . . . . . . 408 Driver Alert System .. .. .. .. .. . .. . .. . 316 DSG dual clutch gearbox . . . . . . . . . . . . . 267 Electric exterior mirrors . . . . . . . . . . . . . . 124 Electric windows . . . . . . . . . . . . . . . . . . . . 57 Front Assist .. .. .. .. .. .. .. .. .. .. .. . 308 Immobilizer . . . . . . . . . . . . . . . . . . . . . . . . 257 Lane change assist system (Side Assist) 313 Main beam assist . . . . . . . . . . . . . . . . . . . . 111 ParkPilot . . . . . . . . . . . . . . . . . . . . . . 288, 289 Radio reception . . . . . . . . . . . . . . . . . . . . 406 Rain sensor . . . . . . . . . . . . . . . . . . . • . . . 120 Sliding/tilting roof . . . . . . . . . . . . . . . . . . . . 59 Towing bracket . . . . . . . . . . . . . . . . . • . . . 145
Fault finding . . . . . . . • . . • . . • . . . . . . . . . . . 410
Fault memory . . . . . . . . . . . . . . . . . . . . . . . . 399
Filling the tank . . . . . . . . . . . . . . . . . . . . . . . 340 At the filling station . . . . . . . . . . . . . . . . . . 340 Checks when filling the tank . . . . . . . . . . 343 Diesel ............................ 342 Fuel ...........•................. 342 Fuel gauge . . . . . . . . . . . . • . . . . . . . . . . . 341 Indicator lamp ......... , . . . . . . . . . . . 341 Petrol . . . . . . . . . . . . . • . . . . . . . . • . . . . . 342
Filling up Incorrect fuel . . . . . . . • . . . . . . . . • . . . . . 341
Filter preheater .......... , . . . . . . . . . . . 345
Fire extinguisher . . . . . . . . . • . . • . . • . . • . . 413 Trailer . . . . . . . . . . . . . . . . • . . . . . . . . . . . 142
First aid kit . . . . . . . . . . . • . . . . . . . . . . . . . . 413 Stowage location . . . . . . . . . . . . . • . . • . . 413
First user pairing Rear-seat telephony.. . . . . . . . . . . . . . . . 190
Flyscreen element Sliding window . . . . . . . . . . • . . . . . . . . . . 232
Fog lights . . . . . . . . . . . . . . . . . . . . . . . . . . . 109
Folding out the table 3-seat bench . . . . . . . . . . . . . . . . . . . . . . . 74 Single seats in the passenger compartment .7.3
Folding table in the side panel . . . . . . . . . . 155 Assembling . . . . . . . . . . . . . . . . . . . . . . . 156 Stowed ........................... 156 Stowing . . . . . . . . . . . . . . . • . . . . . . . . . . 156
4721 tnllex
Folding table in the sliding door . . . . . . . . 229 Assembling . . . . . . . . . . . . . . . . . . . . . . . 229
Foot mats . . . . . . . . . • . . • . . . . . . . . . . . . . . 262
Footwelllight . . . . . . . . . . . . . . . . . . . . . . . . . 31
Four-wheel drive Snow chains . . . . . . . . . . . . . . . . . . . . . . . 379 Towing . . . . . . . . . . . . . . . . . . . . . . . . . . . 447 Winter tyres . . . . . . . . . . . . . . . . . . . . . . . 378
Frequently asked questions . . . . . . . . . . . . 410
Fresh water system . . . . . . . . . . . . . . . . . . . 238 Cleaning . . . . . . . . . . . . . . . . . . . . . . . • . . 239
Front airbags see Alrbag system . . . . . . . . . . . . . . . . . . . 92
Frontal collisions and the laws of physics . 81
Front Assist City Emergency Brake function ......... 311 Displays . . . . . . . . . . . . . . . . . . . . . . . . . . 308 Fault . . . . . . . . . . . . . . . . . . . . . . . . . . . . . 308 Radar sensor . . . . . . . . . . . . . . . . . . . . . . 309 see Area monitoring system (Front Assist) .307 System limits . . . . . . . . . . . . . . . . . . . . . . 312
Front passenger front airbag see Airbag system . . . . . . . . . . . . . . . • . . . 87 Switching off with the key switch . . . . . . . . 93
Front scan system Swnching off temporarily . . . . • . . . • . • . . 310
Front seats Turning . . . . . . • . . . . . . . . . . . . . . . . . . . . . 71
Fuel . . . . . . . . . . . . . . . . . . . . • . . • . . . . . • . . 343 Diesel ............................ 345 Petrol . . . . . . . . . . . . . . . . . . . . . . . . . • . . 344
Fuel consumption Driving economically . . . . . . . . . . . . . . . . 278 What increases it? . . . . . . . . . . . . . . . . . . 408
Fuel gauge . . . . . . . . . . . . . . . . . . . . . . . . . . 341 Indicator lamp . . . . . . . . . . . . . . . . . . . . . 341
Fuses . . . . . . . . . . . . . . . . . . . . . . . . . . . . . . 429
G
Camping equipment . . . . . . . . . . . . . . . . . 249 Changing . . . . . . . . . . . . . . . . . . . . . . . . . 431 Detecting a blown fuse . . . . . . . . . . . . . . . 432 Fuse box in engine compartment . . . . . . . 431 Fuse box in the dash panel . . . . . . . . . . . 430 Preparation for changing . . . . . . . . . . . . . 431
G 12 plus . . . . . . . . . . . . . . . . . . . . . . . . . . . 360
G 12 plus-plus . . . . . . . . . . . . . . . . . . . . . . . 360
G 13 ................................ 360 Gas bottle Changing . . . . . • . . . . . • . . . . . . . . . . . . . 235 Connecting . . . . . . . . . . . . . . . . . . . . . . . . 235
Gas cooker Cleaning . . . . . . • . . . . . • . . . . . . . . . . . . . 253 Turning off . . . . . . . . . . . . . . . . . . . . . . . . 236 Turning on . . . . . . . . . . . . . . . . . . . . . . . . 236