2010 VOLKSWAGEN BEETLE wheel
[x] Cancel search: wheelPage 32 of 138
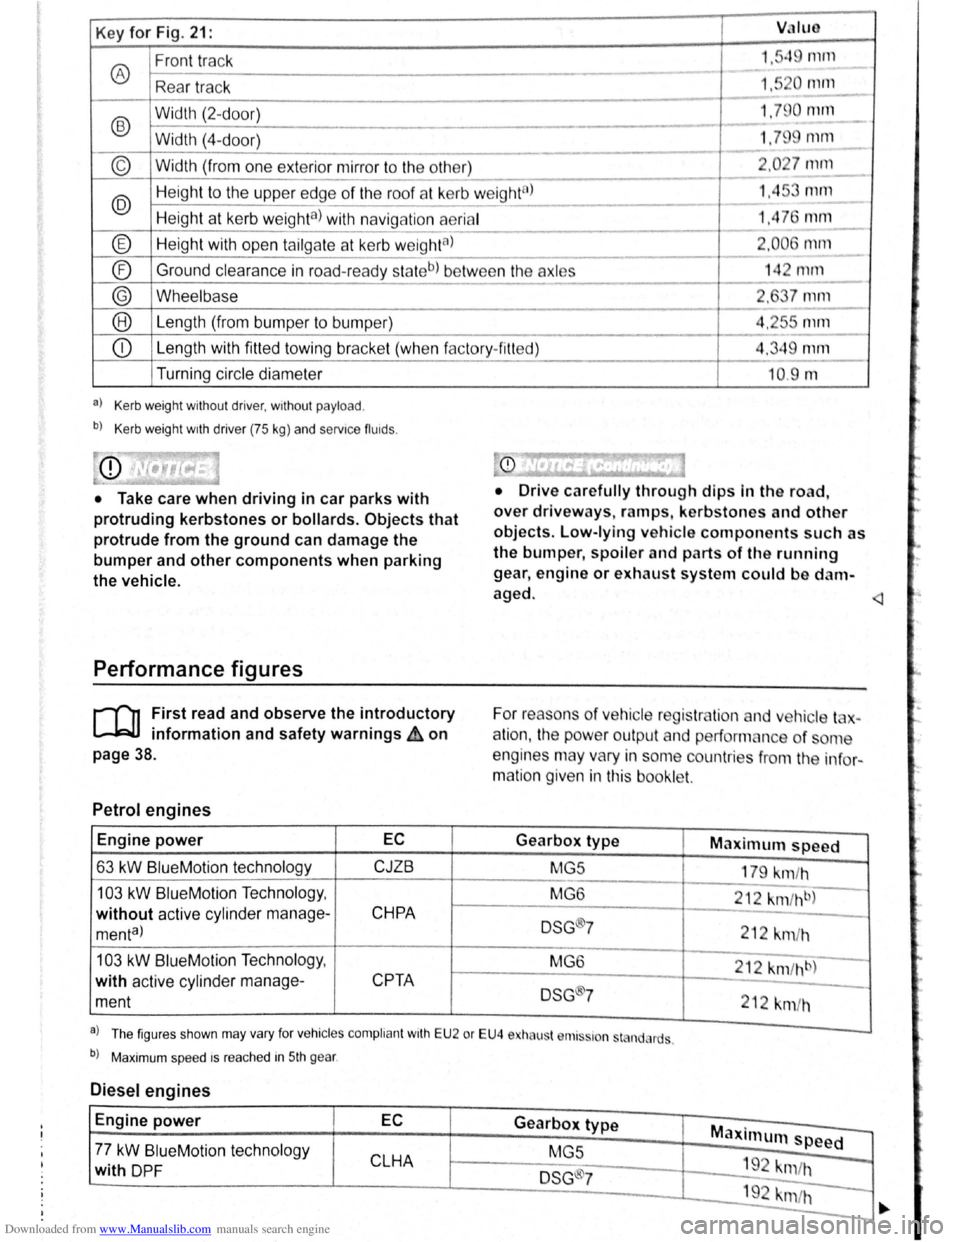
Downloaded from www.Manualslib.com manuals search engine Key for Fig. 21: VJIUO
Front track 1."q rnrn
® ---
Rea r tr ac k 1,5 0 111112.._
-
®
Width (2-d oor) 1.79 0 null
- -Width (4-
door) 1.79 mm
----
© Width (from one exterior mirror to the other) 2 .0 27 mm
---
@ Heig ht to the uppe r edge of the roof at kerb w eight8l 1.45 mm ---
Height at kerb weighta) with navig ation aerial 1,4 76 mm ---
® Height with open tailga te a t kerb w eightal 2.006 1111ll
- --
® Ground
clearance in road-read y sta teb) be tw ee n the axles 14 2 mrn ------
® Wheelbase 2, 7 mm
--® Le ngth (from bumper to bump er) 4.2r-s mm
---
CD Length with fitted towing bracke t (whe n f actory- fitt ed) 4.349 mm
Turning circle diameter
a) Kerb weight without driver, without payload .
b) Kerb weight wrth driver (75 kg) and servrce fluids .
• Take care when driving in car parks with
protruding kerbstones or bollards. Objects that
protrude from the ground can damage the
bumper and other components when parking
the vehicle.
Performance figures
r-('n First read and observe the introductory
L-1=JJ information and safety warnings ih on
page 38.
Petrol engines
Engine power EC
63 kW BlueM otio n technology CJZB
103 kW BlueMotion Techno logy ,
without active cylind er manage-CHPA
menta)
103 kW Blue Motio n Technolog y,
with active cylinder manage-
CPTA
ment
--10.9 m
• Drive c arefully through dips In the road,
over driveways, ramps , kerbstones and other
objects. Low-lying vehicle components such as
the bumper, spoiler and parts of th e running
gear , engine or exhaust system could be d am
aged.
For reaso ns
of ve hicle reg is tr lio n and v hic le t -
a
tio n, the pow er outpu t an d performan ce of ome
engines may vary in some countries f
rom the in fo r
matio n given in this booklet.
Gearbox type Maximum speed
MG5
179 km/h
MG 6
212
km fh b)
DSG ®7 212 km /h
M G6
212 km /hb)
DSG 7
212 km/h
a . . l Th e figur es sh o wn may va ry fo r vehrc les compli ant wrth E U 2 or EU4 e ha ust r111s~ron st nd, rds .
b) Maxim um spee d rs rea ched in 5th gear .
Diesel engines
Engine power EC Gearbox type Maxi mum speed -77 kW BlueM otio n tec hnol ogy
MGS
CLHA 1 9 -with DP F DSG ®7 "m /h
192 krn/h -
-
·.
Page 49 of 138
Downloaded from www.Manualslib.com manuals search engine M chanica l controls on the front seat
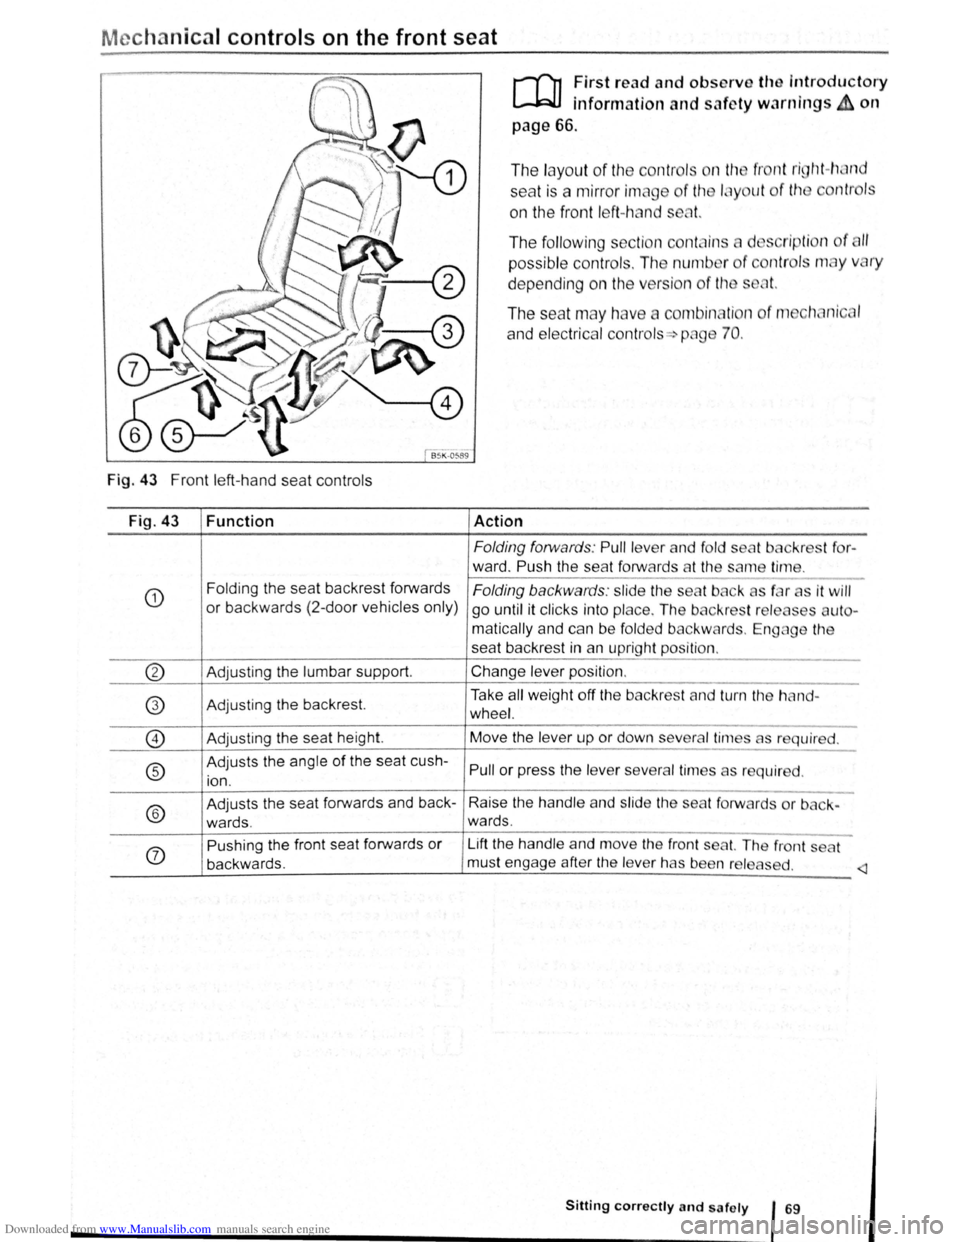
Fig. 43 Front left-hand seat controls
Fig. 43
CD
Function
Folding the seat backrest forwards
or backwards (2-door vehicl es only)
if'l1 First read and obscrvo th introductory
L-.lr::JJ inforn1ation and safety warnings~ on
page 66.
The la yout of the contr I~ n tt1 fr nt ri~jt1t-h·1nd
seat is a mirror imElg f th 1 ... y ut f th ntr I
on the front left- h nd s ot.
The following secti n c ntain d s ripti n f 11
possibl e controls. Th nun1b r f ntr I n1 y v ry
depending on the v r ion of tl1
The seat m ay h v e con1bin, ti n o f 111 t1~.. nic I
and electrical contr ols-=> png 70.
Action
Folding forwards: Pull le ver a nd fold s
ward. Push the se at forw ards at th e an1 tirl"l
Folding backwards : slide the se t b k s f r
go until it clicks into place. The
b ckr t r I o
matic ally and can be fold ed b ackward . Engag
t for-
it will
s ut -
th
seat backrest in an up rig ht position .
--~------------------@ Adjusting the lumbar support . Change lev er position .
----~--~~--~~--------~-------1----~----~------------------
f'3 Take all weig ht off the bac kres t and turn th h nd-
\:V Ad just ing the backrest. wheel.
0 Adjusting the seat height.
® Adjusts the angle of the sea t cush
ion . Move
the le v
er up or down sev era l tirn a s r quir d.
Pull or press the le ve r severa l tin 1es as r qui r d.
--------~------------------------~----------------------------
®
Adjusts the seat forwards and back -Raise the handl e and slide the sea t forw rd or b ck-
wards . wards .
--------~------------------------~----------------------------
(j)
Pushing the front seat forwards or Lift the hand le and move the fron t seat. Th front t
backwards. must engage after
the le ve r has been r I a d.
Sitting correctly and safely 69
Page 53 of 138

Downloaded from www.Manualslib.com manuals search engine -
When removing or fitting head restraints, make
sure that they do not hit the roof or other parts
of the vehicle. The roof and other vehicle parts
could otherwise be damaged.
Fig. 50 Adjusting the steering wheel position me
chanically
r-f"'n First read and observe the i~troductory
~ information and safety warnmgs ~on
page 66.
Adjust the steering wheel position before setting
off
and only when the vehicle is sta tionary.
• Push down the lever =>Fig . 50 G).
• Adjust the steering wheel so that you can hold
it on the outside
of the ring (at the 9 o'cl ock and 3
o'clock positions) with both hands and slightly bent
arms.
• Push the lever up firmly until it lines up with the
steering column
=> ~-
Incorrect use of the steering column position
adjustment and incorrect adjustment of the
steering wheel can cause serious or fatal in
juries.
• After adjusting the steering column, al
ways move lever CD up so that it engages se
curely. This prevents the steering column
from moving spontaneously while the vehicle
is in motion.
• Never adjust the steering wheel when the
vehicle is in motion. If you determine that a
readjustment is necessary, stop the vehicle
safely and adjust the steering wheel to the
correct position.
• The steering wheel must always point to
wards the chest and not towards the face.
This ensures that the driver front airbag pro
vides maximum protection in the event of an
accident.
• While driving, always keep both hands on
the outside of the steering wheel, at the 9
o'clock and 3 o'clock positions. This reduces
the risk of injury if the driver front airbag is
triggered.
• Never hold the steering wheel at the
12 o'clock position, or in any other manner,
e.g .
on the hub of the steering wheel. If the
driver front airbag is triggered, you could re
ceive severe injuries to the arms, hands and
head. ~--------------------------____ _j
Page 59 of 138
Downloaded from www.Manualslib.com manuals search engine ..,
of turn signals, a failure to use
r f rg tting to switch off a turn
nfuse other road users. This can
nt and serious Injuries.
• lw. y activate the turn signal In good
tim wh n ch anging lanes and performing
'lt king or turning manoeuvres.
• Alw ys switch off the turn signal once the
le ne change or overtaking or turning ma-
n euvre has been completed.
A W~RNING
In correct use of the main beam headlights
ca n lead to accidents and serious injuries as
the main beam headlights can distract and
dazzle other road users.
Switching lights on and off
m The turn signal will only work when the igni
W tion is switched on. The hazard warning lights
a ls o work
when the ignition is switched off
=>page 336.
m If one turn signal fails, the indicator lamp will
W start flashing twice as fast.
m The main beam headlights can only be
W switched on if the dipped beam headlights
are already on.
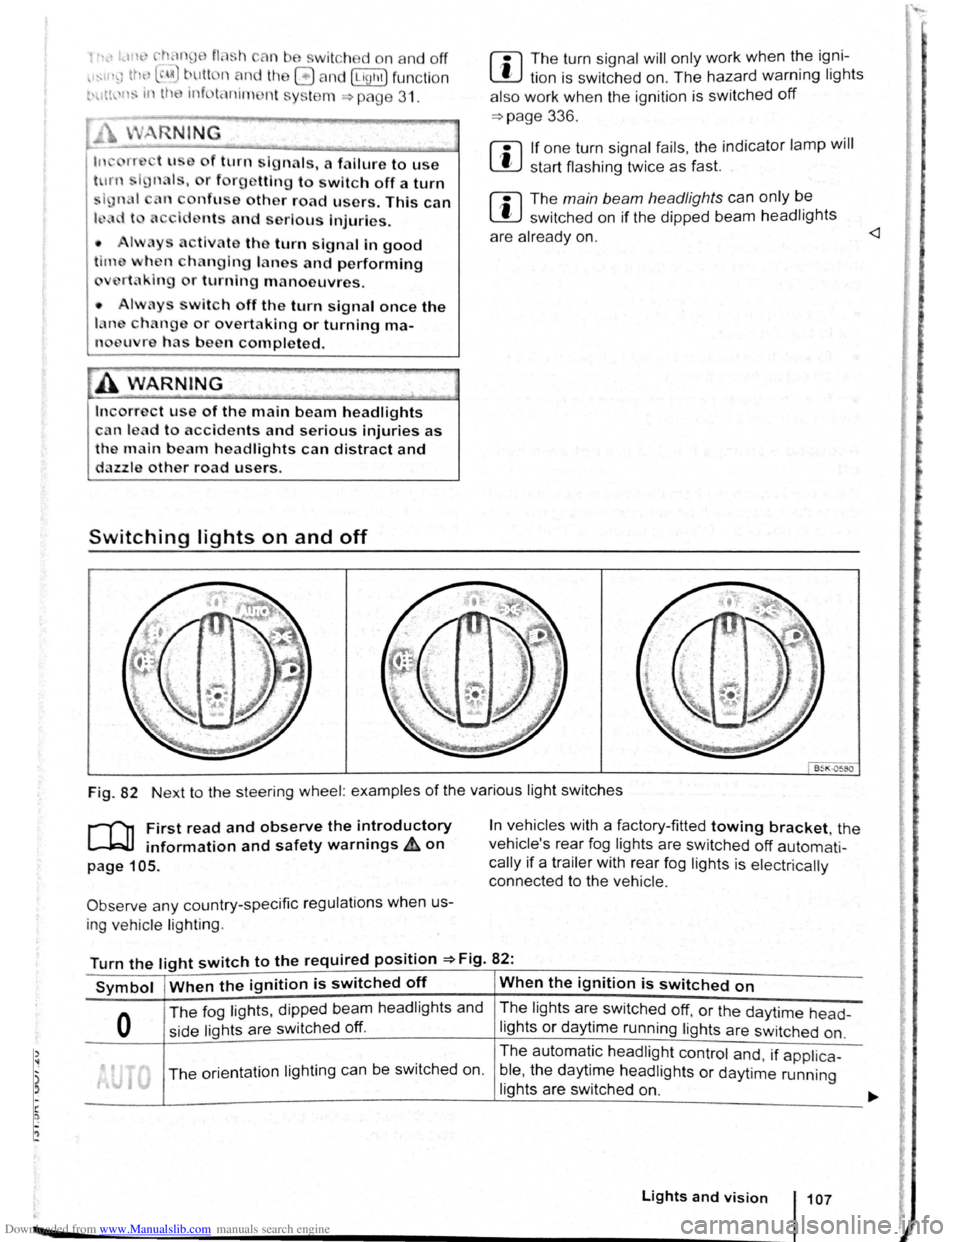
Fig. 82 Next to the steering wheel: examples of the various light switches
r-("n First read and observe the introductory
L-.W1 information and safety warnings ~on
page 105.
Observe any country-specific regulations when us
ing ve hic le lighting .
In vehicles with a factory-fitted towing bracket, the
vehicle's rear fog lights are switched
off automati
cally if a trailer with rear fog lights is electrically
connected to the vehicle .
Turn the light switch to the required position =>Fig. 82:
Symbol When the ignition is switched off When the ignition is switched on
0
The fog lights, dipped bea m headlights and
side lights are switched
off.
The lights are switched off, or the daytime head-
lights or daytime running lights are switched on.
The orientation lighting ca n be switched on. The
automatic
headlight control and, if applica -
ble ,
the daytime headlights or daytime running
lights are switched
on.
Lights and vision 107
Page 64 of 138

Downloaded from www.Manualslib.com manuals search engine "Coming Home"
Switching on
Switching off
"Leaving Home"
Switch ing on
Switc h ing off
I Action
------Swit c h off the ignit io n .
- Operate the headlight flashe r for approximately one second ~page 106.
The Coming Home lights are switched on when the driver door is opened . The
swi tc h-off de lay starts when the last vehicle door or the tailgate has been closed
-Occurs automatica lly once the set switch-off delay has elapsed .
-Occurs automatica lly if another ve h icle door or the tailgate is opened within ap-
proximately 30 seco nds of it being swit ched on.
- Turn the
ligh t switc h to positio n 0.
- Swit ch o n the ignition .
Action
-Unl ock the vehicle when the ligh t senso r is in position AUTO and the twilight sen
sor that it is d ar k.
- Occ urs autom atically once the switch-off delay has elapsed .
- Lo ck
the vehicle.
-Turn the light switc h to positi on 0.
-Switch on the ignition .
Surround lighting in the exterior mirrors m The length of the switch-off delay can be ad
L!:J justed , o r the function can be switched on
and off, u sing the
(ill) button and the~ and (Light)
functio n buttons in the infota inment system
=:.page 31.
Th e surround lighting in the exterior mirrors ligh ts
up the area directly around
the doors while you are
ente ring or ex iting the vehicle . lt is sw itc h ed on
when th e ve hi cle is unlo cked, when opening the
driver door or wh en
the Coming Home or Leav ing
Hom e lighting function is ac tiv e .
If the veh icle is
eq uipp ed with a ligh t sensor , the surround lighting
i n th e exterior mirrors
will only be switched on
wh en it is dark.
m When the Com ing Home function is switched .
L!:J on, no acoustic warning will sound when the t
driver d oor is opened to remind you that a light is
still switched on.
Headlight range control, instrument and switch lighting
Fig. 83 Nex t to the stee ring wheel: head light
ra nge contr ol
CD and in strum ent and swit ch lighting
co ntr ol@
r-('n First read and observe the introductory
~ information and safety warnings ~ on
page 105.
112 Bofore the journey
Headlight range control
D epending on what level it is se t to, the head light
rang e co ntrol
:::.Fig . 83 CD adjusts the position of
the light cones in the head lights according to the
load that the vehi cle is carrying. This gives the driv·
er the best visibilit y possible and means that on
coming traffic
will not be dazzle d :::. &.
The hea dlights ca n on ly be adjust ed when the dip-
ped beam headlights are switched on. ~
t
Page 69 of 138

Downloaded from www.Manualslib.com manuals search engine -~
....,
m
.u \ 1n j w v ip r 1 switched on auto
.1t1 ',111 if the front -.. ind creen wipers are
<::' t ' ' r ~ rse gear i eng ged.
m The automatic switch-on function when in. re
W verse gear can be switched on and off us1ng
the@] button and the G and (Mirror and wipers ) func
tion buttons in the infotainment system ~page 31.
ro Fi tread and observe the introductory information and safety warnings & on page 117.
iper response in various situat ions:
\.._e t e e d~ sat na•y
Healed a her jet
Headlight
hen sw1tched on , the wipers will temporarily be switched to the
ext setting down.
T e C hmatromc w1ll sw1tch to air recirculation mode for approxits ru -n a e l 30 seconds to prevent the smell of the windscreen wash-
a s t
er utd from entering the vehicle interior.
T e
rper in tervals are adjusted depending on the vehicle
speed. The faster the vehicle is travelling, the shorter the inter
a!
nses on
ward s the steering wheel when the dipped beam
headlights or main beam are switched on. Clean
off stubborn dirt (msects, etc.) from the headl ights
at regular intervals, for instance when filling the
tank .
In winter, you should remove any snow from the
headligh t w as her nozzles in the
bumper to keep
the headligh t washer system in work ing order. Re
move any ice with a de-icer spray.
r:l The w1per will try to wipe away any obstacles
L!J that are on the wind screen . The w 1per will
sop moving 1f the obstacle blocks its path . Re-
mo e the obstacle and swttch the wiper back on
agam
Service position for the front windscreen wipers
F ig . 88
2 -!.
r-T'n ~lr t rea~ and observe the introductory
L-Jr:J.J mformat1on and safety warnings on
page 117 .
Tt>e .vtndscreen Wlper arms can be h fted off the
ndsaeen when 10 the serv1ce pos1t1on ~ Ftg. 88.
Carry out e followtng s eps to move the w rnd
screen w1pers
t o the servtce pos1t1on
• The bonnet must be closed ~page 277.
• Swrtch the 1gntlton on and then off aga
1n
•
B ne y press down the wtndsc reen w1per le er
~F1g. 86 @.
Lights and vision 119
I 3£
Page 75 of 138
Downloaded from www.Manualslib.com manuals search engine CD
Please note the following to help avoid damag o
and premature wear:
• Do not rest your hand on the g ear le ve r
when
driving. The pressure from your hand is
passed onto the selector forks in the gearbox.
Automatic gearbox: selecting a gear
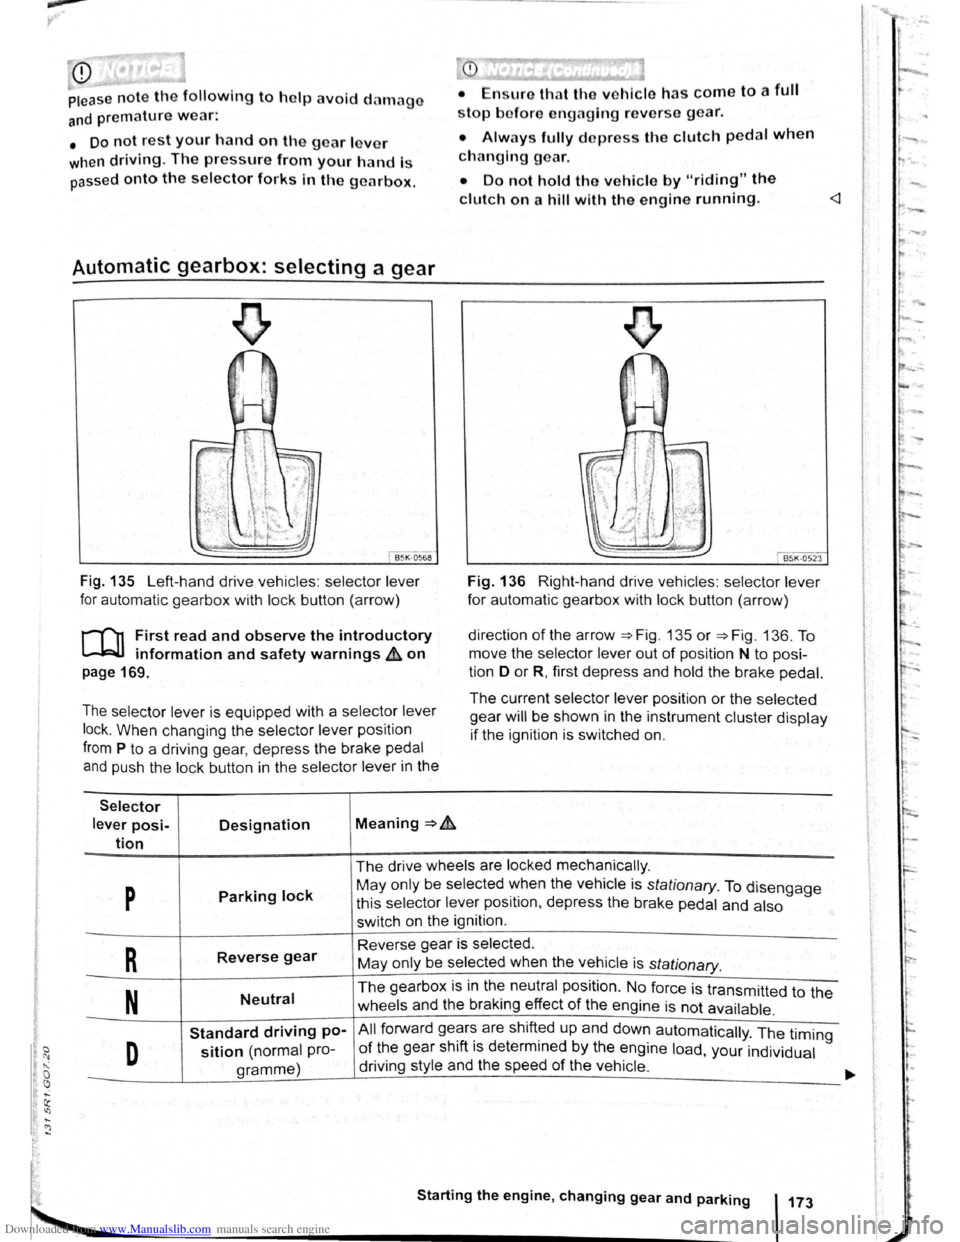
Fig . 135 Left-hand drive vehicles : selector lever
for automatic gearbox with lock button (arrow)
r-('n First read and observe the introductory
~ information and safety warnings & on
page 169.
The selector lever is equipped with a selector lever
lock .
When changing the selector lever position
from P to a driving gear, depress the brake pedal
and push the lock button in the selector lever in the
Selector
lever posi-Designation Meaning ~ .&.
tion
stop bofore engaging re verse gear.
• Always fully d epress the clutch pedal when
changing gear.
• Do not hold the vehicle by "riding" the
clutch on a hill with the engine running.
Fig. 136 Right-hand drive vehicles : selector lever
for automatic gearbox with lock button (arrow)
direction
of the arrow ~Fig. 135 or ~Fig. 136. To
move the selector
lever out of position N to posi
tion D
or R, first depress and hold the brake pedal.
The current selector lever position or the selected
gear
will be shown in the instrument cluster display
if the ignition is switched on.
The drive wheels are locked mechanically .
p Parking lock May only be selected ~hen the vehicle is stationary. To disengage
this selector lever pos1t1on, depress the brake pedal and also
switch on the ignition .
R Reverse gear Reverse gear is selected.
May only be selected when the vehicle is
stationary.
N Neutral The gearbox is in the neutral position . No force is transmitted to the
wheels and the braking effect
of the engine is not available .
Standard driving po-All forward ge~r~ are shift~d up and down automatically . The timing
D sition (normal pro-of the gear sh1ft 1s determmed by the engine load, your individual
gramme) driving
style and the speed
of the vehicle . -
Starting the engine, changing gear and parking 173
Page 77 of 138
Downloaded from www.Manualslib.com manuals search engine rfl If tho lo vo r Is move d accid entally to N when
L!J dr iving , take yo ur foot off the accele rato r.
WiJil fo r tile e ng in e ~~v s in t~e ne utral po sitio n be-
fo re solo ctin g a pos1!1o n agam.
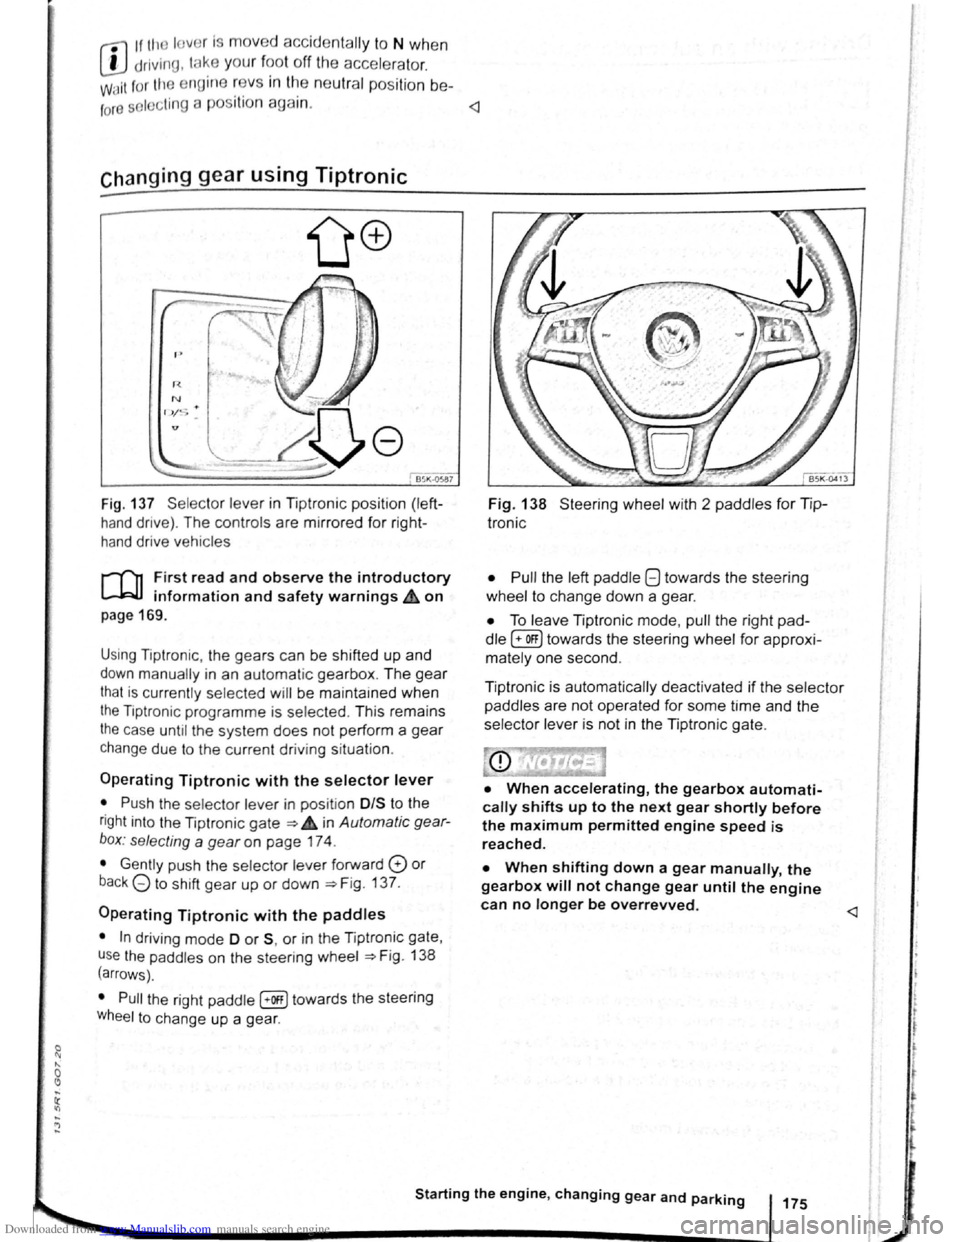
Fig. 137 Se lecto r leve r in Tiptronic position (left
hand drive) . The controls are mirrored for right
hand drive vehicles
rT'n F irst read and observe the introductory
L-.W.I information and safety warnings.& on
page 169 .
Using Tiptronic , the ge ars can be shifted up and
down manually in an automat ic gearbox . The gear
that is currently selected will be maintained when
the Tiptronic programme is selected . This remains
the case until the system does not perform a gear
change due to the current driv ing situation .
Operating Tiptronic with the selector lever
• Push the selector lever in pos it ion 0/S t o the
right into the Tiptronic gate ~ 4 in Automatic gear
b o x: selecting a
gear on page 174 .
• Gently push the selecto r lever forward 0 or
back G to shift gear up or down ~Fig. 137.
Operating Tiptronic with the paddles
• In driving mode 0 or S, or in the Tiptronic gate,
u se
the paddles o n the steering wheel ~Fig. 138
(arrows) .
• Pull the right paddle [+Off] towards the steering
Wheel to change up a gea r.
Fig. 138 Steer ing wheel with 2 padd les for Tip
Ironic
• Pull
the left paddle 8 towards the stee ring
whe el to cha nge down a gea r.
• To leave Tiptronic mode, pull the right pad
dle (+OFF) towa rds the steering whee l for approxi
mat ely one second .
Tiptronic is
automatically deactivated if the selector
paddles
are not operated for some time and the
selector lever is not in the Tiptronic gate.
• When accelerating, the gearbox automati
cally shifts up to the next gear shortly before
the maximum permitted engine speed is
reached.
• When shifting down a gear manually, the
gearbox will not change gear until the engine
can no longer be overrevved.
l t t
t
r