Page 129 of 400
129
2-1. Driving procedures
2
When driving
Engine (ignition) switch
■Engine switch
LOCK
The steering wheel is locked
and the key can be removed.
(Vehicles with an automatic
transmission: The key can be
removed only when the shift
lever is in P.)
ACC
Some electrical components
such as the audio system can
be used.
ON
All electrical components can
be used.
START
For starting the engine.
■Starting the engine
Automatic transmission
Check that the parking brake is set.
Check that the shift lever is set in P.
Sit in the driver’s seat and firmly depress the brake pedal.
Turn the engine switch to the START position and start the
engine.
The engine will crank until it starts or for up to 20 seconds, which-
ever is less.
Continue depressing the brake pedal until the engine is com-
pletely started.
Page 132 of 400
132
2-1. Driving procedures
Automatic Transmission
: If equipped
Select a shift position appropriate for the driving conditions.
■Shifting the shift lever
While the engine switch is on, depress the brake pedal and
move the shift lever.
Page 147 of 400

147 2-2. Instrument cluster
2
When driving
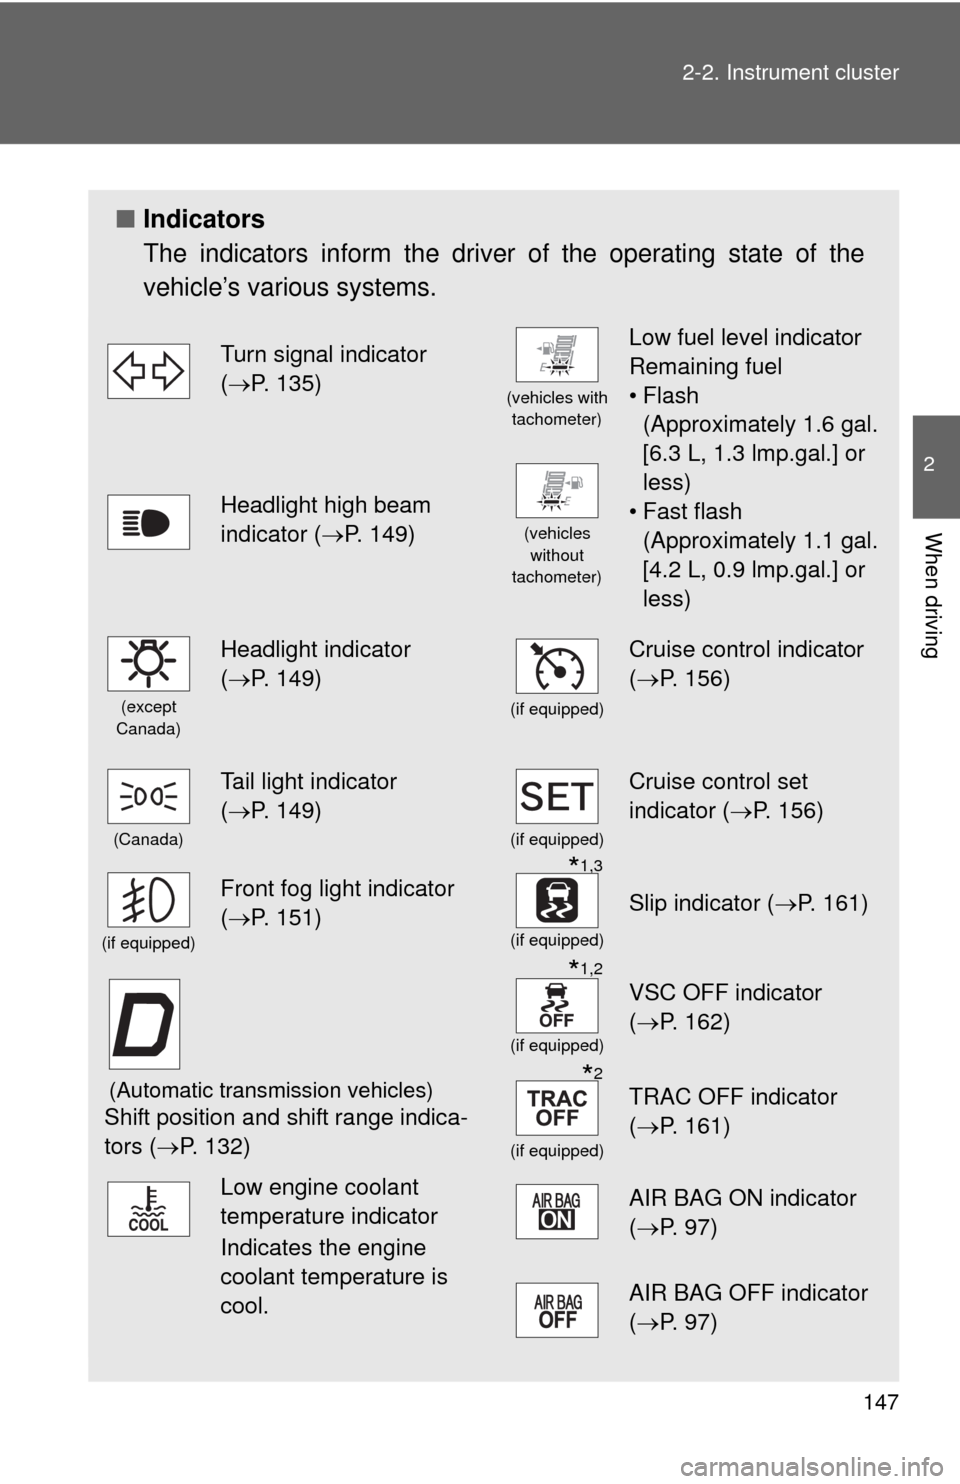
■Indicators
The indicators inform the driver of the operating state of the
vehicle’s various systems.
Turn signal indicator
(P. 135)
(vehicles with
tachometer)
Low fuel level indicator
Remaining fuel
•Flash
(Approximately 1.6 gal.
[6.3 L, 1.3 lmp.gal.] or
less)
• Fast flash
(Approximately 1.1 gal.
[4.2 L, 0.9 lmp.gal.] or
less)
Headlight high beam
indicator (P. 149)
(vehicles
without
tachometer)
(except
Canada)
Headlight indicator
(P. 149)
(if equipped)
Cruise control indicator
(P. 156)
(Canada)
Tail light indicator
(P. 149)
(if equipped)
Cruise control set
indicator (P. 156)
(if equipped)
Front fog light indicator
(P. 151)*1,3
(if equipped)
Slip indicator (P. 161)
(Automatic transmission vehicles)
Shift position and shift range indica-
tors (P. 132)
*1,2
(if equipped)
VSC OFF indicator
(P. 162)
*2
(if equipped)
TRAC OFF indicator
(P. 161)
Low engine coolant
temperature indicator
Indicates the engine
coolant temperature is
cool.AIR BAG ON indicator
(P. 97)
AIR BAG OFF indicator
(P. 97)
Page 158 of 400
158 2-4. Using other driving systems
■Cruise control can be set when
●The shift lever is in D or 3 (vehicles with an automatic transmission).
●Vehicle speed is above approximately 25 mph (40 km/h).
■Accelerating
The vehicle can be accelerated normally. After acceleration, the set speed
resumes.
■Automatic cruise control cancellation
The set speed is automatically canceled in any of the following situations.
●Actual vehicle speed falls more than 10 mph (16 km/h) below the preset
vehicle speed.
At this time, the memorized set speed is not retained.
●Actual vehicle speed is below 25 mph (40 km/h).
●VSC is activated.
■If the cruise control indicator flashes
Press the ON-OFF button to turn the cruise control off, and then reactivate
the system.
If the cruise control speed cannot be set or if the cruise control cancels
immediately after being activated, there may be a malfunction in the cruise
control system. Have the vehicle inspected by your Toyota dealer.
Page 170 of 400

170 2-5. Driving information
Regulations on the use of snow chains
●Regulations regarding the use of tire chains vary according to loca-
tion and type of road. Always check local regulations before install-
ing chains.
●Use SAE Class “S” type radial tire chains, with the exception of
radial cable chains or V-bar type chains.
• Install the chains on the front tires.
• Refer to the explanation that comes with the tire chains for
installation instructions.
●Retighten the chains after driving 1/4 - 1/2 mile (0.5 - 1.0 km).
■Snow chain installation
Observe the following precautions when installing and removing chains.
●Install and remove tire chains in a safe location.
●Install tire chains on the front tires only. Do not install tire chains on the
rear tires.
●Install the tire chains on front tires as tightly as possible.
●Install tire chains following the instructions provided in the accompanying
instructions.
●If wheel ornaments are used, they will be scratched by the chain band,
so remove the ornaments before putting on the chains. (P. 328)
■When driving the vehicle
Accelerate the vehicle slowly and drive at a reduced speed suit-
able to road conditions.
■When parking the vehicle
Park the vehicle and move the shift lever to P (automatic trans-
mission) or to 1 or R (manual transmission) without setting the
parking brake. The parking brake may freeze up, preventing it
from being released. If necessary, block the wheels to prevent
inadvertent sliding or creeping.
Page 179 of 400

179 2-5. Driving information
2
When driving
●In order to maintain engine braking efficiency, do not use the trans-
mission in D (automatic transmission) or 5 (manual transmission).
●Due to the added load of the trailer, your vehicle’s engine may
overheat on hot days (at temperatures over 85°F [30°C]) when
driving up a long or steep grade. If the engine coolant temperature
gauge indicates overheating, immediately turn off the air condition-
ing (if in use), pull your vehicle off the road and stop in a safe spot.
(P. 345)
●Always place wheel blocks under both the vehicle and the trailer
wheels when parking. Apply the parking brake firmly, and put the
transmission in P (automatic transmission) or in 1 or R (manual
transmission). Avoid parking on a slope, but if unavoidable, do so
only after performing the following:
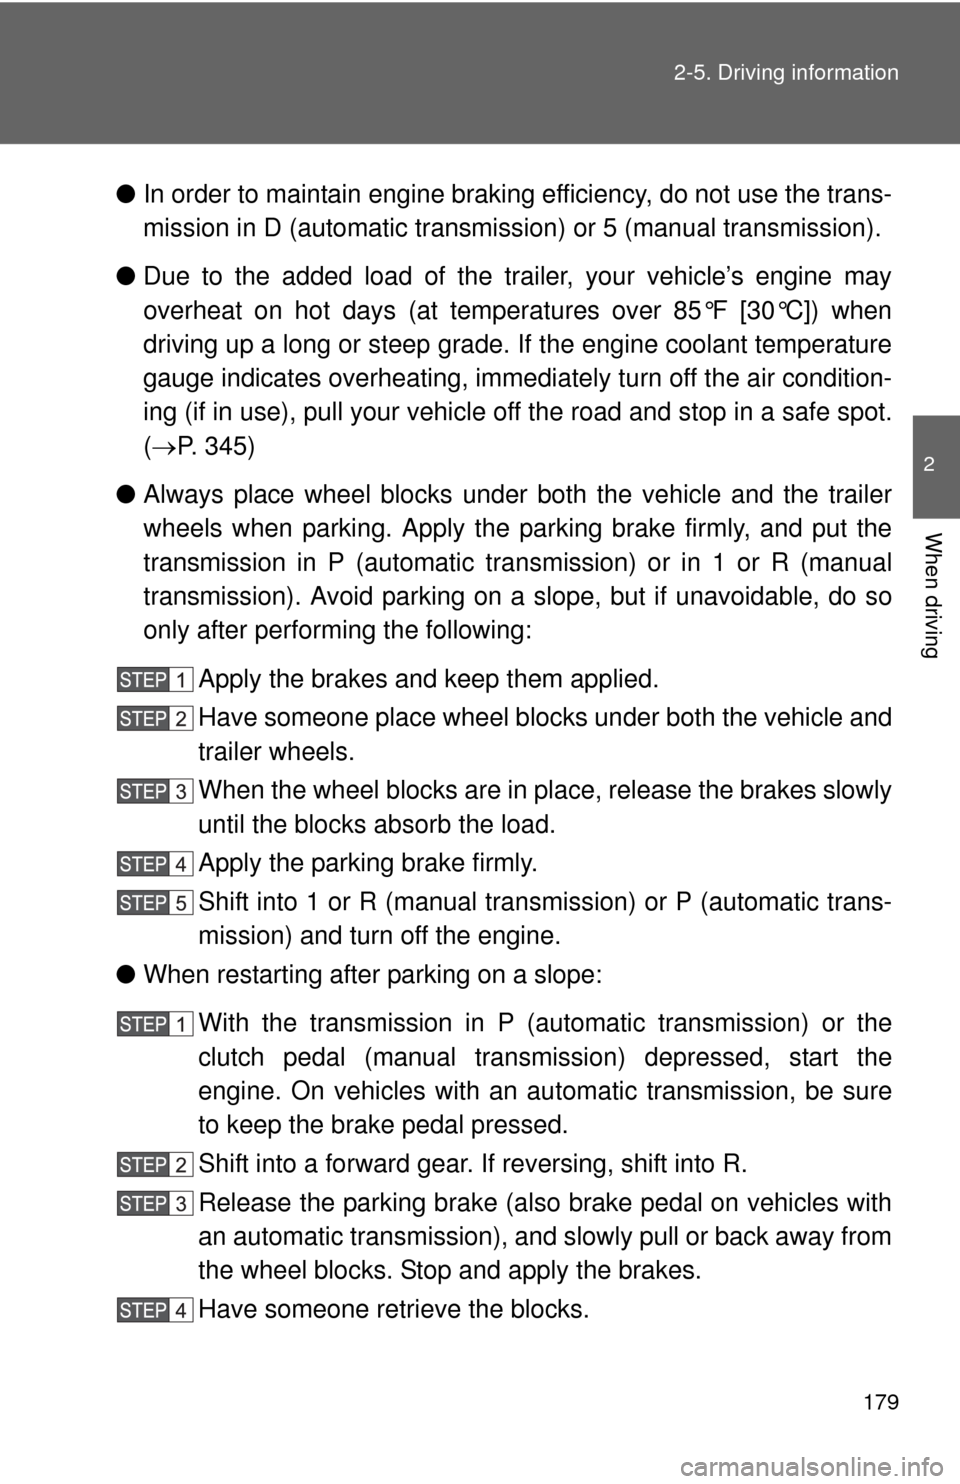
Apply the brakes and keep them applied.
Have someone place wheel blocks under both the vehicle and
trailer wheels.
When the wheel blocks are in place, release the brakes slowly
until the blocks absorb the load.
Apply the parking brake firmly.
Shift into 1 or R (manual transmission) or P (automatic trans-
mission) and turn off the engine.
●When restarting after parking on a slope:
With the transmission in P (automatic transmission) or the
clutch pedal (manual transmission) depressed, start the
engine. On vehicles with an automatic transmission, be sure
to keep the brake pedal pressed.
Shift into a forward gear. If reversing, shift into R.
Release the parking brake (also brake pedal on vehicles with
an automatic transmission), and slowly pull or back away from
the wheel blocks. Stop and apply the brakes.
Have someone retrieve the blocks.
Page 181 of 400
181
2-5. Driving information
2
When driving
Dinghy towing (vehicles with an automatic transmission)
NOTICE
■To avoid serious damage to your vehicle
Do not tow your vehicle with four wheels on the ground.
Your vehicle is not designed to be dinghy towed (with 4 wheels on
the ground) behind a motor home.
Page 232 of 400

232
3-5. Other interior features
Floor mat
CAUTION
Observe the following precautions.
Failure to do so may cause the driver’s floor mat to slip, possibly interfering
with the pedals while driving. An unexpectedly high speed may result or it may
become difficult to stop the vehicle, leading to a serious accident.
■When installing the driver’s floor mat
●Do not use floor mats designed for other models or different model year
vehicles, even if they are Toyota Genuine floor mats.
●Only use floor mats designed for the driver’s seat.
●Always install the floor mat securely using the retaining hooks (clips) pro-
vided.
●Do not use two or more floor mats on top of each other.
●Do not place the floor mat bottom-side up or upside-down.
■Before driving
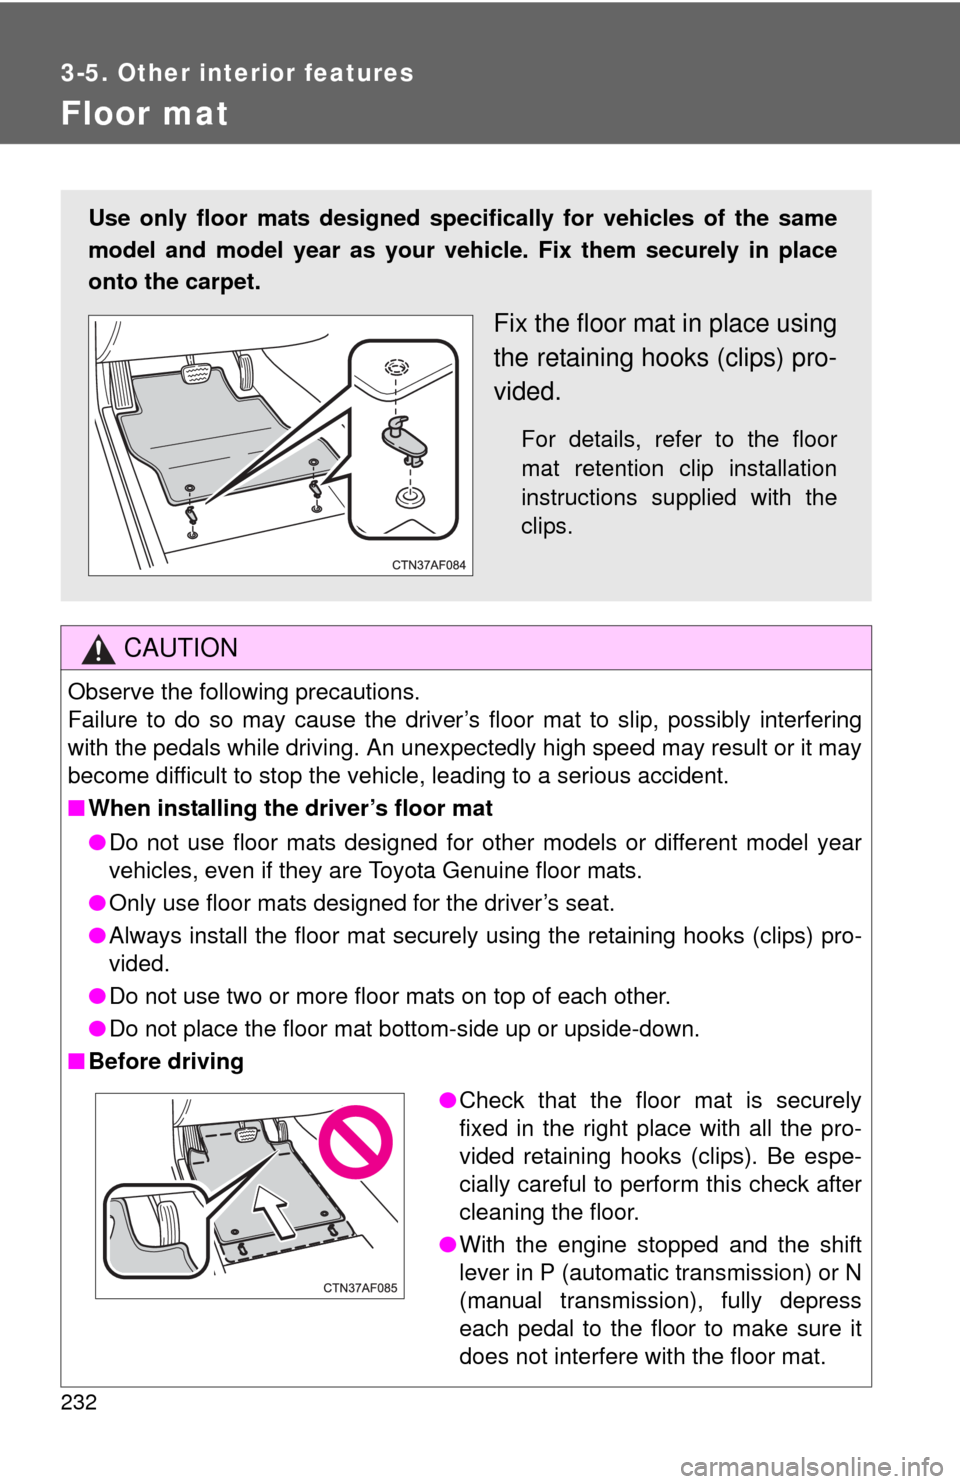
Use only floor mats designed specifically for vehicles of the same
model and model year as your vehicle. Fix them securely in place
onto the carpet.
Fix the floor mat in place using
the retaining hooks (clips) pro-
vided.
For details, refer to the floor
mat retention clip installation
instructions supplied with the
clips.
●Check that the floor mat is securely
fixed in the right place with all the pro-
vided retaining hooks (clips). Be espe-
cially careful to perform this check after
cleaning the floor.
●With the engine stopped and the shift
lever in P (automatic transmission) or N
(manual transmission), fully depress
each pedal to the floor to make sure it
does not interfere with the floor mat.