Page 390 of 513

389
4-3. Do-it-yourself maintenance
4
Maintenance and care
8 ECU-B
10 AGauges and meters, clock, main
body ECU, wireless remote control,
smart key system, audio system,
front passenger occupant classifi-
cation system, ABS, TRAC,
Enhanced VSC, AUTO LSD, down-
hill assist control system, hill-start
assist control system, Active torque
control 4WD system
9 DOME 10 AVanity lights, personal/interior
lights, interior light, luggage com-
partment light, engine switch light,
foot lights
10 H-LP LH 10 A Left-hand headlight (high beam)
11 H-LP RH 10 A Right-hand headlight (high beam)
12 H-LP LL 10 A Left-hand headlight (low beam)
13 H-LP RL 10 A Right-hand headlight (low beam)
14 AC INV 15 A AC inverter
15 TOWING*
130 A No circuit
16 DEICER 20 A Windshield wiper deicer
17 HTR 50 A Air conditioning system
18 PTC NO.3 50 A No circuit
19 PTC NO.2 50 A No circuit
20 PTC NO.1 50 A No circuit
21 HEAD MAIN 50 A H-LP LH, H-LP RH, H-LP LL,
H-LP RL fuses
22 RDI*
230 A
Electric cooling fan
FA N 2 *
150 A
FuseAmpereCircuit
Page 392 of 513

391
4-3. Do-it-yourself maintenance
4
Maintenance and care
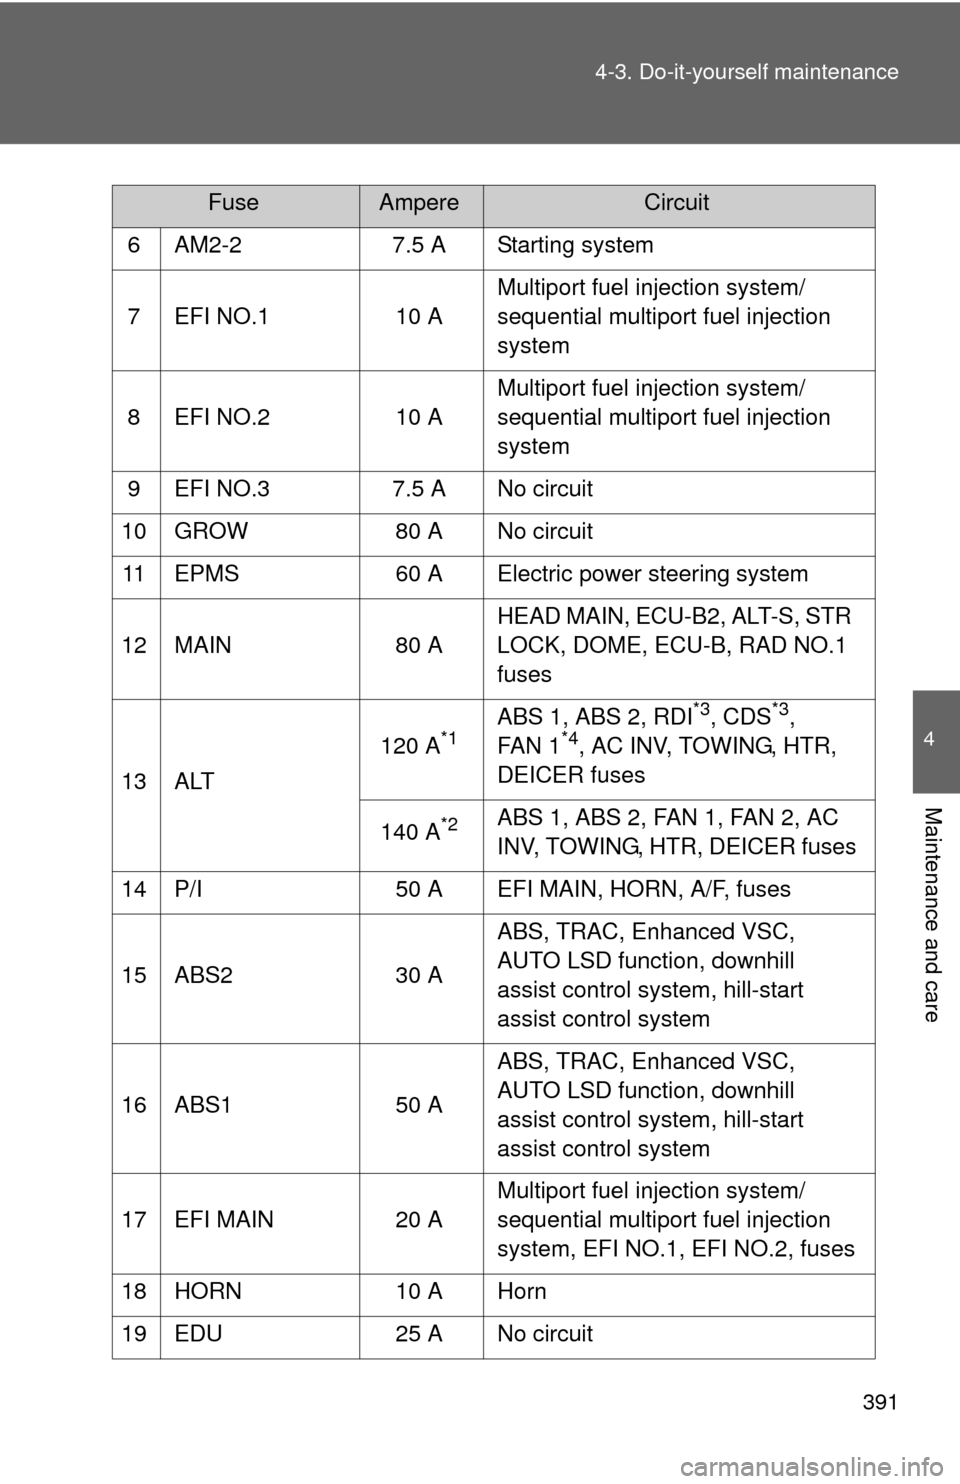
6 AM2-2
7.5 A Starting system
7 EFI NO.1 10 AMultiport fuel injection system/
sequential multiport fuel injection
system
8 EFI NO.2 10 AMultiport fuel injection system/
sequential multiport fuel injection
system
9 EFI NO.3 7.5 A No circuit
10 GROW 80 A No circuit
11 EPMS 60 A Electric power steering system
12 MAIN 80 AHEAD MAIN, ECU-B2, ALT-S, STR
LOCK, DOME, ECU-B, RAD NO.1
fuses
13 ALT 120 A
*1ABS 1, ABS 2, RDI*3, CDS*3,
FA N 1*4, AC INV, TOWING, HTR,
DEICER fuses
140 A
*2ABS 1, ABS 2, FAN 1, FAN 2, AC
INV, TOWING, HTR, DEICER fuses
14 P/I 50 A EFI MAIN, HORN, A/F, fuses
15 ABS2 30 A ABS, TRAC, Enhanced VSC,
AUTO LSD function, downhill
assist control system, hill-start
assist control system
16 ABS1 50 A ABS, TRAC, Enhanced VSC,
AUTO LSD function, downhill
assist control system, hill-start
assist control system
17 EFI MAIN 20 A Multiport fuel injection system/
sequential multiport fuel injection
system, EFI NO.1, EFI NO.2, fuses
18 HORN 10 A Horn
19 EDU 25 A No circuit
FuseAmpereCircuit
Page 394 of 513

393
4-3. Do-it-yourself maintenance
4
Maintenance and care
9 ACC
7.5 AAudio system, power outlets,
power rear view mirror control,
automatic transmission shift lock
system, main body ECU, clock,
smart key system
10 MIR HTR 10 A Outside rear view mirror defoggers
11 PWR OUTLET 15 A Power outlet
12 RR FOG 10 A No circuit
13 IGN 7.5 AMultiport fuel injection system/
sequential multiport fuel injection
system, steering lock system, front
passenger occupant classification
system, smart key system, SRS
airbag system
14 GAUGE 2 7.5 A Gauges and meters
15 S-HTR 15 A Seat heaters
16 FR WIP 25 A Windshield wipers
17 RR WIP 15 A Rear window wiper
18 WSH 15 AWindshield washer, rear window
washer
19 ECU IG 1 10 AElectric cooling fan, ABS, TRAC,
Enhanced VSC, AUTO LSD func-
tion, downhill assist control system,
hill-start assist control system,
active torque control 4WD system,
automatic transmission shift lock
system, air conditioning system,
main body ECU, electric moon
roof, stop/tail lights, electric power
steering system, clock, AC inverter,
auto anti-glare inside rear view mir-
ror
20 ECU IG 2 10 AAir conditioning system, rear win-
dow defogger, emergency flashers
FuseAmpereCircuit
Page 395 of 513
394 4-3. Do-it-yourself maintenance
*: Vehicles without smart key system
21 OBD7.5 A On-board diagnosis system
22 STOP 10 AStop/tail lights, high mounted stop-
light, automatic transmission shift
lock system, multiport fuel injection
system/sequential multiport fuel
injection system, ABS, TRAC,
Enhanced VSC, AUTO LSD sys-
tem, downhill assist control system,
hill-start assist control system
23 DOOR 25 AMain body ECU, power door lock
system
24 ACC-B 25 A ACC, CIG, fuses
25 4WD 7.5 A Active torque control 4WD system
26 FR FOG 15 A Front fog lights
27 AM1* 7.5 A Starting system
28 DEF 30 ARear window defogger, MIR HTR
fuse
29 P/SEAT 30 A Power seat
30 POWER 30 A Power windows
FuseAmpereCircuit
Page 405 of 513

404 4-3. Do-it-yourself maintenance
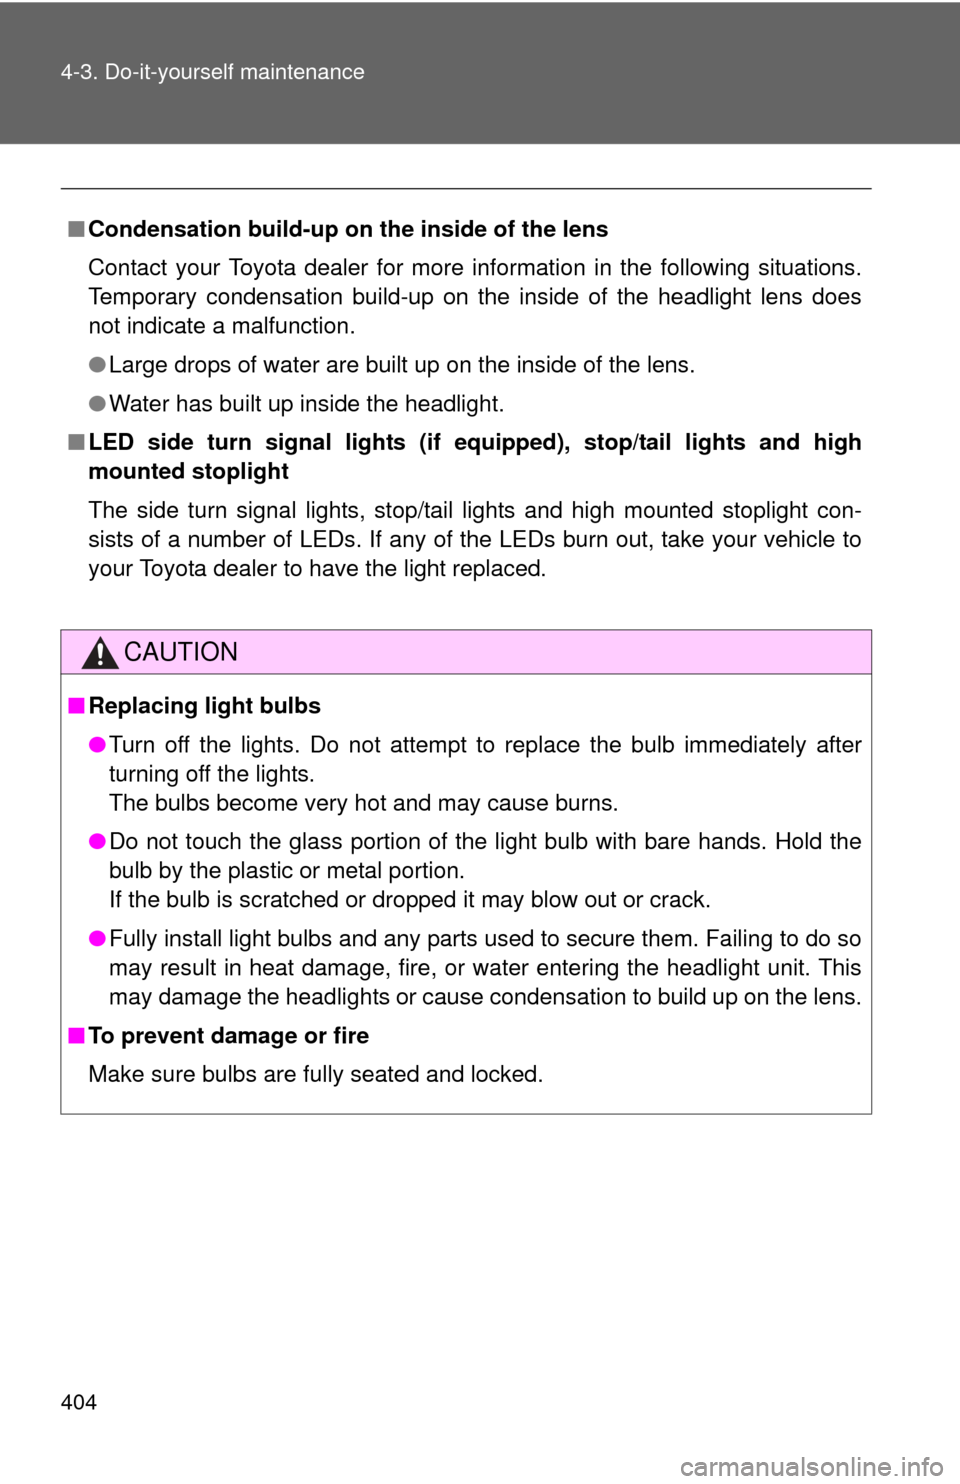
■Condensation build-up on th e inside of the lens
Contact your Toyota dealer for more information in the following situations.
Temporary condensation build-up on the inside of the headlight lens does
not indicate a malfunction.
● Large drops of water are built up on the inside of the lens.
● Water has built up inside the headlight.
■ LED side turn signal lights (if equipped), stop/tail lights and high
mounted stoplight
The side turn signal lights, stop/tail lights and high mounted stoplight con-
sists of a number of LEDs. If any of the LEDs burn out, take your vehicle to
your Toyota dealer to have the light replaced.
CAUTION
■Replacing light bulbs
●Turn off the lights. Do not attempt to replace the bulb immediately after
turning off the lights.
The bulbs become very hot and may cause burns.
● Do not touch the glass portion of the light bulb with bare hands. Hold the
bulb by the plastic or metal portion.
If the bulb is scratched or dropped it may blow out or crack.
● Fully install light bulbs and any parts used to secure them. Failing to do so
may result in heat damage, fire, or water entering the headlight unit. This
may damage the headlights or cause condensation to build up on the lens.
■ To prevent damage or fire
Make sure bulbs are fully seated and locked.
Page 409 of 513
408 5-1. Essential information
Emergency towingIf a tow truck is not available, in an emergency your vehicle may be
temporarily towed using a cable or chain secured to the emergency
towing eyelet. This should only be attempted on hard surfaced roads
for short distances at low speeds.
A driver must be in the vehicle to steer and operate the brakes. The
vehicle’s wheels, drive train, axles, steering and brakes must be in
good condition.
Towing eyelet
Page 410 of 513
5
When trouble arises
409
5-1. Essential information
Installing towing eyelet
Remove the eyelet cover using a
flathead screwdriver.
To protect the bodywork, place a
rag between the screwdriver and
the vehicle body, as shown in the
illustration.
Insert the towing eyelet into the
hole and tighten partially by
hand.
Tighten down the towing eyelet
securely using a wheel nut
wrench.
STEP 1
STEP 2
STEP 3
Page 413 of 513
412 5-1. Essential information
CAUTION
■Caution while towing
●Use extreme caution when towing the vehicle.
Avoid sudden starts or erratic driving maneuvers which place excessive
stress on the emergency towing eyelet and the cables or chains. Always
use caution for the surroundings and other vehicles while towing.
● If the engine is not running, the power assist for the brakes and steering
will not function, making steering and braking more difficult.
■ Installing towing eyelet to the vehicle
Make sure that towing eyelet is installed securely.
If not securely installed, towing eyelet may come loose during towing. This
may lead to accidents that cause serious injury or even death.