Page 146 of 188

AUDIO SYSTEM
150
Push “” or “” sides of the
“TUNE·SEEK/TRACK” button to step
up or step down the station band.
Your radio automatically changes to stereo
reception when a stereo broadcast is re-
ceived. “ST” appears on the screen. If the
signal becomes weak, the radio reduces
the amount of channel separation to pre-
vent the weak signal from creating noise.
If the signal becomes extremely weak, the
radio switches from stereo to mono recep-
tion. In this case, “ST” disappears from the
screen.
�Presetting a station
1. Tune in the desired station.
2. Touch one of the channel selector
buttons (1 — 6) you want and hold it un-
til a beep is heard.
This sets the station to the touch screen
button and the frequency appears on the
touch screen button.
Each radio mode can store up to 6 station-
s. To change the preset station to a differ-
ent one, follow the same procedure.
The preset station memory is cancelled
when the power source is interrupted by
battery disconnection or a blown fuse.
Page 147 of 188
 for the station you want.
The touc")
AUDIO SYSTEM
151
�
Selecting a station
Tune in the desired station using one of the
following methods.
Preset tuning: Touch the channel selec-
tor button (1 — 6) for the station you want.
The touch screen button is highlighted and
the station frequency appears on the
screen.
Seek tuning: Push “
” or “” sides of
the “TUNE·SEEK/TRACK” button and
hold it until you hear a beep. The radio will
begin seeking up or down for a station of
the nearest frequency and will stop on re-
ception. Each time you push the button,
the stations will be searched automatically
one after another.
To scan all the frequencies: Touch
“SCAN” on the screen briefly. “SCAN” ap-
pears on the screen. The radio will find the
next station and stay there for a few se-
conds, and then scan again. To select a
station, touch “SCAN” again.
To scan the preset stations: Touch
“SCAN” on the screen for longer than
approximately a second. “P·SCAN” ap-
pears on the screen. The radio will tune in
the next preset station, stay there for a few
seconds, and then move to the next preset
station. To select a station, touch “SCAN”
again. To listen to a satellite radio broadcast in
your vehicle, the subscription to the XM
�
Satellite Radio is necessary.
�How to subscribe to an XM � Satellite
Radio
An XM� Satellite Radio is a tuner designed
exclusively to receive broadcasts provided
under a separate subscription. A vailability
is limited to the 48 contiguous states and
10 Canadian provinces.
How to subscribe:
You must enter into a separate service
agreement with the XM � Satellite Radio in
order to receive satellite broadcast pro-
gramming in the vehicle. Additional activa-
tion and service subscription fees apply
that are not included in the purchase price
of the vehicle and optional digital satellite
tuner.
For detailed information about XM� Satel-
lite Radio or to subscribe:
U.S.A.—
Visit on the web at www.xmradio.com
or
call 1 −800− 967−2346.
Canada—
Visit on the web at www .xmradio.ca
or call
1−877−438−9677.
The XM � Satellite Radio is solely responsi-
ble for the quality, availability and content
of the satellite radio services provided,
which are subject to the terms and condi-
tions of the XM � Satellite Radio customer
service agreement.
Customers should have their radio ID
ready; the radio ID can be found by tuning
to “channel 000” on the radio. For details,
see “Displaying the radio ID” below.
All fees and programming are the respon-
sibility of the XM� Satellite Radio and are
subject to change.
— Radio operation
(XM � Satellite Radio
broadcast)
Page 149 of 188
AUDIO SYSTEM
153
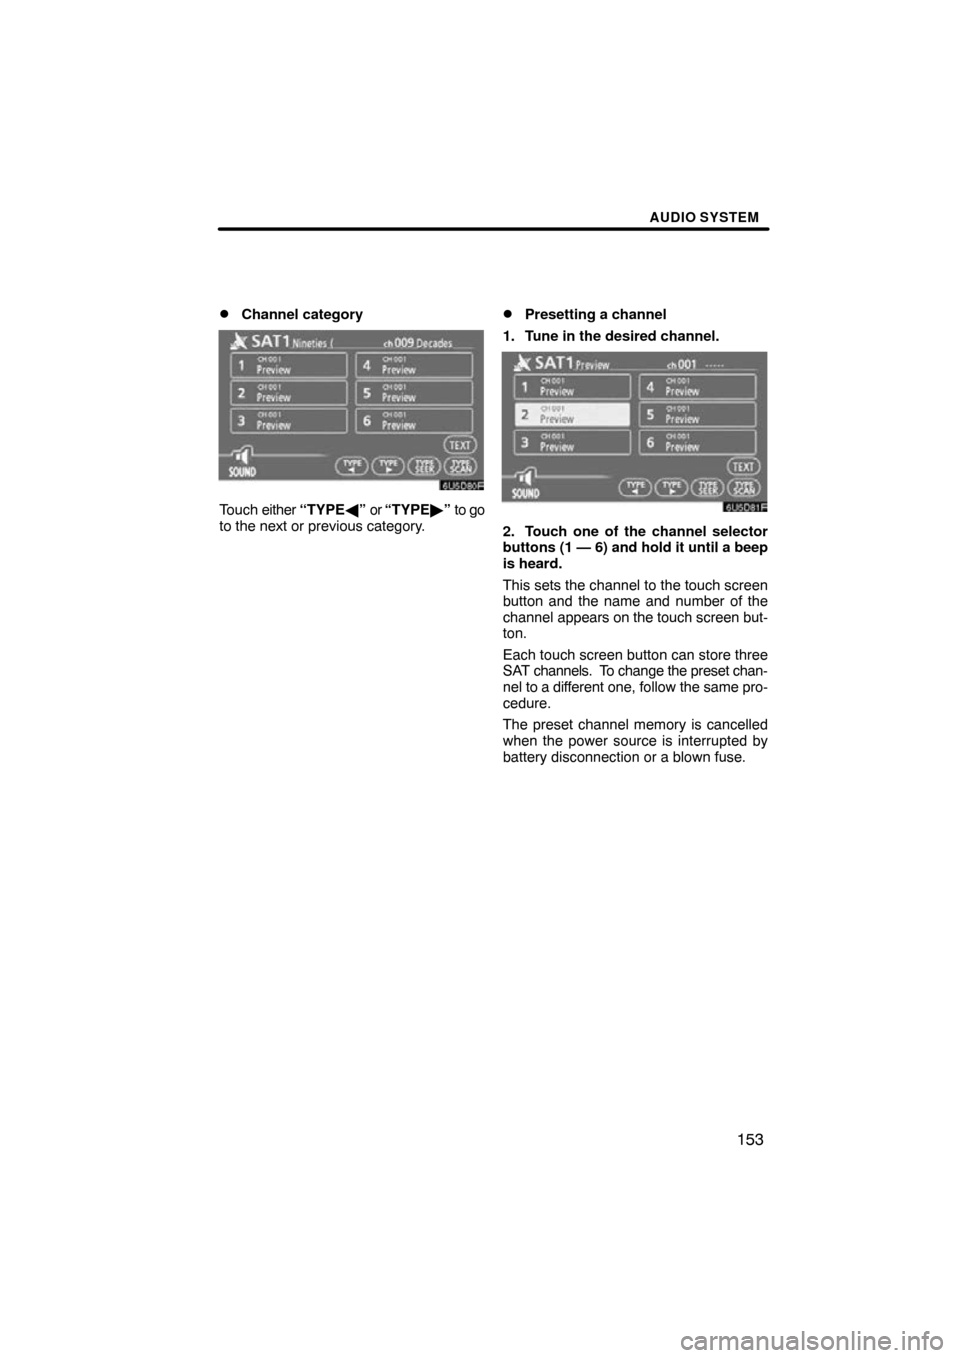
�
Channel category
Touch
either “TYPE \b” or “TYPE �” to go
to the next or previous category.
�Presetting a channel
1. Tune in the desired channel.
2. Touch one of the channel selector
buttons (1 — 6) and hold it until a beep
is heard.
This sets the channel to the touch screen
button and the name and number of the
channel appears on the touch screen but-
ton.
Each touch screen button can store three
SAT channels. To change the preset chan-
nel to a different one, follow the same pro-
cedure.
The preset channel memory is cancelled
when the power source is interrupted by
battery disconnection or a blown fuse.
Page 150 of 188
AUDIO SYSTEM
154
�
Selecting a channel
Tune in the desired channel using one of
the following methods.
Preset tuning: Touch the channel selec-
tor button (1 — 6) for the channel you want.
The button (1 — 6) is highlighted and chan-
nel number appears on the display.
To select channel within the current
category: Push “
” or “” sides of the
“TUNE·SEEK/TRACK” button. The radio
will step up or down the channel within the
current channel category. Touch “TYPE
SEEK” . The radio will step up the channel
within the current channel category.
To scan the currently selected channel
category: Touch “TYPE SCAN” briefly.
“SCAN” appears on the display. The radio
will find the next channel in the same chan-
nel category, stay there for a few seconds,
and then scan again. To select a channel,
touch “TYPE SCAN” a second time.
Page 164 of 188

AUDIO SYSTEM
168
“RAND”: Use it for automatic and random
selection of the folder or the disc which you
are currently listening to.
Playing the files in one folder in random
order —
While the disc is playing, touch
“RAND” briefly.
“RAND” appears on the screen. The sys-
tem selects a file in the folder you are cur-
rently listening to. To cancel it, touch
“RAND” once again.
Playing the files in all the folders on one
disc in random order —
While the disc is playing, touch
“RAND” and hold it until the
“FLD.RAND” appears on the screen.
The system selects a file in all the folders.
To cancel it, touch the button once again.
When a file is skipped or the system is in-
operative, touch “RAND” to reset. (f) If the player malfunctions
If the player or another unit equipped with
the player malfunctions, your audio sys-
tem will display following messages.
If “No CD” appears on the display:
It in-
dicates that there is no disc in the CD play-
er.
If “CD Check” appears on the display:
It indicates that the disc dirty, damaged, or
it was inserted upside down. Clean the
disc or insert it correctly. If a disc which is
not playable is inserted, “CD Check” will
also appear on the screen. For appropri-
ate discs for this player, see “Audio system
operating hints” on page 170.
If “CD Error” appears on the display:
The following causes are possible.
�There is a trouble inside the system.
Eject the disc.
�The inside of the player unit may be too
hot due to the very high ambient tem-
perature. Eject the disc and allow the
player to cool down.
If “NO MUSIC FILE” appears on the dis-
play: It indicates that the disc has no play-
able data.
If the malfunction is not rectified: Take
your vehicle to your dealer.
If an MP3/WMA disc contains CD −DA
files, only CD−DA files are played. If an
MP3/WMA disc contains files other than
CD−DA, only MP3/WMA files are played.
Page 165 of 188

AUDIO SYSTEM
169
Some parts of the audio system can be ad-
justed with the switches on the steering
wheel.
Details of the specific switches, controls,
and features are described below.
1Volume control switch
2“” “” switches
3“MODE” switch
1Volume control switch
Push “+” side to increase the volume. The
volume continues to increase while the
switch is being pressed.
Push “�” side to decrease the volume.
The volume continues to decrease while
the switch is being pressed.
2“” “” switches
Radio
To select a preset station:
Quickly push and release the “
” or “”
switch. Do this again to select the next pre-
set station.
To seek a station:
Push and hold the “
” or “” switch until
you hear a beep. Do this again to find the
next station. If you push either the “
” or
“” switch in seek mode, the seek mode
will cancel.
CD player
Use this button to skip up or down to a dif-
ferent track or file in either direction.
To select a desired track or file:
Quickly push and release the “
” or “”
switch until the track or file you want to play
is set. If you want to return to the beginning
of the current track or file, push the “
”
switch once, quickly.
3“MODE” switch
Each time you push the “MODE” switch,
the system changes the audio mode.
To turn the audio system on, push the
“MODE” switch.
To turn the audio system off, push and hold
the “MODE” switch until you hear a beep.
Audio remote controls —
— Steering switches