Page 240 of 360
. Once outside this range, you may
notice fading and drifting, which increase")
AUDIO/VIDEO SYSTEM
240
FM
Fading and drifting stations — Generally,
the effective range of FM is about 25 miles
(40 km). Once outside this range, you may
notice fading and drifting, which increase
with the distance from the radio transmit-
ter. They are often accompanied by distor-
tion.
Multi−path — FM signals are reflective,
making it possible for two signals to reach
your antenna at the same time. If this hap-
pens, the signals will cancel each other
out, causing a momentary flutter or loss of
reception.
Static and fluttering — These occur when
signals are blocked by buildings, trees, or
other large objects. Increasing the bass
level may reduce static and fluttering.
Station swapping — If the FM signal you
are listening to is interrupted or weakened,
and there is another strong station nearby
on the FM band, your radio may tune in the
second station until the original signal can
be picked up again.
AM
Fading — AM broadcasts are reflected by
the upper atmosphere — especially at
night. These reflected signals can inter-
fere with those received directly from the
radio station, causing the radio station to
sound alternately strong and weak.
Station interference — When a reflected
signal and a signal received directly from
a radio station are very nearly the same
frequency, they can interfere with each
other, making it difficult to hear the broad-
cast.
Static — AM is easily affected by external
sources of electrical noise, such as high
tension power lines, lightening, or electri-
cal motors. This results in static. XM
� (if equipped)
Cargo loaded on the roof luggage carrier,
especially metal objects, may adversely
affect the reception of XM � Satellite Radio.
Alternation or modifications carried out
without appropriate authorization may in-
validate the user’s right to operate the
equipment.
iPod �
About iPod � —
�“Made for iPod” means that an elec-
tronic accessory has been designed to
connect specifically to iPod and has
been certified by the developer to meet
Apple performance standards.
�Apple is not responsible for the opera-
tion of this device or its compliance with
safety and regulatory standards.
�iPod is a trademark of apple Inc., regis-
tered in the U.S. and other countries.
Compatible models —
�iPod � 5th generation Ver. 1.2 or later
�iPod nano � 3rd generation Ver. 1.0 or
later
�iPod nano � 2nd generation Ver. 1.1.2
or later
�iPod nano � Ver. 1.2 or later
�iPod touch� Ver. 1.1 or later
�iPod classic � Ver. 1.0 or later
iPhone , iPod� mini, iPod shuffle �, iPod�
photo and 4th generation and earlier mod-
els of iPod � are not compatible with this
system.
USB memory
USB memory that can be used for MP3
and WMA playback.
�USB communication formats: USB 2.0
FS (12 MBPS)
�File formats: FAT 16/32 (Windows �)
�Correspondence class: Mass storage
class
Page 258 of 360

AIR CONDITIONING
258
To remove frost or exterior fog on the
windshield—
1. Push the upper side of the temperature
control button until maximum figure ap-
pears on the temperature display.
2. Push the windshield air flow button.
3. Touch “HI” of the air flow control to ob-
tain a maximum air flow.
4. Leave the air conditioning on −off con-
trol off.
When the windshield air flow button is
pushed while operating in automatic
mode, the air conditioning is set to operate
and the OUTSIDE AIR mode is set.
Touch “A/C” for dehumidified heating or
cooling. This setting clears the front view
more quickly.
If you push the windshield air flow button
once again while in the FRONT WIND-
SHIELD mode, the mode then returns to
the last mode used.
CAUTION
To prevent the windshield from fog-
ging up, do not use the windshield air
flow button during cool air operation
in extremely humid weather. The dif-
ference between the temperature of
the outside air and that of the wind-
shield can cause the outer surface of
the windshield to fog up, blocking
your vision.
(d) Micro dust and pollen filter
Push the micro dust and pollen filter
button
Outside air mode switches to recirculated
air mode. Pollen is removed from air and
the air flows to the upper part of the body.
Usually the system will turn off automati-
cally approximately 3 minutes later.
To stop the operation, press the button
again.
Page 267 of 360

SECTION 9
SETUP
267
SETUP
Setup
�General settings 268 . . . . . . . . . . . . . . . . . . . . . . . . . . . . . . . . . . . . .\
.
(Used for language selection and the on/off settings of
operation sounds and automatic screen change.)
� Clock settings 273 . . . . . . . . . . . . . . . . . . . . . . . . . . . . . . . . . . . . .\
. . . .
(Used for changing time zones and the on/off settings of
daylight saving time.)
� Voice settings 275 . . . . . . . . . . . . . . . . . . . . . . . . . . . . . . . . . . . . .\
. . . .
(Voice guidance can be set.)
� Navigation settings 278 . . . . . . . . . . . . . . . . . . . . . . . . . . . . . . . . . . . .
(“Home” and “Preset Destinations” can be set and edited.)
� Detailed navigation settings 278 . . . . . . . . . . . . . . . . . . . . . . . . . . . .
(Average cruising speed, displayed screen contents,
and POI icon categories can be set.)
� Telephone settings 287 . . . . . . . . . . . . . . . . . . . . . . . . . . . . . . . . . . . .
(Bluetooth � phones can be registered.)
� Audio settings 326
. . . . . . . . . . . . . . . . . . . . . . . . . . . . . . . . . . . . .\
. . .
(Settings are available for portable audio devices and
Bluetooth � audio devices players.)
� Vehicle settings 333
. . . . . . . . . . . . . . . . . . . . . . . . . . . . . . . . . . . . .\
. .
(Vehicle information can be set.)
Page 268 of 360
SETUP
268
Used for language selection and the on/off
settings of operation sounds and automat-
ic screen change.
1. Push the “SETUP” button.
2. Touch “General”.
3. Touch the items to be set.
4. Touch “Save”. SCREENS FOR GENERAL SETTINGS
On this screen, the following functions can
be performed.
No.
Function
1You can change the language.
(See “� Selecting a language” on
page 269.)
2
Rear system lock* can be set to
“On” or “Off” . (See “� Rear sys-
tem lock” on page 270.)
* : Vehicles with rear seat enter- tainment system
3“On” or “Off” can be selected to
sound beeps.
4
“On” or “Off” can be selected for
automatic screen changes from
the audio/air conditioner screen to
the map. When “On” is selected,
the screen will automatically re-
turn to the map from the audio
screen after 20 seconds.
General settings
Page 270 of 360
SETUP
270
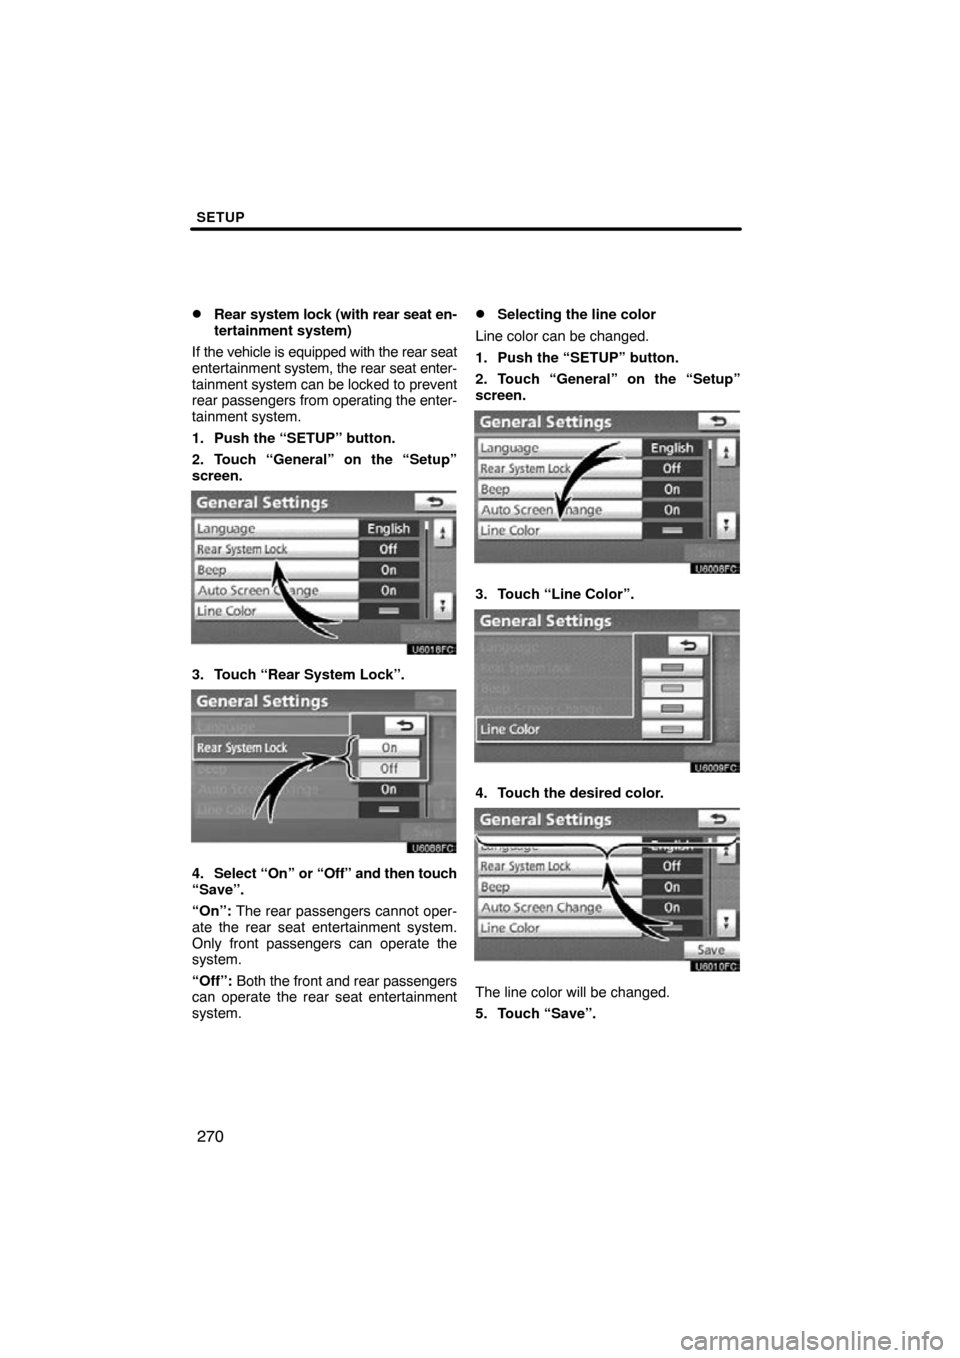
�
Rear
system lock (with rear seat en-
tertainment system)
If the vehicle is equipped with the rear seat
entertainment system, the rear seat enter-
tainment system can be locked to prevent
rear passengers from operating the enter-
tainment system.
1. Push the “SETUP” button.
2. Touch “General” on the “Setup”
screen.
3. Touch “Rear System Lock”.
4. Select “On” or “Off” and then touch
“Save”.
“On”: The rear passengers cannot oper-
ate the rear seat entertainment system.
Only front passengers can operate the
system.
“Off”: Both the front and rear passengers
can operate the rear seat entertainment
system.
�Selecting the line color
Line color can be changed.
1. Push the “SETUP” button.
2. Touch “General” on the “Setup”
screen.
3. Touch “Line Color”.
4. Touch the desired color.
The line color will be changed.
5. Touch “Save”.
Page 273 of 360
SETUP
273
1. Push the “SETUP” button.
2. Touch “General” on the “Setup”
screen.
Then touch
to display page 2 of the
“General Settings” screen.
3. Touch “Delete Personal Data”.
4. Touch “Delete”.
5. Touch “Yes”. Used for
changing time zones and the on/
off settings of daylight saving time.
1. Push the “SETUP” button.
2. Touch “Clock”.
3. Touch the items to be set.
4. Touch “Save”.
Clock settings
Page 274 of 360
SETUP
274
SCREEN FOR CLOCK SETTINGS
On this screen, the following functions can
be performed.No.
Function
1Time zone can be changed. (See
“� Time zone” on page 274.)
2“On” or “Off” can be selected for
daylight savings time.
3“On” or “Off” can be selected for
automatic adjustment of the clock.
4
When “Auto Adjust Clock” is
turned “Off”, the clock can be
manually adjusted. (See “
� Manu-
al clock setting” on page 275.)
�Time zone
A time zone can be selected and GMT can
be set.
1. Push the “SETUP” button.
2. Touch “Clock” on the “Setup”
screen.
3. Touch “Time Zone”.
4. Touch the desired time zone.
If you touch “Other”, adjust the zone
manually.
5. Touch “OK”.
Page 275 of 360
SETUP
275
�
Manual clock setting
When “Auto Adjust Clock” is turned
“Off” , the clock can be manually adjusted.
1. Push the “SETUP” button.
2. Touch “Clock” on the “Setup”
screen.
Hours “+”, “�”: Touch “+” to set the time
forward one hour and “�” to set the time
back one hour.
Minutes “+”, “�” : Touch “+” to set the
time forward one minute and “�” to set the
time back one minute.
Minutes “:00”: Rounds to the nearest
hour*
*: e.g. 1:00 to 1:29 → 1:00
1:30 to 1:59 → 2:00
3. Touch “Save”. Voice guidance can be set.
1. Push the “SETUP” button.
2. Touch “Voice”.
3. Touch the items to be set.
4. Touch “Save”.
Voice settings