Page 37 of 264

DESTINATION SEARCH
41
8“Intersection”
The names of two intersecting streets can
be entered. This is helpful if only the gen-
eral vicinity, not the specific address, is
known. 57 . . . . . . . . . . . . . . . . . . . . . . . . . . .
9“Freeway Ent./Exit”
The name of a freeway (interstate) en-
trance or exit can be entered. 58 . . . . . . .
10“?”
Function help for the “Destination” screen
can be viewed on this screen. 28 . . . . . . .
11“Change”
To change the search area, touch this
touch−screen button. 42
. . . . . . . . . . . . . .
12Quick access touch�screen but-
tons
One of 5 preset destinations can be se-
lected by touching the screen directly. To
use this function, it is necessary to set the
“Quick access” for each memory point. (To
register a “Quick Access”, see “ — Editing
memory points” on page 94.) 44 . . . . . . . .
13Home touch�screen button
A personal home address can be selected
without entering the address each time. To
use this function, it is necessary to set
“Home” for the memory point. (To register
“Home”, see “ — Registering home” on
page 100.) 44 . . . . . . . . . . . . . . . . . . . . . . . .
14“Phone #”
A destination can be entered by the tele-
phone number. 60 . . . . . . . . . . . . . . . . . . . .
15“Coordinates”
A destination can be set by using latitude
and longitude as coordinates. 59 . . . . . . .
Push the “DEST” button.
You can use one of 13 different methods to
search your destination. (See pages 44
through 60.)
INFORMATION
When searching the destination, the
response to the touch�screen button
may be slow.
Destination search —
Page 56 of 264

DESTINATION SEARCH
60
1. Push the “DEST” button.
2. Touch “Phone #” on the “Destina-
tion” screen.
3. Input a telephone number.
4. After inputting a telephone number,
touch “OK”.
The screen changes and displays the map
location of the selected destination and the
road preference. (See “Starting route
guidance” on page 60.)
If there is more than one site having the
same number, the following screen will be
displayed.
INFORMATION
�If there is no match for the tele-
phone number inputted, a list of
identical numbers with different
area codes will be displayed.
�To set a memory point as a destina-
tion using the phone number, the
number must be registered pre-
viously. (See page 99.)
After inputting the destination, the screen
changes and displays the map location of
the selected destination and the route pref-
erence. Registering the destination allows
you select a route.
1. When an arrow facing the desired
point is touched, the map scrolls in that
direction.
Releasing the finger from the arrow will
stop the scrolling.
2. Touch “Enter”.
The system starts route search and dis-
plays recommended routes.
If there is already a set destination, “Add
to
” and “Replace ” are displayed.
“Add to
”: To add a destination.
“Replace
”: To delete the existing des-
tinations and set a new one.
“Route Preference”: To change the route
preference. (See page 62.)
“Info.”: If this touch− screen button is dis-
played on the top of the screen, touch the
switch to view items such as name, ad-
dress, and phone number.
— Destination search by
“Phone #”Starting route guidance
Page 90 of 264
ADVANCED FUNCTIONS
94
5. Touch “OK”.
To edit registered information, see “ —
Editing memory points” on page 94.
INFORMATION
Up to 106 memory points can be reg-
istered.
The icon, attribute, name, location and/or
telephone number of a registered memory
point can be edited.
1. Push the “MENU” button.
2. Touch “My Places” on the “Menu”
screen.
3. Touch “Edit”.
4. Touch the desired memory point
button.
— Editing memory points
Page 91 of 264
ADVANCED FUNCTIONS
95
5. Touch the touch�screen button to
be edited.
“Icon”: To select icons to be displayed on
the map. (See page 95.)
“Quick Access”: To set an attribute.
Memory points with a set attribute can be
used as a “Quick access” or “Home” but-
ton. (See page 96.)
“Name”: To edit memory point names.
The names can be displayed on the map.
(See page 97.)
“Location”: To edit location information.
(See page 98.)
“Phone #”: To edit telephone numbers.
(See page 99.)
6. Touch “OK”.
�To change “Icon”
1. Touch “Icon” on the “Memory
Point” screen.
2. Touch the desired icon.
Turn the page by touching “Page 1”,
“Page 2” or “with Sound”.
Page 95 of 264
ADVANCED FUNCTIONS
99
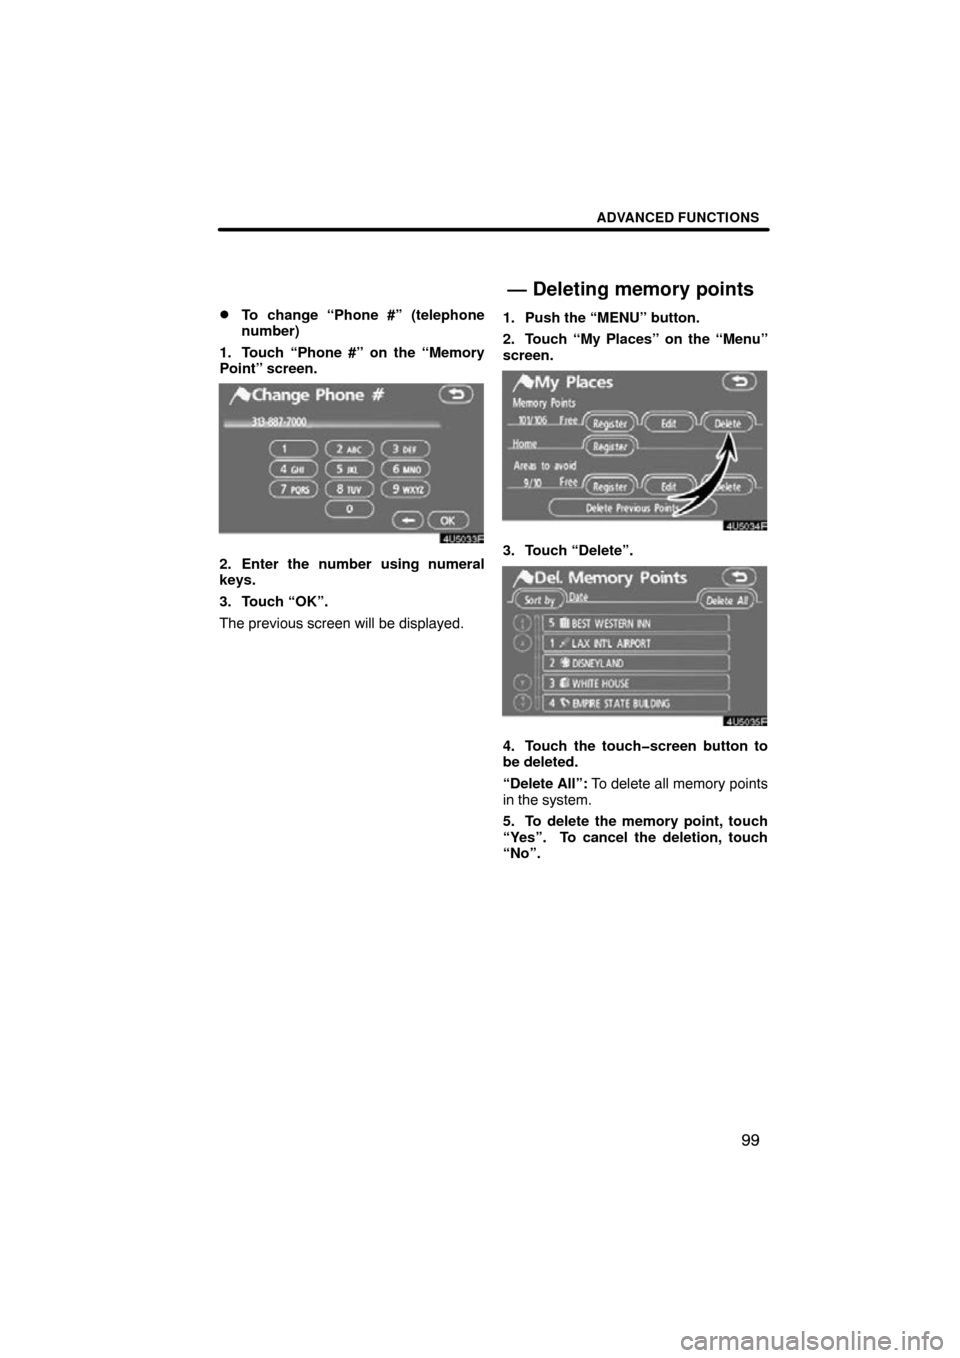
�
To change “Phone #” (telephone
number)
1. Touch “Phone #” on the “Memory
Point” screen.
2. Enter the number using numeral
keys.
3. Touch “OK”.
The previous screen will be displayed. 1. Push the “MENU” button.
2. Touch “My Places” on the “Menu”
screen.3. Touch “Delete”.
4. Touch the touch�screen button to
be deleted.
“Delete All”: To delete all memory points
in the system.
5. To delete the memory point, touch
“Yes”. To cancel the deletion, touch
“No”.
— Deleting memory points
Page 113 of 264

SECTION 5
OTHER FUNCTIONS
11 7
OTHER FUNCTIONS
Other functions
� Maintenance information 118
Maintenance information setting 11 8
. . . . . . . . . . . . . . . . . . . . . . .
Dealer setting 120
. . . . . . . . . . . . . . . . . . . . . . . . . . . . . . . . . . . . .\
.
� Calendar with memo 122
Adding a memo 124
. . . . . . . . . . . . . . . . . . . . . . . . . . . . . . . . . . . . .\
Editing a memo 125
. . . . . . . . . . . . . . . . . . . . . . . . . . . . . . . . . . . . .\
Memo list 125
. . . . . . . . . . . . . . . . . . . . . . . . . . . . . . . . . . . . .\
. . . . . .
� Hands −free system (for cellular phone) 127
� Speech command system 174
� Help screen 177
� Screen adjustment 178
� Screen setting 180
� Beep setting 183
� Select language 183
. . . . . . . . . . . . . . . . . . . . . . . . . . . . . . . . . .
. . . . . . . . . . . . . . . . . . . . . . . . . . . . . .
. . . . . . . . . . . . . . . . . . . . . . . . . . . . . .
. . . . . . . . . . . . . . . . . . . . . . . . . . . . . . . . . . . .\
. . . . . . . . . . . . . . . . . . . . . . . . . .
. . . . . . . . . . . . . . . . . . . . . . . . . . . . . . . . . . . .\
.
. . . . . . . . . . . . . . . . . . . . . . . . . . . . . . . . . . . .\
. . . . .
. . . . . . . . . . . . . . . . . . . . . . . . . . . . . . . . . . . .\
. . . . . . . . . . . . . . . . . . . . . . . . . . . . . . . . . . . . . . . . . . .\
. . .
Page 116 of 264

OTHER FUNCTIONS
120
It is possible to register a dealer in the sys-
tem. With dealer information registered,
route guidance to the dealer is available.
1. Push the “INFO” button.
2. Touch “Maintenance” on the “Infor-
mation” screen.
3. Touch “Set Dealer” on the “Mainte-
nance” screen.
4. If the dealer has not been registered,
enter the location of the dealer in the
same way as for a destination search.
(See “Destination search” on page 41.)
When “Set Dealer” registration is finished,
the “Edit Dealer” screen will be displayed.
5. Touch the touch�screen button to
be edited.
“Dealer”: To enter the name of a dealer.
(See page 121.)
“Contact”: To enter the name of a dealer
member. (See page 121.)
“Location”: To set a location. (See page
121.)
“Phone #”: To set a telephone number.
(See page 122.)
“Delete Dealer”: To delete the dealer in-
formation displayed on the screen.
“Enter
”: To set the displayed dealer as
a destination. (See “Starting route guid-
ance” on page 60.)
— Dealer setting
Page 118 of 264
OTHER FUNCTIONS
122
�
To edit “Phone #” (telephone num-
ber)
1. Touch “Phone #” on the “Edit Deal-
er” screen.
2. Enter the number using numeral
keys.
3. Touch “OK”.
The previous screen will be displayed. It is possible to enter memos for particular
dates on the calendar.
The system informs
you of the memo entry when the system is
turned on. (See page 23.) Memos can also
be used for route guidance if the memo has
been registered with location information.
1. Push the “INFO” button.
2. Touch “Calendar”.
Calendar with memo —


“Quick Access”: To set an attribute.
Memory points wit")