Page 134 of 476
134
2-1. Driving procedures
Automatic transmission
Select a shift position appropriate for the driving conditions.
■Shifting the shift lever
Standard type
Vehicles with smart key system:
While the “ENGINE START STOP” switch is in IGNITION
ON mode, depress the brake pedal and move the shift
lever.
Vehicles without smart key system:
While the engine switch is in
the “ON” position, depress the
brake pedal and move the shift lever.
�
: If equipped
Page 138 of 476

138 2-1. Driving procedures
A lower shift range will provide greater engine braking forces than a
higher shift range.
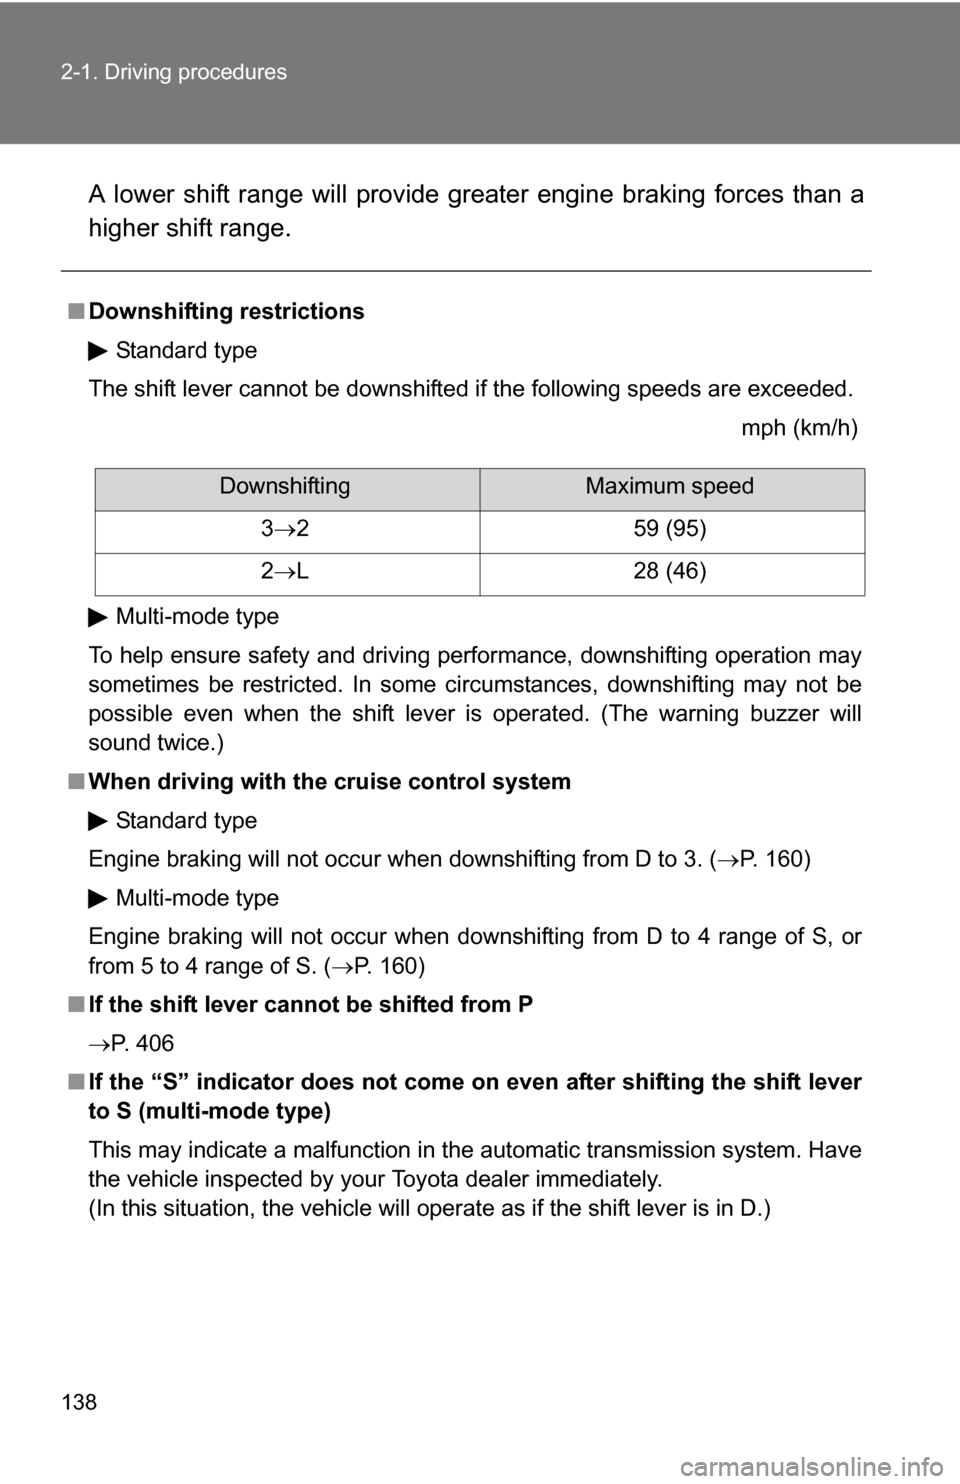
■Downshifting restrictions
Standard type
The shift lever cannot be downshifted if the following speeds are exceeded. mph (km/h)
Multi-mode type
To help ensure safety and driving performance, downshifting operation may
sometimes be restricted. In some circumstances, downshifting may not be
possible even when the shift lever is operated. (The warning buzzer will
sound twice.)
■ When driving with the cruise control system
Standard type
Engine braking will not occur when downshifting from D to 3. (P. 160) Multi-mode type
Engine braking will not occur when downshifting from D to 4 range of S, or
from 5 to 4 range of S. ( P. 160)
■ If the shift lever cannot be shifted from P
P. 406
■ If the “S” indicator does not come on even after shifting the shift lever
to S (multi-mode type)
This may indicate a malfunction in the automatic transmission system. Have
the vehicle inspected by your Toyota dealer immediately.
(In this situation, the vehicle will operate as if the shift lever is in D.)
DownshiftingMaximum speed
3 2 59 (95)
2 L 28 (46)
Page 139 of 476
139
2-1. Driving procedures
2
When driving
Manual transmission
■Maximum allowable speeds
Observe the following maximum allowable speeds in each gear when maxi-
mum acceleration is necessary.
2.4 L 4-cylinder (2AZ-FE) engine mph (km/h)
1.8 L 4-cylinder (2ZR-FE) engine mph (km/h)
■Shifting the shift lever
Fully depress the clutch pedal
before operating the shift
lever, and then release the
clutch pedal slowly.
Shift positionMaximum speed
1 29 (48)
2 53 (85)
3 81 (130)
4 110 (178)
Shift positionMaximum speed
1 33 (54)
2 56 (90)
3 81 (130)
: If equipped
Page 149 of 476
149
2-2. Instrument cluster
2
When driving
■
Indicators
The indicators inform the driver of the operating state of the
vehicle’s various systems.
Turn signal indicator
(P. 140)
(U.S.A.)
Headlight indicator
( P. 155)
Headlight high beam
indicator ( P. 155)
(Canada)
Tail light indicator
(P. 155)
(if equipped)
Slip indicator
(P. 163)
(if equipped)
Front fog light indicator
( P. 157)
Engine immobilizer sys-
tem indicator ( P. 78)
(if equipped)
Cruise control indicator
(P. 160)
(if equipped)
“VSC OFF” indicator
(P. 163)
(vehicles with an automatic transmission)
*2
*2
*1
*1“AIR BAG ON”
and “AIR BAG
OFF” indica-
tor ( P. 9 5 )*1
Shift position
indicators
(P. 134)
Page 161 of 476
161
2-4. Using other
driving systems
2
When driving
■Cruise control can be set when
●Automatic transmission:
The shift lever is in D or 3 (standard type), or in D, 4 or 5 range of S
(multi-mode type).
● Vehicle speed is above 25 mph (40 km/h).
■ Adjusting the speed setting
Increase speed
Decrease speed
Hold the lever until the desired
speed setting is obtained.
Fine adjustment of the set
speed (approximately 1.0 mph
[1.6 km/h]) can be made by
lightly pushing the lever up or
down and releasing it.
■Canceling and resuming regular acceleration
Cancel
Pull the lever towards you to
cancel cruise control.
The speed setting is also can-
celed when the brakes are
applied or the clutch pedal
(manual transmission) is
depressed.
Resume
To resume cruise control and
return to the set speed, push
the lever up.
Page 172 of 476
172 2-5. Driving information
Selecting tire chainsVehicles with 15-inch tires
Use the tire chains of correct size and type.
Use SAE Class “S” type radial tire chai ns except radial cable chains or
V-bar type chains.
Vehicles with 16-inch and 17-inch tires
Use the correct tire chain size when mounting the snow chains.
Chain size is regulated for each tire size.
Side chain: 0.12 in. (3 mm) in diameter
0.39 in. (10 mm) in width
1.18 in. (30 mm) in length
Cross chain: 0.16 in. (4 mm) in diameter
0.55 in. (14 mm) in width
0.98 in. (25 mm) in length
■When driving the vehicle
Accelerate the vehicle slowly and drive at a reduced speed suit-
able to road conditions.
■ When parking the vehicle
Park the vehicle and move the shift lever to P (automatic trans-
mission), 1 or R (manual transmission) without setting the park-
ing brake. The parking brake may freeze up, preventing it from
being released.
Page 177 of 476

177
2-5. Driving information
2
When driving
■
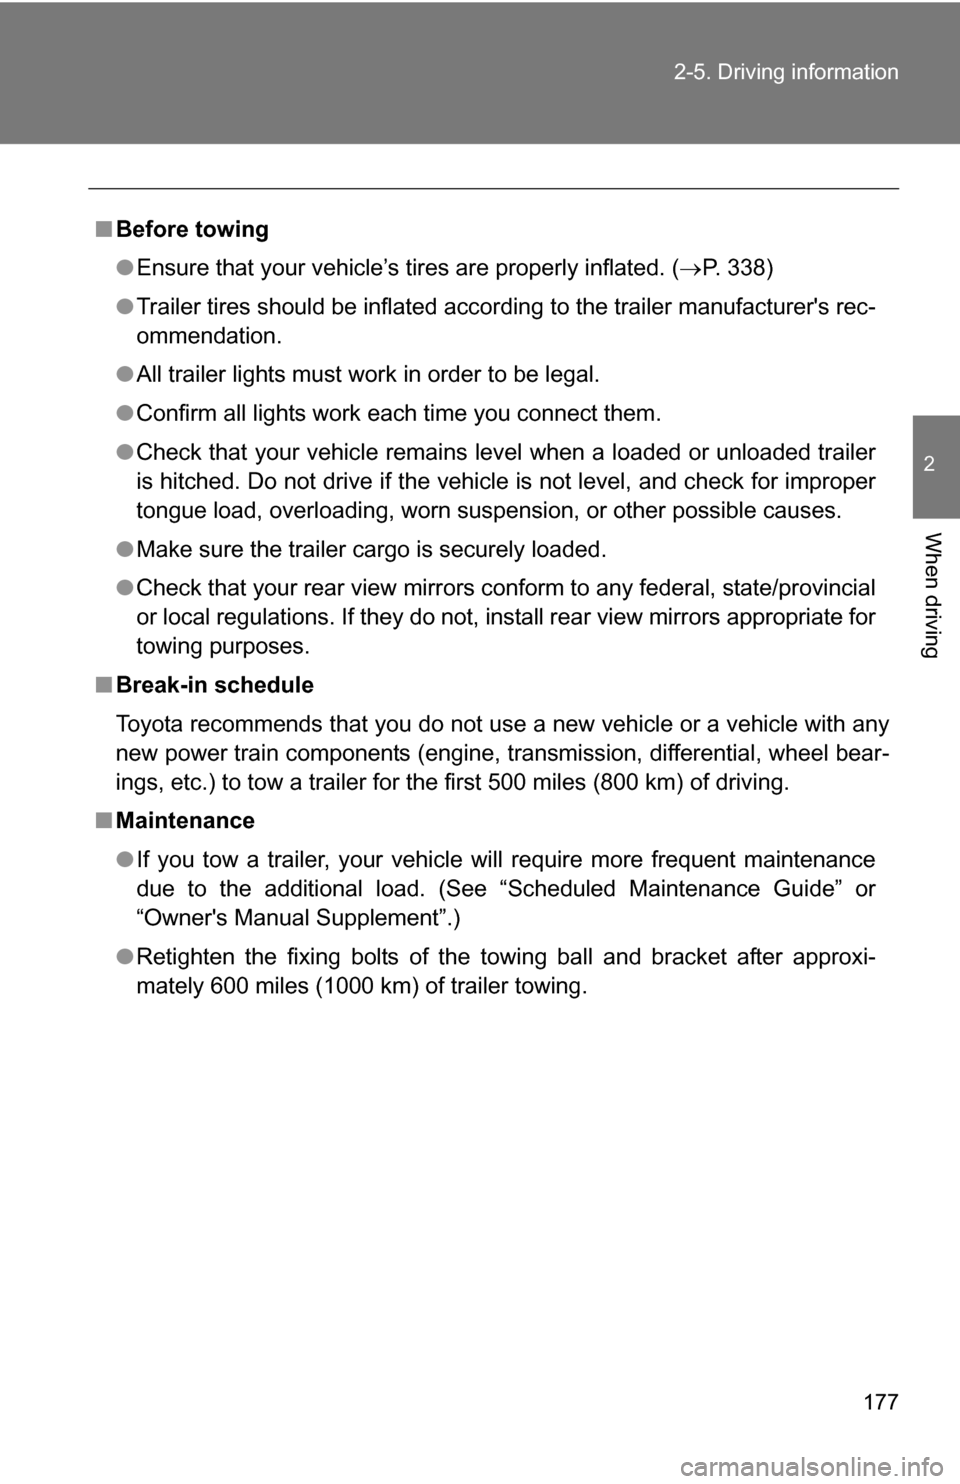
Before towing
●Ensure that your vehicle’s tires are properly inflated. ( P. 338)
● Trailer tires should be inflated according to the trailer manufacturer's rec-
ommendation.
● All trailer lights must work in order to be legal.
● Confirm all lights work each time you connect them.
● Check that your vehicle remains level when a loaded or unloaded trailer
is hitched. Do not drive if the vehicle is not level, and check for improper
tongue load, overloading, worn suspension, or other possible causes.
● Make sure the trailer cargo is securely loaded.
● Check that your rear view mirrors c onform to any federal, state/provincial
or local regulations. If they do not, inst all rear view mirrors appropriate for
towing purposes.
■ Break-in schedule
Toyota recommends that you do not use a new vehicle or a vehicle with any
new power train components (engine, transmission, differential, wheel bear-
ings, etc.) to tow a trailer for the first 500 miles (800 km) of driving.
■ Maintenance
●If you tow a trailer, your vehicle will require more frequent maintenance
due to the additional load. (See “Scheduled Maintenance Guide” or
“Owner's Manual Supplement”.)
● Retighten the fixing bolts of the towing ball and bracket after approxi-
mately 600 miles (1000 km) of trailer towing.
Page 181 of 476

181
2-5. Driving information
2
When driving
●
In order to maintain efficient engine braking and electrical charging
performance, do not use “D” (autom atic transmission) or the 5th
gear (manual transmission).
● Due to the added load of the trailer, your vehicle's engine may
overheat on hot days (at temperatures over 85°F [30°C]) when
driving up a long or steep grade. If the engine coolant temperature
gauge indicates overheating, immedi ately turn off the air condition-
ing (if in use), pull your vehicle off the road and stop in a safe spot.
( P. 416)
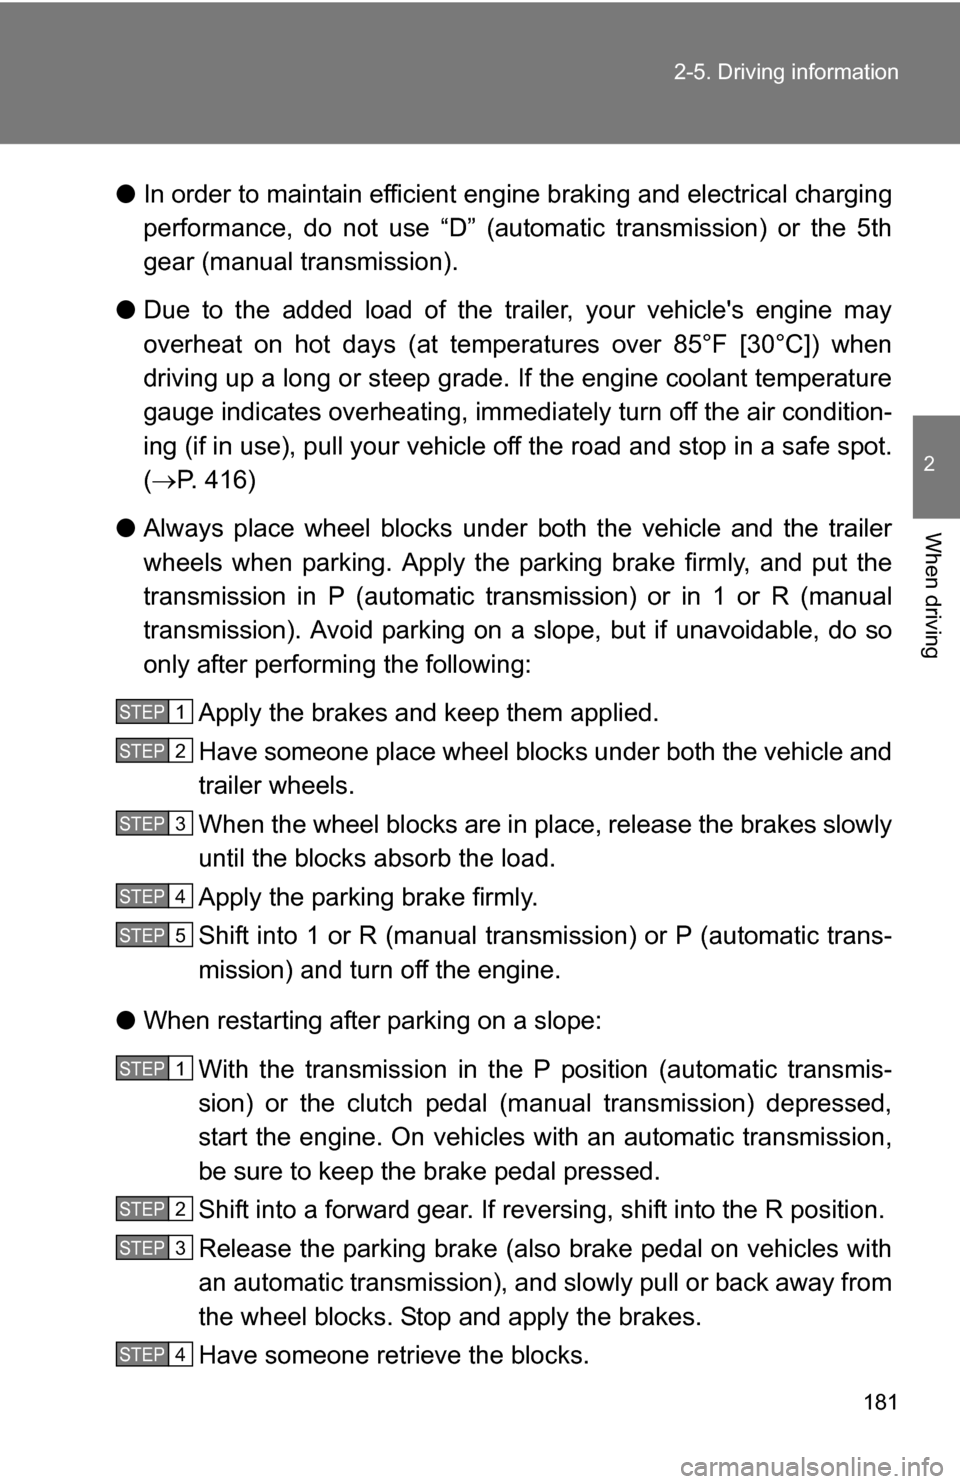
● Always place wheel blocks under both the vehicle and the trailer
wheels when parking. Apply the parking brake firmly, and put the
transmission in P (automatic transmission) or in 1 or R (manual
transmission). Avoid parking on a slope, but if unavoidable, do so
only after performing the following:
Apply the brakes and keep them applied.
Have someone place wheel blocks under both the vehicle and
trailer wheels.
When the wheel blocks are in pl ace, release the brakes slowly
until the blocks absorb the load.
Apply the parking brake firmly.
Shift into 1 or R (manual transmission) or P (automatic trans-
mission) and turn off the engine.
● When restarting after parking on a slope:
With the transmission in the P position (automatic transmis-
sion) or the clutch pedal (m anual transmission) depressed,
start the engine. On vehicles with an automatic transmission,
be sure to keep the brake pedal pressed.
Shift into a forward gear. If reversing, shift into the R position.
Release the parking brake (also brake pedal on vehicles with
an automatic transmission), and slowly pull or back away from
the wheel blocks. Stop and apply the brakes.
Have someone retrieve the blocks.
STEP 1
STEP 2
STEP 3
STEP 4
STEP 5
STEP 1
STEP 2
STEP 3
STEP 4