Page 355 of 476

355
4-3. Do-it-yourself maintenance
4
Maintenance and care
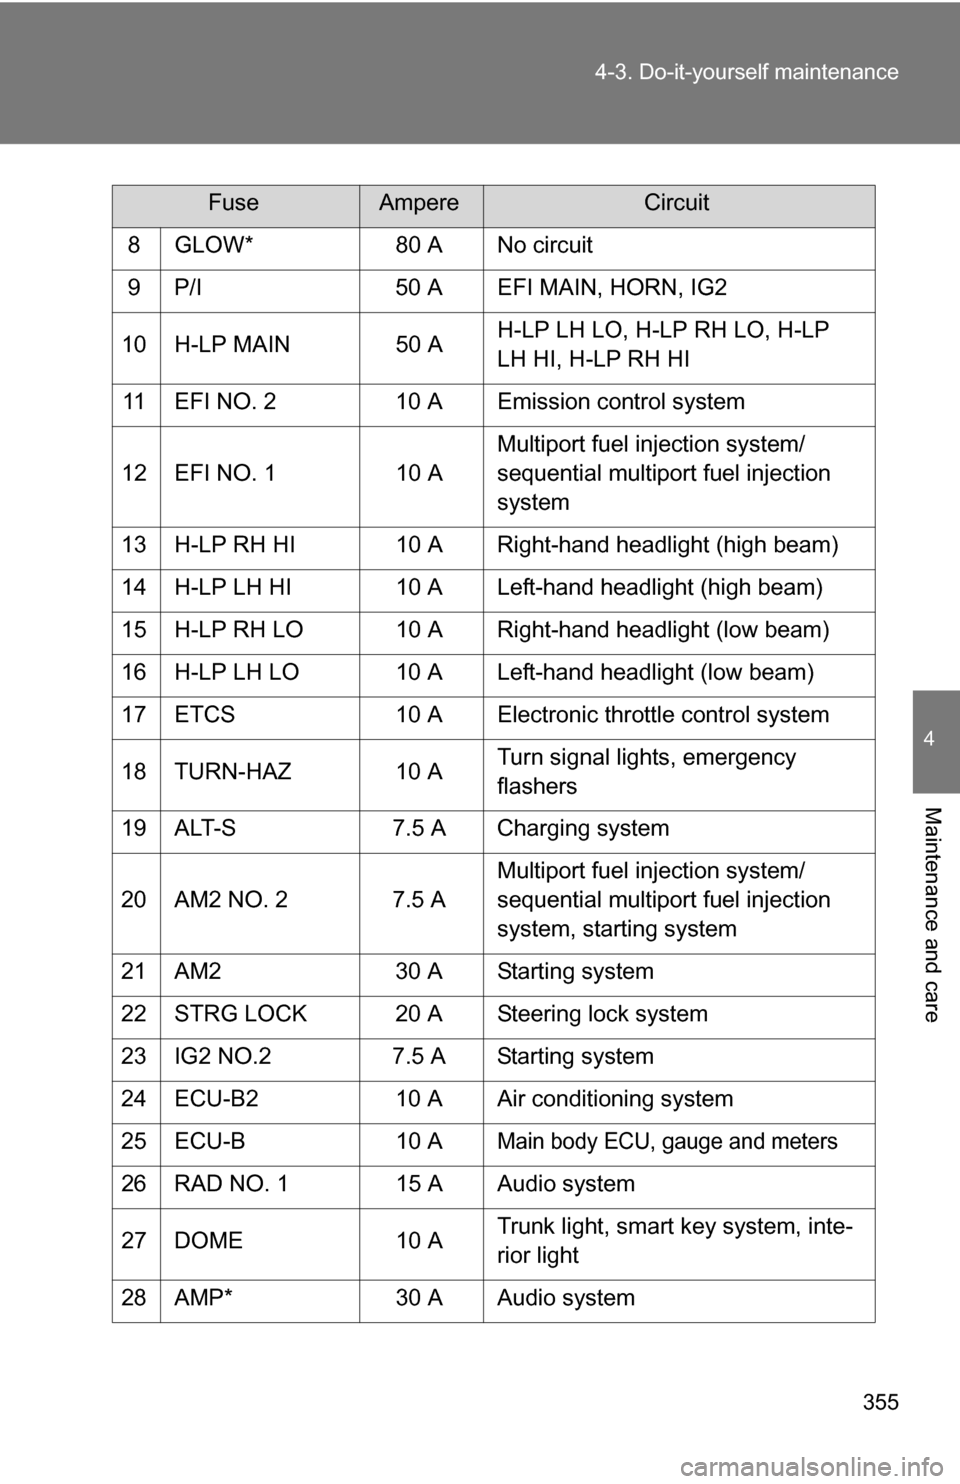
8 GLOW*
80 A No circuit
9 P/I 50 A EFI MAIN, HORN, IG2
10 H-LP MAIN 50 A H-LP LH LO, H-LP RH LO, H-LP
LH HI, H-LP RH HI
11 EFI NO. 2 10 A Emission control system
12 EFI NO. 1 10 AMultiport fuel injection system/
sequential multiport fuel injection
system
13 H-LP RH HI 10 A Right-hand headlight (high beam)
14 H-LP LH HI 10 A Left-hand headlight (high beam)
15 H-LP RH LO 10 A Right-hand headlight (low beam)
16 H-LP LH LO 10 A Left-hand headlight (low beam)
17 ETCS 10 A Electronic throttle control system
18 TURN-HAZ 10 A Turn signal lights, emergency
flashers
19 ALT-S 7.5 A Charging system
20 AM2 NO. 2 7.5 A Multiport fuel injection system/
sequential multiport fuel injection
system, starting system
21 AM2 30 A Starting system
22 STRG LOCK 20 A Steering lock system
23 IG2 NO.2 7.5 A Starting system
24 ECU-B2 10 A Air conditioning system
25 ECU-B 10 A
Main body ECU, gauge and meters
26 RAD NO. 1 15 A Audio system
27 DOME 10 A Trunk light, smart key system, inte-
rior light
28 AMP* 30 A Audio system
FuseAmpereCircuit
Page 360 of 476
360
4-3. Do-it-yourself maintenance
Light bulbs
You may replace the following bulbs yourself. The difficulty level of
replacement varies depending on the bulb. If necessary bulb
replacement seems difficult to perfor m, contact your Toyota dealer.
For more information about replacing other light bulbs, contact your
Toyota dealer.
■ Prepare a replacement light bulb.
Check the wattage of the light bulb being replaced. ( P. 433)
■ Front bulb locations
Headlight high beam
Headlight low beamFront turn signal and parking lights
Front fog lights (if equipped)
Front side marker lights
Page 361 of 476
361
4-3. Do-it-yourself maintenance
4
Maintenance and care
■
Rear bulb locations
Stop/tail and rear side marker lights Rear turn signal lights
Back-up lights
License plate lights
Page 364 of 476
364 4-3. Do-it-yourself maintenance
Unplug the bulb while depress-
ing the lock release.
■ Front turn signal/parking lights and front side marker lights
Turn the steering wheel away from the side being worked on.
This will move the tire to provide more room.
Remove the fender liner clips.STEP 4
STEP 1
STEP 2
Page 365 of 476
365
4-3. Do-it-yourself maintenance
4
Maintenance and care
Partly remove the fender liner
and turn the bulb base counter-
clockwise.
Front side marker light
Front turn signal/parking light
Remove the light bulb. Front side marker light
Front turn signal/parking lightSTEP 3
STEP 4
Page 366 of 476
366 4-3. Do-it-yourself maintenance
■Stop/tail and rear side marker lights, and rear turn signal
lights
Open the trunk lid.
Remove the luggage trim cover
clips. Partly remove the luggage
trim cover.
Type A Turn the bulb base counterclock-
wise.
Stop/tail and rear side marker
light
Rear turn signal light
Remove the light bulb. Stop/tail and rear side marker
light
Rear turn signal light
STEP 1
STEP 2
STEP 3
STEP 4
Page 367 of 476
367
4-3. Do-it-yourself maintenance
4
Maintenance and care
Type B
Turn the bulb base counterclock-
wise.
Stop/tail and rear side marker
light
Rear turn signal light
Remove the light bulb. Stop/tail and rear side marker
light
Rear turn signal light
■ Back-up light
Open the trunk lid and remove
the cover.
Turn the bulb base counterclock-
wise.
STEP 3
STEP 4
STEP 1
STEP 2
Page 372 of 476
372
5-1. Essential information
Emergency flashers
NOTICE
■To prevent battery discharge
Do not leave the emergency flashers on longer than necessary when the
engine is not running.
Use the emergency flashers if th e vehicle malfunctions or is
involved in an accident.
Press the switch to flash all
the turn signal lights. To turn
them off, press the switch
once again.