Page 126 of 476
126
2-1. Driving procedures
Engine (ignition) switch (vehicles with smart key system)
Performing the following operations when carrying the electronic
key on your person starts the en gine or changes “ENGINE START
STOP” switch modes.
■ Starting the engine
Check that the parking brake is set.
Check that the shift lever is set in P.
Sit in the driver’s seat and firmly depress the brake pedal.
The “ENGINE START STOP” switch indicator turns green. If the
indicator does not turn green, the engine cannot be started.
Press the “ENGINE START
STOP” switch.
The engine will crank until it
starts or for up to 25 seconds,
whichever is less. If you press
and hold the “ENGINE START
STOP” switch, the engine will
keep cranking for about 30
seconds maximum.
Continue depressing the brake
pedal until the engine is com-
pletely started.
The engine can be started
from any mode.
STEP 1
STEP 2
STEP 3
STEP 4
Page 129 of 476

129
2-1. Driving procedures
2
When driving
CAUTION
■
When starting the engine
Always start the engine while sitting in the driver's seat. Do not depress the
accelerator pedal while starting the engine under any circumstances.
Doing so may cause an accident resulting in death or serious injury.
■ Stopping the engine in an emergency
If you want to stop the engine in an emergency while driving the vehicle,
push and hold the “ENGINE START STOP” switch for more than 3 seconds.
However, do not touch the "ENGINE START STOP" switch while driving
except in an emergency. Turning the engine off while driving will not cause
loss of steering or braking control, but the power assist to these systems will
be lost. This will make it more difficult to steer and brake, so you should pull
over and stop the vehicle as soon as it is safe to do so.
NOTICE
■To prevent battery discharge
Do not leave the “ENGINE START STOP” switch in ACCESSORY or IGNI-
TION ON mode for long periods without the engine running.
■ When starting the engine
●Do not race a cold engine.
● If the engine becomes difficult to start or stalls frequently, have the engine
checked immediately.
Page 136 of 476
136 2-1. Driving procedures
■Shift position uses
*1: Shifting to the D position allows the system to select a gear suitable
driving conditions. Setting the shift lever to the D position is recom-
mended for normal driving.
*2: Selecting shift ranges using S mode restricts the upper limit of thepossible gear ranges, controls engine braking forces, and prevents
unnecessary upshifting.
Shift positionFunction
Standard typeMulti-mode type
P Parking the vehicle or starting the engine
R Reversing
N Neutral
D Normal driving
*1
S S mode driving*2
( P. 137)
3 Position for engine
braking
2 Position for more
powerful engine braking
L Position for maximum
engine braking
Page 150 of 476

150 2-2. Instrument cluster
CAUTION
■If a safety system warning light does not come on
Should a safety system light such as the ABS or the SRS airbag warning
light not come on when you start the engine, this could mean that these sys-
tems are not available to help protect you in an accident, which could result
in death or serious injury. Have the vehicle inspected by your Toyota dealer
immediately if this occurs.
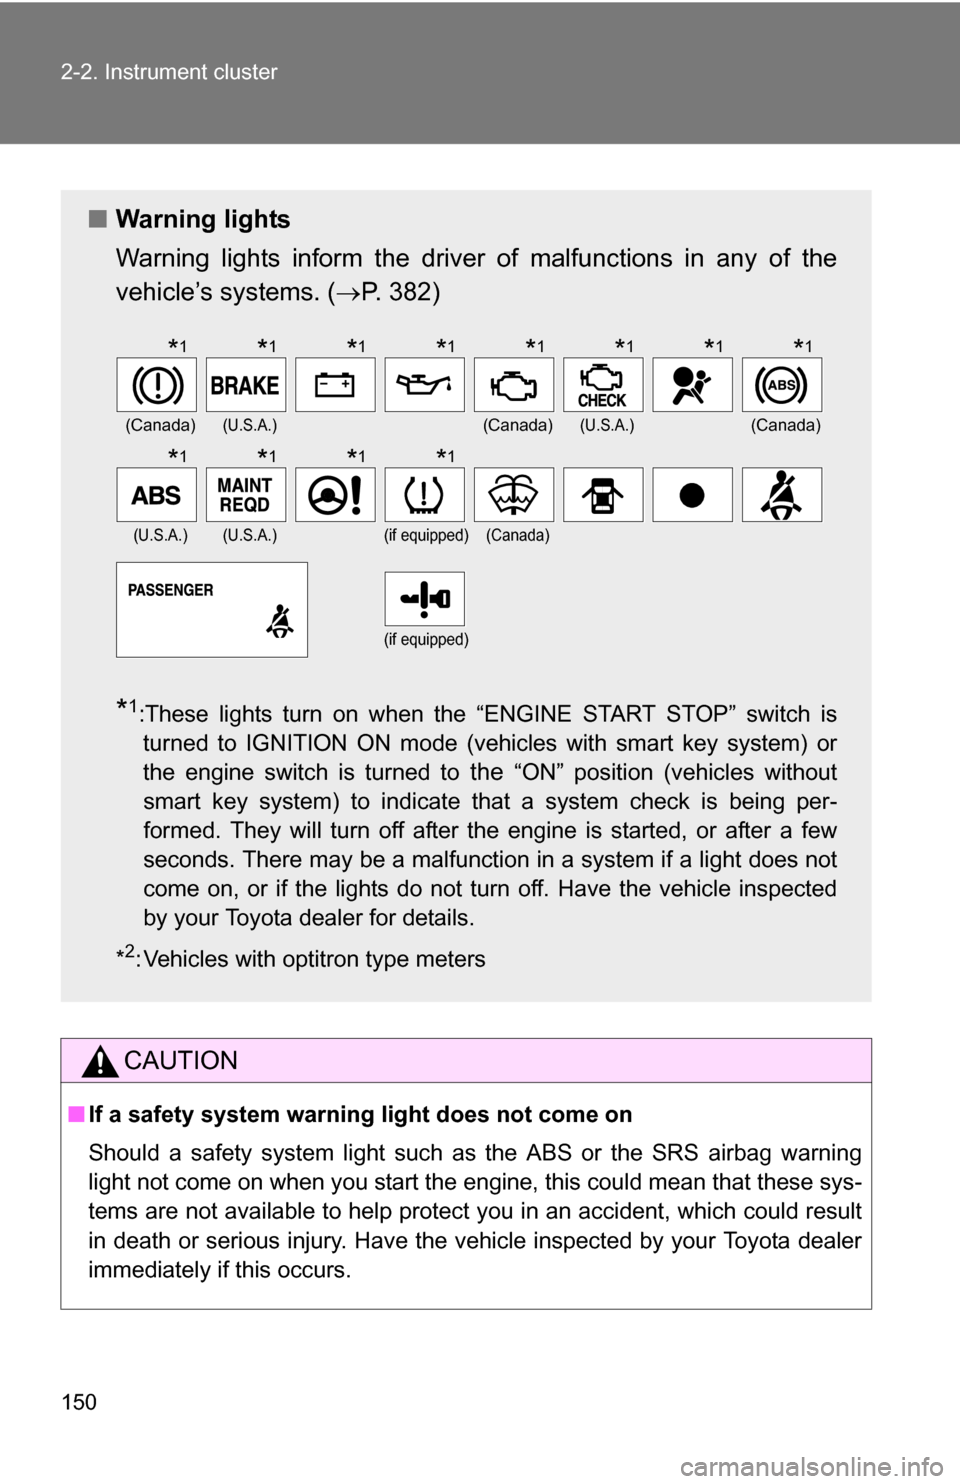
■ Warning lights
Warning lights inform the driver of malfunctions in any of the
vehicle’s systems. ( P. 382)
*1:These lights turn on when the “ENGINE START STOP” switch is
turned to IGNITION ON mode (vehicles with smart key system) or
the engine switch is turned to
the “ON” position (vehicles without
smart key system) to indicate that a system check is being per-
formed. They will turn off after the engine is started, or after a few
seconds. There may be a malfunction in a system if a light does not
come on, or if the lights do not turn off. Have the vehicle inspected
by your Toyota dealer for details.
*
2: Vehicles with optitron type meters
(Canada)(U.S.A.)(Canada)(U.S.A.)(Canada)
(U.S.A.)(U.S.A.)(if equipped)(Canada)
(if equipped)
*1*1*1*1*1*1*1*1
*1*1*1*1
Page 153 of 476
153
2-2. Instrument cluster
2
When driving
●
Average vehicle speed
● Elapsed time
Setting the clock
Display the clock when the vehicle is stopped. ( P. 151)
Press and hold the display but-
ton to enter the adjustment mode
for the clock.
Press the display button to adjust the minutes.
After adjusting the minutes, wait 5 seconds to allow the minutes to
be automatically input.
Press the display button to adjust the hours.
After adjusting the hours, wait 5 seconds to allow the hours to be
automatically input.
Displays the average vehicle speed since the
engine was started or since the function was
reset.
The function can be reset by pressing the display but-
ton for longer than one second when the average
vehicle speed is displayed.
Displays the elapsed ti me since the engine was
started or since the function was reset.
The function can be reset by pressing the display but-
ton for longer than one second when the elapsed time
is displayed.
STEP 1
STEP 2
STEP 3
STEP 4
Page 159 of 476
159
2-3. Operating the lights and wipers
2
When driving
■
The windshield wipers and w ashers can be operated when
Vehicles with smart key system
The “ENGINE START STOP” switch is in IGNITION ON mode.
Vehicles without smart key system
The engine switch is in the “ON” position.
■ If no windshield washer fluid sprays
Check that the washer nozzles are not blocked and if there is washer fluid in
the windshield washer fluid reservoir.
NOTICE
■When the windshield is dry
Do not use the wipers, as they may damage the windshield.
■ When there is no washer fluid spray from the nozzle
Damage to the washer fluid pump may be caused if the lever is pulled
toward you and held continually.
■ When a nozzle becomes blocked
Do not try to clear it with a pin or other object. The nozzle will be damaged.
Page 205 of 476
205
3-2. Using the audio system
3
Interior features
Using the radio
Setting station presets (excluding XM® Satellite Radio)
Search for desired stations by turning or pressing “
”
or “ ” on .
Press and hold the button (from to ) the station
is to be set to until you hear a beep.
Scanning radio stations (excluding XM® Satellite Radio)
■ Scanning the preset radio stations
Press and hold until you hear a beep.
Preset stations will be played for 5 seconds each.
When the desired station is reached, press once
again.
Vol um e
Scanning for
receivable stations Station selector
Seeking the frequency Adjusting the frequency (AM, FM
mode) or channel (SAT mode)
AM SAT/FM
mode buttonsPower
Displaying radio text
messages
Changing the channel
STEP 1
STEP 2
STEP 1
STEP 2
Page 222 of 476

222 3-2. Using the audio system
■MP3 and WMA files
MP3 (MPEG Audio LAYER3) is a standard audio compression format.
Files can be compressed to approximately 1/10 of their original size by using
MP3 compression.
WMA (Windows Media
TM Audio) is a Microsoft audio compression format.
This format compresses audio data to a size smaller than that of the MP3
format.
There is a limit to the MP3 and WMA file standards and to the media/formats
recorded by them that can be used.
● MP3 file compatibility
• Compatible standards
MP3 (MPEG1 LAYER3, MPEG2 LSF LAYER3)
• Compatible sampling frequencies MPEG1 LAYER3: 32, 44.1, 48 (kHz)
MPEG2 LSF LAYER3: 16, 22.05, 24 (kHz)
• Compatible bit rates (compatible with VBR) MPEG1 LAYER3: 64, 80, 96, 112, 128, 160, 192, 224, 256, 320 (kbps)
MPEG2 LSF LAYER3: 64, 80, 96, 112, 128, 144, 160 (kbps)
• Compatible channel modes: stereo, joint stereo, dual channel and monaural
● WMA file compatibility
• Compatible standards
WMA Ver. 7, 8, 9
• Compatible sampling frequencies 32, 44.1, 48 (kHz)
• Compatible bit rates (only compatible with 2-channel playback) Ver. 7, 8: CBR 48, 64, 80, 96, 128, 160, 192 (kbps)
Ver. 9: CBR 48, 64, 80, 96, 128, 160, 192, 256, 320 (kbps)
● Compatible media
Media that can be used for MP3 and WMA playback are CD-Rs and CD-
RWs.
Playback in some instances may not be possible, depending on the status
of the CD-R or CD-RW. Playback may not be possible or the audio may
jump if the disc is scratched or marked with fingerprints.