2010 SUZUKI SX4 brake
[x] Cancel search: brakePage 203 of 297
6-4
VEHICLE LOADING AND TOWING
80J23-03E
80J2079
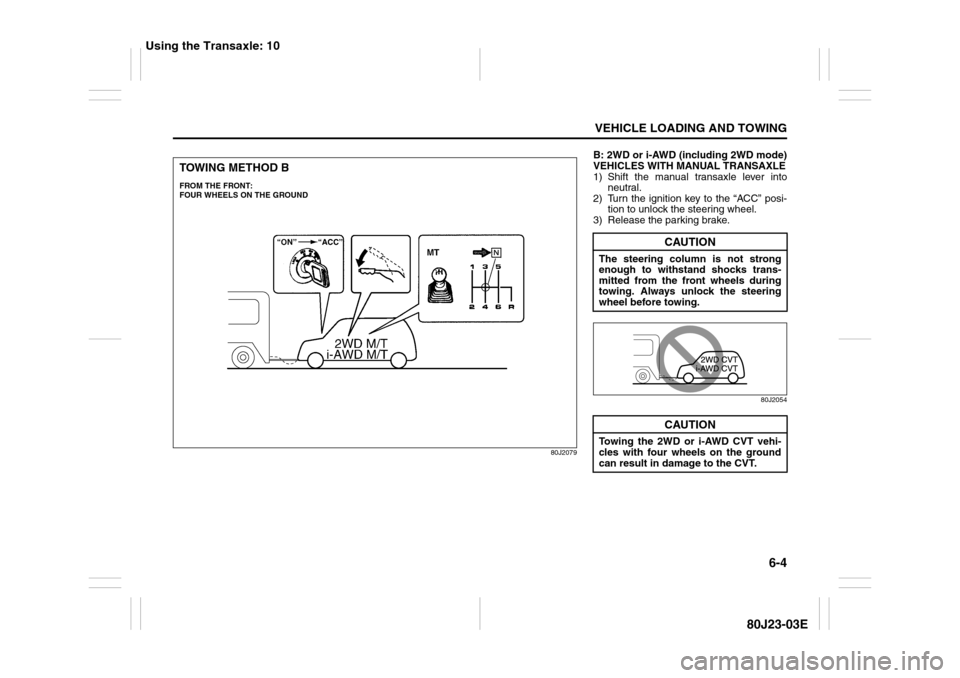
TOWING METHOD BFROM THE FRONT:
FOUR WHEELS ON THE GROUND
B: 2WD or i-AWD (including 2WD mode)
VEHICLES WITH MANUAL TRANSAXLE
1) Shift the manual transaxle lever into
neutral.
2) Turn the ignition key to the “ACC” posi-
tion to unlock the steering wheel.
3) Release the parking brake.
80J2054
CAUTION
The steering column is not strong
enough to withstand shocks trans-
mitted from the front wheels during
towing. Always unlock the steering
wheel before towing.
CAUTION
Towing the 2WD or i-AWD CVT vehi-
cles with four wheels on the ground
can result in damage to the CVT.
Using the Transaxle: 10
Page 205 of 297

INSPECTION AND MAINTENANCE
7
80J23-03E
60G410
INSPECTION AND MAINTENANCEMaintenance Schedule ....................................................... 7-2
Periodic Maintenance Schedule ........................................ 7-3
Maintenance Recommended under Severe Driving
Conditions ........................................................................... 7-7
Drive Belt ............................................................................. 7-11
Engine Oil and Filter ........................................................... 7-11
Engine Coolant .................................................................... 7-14
Air Cleaner ........................................................................... 7-16
Spark Plugs ......................................................................... 7-16
Gear Oil ................................................................................ 7-18
Clutch Pedal ........................................................................ 7-19
Continuously Variable Transaxle (CVT) Fluid .................. 7-20
Brakes .................................................................................. 7-21
Steering Wheel .................................................................... 7-23
Tires ...................................................................................... 7-24
Battery .................................................................................. 7-35
Fuses .................................................................................... 7-36
Headlight Aiming ................................................................. 7-39
Bulb Replacement ............................................................... 7-40
Wiper Blades ....................................................................... 7-46
Windshield Washer Fluid ................................................... 7-50
Air Conditioning System .................................................... 7-50
Page 206 of 297
7-1INSPECTION AND MAINTENANCE
80J23-03E
60A187S
WARNING
You should take extreme care when
working on your vehicle to prevent
accidental injury. Here are a few pre-
cautions that you should be espe-
cially careful to observe:
To prevent damage or unintended
inflation of the air bag system, be
sure the battery is disconnected
and the ignition switch has been in
the “LOCK” position for at least 90
seconds before performing any
electrical service work on your
SUZUKI. Do not touch air bag sys-
tem components or wires. The
wires are wrapped with yellow tape
or yellow tubing, and the couplers
are yellow for easy identification.
(Continued)
WARNING
(Continued)
Do not leave the engine running in
garages or other confined areas.
When the engine is running, keep
hands, clothing, tools and other
objects away from the moving fan
and drive belt.
When it is necessary to do service
work with the engine running, make
sure that the parking brake is set
fully and the transaxle is in Neutral
(for manual transaxle vehicles) or
Park (for CVT vehicles).
Do not touch ignition wires or other
ignition system parts when starting
the engine or when the engine is
running, or you could receive an
electric shock.
Be careful not to touch a hot
engine, exhaust manifold and
pipes, muffler, radiator and water
hoses.
Do not allow smoking, sparks or
flames around fuel or the battery.
Flammable fumes are present.
Do not get under your vehicle if it is
supported only with the portable
jack provided in your vehicle.
(Continued)
WARNING
(Continued)
Be careful not to cause accidental
short circuits between the positive
and negative battery terminals.
Keep used oil, engine coolant and
other fluids away from children and
pets. Dispose of used fluids prop-
erly; never pour them on the
ground, into sewers, etc.
Highway Driving: NO
Driving on Hills: NO
Page 210 of 297
7-5INSPECTION AND MAINTENANCE
80J23-03E
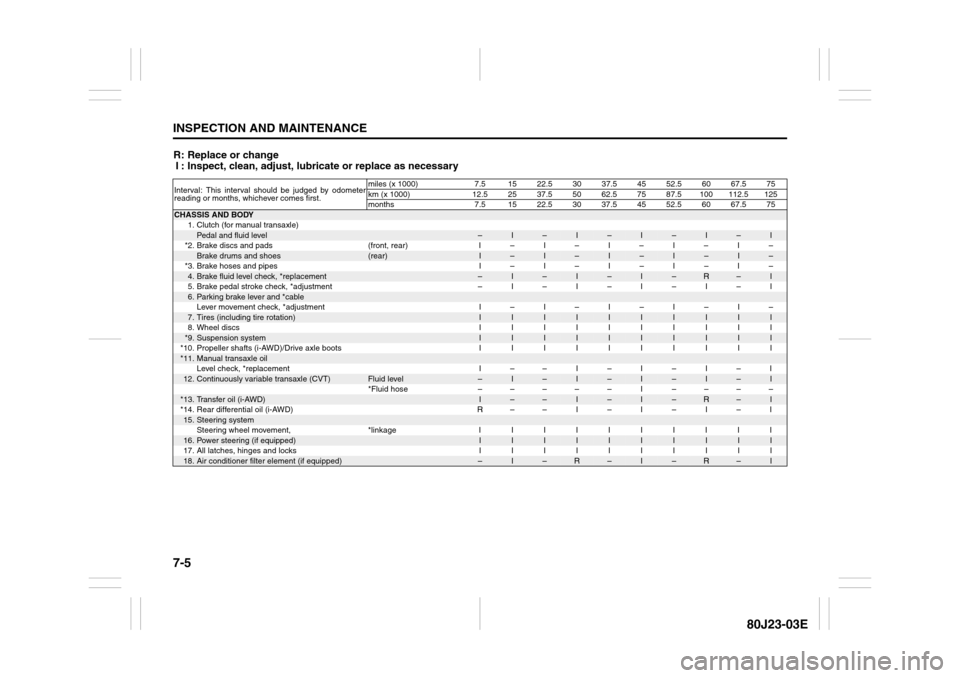
R: Replace or change
I : Inspect, clean, adjust, lubricate or replace as necessaryInterval: This interval should be judged by odometer
reading or months, whichever comes first.miles (x 1000) 7.5 15 22.5 30 37.5 45 52.5 60 67.5 75
km (x 1000) 12.5 25 37.5 50 62.5 75 87.5 100 112.5 125
months 7.5 15 22.5 30 37.5 45 52.5 60 67.5 75CHASSIS AND BODY
1. Clutch (for manual transaxle)
Pedal and fluid level
–
I
–
I
–
I
–
I
–
I
*2. Brake discs and pads (front, rear) I – I – I – I – I –
Brake drums and shoes
(rear)
I
–
I
–
I
–
I
–
I
–
*3. Brake hoses and pipes I – I – I – I – I –
4.Brake fluid level check, *replacement
–
I
–
I
–
I
–
R
–
I
5. Brake pedal stroke check, *adjustment – I – I – I – I – I
6.Parking brake lever and *cableLever movement check, *adjustment I – I – I – I – I –7.Tires (including tire rotation)
I
I
I
I
I
I
I
I
I
I
8. Wheel discs I I I I I I I I I I
*9.
Suspension system
I
I
I
I
I
I
I
I
I
I
*10. Propeller shafts (i-AWD)/Drive axle boots I I I I I I I I I I
*11.
Manual transaxle oilLevel check, *replacement I – – I – I – I – I
12.
Continuously variable transaxle (CVT)
Fluid level
–
I
–
I
–
I
–
I
–
I
*Fluid hose ––––– I ––––
*13.
Transfer oil (i-AWD)
I
–
–
I
–
I
–
R
–
I
*14. Rear differential oil (i-AWD) R – – I – I – I – I
15.
Steering systemSteering wheel movement, *linkage I I I I I I I I I I
16.
Power steering (if equipped)
I
I
I
I
I
I
I
I
I
I
17. All latches, hinges and locks I I I I I I I I I I
18.
Air conditioner filter element (if equipped)
–
I
–
R
–
I
–
R
–
I
Page 211 of 297

7-6
INSPECTION AND MAINTENANCE
80J23-03E
R: Replace or change
I : Inspect, clean, adjust, lubricate or replace as necessary
NOTE:
This table shows the service schedule up to 250000 km (150000 miles).
Beyond 250000 km (150000 miles), perform the same services at the same intervals shown in the chart.
Beyond 250000 km (150000 miles), the maintenance services enclosed with a rectangle are required.Interval: This interval should be judged by odometer
reading or months, whichever comes first.miles (x 1000) 82.5 90 97.5 105 112.5 120 127.5 135 142.5 150
km (x 1000) 137.5 150 162.5 175 187.5 200 212.5 225 237.5 250
months 82.5 90 97.5 105 112.5 120 127.5 135 142.5 150CHASSIS AND BODY
1. Clutch (for manual transaxle)
Pedal and fluid level
–
I
–
I
–
I
–
I
–
I
*2. Brake discs and pads (front, rear) I – I – I – I – I –
Brake drums and shoes
(rear)
I
–
I
–
I
–
I
–
I
–
*3. Brake hoses and pipes I – I – I – I – I –
4.Brake fluid level check, *replacement
–
I
–
I
–
R
–
I
–
I
5. Brake pedal stroke check, *adjustment – I – I – I – I – I
6.Parking brake lever and *cableLever movement check, *adjustment I – I – I – I – I –7.Tires (including tire rotation)
I
I
I
I
I
I
I
I
I
I
8. Wheel discs I I I I I I I I I I
*9.
Suspension system
I
I
I
I
I
I
I
I
I
I
*10. Propeller shafts (i-AWD)/Drive axle boots I I I I I I I I I I
*11.
Manual transaxle oilLevel check, *replacement – R – I – I – I – I
12.
Continuously variable transaxle (CVT)
Fluid level
–
I
–
I
–
I
–
I
–
I
*Fluid hose – I ––––– I ––
*13.
Transfer oil (i-AWD)
–
I
–
I
–
R
–
I
–
I
*14. Rear differential oil (i-AWD) – I – I – I – I – I
15.
Steering systemSteering wheel movement, *linkage I I I I I I I I I I
16.
Power steering (if equipped)
I
I
I
I
I
I
I
I
I
I
17. All latches, hinges and locks I I I I I I I I I I
18.
Air conditioner filter element (if equipped)
–
R
–
I
–
R
–
I
–
R
Page 214 of 297
7-9INSPECTION AND MAINTENANCE
80J23-03E
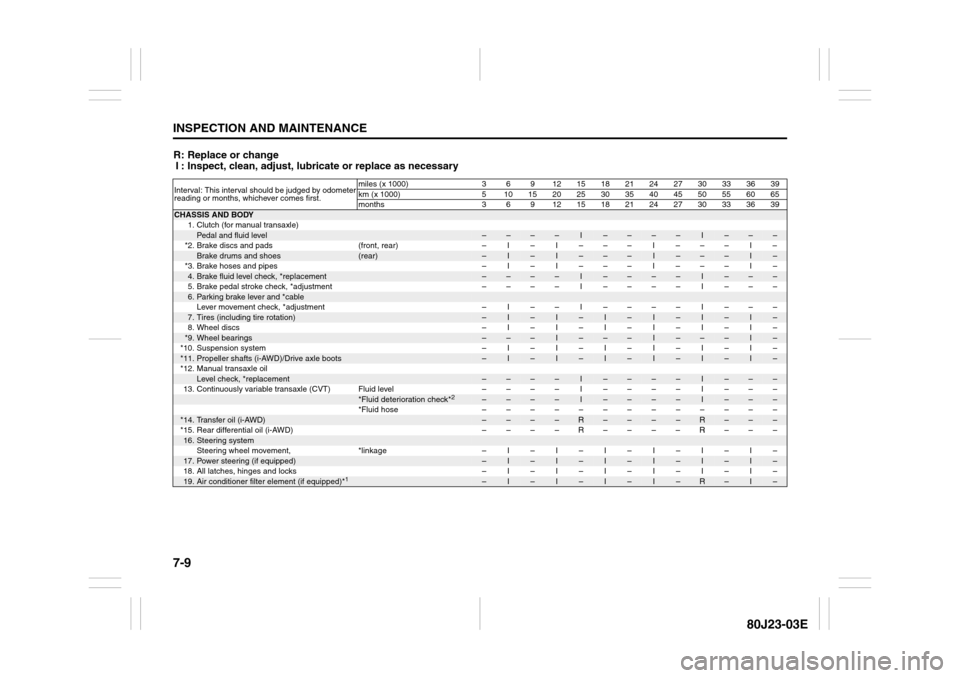
R: Replace or change
I : Inspect, clean, adjust, lubricate or replace as necessaryInterval: This interval should be judged by odometer
reading or months, whichever comes first.miles (x 1000) 3 6 9 12 15 18 21 24 27 30 33 36 39
km (x 1000) 5 101520253035404550556065
months 3 6 9 12151821242730333639CHASSIS AND BODY
1. Clutch (for manual transaxle)
Pedal and fluid level
–
–
–
–
I
–
–
–
–
I
–
–
–
*2. Brake discs and pads (front, rear) – I – I – – – I – – – I –
Brake drums and shoes
(rear)
–
I
–
I
–
–
–
I
–
–
–
I
–
*3. Brake hoses and pipes – I – I – – – I – – – I –
4.Brake fluid level check, *replacement
–
–
–
–
I
–
–
–
–
I
–
–
–
5. Brake pedal stroke check, *adjustment – – – – I – – – – I – – –
6.Parking brake lever and *cableLever movement check, *adjustment – I – – I – – – – I – – –7.Tires (including tire rotation)
–
I
–
I
–
I
–
I
–
I
–
I
–
8. Wheel discs – I – I – I – I – I – I –
*9.
Wheel bearings
–
–
–
I
–
–
–
I
–
–
–
I
–
*10. Suspension system – I – I – I – I – I – I –
*11.
Propeller shafts (i-AWD)/Drive axle boots
–
I
–
I
–
I
–
I
–
I
–
I
–
*12. Manual transaxle oil
Level check, *replacement
–
–
–
–
I
–
–
–
–
I
–
–
–
13. Continuously variable transaxle (CVT) Fluid level – – – – I – – – – I – – –
*Fluid deterioration check*
2
–
–
–
–
I
–
–
–
–
I
–
–
–
*Fluid hose –––––––––––––
*14.
Transfer oil (i-AWD)
–
–
–
–
R
–
–
–
–
R
–
–
–
*15. Rear differential oil (i-AWD) – – – – R – – – – R – – –
16.
Steering systemSteering wheel movement, *linkage – I – I – I – I – I – I –
17.
Power steering (if equipped)
–
I
–
I
–
I
–
I
–
I
–
I
–
18. All latches, hinges and locks – I – I – I – I – I – I –
19.
Air conditioner filter element (if equipped)*
1
–
I
–
I
–
I
–
I
–
R
–
I
–
Page 215 of 297
7-10
INSPECTION AND MAINTENANCE
80J23-03E
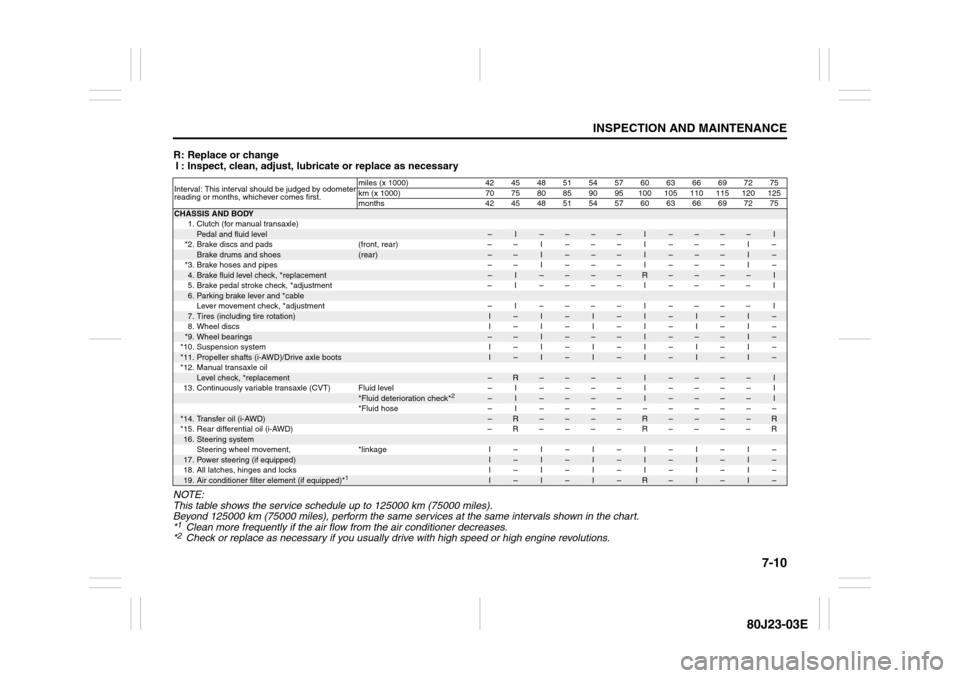
R: Replace or change
I : Inspect, clean, adjust, lubricate or replace as necessary
NOTE:
This table shows the service schedule up to 125000 km (75000 miles).
Beyond 125000 km (75000 miles), perform the same services at the same intervals shown in the chart.
*1Clean more frequently if the air flow from the air conditioner decreases.
*2Check or replace as necessary if you usually drive with high speed or high engine revolutions.
Interval: This interval should be judged by odometer
reading or months, whichever comes first.miles (x 1000) 42 45 48 51 54 57 60 63 66 69 72 75
km (x 1000) 70 75 80 85 90 95 100 105 110 115 120 125
months 42 45 48 51 54 57 60 63 66 69 72 75CHASSIS AND BODY
1. Clutch (for manual transaxle)
Pedal and fluid level
–
I
–
–
–
–
I
–
–
–
–
I
*2. Brake discs and pads (front, rear) – – I – – – I – – – I –
Brake drums and shoes
(rear)
–
–
I
–
–
–
I
–
–
–
I
–
*3. Brake hoses and pipes – – I – – – I – – – I –
4.Brake fluid level check, *replacement
–
I
–
–
–
–
R
–
–
–
–
I
5.Brake pedal stroke check, *adjustment – I –––– I –––– I
6.Parking brake lever and *cableLever movement check, *adjustment – I –––– I –––– I7.Tires (including tire rotation)
I
–
I
–
I
–
I
–
I
–
I
–
8.Wheel discs I–I–I–I–I–I–
*9.
Wheel bearings
–
–
I
–
–
–
I
–
–
–
I
–
*10. Suspension system I – I – I – I – I – I –
*11.
Propeller shafts (i-AWD)/Drive axle boots
I
–
I
–
I
–
I
–
I
–
I
–
*12. Manual transaxle oil
Level check, *replacement
–
R
–
–
–
–
I
–
–
–
–
I
13. Continuously variable transaxle (CVT) Fluid level – I–––– I –––– I
*Fluid deterioration check*
2
–
I
–
–
–
–
I
–
–
–
–
I
*Fluid hose – I ––––––––––
*14.
Transfer oil (i-AWD)
–
R
–
–
–
–
R
–
–
–
–
R
*15.Rear differential oil (i-AWD) –R––––R––––R
16.
Steering systemSteering wheel movement, *linkage I – I – I – I – I – I –
17.
Power steering (if equipped)
I
–
I
–
I
–
I
–
I
–
I
–
18. All latches, hinges and locks I – I – I – I – I – I –
19.
Air conditioner filter element (if equipped)*
1
I
–
I
–
I
–
R
–
I
–
I
–
Page 224 of 297
7-19INSPECTION AND MAINTENANCE
80J23-03E
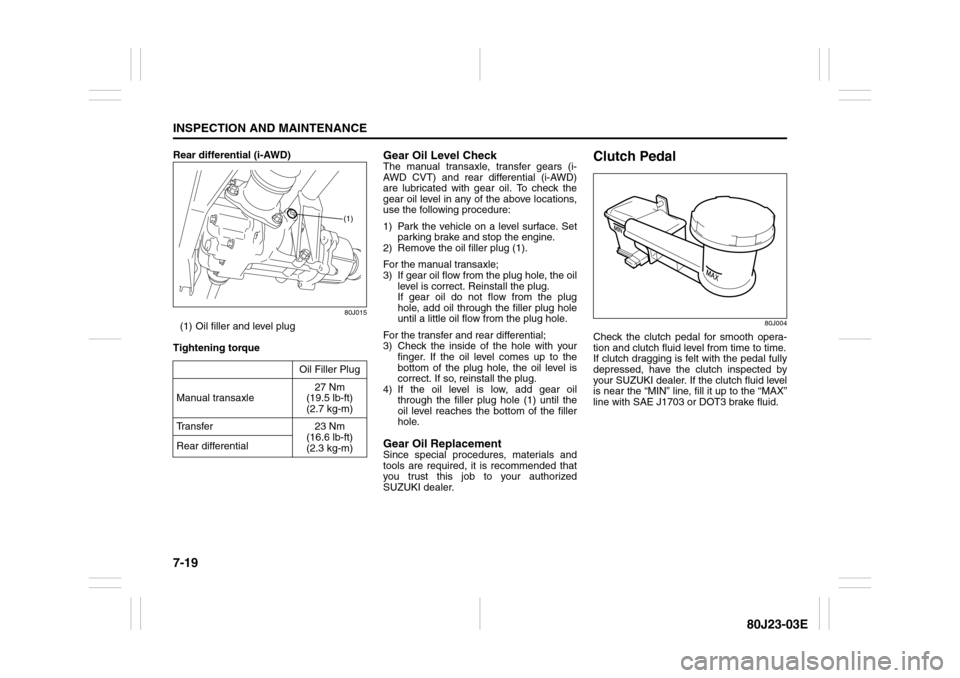
Rear differential (i-AWD)
80J015
(1) Oil filler and level plug
Tightening torque
Gear Oil Level CheckThe manual transaxle, transfer gears (i-
AWD CVT) and rear differential (i-AWD)
are lubricated with gear oil. To check the
gear oil level in any of the above locations,
use the following procedure:
1) Park the vehicle on a level surface. Set
parking brake and stop the engine.
2) Remove the oil filler plug (1).
For the manual transaxle;
3) If gear oil flow from the plug hole, the oil
level is correct. Reinstall the plug.
If gear oil do not flow from the plug
hole, add oil through the filler plug hole
until a little oil flow from the plug hole.
For the transfer and rear differential;
3) Check the inside of the hole with your
finger. If the oil level comes up to the
bottom of the plug hole, the oil level is
correct. If so, reinstall the plug.
4) If the oil level is low, add gear oil
through the filler plug hole (1) until the
oil level reaches the bottom of the filler
hole.Gear Oil ReplacementSince special procedures, materials and
tools are required, it is recommended that
you trust this job to your authorized
SUZUKI dealer.
Clutch Pedal
80J004
Check the clutch pedal for smooth opera-
tion and clutch fluid level from time to time.
If clutch dragging is felt with the pedal fully
depressed, have the clutch inspected by
your SUZUKI dealer. If the clutch fluid level
is near the “MIN” line, fill it up to the “MAX”
line with SAE J1703 or DOT3 brake fluid. Oil Filler Plug
Manual transaxle27 Nm
(19.5 lb-ft)
(2.7 kg-m)
Transfer 23 Nm
(16.6 lb-ft)
(2.3 kg-m) Rear differential
(1)