2010 SUZUKI SX4 ECU
[x] Cancel search: ECUPage 56 of 297
2-39BEFORE DRIVING
80J23-03E
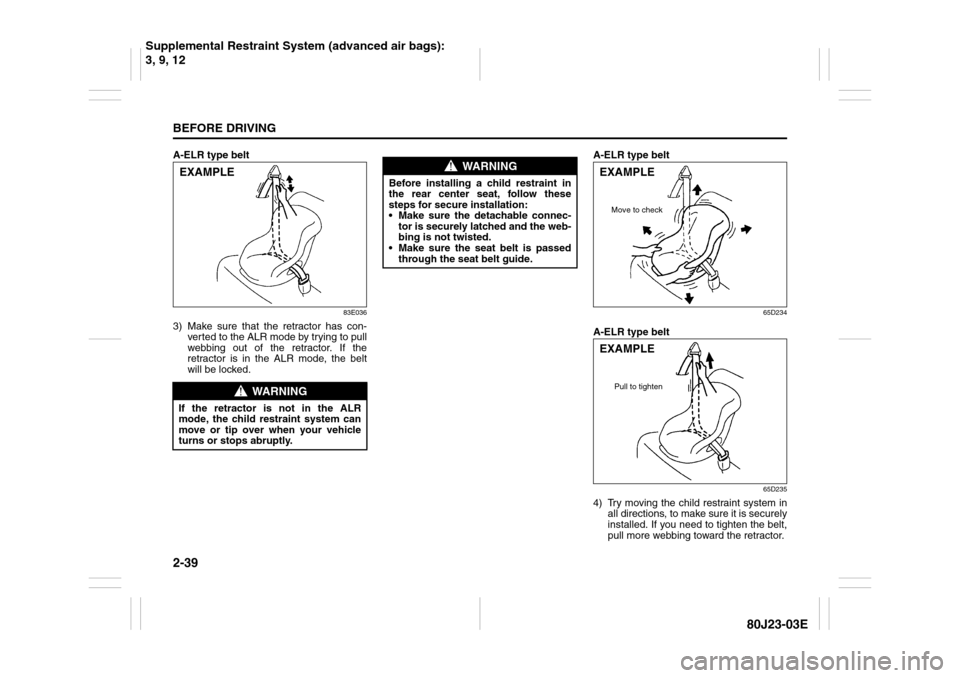
A-ELR type belt
83E036
3) Make sure that the retractor has con-
ver ted to the ALR mode by trying to pull
webbing out of the retractor. If the
retractor is in the ALR mode, the belt
will be locked.A-ELR type belt
65D234
A-ELR type belt
65D235
4) Try moving the child restraint system in
all directions, to make sure it is securely
installed. If you need to tighten the belt,
pull more webbing toward the retractor.
WARNING
If the retractor is not in the ALR
mode, the child restraint system can
move or tip over when your vehicle
turns or stops abruptly.EXAMPLE
WARNING
Before installing a child restraint in
the rear center seat, follow these
steps for secure installation:
Make sure the detachable connec-
tor is securely latched and the web-
bing is not twisted.
Make sure the seat belt is passed
through the seat belt guide.
EXAMPLE
Move to check
EXAMPLE
Pull to tighten
Supplemental Restraint System (advanced air bags):
3, 9, 12
Page 57 of 297
2-40
BEFORE DRIVING
80J23-03E
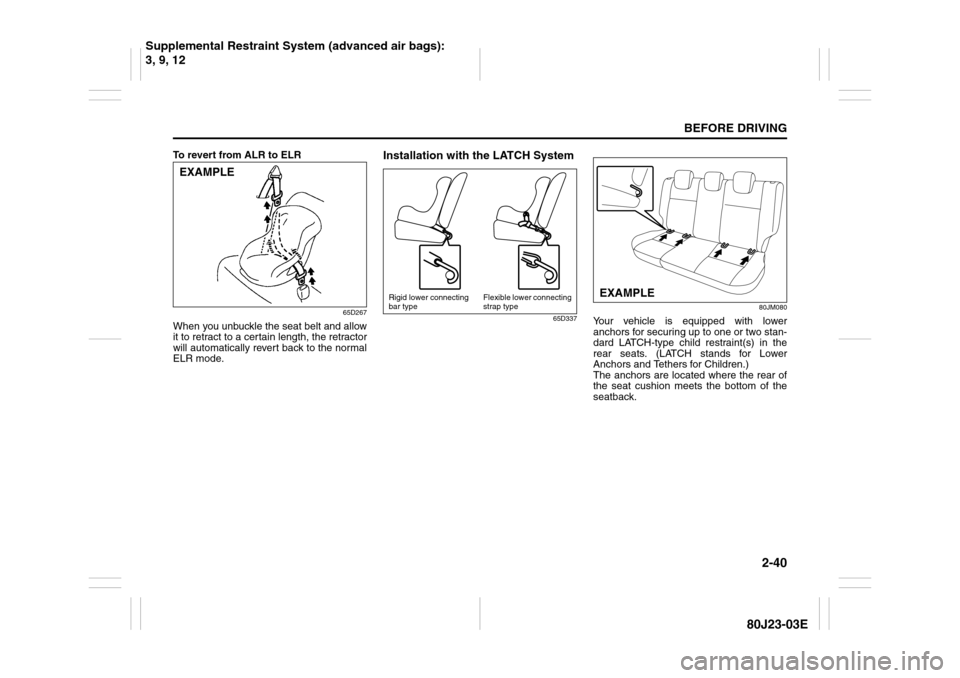
To revert from ALR to ELR
65D267
When you unbuckle the seat belt and allow
it to retract to a certain length, the retractor
will automatically revert back to the normal
ELR mode.
Installation with the LATCH System
65D33780JM080
Your vehicle is equipped with lower
anchors for securing up to one or two stan-
dard LATCH-type child restraint(s) in the
rear seats. (LATCH stands for Lower
Anchors and Tethers for Children.)
The anchors are located where the rear of
the seat cushion meets the bottom of the
seatback.
EXAMPLE
Rigid lower connecting
bar typeFlexible lower connecting
strap type
EXAMPLE
Supplemental Restraint System (advanced air bags):
3, 9, 12
Page 58 of 297
2-41BEFORE DRIVING
80J23-03E
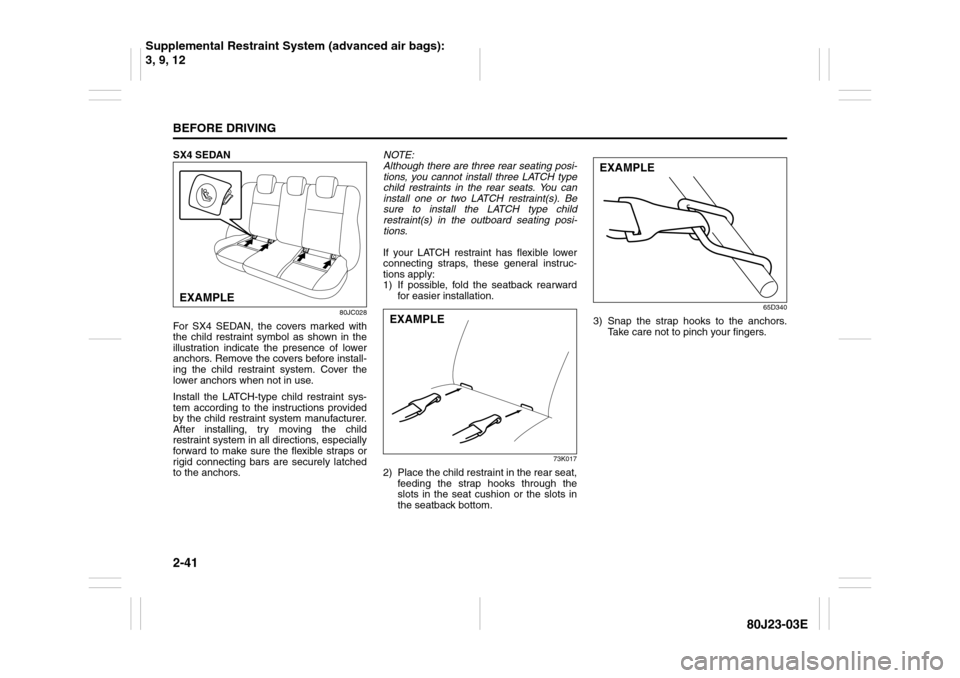
SX4 SEDAN
80JC028
For SX4 SEDAN, the covers marked with
the child restraint symbol as shown in the
illustration indicate the presence of lower
anchors. Remove the covers before install-
ing the child restraint system. Cover the
lower anchors when not in use.
Install the LATCH-type child restraint sys-
tem according to the instructions provided
by the child restraint system manufacturer.
After installing, try moving the child
restraint system in all directions, especially
forward to make sure the flexible straps or
rigid connecting bars are securely latched
to the anchors.NOTE:
Although there are three rear seating posi-
tions, you cannot install three LATCH type
child restraints in the rear seats. You can
install one or two LATCH restraint(s). Be
sure to install the LATCH type child
restraint(s) in the outboard seating posi-
tions.
If your LATCH restraint has flexible lower
connecting straps, these general instruc-
tions apply:
1) If possible, fold the seatback rearward
for easier installation.
73K017
2) Place the child restraint in the rear seat,
feeding the strap hooks through the
slots in the seat cushion or the slots in
the seatback bottom.
65D340
3) Snap the strap hooks to the anchors.
Take care not to pinch your fingers.
EXAMPLE
EXAMPLE
EXAMPLE
Supplemental Restraint System (advanced air bags):
3, 9, 12
Page 59 of 297
2-42
BEFORE DRIVING
80J23-03E
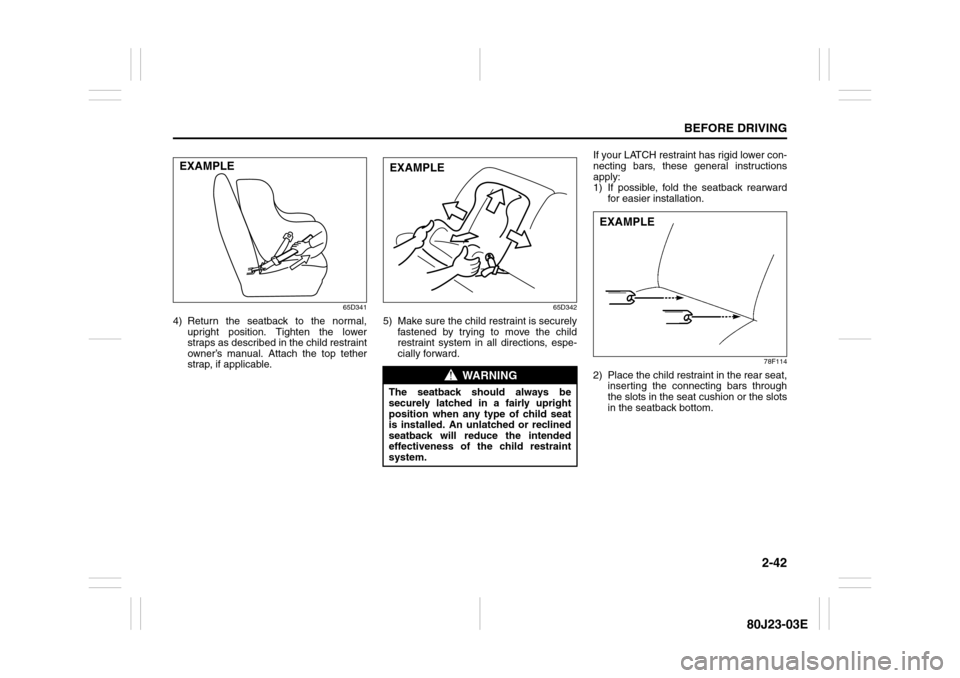
65D341
4) Return the seatback to the normal,
upright position. Tighten the lower
straps as described in the child restraint
owner’s manual. Attach the top tether
strap, if applicable.
65D342
5) Make sure the child restraint is securely
fastened by trying to move the child
restraint system in all directions, espe-
cially forward.If your LATCH restraint has rigid lower con-
necting bars, these general instructions
apply:
1) If possible, fold the seatback rearward
for easier installation.
78F114
2) Place the child restraint in the rear seat,
inserting the connecting bars through
the slots in the seat cushion or the slots
in the seatback bottom.
EXAMPLE
WARNING
The seatback should always be
securely latched in a fairly upright
position when any type of child seat
is installed. An unlatched or reclined
seatback will reduce the intended
effectiveness of the child restraint
system.EXAMPLE
EXAMPLE
Page 60 of 297
2-43BEFORE DRIVING
80J23-03E
54G183
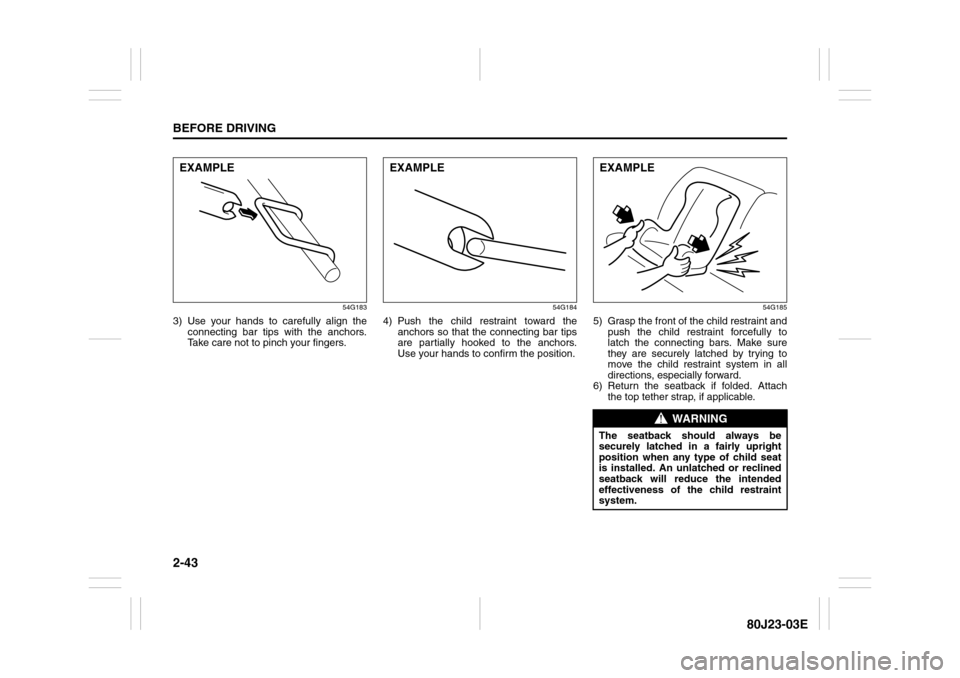
3) Use your hands to carefully align the
connecting bar tips with the anchors.
Take care not to pinch your fingers.
54G184
4) Push the child restraint toward the
anchors so that the connecting bar tips
are partially hooked to the anchors.
Use your hands to confirm the position.
54G185
5) Grasp the front of the child restraint and
push the child restraint forcefully to
latch the connecting bars. Make sure
they are securely latched by trying to
move the child restraint system in all
directions, especially forward.
6) Return the seatback if folded. Attach
the top tether strap, if applicable.
EXAMPLE
EXAMPLE
WARNING
The seatback should always be
securely latched in a fairly upright
position when any type of child seat
is installed. An unlatched or reclined
seatback will reduce the intended
effectiveness of the child restraint
system.EXAMPLE
Page 61 of 297
2-44
BEFORE DRIVING
80J23-03E
Installation of Child Restraint with
To p S t r a pSX4
80JS072
SX4 SEDAN
80JC102
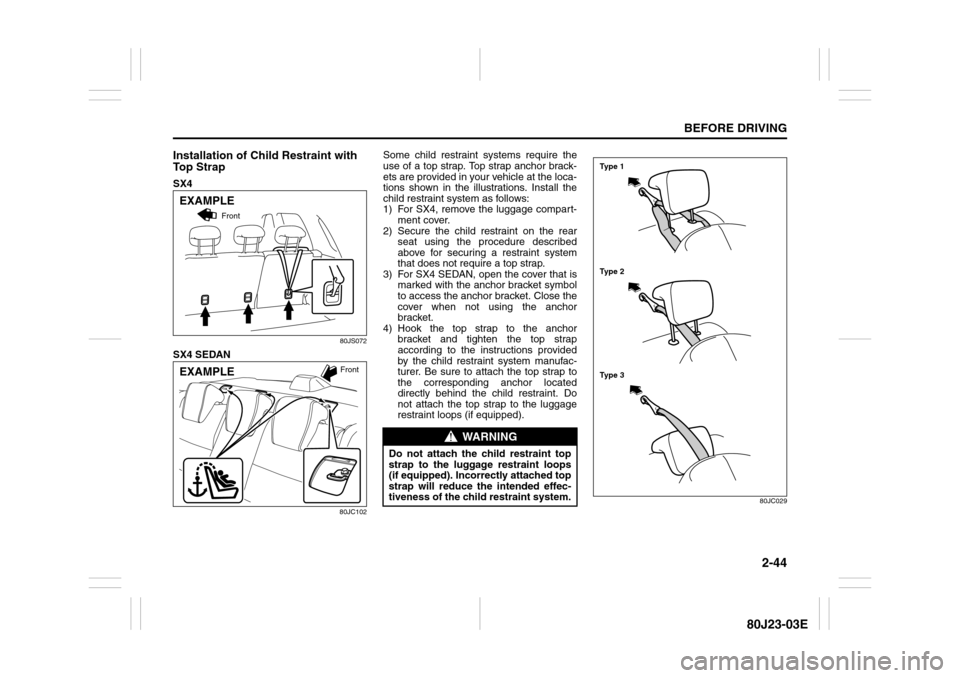
Some child restraint systems require the
use of a top strap. Top strap anchor brack-
ets are provided in your vehicle at the loca-
tions shown in the illustrations. Install the
child restraint system as follows:
1) For SX4, remove the luggage compart-
ment cover.
2) Secure the child restraint on the rear
seat using the procedure described
above for securing a restraint system
that does not require a top strap.
3) For SX4 SEDAN, open the cover that is
marked with the anchor bracket symbol
to access the anchor bracket. Close the
cover when not using the anchor
bracket.
4) Hook the top strap to the anchor
bracket and tighten the top strap
according to the instructions provided
by the child restraint system manufac-
turer. Be sure to attach the top strap to
the corresponding anchor located
directly behind the child restraint. Do
not attach the top strap to the luggage
restraint loops (if equipped).
80JC029
EXAMPLE
Front
EXAMPLE
Front
WARNING
Do not attach the child restraint top
strap to the luggage restraint loops
(if equipped). Incorrectly attached top
strap will reduce the intended effec-
tiveness of the child restraint system.
Ty p e 2 Ty p e 1
Ty p e 3
Page 62 of 297
2-45BEFORE DRIVING
80J23-03E
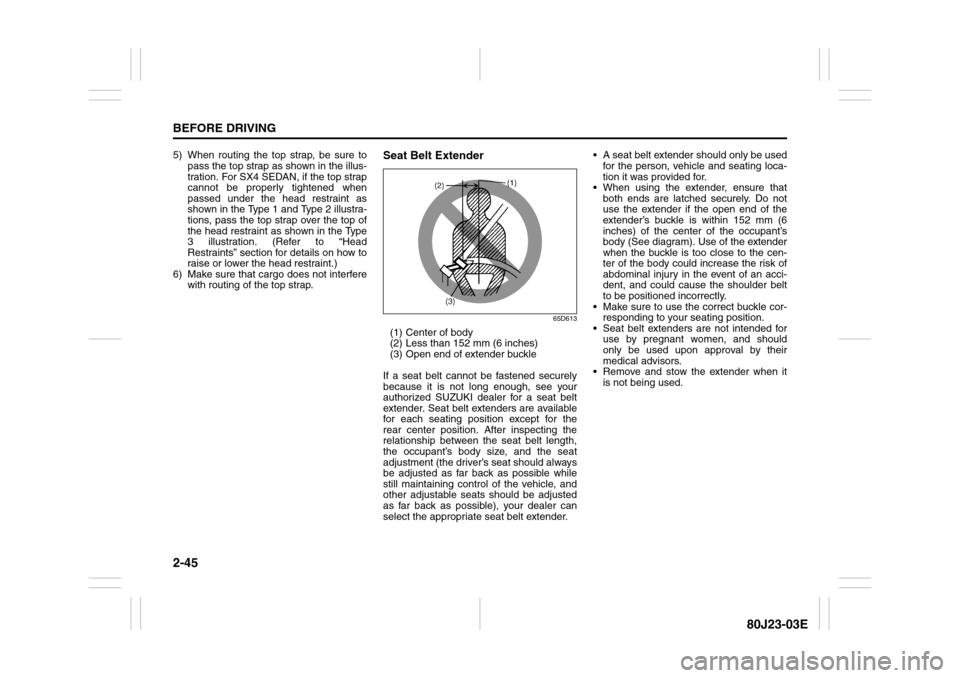
5) When routing the top strap, be sure to
pass the top strap as shown in the illus-
tration. For SX4 SEDAN, if the top strap
cannot be properly tightened when
passed under the head restraint as
shown in the Type 1 and Type 2 illustra-
tions, pass the top strap over the top of
the head restraint as shown in the Type
3 illustration. (Refer to “Head
Restraints” section for details on how to
raise or lower the head restraint.)
6) Make sure that cargo does not interfere
with routing of the top strap.
Seat Belt Extender
65D613
(1) Center of body
(2) Less than 152 mm (6 inches)
(3) Open end of extender buckle
If a seat belt cannot be fastened securely
because it is not long enough, see your
authorized SUZUKI dealer for a seat belt
extender. Seat belt extenders are available
for each seating position except for the
rear center position. After inspecting the
relationship between the seat belt length,
the occupant’s body size, and the seat
adjustment (the driver’s seat should always
be adjusted as far back as possible while
still maintaining control of the vehicle, and
other adjustable seats should be adjusted
as far back as possible), your dealer can
select the appropriate seat belt extender. A seat belt extender should only be used
for the person, vehicle and seating loca-
tion it was provided for.
When using the extender, ensure that
both ends are latched securely. Do not
use the extender if the open end of the
extender’s buckle is within 152 mm (6
inches) of the center of the occupant’s
body (See diagram). Use of the extender
when the buckle is too close to the cen-
ter of the body could increase the risk of
abdominal injury in the event of an acci-
dent, and could cause the shoulder belt
to be positioned incorrectly.
Make sure to use the correct buckle cor-
responding to your seating position.
Seat belt extenders are not intended for
use by pregnant women, and should
only be used upon approval by their
medical advisors.
Remove and stow the extender when it
is not being used.
Page 71 of 297
2-54
BEFORE DRIVING
80J23-03E
When the ignition switch is turned to the
“ON” position, the “PASS AIR BAG OFF”
indicator comes on for several seconds to
let you know the system is working. When
the front passenger sensing system has
turned off the front passenger’s front air
bag including the seat belt pretensioner,
the “PASS AIR BAG OFF” indicator will
come on and stay on to remind you that
the front passenger’s front air bag is off.
The front passenger sensing system uses
front seat pressure measurements and
pressure locations to determine whether to
activate or deactivate the front passenger’s
front air bag. The front passenger sensing
system may or may not turn off the front air
bag, depending on the front passenger’s
seating posture and body build. The air
bag should be turned off in the following
situations:
There is no occupant in the front pas-
senger seat.
The occupant of the front passenger
seat lifts his or her weight off of the seat
for a period of time.
The occupant of the front passenger
seat is an infant or small child in a child
restraint system or a small child in a
booster seat.
A smaller person, such as a child who
has outgrown child restraints or a very
small adolescent is seated in the front
passenger seat.NOTE:
If the front passenger seat is unoccupied,
the “PASS AIR BAG OFF” indicator will not
come on but the front passenger’s front air
bag will not deploy and the seat belt pre-
tensioner will not operate.
If you have secured a child in the front pas-
senger seat in a forward-facing child
restraint system or booster seat and the
“PASS AIR BAG OFF” indicator light is not
on, turn the vehicle off, remove the child
restraint or booster seat from the vehicle
and reinstall it following the child restraint
or booster seat manufacturer’s directions.
Also refer to “Seat Belts and Child
Restraint Systems” in this section. If, after
reinstalling the child restraint and restart-
ing the vehicle, the “PASS AIR BAG OFF”
indicator is still not lit, check to make sure
that the vehicle’s seatback is not pressing
the child restraint into the seat cushion. If
this happens, slightly recline the vehicle’s
seatback and adjust the seat cushion if
possible. Also make sure the child restraint
is not trapped under the vehicle head
restraint. If this happens, adjust the head
restraint. If the “PASS AIR BAG OFF” indi-
cator is still not on, secure the child in the
child restraint or booster seat in a rear seat
position in the vehicle and check with your
dealer.
65D607
According to accident statistics, children
are safer when properly restrained in rear
seating positions than in front seating posi-
tions. Whenever possible, SUZUKI recom-
mends you install child restraints in the
rear seat.
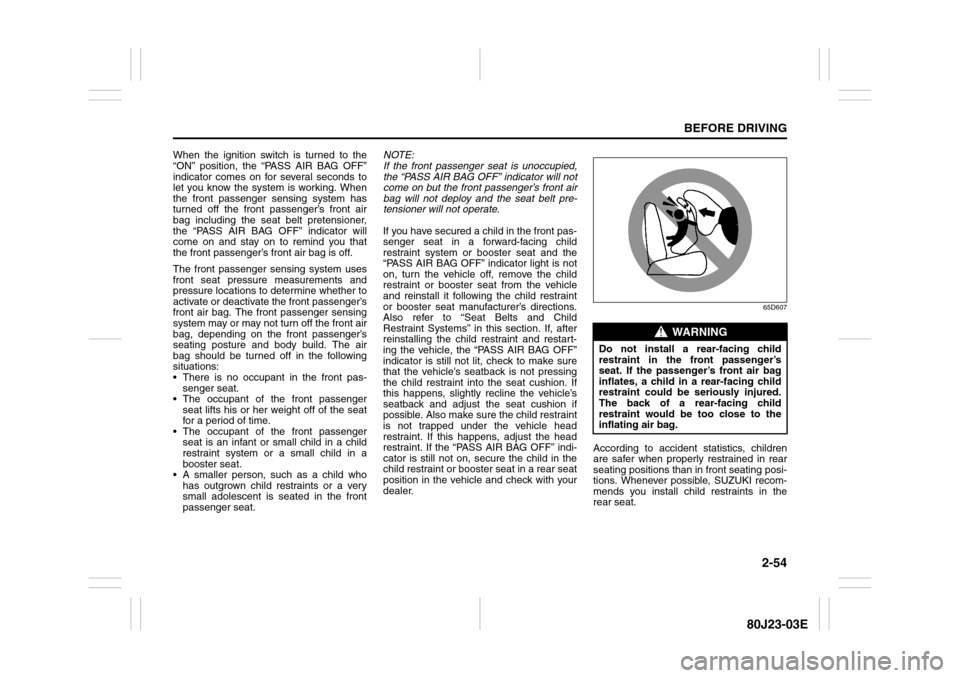
WARNING
Do not install a rear-facing child
restraint in the front passenger’s
seat. If the passenger’s front air bag
inflates, a child in a rear-facing child
restraint could be seriously injured.
The back of a rear-facing child
restraint would be too close to the
inflating air bag.