Page 160 of 297

5-19OTHER CONTROLS AND EQUIPMENT
80J23-03E
Turning power on/off
Press the power on/off knob (1).
The unit starts in the function mode it was
in when the power was turned off last.
Adjusting the volume
Turn the volume control knob (1).
Turning it clockwise increases the volume;
turning it counterclockwise decreases the
volume.
NOTE:
While driving, adjust the volume to an
extent that sound and/or noise coming
from outside the car can be heard.Adjusting bass/treble/balance/fader
1) Press the tone/balance/fader control
knob (2).
Each time it is pressed, sound adjust-
ment is changed as follows:
66J224
2) Turn the tone/balance/fader control
knob (2) to adjust the sound.Adjusting the AVC (Auto volume con-
trol)
The Automatic Volume Control (AVC) func-
tion automatically adjusts (increases/
decreases) the sound volume in accor-
dance with vehicle speed. The AVC control
is provided with three selectable levels
(LEVEL OFF, 1, 2, 3). The range of volume
adjustment increases together with the
LEVEL number,
1) Press the tone/balance/fader control
knob (2) until the AVC adjustment mode
is selected.
2) Turn the tone/balance/fader control
knob (2) to select the desired AVC
adjustment level. (Initial setting: LEVEL
2)
Adjusting the contrast of the display
1) Press the tone/balance/fader/control
knob (2) and preset button 5 (3), preset
button 6 (4) simultaneously.
2) To adjust the contrast of the display,
turn the power on/off knob (1).
Cancel the dimmer condition
Each time you press the power on/off knob
(1) for two seconds with the lighting switch
on, the background brightness of the audio
display will switch between normal and
dimmed.
Bass adjustment (BASS 0)
Treble adjustment (TREBLE 0)
Balance adjustment (BALANCE 0)
Fader adjustment (FADER 0)
AVC adjustment (AVC LEVEL 2)
Original mode
Page 184 of 297
5-43OTHER CONTROLS AND EQUIPMENT
80J23-03E
Fuel Filler CapSX4
80JC060
79J049
SX4 SEDAN
56KN029
56KN030
The fuel filler cap is located on the left rear
side of the vehicle. The fuel filler door can
be unlocked by pulling up the opener lever
located on the outboard side of the driver’s
seat and can be locked by simply closing
the door.
79K053
To remove the fuel filler cap:
1) Open the fuel filler door.
2) Remove the cap by turning it counter-
clockwise.
EXAMPLE
EXAMPLE
EXAMPLE
EXAMPLE
WARNING
Remove the fuel filler cap slowly. The
fuel may be under pressure and may
spray out, causing injury.Open CloseEXAMPLE
Page 185 of 297

5-44
OTHER CONTROLS AND EQUIPMENT
80J23-03E
56KN078
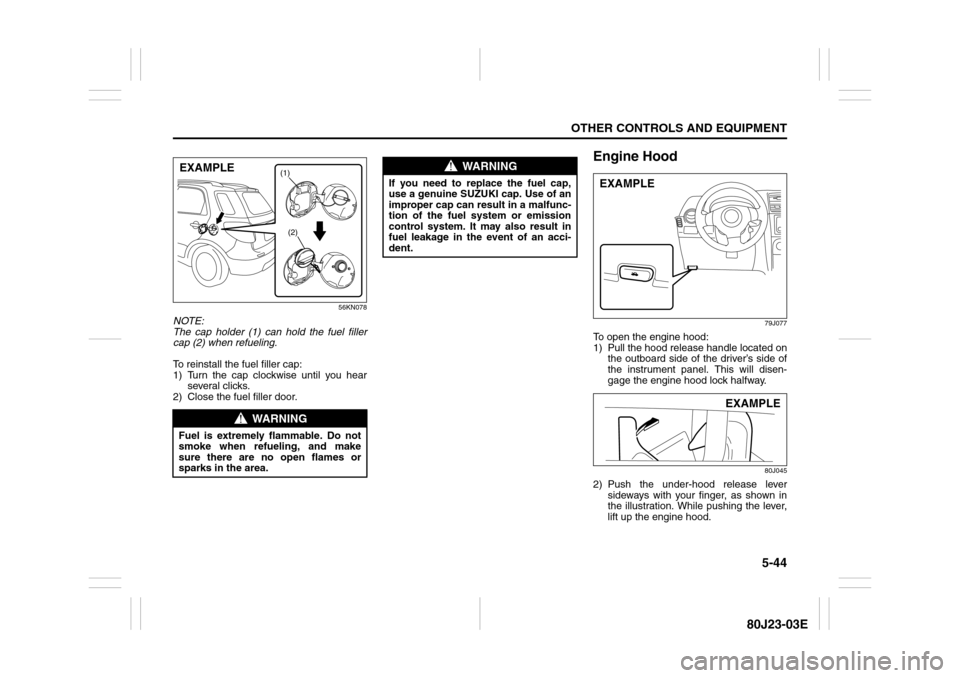
NOTE:
The cap holder (1) can hold the fuel filler
cap (2) when refueling.
To reinstall the fuel filler cap:
1) Turn the cap clockwise until you hear
several clicks.
2) Close the fuel filler door.
Engine Hood
79J077
To open the engine hood:
1) Pull the hood release handle located on
the outboard side of the driver’s side of
the instrument panel. This will disen-
gage the engine hood lock halfway.
80J045
2) Push the under-hood release lever
sideways with your finger, as shown in
the illustration. While pushing the lever,
lift up the engine hood.
WARNING
Fuel is extremely flammable. Do not
smoke when refueling, and make
sure there are no open flames or
sparks in the area.
(1)
(2)
EXAMPLE
WARNING
If you need to replace the fuel cap,
use a genuine SUZUKI cap. Use of an
improper cap can result in a malfunc-
tion of the fuel system or emission
control system. It may also result in
fuel leakage in the event of an acci-
dent.
EXAMPLE
EXAMPLE
Page 218 of 297

7-13INSPECTION AND MAINTENANCE
80J23-03E
4) Reinstall the drain plug and gasket.
Tighten the plug with a wrench to the
specified torque.
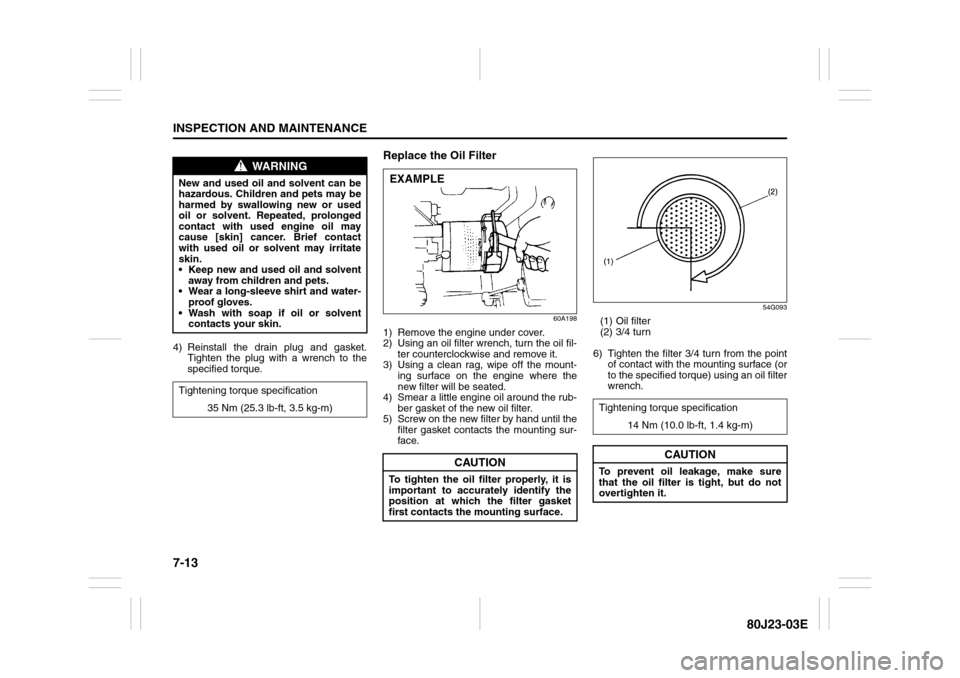
Replace the Oil Filter
60A198
1) Remove the engine under cover.
2) Using an oil filter wrench, turn the oil fil-
ter counterclockwise and remove it.
3) Using a clean rag, wipe off the mount-
ing surface on the engine where the
new filter will be seated.
4) Smear a little engine oil around the rub-
ber gasket of the new oil filter.
5) Screw on the new filter by hand until the
filter gasket contacts the mounting sur-
face.
54G093
(1) Oil filter
(2) 3/4 turn
6) Tighten the filter 3/4 turn from the point
of contact with the mounting surface (or
to the specified torque) using an oil filter
wrench.
WARNING
New and used oil and solvent can be
hazardous. Children and pets may be
harmed by swallowing new or used
oil or solvent. Repeated, prolonged
contact with used engine oil may
cause [skin] cancer. Brief contact
with used oil or solvent may irritate
skin.
Keep new and used oil and solvent
away from children and pets.
Wear a long-sleeve shirt and water-
proof gloves.
Wash with soap if oil or solvent
contacts your skin.
Tightening torque specification
35 Nm (25.3 lb-ft, 3.5 kg-m)
CAUTION
To tighten the oil filter properly, it is
important to accurately identify the
position at which the filter gasket
first contacts the mounting surface.EXAMPLE
Tightening torque specification
14 Nm (10.0 lb-ft, 1.4 kg-m)
CAUTION
To prevent oil leakage, make sure
that the oil filter is tight, but do not
overtighten it.
Page 246 of 297
7-41INSPECTION AND MAINTENANCE
80J23-03E
Headlights
80J2084
Open the engine food. Disconnect the cou-
pler (1). Then remove the socket cover (2)
and replace the bulb. Install a new bulb in
the reverse order of removal.
Other General LightsBulb holder
54G123
(1) Removal
(2) Installation
To remove a bulb holder from a light hous-
ing, turn the holder counterclockwise and
pull it out. To install the holder, push the
holder in and turn it clockwise.Bulb
54G124
(3) Removal
(4) Installation
There are two types of bulb, “Full glass
type” (1) and “Glass/metal type” (2).
To remove and install a full glass type bulb
(1), simply pull out or push in the bulb.
To remove a glass metal type bulb (2) from
a bulb holder, push in the bulb and turn it
counterclockwise. To install a new bulb,
push it in and turn it clockwise.
You can access the individual bulb or bulb
holders as follows.
(1)(2)
(1)
(1) (2)(2)
EXAMPLE
(1)
(2) (3)
(4)EXAMPLE
Page 248 of 297
7-43INSPECTION AND MAINTENANCE
80J23-03E
SX4
80JM116
4) Open the fender cover. Disconnect the
coupler by pushing the lock release.
Pinch both side of the clips (4) and (5),
and push them in.
80JM117
5) Remove the front fog light. Turn the
bulb holder counterclockwise and
remove it.
SX4 SEDAN
80JM071
4) Open the fender cover. Disconnect the
coupler with pushing the lock release.
Turn the bulb holder counterclockwise
and remove it.Rear combination light
(tail, stop, turn signal, etc.)
SX4
80JM131
SX4 SEDAN
80JM072
(4)
(5)
EXAMPLE
(2)
(1)
Page 258 of 297
8-1EMERGENCY SERVICE
80J23-03E
Tire Changing ToolSX4
80JC014
SX4 SEDAN
80JC045
The jack, wheel brace, jack handle are
stowed in the luggage compartment.
80J048
To remove the spare tire, turn its bolt (1)
counterclockwise and remove it.
79J085
To remove the jack, turn its shaft counter-
clockwise and pull the jack out of the stor-
age bracket.SX4
79J086
SX4 SEDAN
80JC015
To stow the jack, place it in the storage
bracket and turn the shaft clockwise until
the jack is securely held in place.
EXAMPLEEXAMPLE
(1)
EXAMPLE
Vehicle Loading: 11
Page 260 of 297

8-3EMERGENCY SERVICE
80J23-03E
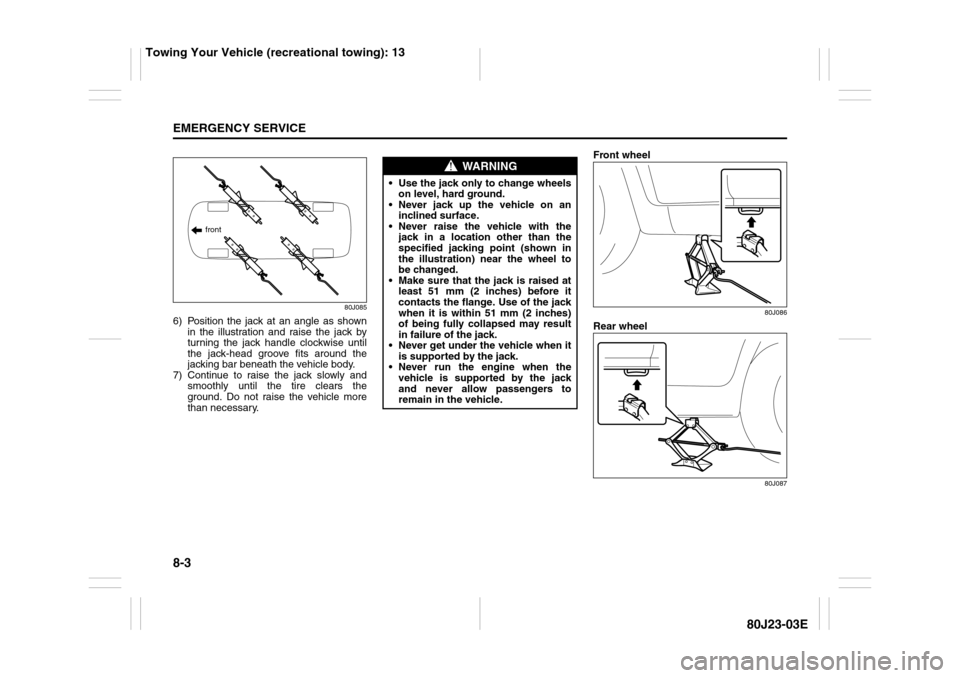
80J085
6) Position the jack at an angle as shown
in the illustration and raise the jack by
turning the jack handle clockwise until
the jack-head groove fits around the
jacking bar beneath the vehicle body.
7) Continue to raise the jack slowly and
smoothly until the tire clears the
ground. Do not raise the vehicle more
than necessary.Front wheel
80J086
Rear wheel
80J087
front
WARNING
Use the jack only to change wheels
on level, hard ground.
Never jack up the vehicle on an
inclined surface.
Never raise the vehicle with the
jack in a location other than the
specified jacking point (shown in
the illustration) near the wheel to
be changed.
Make sure that the jack is raised at
least 51 mm (2 inches) before it
contacts the flange. Use of the jack
when it is within 51 mm (2 inches)
of being fully collapsed may result
in failure of the jack.
Never get under the vehicle when it
is supported by the jack.
Never run the engine when the
vehicle is supported by the jack
and never allow passengers to
remain in the vehicle.
Towing Your Vehicle (recreational towing): 13