Page 154 of 297

5-13OTHER CONTROLS AND EQUIPMENT
80J23-03E
Defrost
80JM051
Temperature-controlled air comes out of
the windshield defroster outlets, the side
defroster outlets and the side outlets.
NOTE:
When the defrost switch (5) is pushed to
turn on the defroster, the air conditioning
system will come on and the “FRESH AIR”
mode will be selected automatically. In
very cold weather, however, the air condi-
tioning system will not turn on.
System Operating InstructionsAutomatic operation
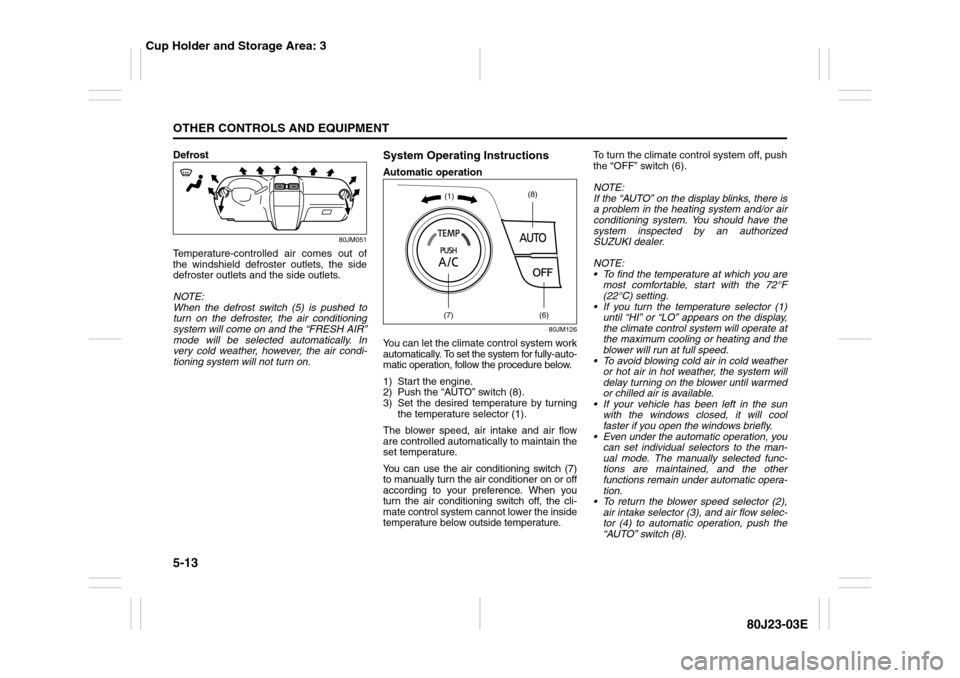
80JM126
You can let the climate control system work
automatically. To set the system for fully-auto-
matic operation, follow the procedure below.
1) Start the engine.
2) Push the “AUTO” switch (8).
3) Set the desired temperature by turning
the temperature selector (1).
The blower speed, air intake and air flow
are controlled automatically to maintain the
set temperature.
You can use the air conditioning switch (7)
to manually turn the air conditioner on or off
according to your preference. When you
turn the air conditioning switch off, the cli-
mate control system cannot lower the inside
temperature below outside temperature.To turn the climate control system off, push
the “OFF” switch (6).
NOTE:
If the “AUTO” on the display blinks, there is
a problem in the heating system and/or air
conditioning system. You should have the
system inspected by an authorized
SUZUKI dealer.
NOTE:
To find the temperature at which you are
most comfortable, start with the 72°F
(22°C) setting.
If you turn the temperature selector (1)
until “HI” or “LO” appears on the display,
the climate control system will operate at
the maximum cooling or heating and the
blower will run at full speed.
To avoid blowing cold air in cold weather
or hot air in hot weather, the system will
delay turning on the blower until warmed
or chilled air is available.
If your vehicle has been left in the sun
with the windows closed, it will cool
faster if you open the windows briefly.
Even under the automatic operation, you
can set individual selectors to the man-
ual mode. The manually selected func-
tions are maintained, and the other
functions remain under automatic opera-
tion.
To return the blower speed selector (2),
air intake selector (3), and air flow selec-
tor (4) to automatic operation, push the
“AUTO” switch (8).
(7)
(6)
(8)
(1)
Cup Holder and Storage Area: 3
Page 212 of 297

7-7INSPECTION AND MAINTENANCE
80J23-03E
Maintenance Recommended under Severe Driving ConditionsFollow this schedule if your car is mainly operated under one or more of the following conditions:
When most trips are less than 6 kilometers (4 miles)
When most trips are less than 16 kilometers (10 miles) and outside temperature remain below freezing.
Idling and/or low-speed operation in stop-and-go traffic.
Operating in dusty areas.
Schedule should also be followed if the car is used for delivery service, police, taxi or other commercial applications.
R: Replace or change
I : Inspect, clean, adjust, lubricate or replace as necessary
#1: Be sure to perform the engine coolant level check under the daily inspection in “OPERATING YOUR VEHICLE” section.
If you replace the engine coolant other than the SUZUKI LLC: Super (Blue), follow the schedule of SUZUKI LLC: Standard (Green).Interval: This interval should be judged by
odometer reading or months, whichever
comes first.miles (x 1000) 3 6 9 12151821242730333639
km (x 1000) 5 10 15 20 25 30 35 40 45 50 55 60 65
months 3 6 9 12151821242730333639ENGINE & EMISSION CONTROL
1. Drive belt
Inspect for damage
–
–
–
–
–
–
–
–
–
I
–
–
–
*2.Valve lash (clearance) –––––––––––––
3.Engine oil and oil filter
R
R
R
R
R
R
R
R
R
R
R
R
R
*4. Cooling system hoses and connections – – – – I – – – – I – – –
5.Engine coolant
SUZUKI LLC: Standard (Green)
–
–
–
–
–
–
–
–
–
R
–
–
–
SUZUKI LLC: Super (Blue) (#1) First time only: Replace at 150000 km (90000 miles) or 90 months
Second time and after: Replace every 75000 km (45000 miles) or 45 months
*6. Exhaust pipes and mountings – – – – I – – – – I – – –
*7.
EVAP canister
Replace every 250000 km (150000 miles) or 180 months
*8. Emission-related hoses & tubes – ––––––––––––
9.Spark plugs
–
–
–
–
–
–
–
–
–
–
–
–
–
*10.Ignition coil (plug cap) ––––––––– I –––
*11.
Fuel tank & cap
–
–
–
–
I
–
–
–
–
I
–
–
–
12. Air cleaner filter element (paved road) I IIIIIIIIRIII
*13.
Fuel filter
Replace every 250000 km (150000 miles) or 150 months
*14. Fuel lines and connections – – – – I – – – – I – – –
*15.
Canister air suction filter
–
–
–
–
–
–
–
–
–
–
–
–
–
Page 232 of 297

7-27INSPECTION AND MAINTENANCE
80J23-03E
NOTE:
The tire inflation pressure will change
due to changes in atmospheric pres-
sure, temperature or tire temperature
when driving. To reduce the chance that
the low tire pressure warning light will
come on due to normal changes in tem-
perature and atmospheric pressure, it is
important to check and adjust the tire
pressures when the tires are cold. Tires
that appear to be at the specified pres-
sure when checked after driving, when
the tires are warm, could have pressure
below the specification when the tires
cool down. Also, tires that are inflated to
the specified pressure in a warm
garage may have pressure below the
specification when the vehicle is driven
outside in very cold temperature. If you
adjust the tire pressure in a garage that
is warmer than the outside tempera-
ture, you should add 1 psi to the recom-
mended cold tire inflation pressure for
every 10°F difference between garage
temperature and outside temperature.Measuring Air Pressure
Use the following steps to achieve
proper tire inflation:
1) Identify the recommended tire pres-
sure on the vehicle’s Tire and Load-
ing Information Label or in the
owner’s manual.
2) Remove the valve cap from the tire
valve stem.
3) Using a reliable pressure gauge,
measure the tire inflation pressure
by pressing the tire gauge firmly
onto the valve to get a pressure
measurement. Remember that
inflation pressures should be
checked when the tires are “cold”,
meaning before they have been
driven one mile or after sitting for
three hours or more allowing the tire
to cool to ambient air temperature.
4) If the air pressure is too high, slowly
release the air by pressing on the
tire valve stem with the edge of the
tire gauge until you reach the cor-
rect pressure.
5) If the air pressure is too low, fill the
tire with air at a service station until
it reaches the recommended pres-
sure.
6) Make sure all tires have the same
air pressure (unless the owner’s
manual indicates otherwise).
WARNING
Air pressures should be
checked when the tires are cold
or you may get inaccurate read-
ings.
Check the inflation pressure
from time to time while inflating
the tire gradually, until the spec-
ified pressure is obtained.
Never underinflate or overin-
flate the tires.
Underinflation can cause
unusual handling characteristics
or can cause the rim to slip on
the tire bead, resulting in an acci-
dent or damage to the tire or rim.
Underinflation can also cause
tires to overheat, leading to tire
failure.
Overinflation can cause the tire
to burst, resulting in personal
injury.
Overinflation can also cause
unusual handling characteristics
which may result in an accident.