2010 SUZUKI KIZASHI ESP
[x] Cancel search: ESPPage 199 of 388

5-20
OTHER CONTROLS AND EQUIPMENT
57L20-03E
Selecting the reception band
Press the FM/AM button (1).
Each time the button is pressed, the
reception band is switched as follows:
Seek tuning
Press the seek Up button (2) or the seek
Down button (3).
The unit stops searching for a station at a
frequency where a broadcast station is
available.
Manual tuning
Turn the TUNE FOLDER PUSH SOUND
knob (4).
The frequency being received is dis-
played.Preset memory
1) Select the desired station.
2) Select the Preset button (5) to which
you want to store the station and press
and hold the button for 2 seconds or
longer.
Auto store
Press and hold the AS button (6) for 2 sec-
onds or longer.
Six stations in good reception are auto-
matically stored to the Preset buttons (5)
in sequential order, starting from the lower
frequencies.
NOTE:
Auto store can be released by pressing
AS button (6) while auto store is under
way.
When the auto store is performed, the
station previously stored in the memory
at the position is overwritten.
When there are fewer than 6 stations
that can be stored even if 1 round of
auto store operation is performed, no
station will be stored at the remaining
Preset buttons (5).
6 stations can be preset for FM1 and
FM2 in common, and 6 stations for AM
in auto store mode.Auto store mode on/off
Press the AS button (6).
Each time the button is pressed, the mode
is switched as follows:
Preset station calling
Press the Preset button (5).
The corresponding station preset can be
received.
NOTE:
If the button for a station not preset is
pressed, the unit displays “- - - ”. FM1 FM2 AM
AS mode on AS mode off
Page 202 of 388

5-23OTHER CONTROLS AND EQUIPMENT
57L20-03E
Selecting the reception band
Press the XM button (1).
Each time the button is pressed, the
reception band is switched as follows:
Category selection
Press the Up button (2) or the Down but-
ton (3).
The category being received is displayed.Channel selection
Turn the TUNE FOLDER PUSH SOUND
knob (4).
The channel being received is displayed.
NOTE:
• “RADIO ID” is displayed with channel
000.
“Loading” is displayed during the acqui- sition of audio data or information.
Channel selection by category
Turn the TUNE FOLDER PUSH SOUND
knob (4) during category display.
The channel being received is displayed.
Preset memory
1) Select the desired channel.
2) Select the Preset buttons (5) to which you want to store the channel and
press and hold the button for 2 sec-
onds or longer.
Preset channel calling
Press the Preset button (5).
The corresponding channel preset can be
received.
NOTE:
If the button for a channel not preset is
pressed, the unit displays “- - - ”. Display change
Press the DISP button (6).
Each time it is pressed, display is changed
as follows:
XM Reception
XM reception can be affected by atmo-
spheric conditions. Nearby buildings or
under the overhead railway may interfere
or deflect reception, causing poor recep-
tion.
XM1 XM2 XM3
Channel name/
Channel number display
Song (program) title display
Artist (feature) name display
Page 213 of 388

5-34
OTHER CONTROLS AND EQUIPMENT
57L20-03E
Display change
Press the DISP button (7).
Each time it is pressed, display is changed
as follows:
NOTE:
“NO TITLE” is displayed when there is
no information on the disc.
If all the text data cannot be displayed,
the “>” mark appears at the right end.
Holding down the DISP button (7) for
1 sec. or more calls the next page.
Notes on USB deviceCompatible USB devices
USB Mass Storage Class
For details as to whether your USB
memory/USB Audio is compatible with
USB Mass Storage Class, please con-
tact the USB memory/USB Audio manu-
facturer.
USB Standard Compatibility 1.1/2.0 Full
Speed
File System FAT16/32
Maximum current less than 500 mA
Capacity less than 4 GB (1 partition)
USB device connection
When connecting a USB device, make
sure the connector is pushed all the way
into the socket.
Do not leave the USB device for long
periods of time in places inside the car
where the temperature rises too high.
Back up any important data beforehand.
We cannot accept responsibility for any
lost data.
The use of USB devices that contain
data files other than MP3/WMA format
is not recommended.
Recording MP3/WMA files on a USB device Playback or display may not be possible
depending on the type of USB device or
the condition of the recording. Depending on the connected USB
memory, the order in which the files are
played back may differ from the order in
which the files were stored.
Compression formats
MP3
Bit rate: MPEG1 Audio Layer III : 64 k - 320 kbps
MPEG2 Audio Layer III : 64 k - 160 kbps Sampling frequency: MPEG1 Audio Layer III : 32 k/44.1 k/48 kHz
MPEG2 Audio Layer III : 16 k/22.05 k/24 kHzWMA (Ver.7, Ver.8)
Bit rate: CBR 48 k - 192 kbps
Sampling frequency: 32 k/44.1 k/48 kHz
WMA (Ver. 9*)
Bit rate: CBR 48 k - 320 kbps
Sampling frequency: 32 k/44.1 k/48 kHz
* WMA 9 Professional/LossLess/Voice are
not supported.
Maximum number of files/folders
Maximum number of files: 2500 (files +
folders) Maximum number of files in one folder: 255 Maximum depth of trees: 8
Maximum number of folders: 255
(Root folder is included.) Play time display
Folder name display
File name display
Album name display (MP3 only)
Track title display
Artist name display
Page 216 of 388

5-37OTHER CONTROLS AND EQUIPMENT
57L20-03E
Display change
Press the DISP button (7).
Each time it is pressed, display is changed
as follows:
NOTE:
If all the text data cannot be displayed, the
“>” mark appears at the right end. Holding
down the DISP button (7) for 1 sec. or
more calls the next page.Playing Mode selection
1) Press and hold the USB button (1) for
1 second or longer.
2) Turn the TUNE FOLDER PUSH
SOUND knob (2).
Each time it is turned, mode is
changed as follows:
3) Press the TUNE FOLDER PUSH
SOUND knob (2) to select an item.
NOTE:
When the USB button (1) is pressed, the
previous screen appears.
When the DISP button (7) is pressed,
the regular screen appears.
“NO SONGS” will appear if no song
exists.
Notes on iPod
®
Controllable iPod
®/software version
iPod
® touch
iPod® classic
iPod® nano (4th generation)
iPod® nano (3rd generation)
iPod® nano (2nd generation)
iPod® nano (1st generation)
iPod® (5th generation)
* Please update the firmware of your
iPod® before using it.
Some functions may not be available
depending on the model of iPod
® or its
firmware version.
iPod
® is a trademark of Apple Inc., reg-
istered in the U.S. and other countries.
Apple is not responsible for the opera-
tion of this device or its compliance with
safety and regulatory standards.
iPod
® connection
Please make sure to detach the iPod
®
after turning off the car engine (turning
the ACC to OFF). The iPod
® may not
shut down while still connected, which
may result in battery depletion.
Please do not connect iPod® accesso-
ries such as an iPod
® remote control or
headphones while connecting iPod
®
with the unit. The unit may not operate
correctly. Playlist name & Track title display
(Playlist mode only)
Artist name & Track title display
Album name & Track title display
Track title & Play time display
PLAYLIST
ARTIST
ALBUM
SONGS
GENRE
Page 219 of 388

5-40
OTHER CONTROLS AND EQUIPMENT
57L20-03E
Receiving a call
Press the Off Hook button (7) to receive a
call.
Ending a call
Press the On Hook button (8) to end a call.
Rejecting a call (only for supported-
models)
Press the On Hook button (8) to reject a
incoming call.Adjusting the listening volume
Turn the VOL PUSH POWER knob (2)
during a call.
Turning it clockwise increases the vol-
ume; turning it counterclockwise
decreases the volume.
Lean the VOL switch (9) during a call.
Leaning to the upper side increases the
volume; leaning the lower side
decreases the volume.
Adjusting the ring volume
Turn the VOL PUSH POWER knob (2)
while a call coming in.
Turning it clockwise increases the vol-
ume; turning it counterclockwise
decreases the volume.
Lean the VOL switch (9) while a call
coming in.
Leaning to the upper side increases the
volume; leaning the lower side
decreases the volume.Dialing by using Redial/Callback
The last dialed number is dialed.
NOTE:
Up to latest 5 calls can be stored for each.
1) Press the Off Hook button (7).
The Bluetooth
® main menu appears.
2) Turn the TUNE FOLDER PUSH
SOUND knob (1) to select “Redial” or
“Callback”, and press the TUNE
FOLDER PUSH SOUND knob (1) to
determine the selection.
For calling from the outgoing call
record or incoming call record, “Redial”
or “Callback” shall be selected, respec-
tively.
3) Turn the TUNE FOLDER PUSH
SOUND knob (1) to select a number,
and press the TUNE FOLDER PUSH
SOUND knob (1) to determine the
selection.
4) Turn the TUNE FOLDER PUSH
SOUND knob (1) to select “Dial”, and
press the TUNE FOLDER PUSH
SOUND knob (1) to determine the
selection.
The selected number is dialed.
NOTE:
Selection of “Go Back” displays the pre-
vious menu.
Pressing the Off Hook button (7) in the
2nd step allows users to forward to the
3rd step with a single motion.
Page 236 of 388

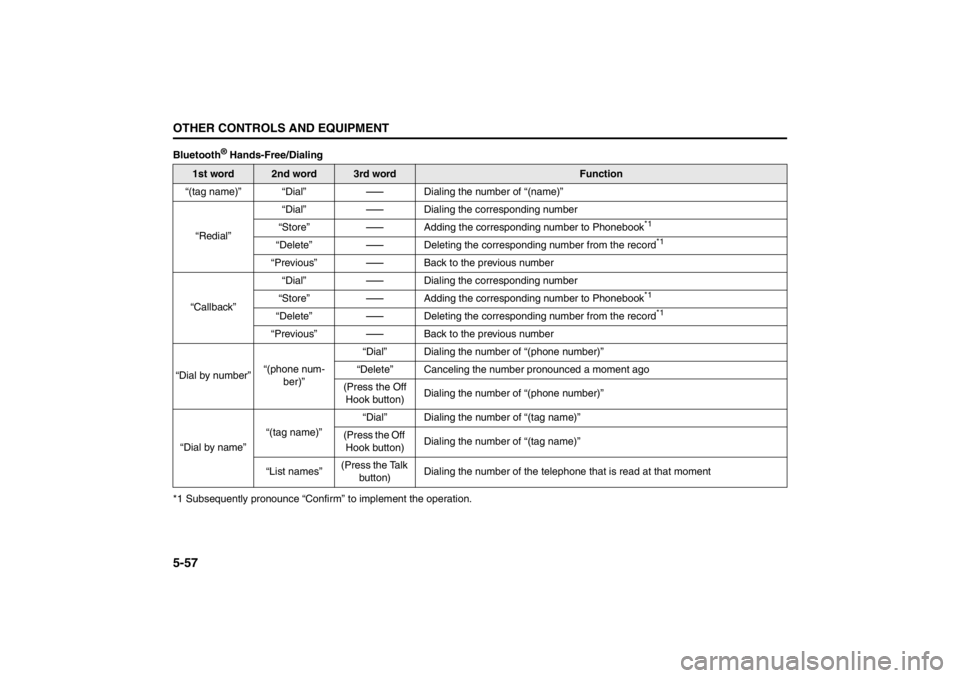
5-57OTHER CONTROLS AND EQUIPMENT
57L20-03E
Bluetooth
® Hands-Free/Dialing
*1 Subsequently pronounce “Confirm” to implement the operation.
1st word
2nd word
3rd word
Function
“(tag name)” “Dial”
-
Dialing the number of “(name)”
“Redial”“Dial”
-
Dialing the corresponding number
“Store”
-
Adding the corresponding number to Phonebook
*1
“Delete”
-
Deleting the corresponding number from the record
*1
“Previous”
-
Back to the previous number
“Callback”“Dial”
-
Dialing the corresponding number
“Store”
-
Adding the corresponding number to Phonebook
*1
“Delete”
-
Deleting the corresponding number from the record
*1
“Previous”
-
Back to the previous number
“Dial by number”“(phone num-
ber)”“Dial” Dialing the number of “(phone number)”
“Delete” Canceling the number pronounced a moment ago
(Press the Off
Hook button)Dialing the number of “(phone number)”
“Dial by name”“(tag name)”“Dial” Dialing the number of “(tag name)”
(Press the Off
Hook button)Dialing the number of “(tag name)”
“List names”(Press the Talk
button)Dialing the number of the telephone that is read at that moment
Page 238 of 388

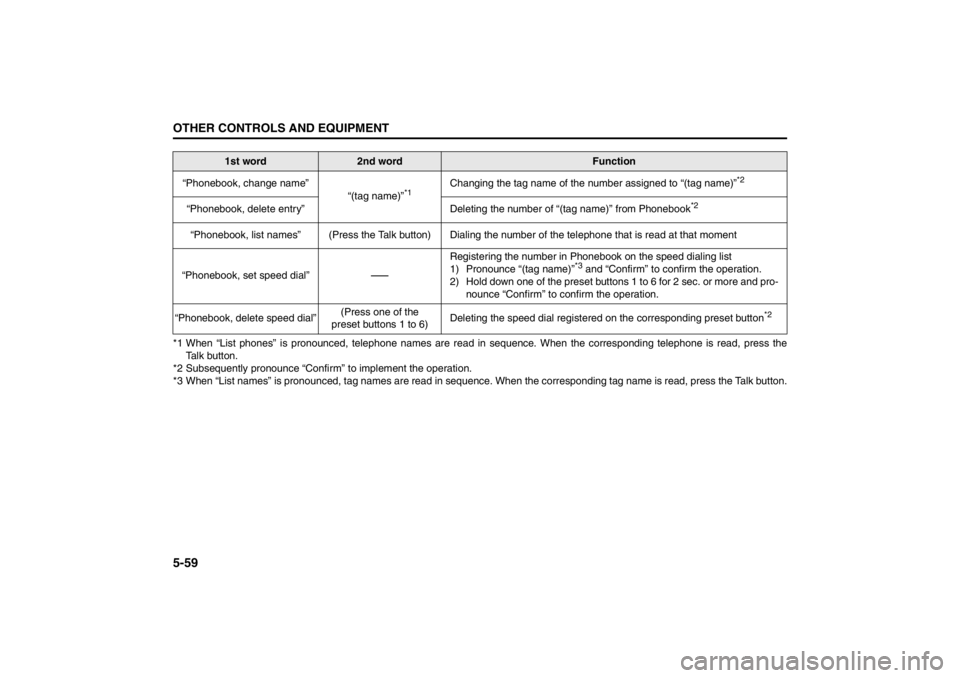
5-59OTHER CONTROLS AND EQUIPMENT
57L20-03E
*1 When “List phones” is pronounced, telephone names are read in sequence. When the corresponding telephone is read, press the
Talk button.
*2 Subsequently pronounce “Confirm” to implement the operation.
*3 When “List names” is pronounced, tag names are read in sequence. When the corresponding tag name is read, press the Talk button. “Phonebook, change name”
“(tag name)”
*1
Changing the tag name of the number assigned to “(tag name)”
*2
“Phonebook, delete entry” Deleting the number of “(tag name)” from Phonebook
*2
“Phonebook, list names” (Press the Talk button) Dialing the number of the telephone that is read at that moment
“Phonebook, set speed dial”
-
Registering the number in Phonebook on the speed dialing list
1) Pronounce “(tag name)”
*3 and “Confirm” to confirm the operation.
2) Hold down one of the preset buttons 1 to 6 for 2 sec. or more and pro-
nounce “Confirm” to confirm the operation.
“Phonebook, delete speed dial”(Press one of the
preset buttons 1 to 6)Deleting the speed dial registered on the corresponding preset button
*2
1st word
2nd word
Function
Page 240 of 388

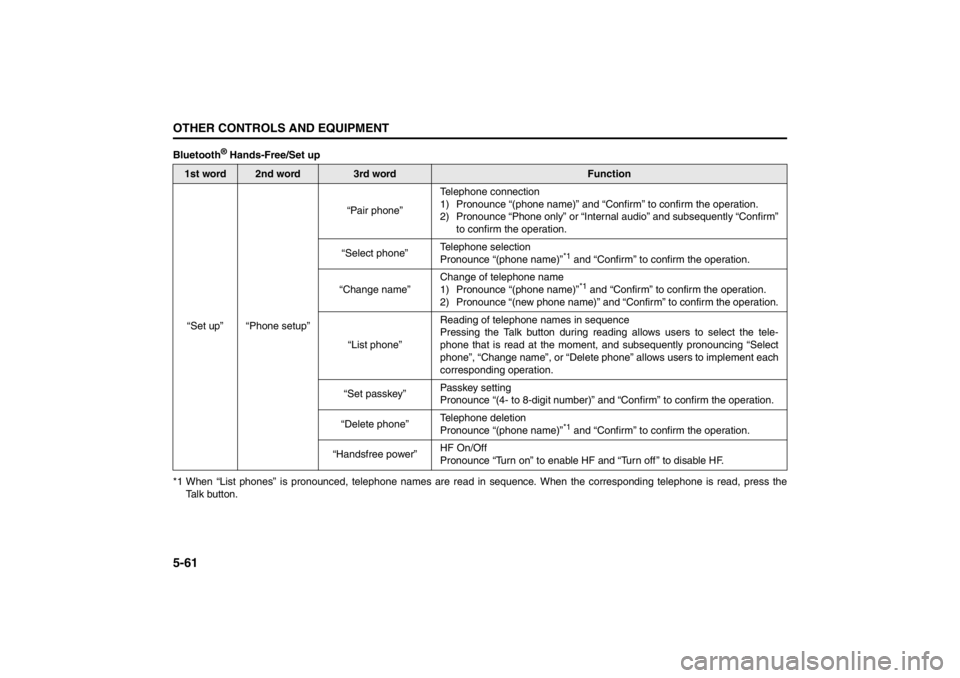
5-61OTHER CONTROLS AND EQUIPMENT
57L20-03E
Bluetooth
® Hands-Free/Set up
*1 When “List phones” is pronounced, telephone names are read in sequence. When the corresponding telephone is read, press the
Talk button.
1st word
2nd word
3rd word
Function
“Set up” “Phone setup”“Pair phone”Telephone connection
1) Pronounce “(phone name)” and “Confirm” to confirm the operation.
2) Pronounce “Phone only” or “Internal audio” and subsequently “Confirm”
to confirm the operation.
“Select phone”Telephone selection
Pronounce “(phone name)”
*1 and “Confirm” to confirm the operation.
“Change name”Change of telephone name
1) Pronounce “(phone name)”*1 and “Confirm” to confirm the operation.
2) Pronounce “(new phone name)” and “Confirm” to confirm the operation.
“List phone”Reading of telephone names in sequence
Pressing the Talk button during reading allows users to select the tele-
phone that is read at the moment, and subsequently pronouncing “Select
phone”, “Change name”, or “Delete phone” allows users to implement each
corresponding operation.
“Set passkey”Passkey setting
Pronounce “(4- to 8-digit number)” and “Confirm” to confirm the operation.
“Delete phone”Telephone deletion
Pronounce “(phone name)”
*1 and “Confirm” to confirm the operation.
“Handsfree power”HF On/Off
Pronounce “Turn on” to enable HF and “Turn off ” to disable HF.