2010 SUZUKI KIZASHI turn signal
[x] Cancel search: turn signalPage 247 of 388

5-68
OTHER CONTROLS AND EQUIPMENT
57L20-03E
TroubleshootingIf you suspect something wrong, check and take steps as described below.
If the described suggestions do not solve the problem, it is recommended to take the unit to your nearest dealer.
Problem
Possible cause
Possible solution
Common
Unable to operate The security function is on.If the unit displays “SECURITY”, enter
your user ID.
If the unit displays “HELP”, consult your
dealer.
Power is not turned on.
(No sound is produced)Fuse is blown. Contact your authorized SUZUKI dealer.
Radio
Much noiseThe unit is not exactly tuned in to the sta-
tion.Tune it in exactly to the station.
Unable to receive by auto tuningThere is no station emitting signals pow-
erful enough.Pick up a station by manual tuning.
XM
Channel unselectable No contact with XM Satellite radio Inc.Refer to the XM’s website to sign up for
XM Radio service.
CD
Sound skipping or noiseThe disc is dirty. Wipe the disc with a soft cloth.
The disc has a major flaw or is warped.Replace the disc with another without
flaws.
Page 273 of 388

5-94
OTHER CONTROLS AND EQUIPMENT
57L20-03E
any garage door opener position manufac-
tured before April 1, 1982). A garage door
that cannot detect an object – signaling the
door to stop and reverse – does not meet
current U.S. federal safety standards. For
more information, contact HomeLink
® at
www.homelink.com
or by calling 1-800-
355-3515.
Retain the original transmitter of the RF
device you are programming for use in
other vehicles as well as for future
HomeLink
® programming. It is also sug-
gested that upon the sale of the vehicle,
the programmed HomeLink
® buttons be
erased for security purposes. Refer to
“Programming HomeLink
®” (step 1) only)
or, for assistance, contact HomeLink
® at
www.homelink.com
or by calling 1-800-
355-3515.
Programming HomeLink
®
NOTE:
Some vehicles may require the ignition
switch to be turned to the second (or
“accessories”) position or the “on” position
for programming and/or operation of
HomeLink
®. It is also recommended that a
new battery be placed in the hand-held
transmitter of the device being pro-
grammed to HomeLink
® for quicker train-
ing and accurate transmission of the
radiofrequency signal. Do not repeat “Pro-
gramming HomeLink
®” – step 1) to train
additional devices to a second or thirdHomeLink
® button. Begin with “Program-
ming HomeLink
®” – step 2).
57L51036
1) Press and hold the two outer
HomeLink
® buttons (buttons one and
three) – releasing only when the indica-
tor light begins to flash (after 20 sec-
onds). Do not hold the buttons for
longer than 30 seconds and do not
repeat step 1) to program a second
and/or third hand-held transmitter to the
remaining two HomeLink
® buttons.
2) Position the end of your hand-held
transmitter 5–14 cm (1–3 inches) away
from the HomeLink
® button you wish to
program while keeping the indicator
light in view.
3) Simultaneously press and hold both the
chosen HomeLink® and hand-held
transmitter buttons. Do not release the
buttons until step 4) has been com-
pleted.NOTE:
Some gate operators and garage door
openers may require you to replace this
Programming step 3) with procedures
noted in the “Gate Operator / Canadian
Programming” section.
4) After the HomeLink
® indicator light
changes from a slow to a rapidly blink-
ing light, release both the HomeLink
®
and hand-held transmitter buttons.
NOTE:
If the HomeLink
® indicator light does not
change to a rapidly blinking light, contact
HomeLink
® at www.homelink.com
or call
1-800-355-3515 for assistance.
5) Press and hold the just-trained
HomeLink
® button and observe the
indicator light.
– If the indicator light stays on con-
stantly, programming is complete and
your device should activate when the
HomeLink® button is pressed and
released.
NOTE:
To program the remaining two HomeLink
®
buttons, begin with “Programming
HomeLink
®” – step 2). Do not repeat step
1).
– If the indicator light blinks rapidly for
two seconds and then turns to a con-
stant light continue with “Programming
Page 274 of 388

5-95OTHER CONTROLS AND EQUIPMENT
57L20-03E
HomeLink
®” steps 6–8 to complete the
programming of a rolling code
equipped device (most commonly a
garage door opener).
66J051
66J052
6) At the garage door opener receiver
(motor-head unit) in the garage, locate
the “learn” or “smart” button. This can
usually be found where the hanging
antenna wire is attached to the motor-
head unit.
7) Firmly press and release the “learn” or
“smart” button. (The name and color of
the button may vary by manufacturer.)
NOTE:
There are 30 seconds in which to initiate
step 8).
8) Return to the vehicle and firmly press,
hold for two seconds and release the
programmed HomeLink
® button.
Repeat the “press/hold/release”
sequence a second time, and, depend-
ing on the brand of the garage door
opener (or other rolling code equipped
device), repeat this sequence a third
time to complete the programming pro-
cess.
HomeLink
® should now activate your
rolling code equipped device.
NOTE:
To program the remaining two HomeLink
®
buttons, begin with “Programming
HomeLink
®” – step 2). Do not repeat step
1).
For questions or comments, please con-
tact HomeLink
® at www.homelink.com
or
1-800-355-3515.
Gate Operator / Canadian Program-
mingCanadian radio-frequency laws require
transmitter signals to “time-out” (or quit)
after several seconds of transmission –
which may not be long enough for
HomeLink
® to pick up the signal during
programming. Similar to this Canadian law,
some U.S. gate operators are designed to
“time-out” in the same manner.
If you live in Canada or you are having diffi-
culties programming a gate operator by
using the Programming procedures
(regardless of where you live), replace
“Programming HomeLink
®” step 3) with
the following:
NOTE:
If programming a garage door opener or
gate operator, it is advised to unplug the
device during the “cycling” process to pre-
vent possible overheating.
3) Continue to press and hold the
HomeLink
® button while you press and
release – every two seconds (“cycle”)
your hand-held transmitter until the fre-
quency signal has successfully been
accepted by HomeLink
®. (The indicator
light will flash slowly and then rapidly.)
Proceed with “Programming HomeLink
®”
step 4) to complete.
Page 335 of 388

7-50
INSPECTION AND MAINTENANCE
57L20-03E
5) Pull on the cable (4) toward the rear of
the vehicle to remove the bulb socket
(5) from the parking light body.
NOTE:
You can remove the parking light’s bulb
socket only by pulling on the cable, but this
method must never be used to remove the
bulb sockets of any other lights.
6) Replace the bulb, then follow the above
steps in reverse to restore the original
state.Side turn signal lights
57L71028
1) Pull out the rear end of the side turn
signal light (1) while pushing it toward
the front of the vehicle as shown in the
illustration.
57L71029
2) Disconnect the coupler while pushing
the lock release (2) on it.
3) Replace the side turn signal light (1),
then follow the above steps in reverse
to restore the original state.
Front fog light (if equipped)
1) Start the engine. To facilitate bulb
replacement, turn the steering wheel
away from the front fog light whose bulb
is to be replaced, then turn off the
engine.
57L70039
2) Remove the screw (1).
(1)
(2)
(1)
EXAMPLE
Page 337 of 388

7-52
INSPECTION AND MAINTENANCE
57L20-03E
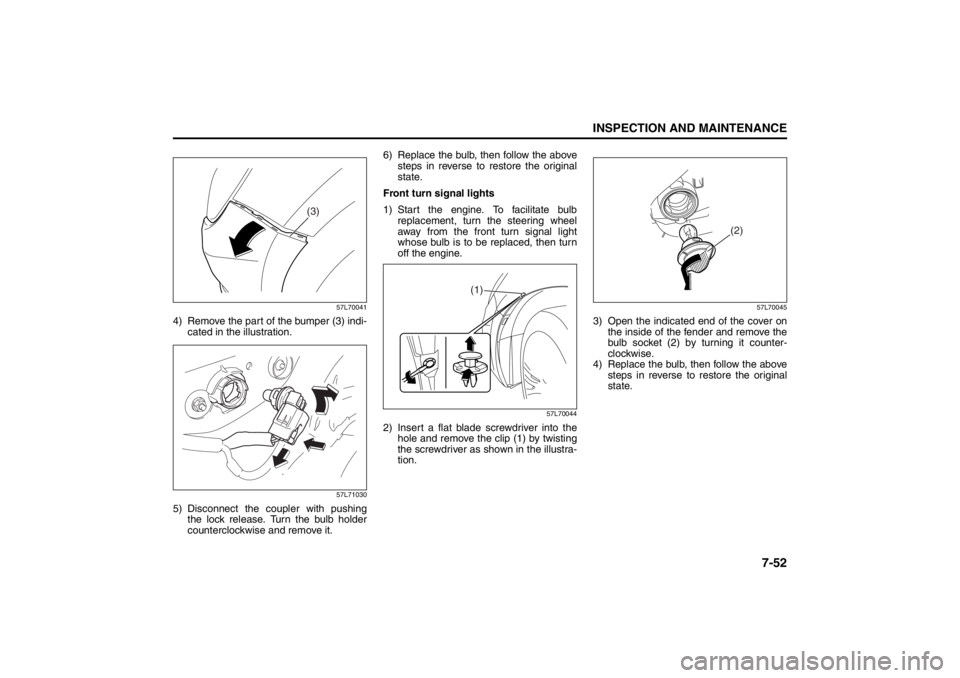
57L70041
4) Remove the part of the bumper (3) indi-
cated in the illustration.
57L71030
5) Disconnect the coupler with pushing
the lock release. Turn the bulb holder
counterclockwise and remove it.6) Replace the bulb, then follow the above
steps in reverse to restore the original
state.
Front turn signal lights
1) Start the engine. To facilitate bulb
replacement, turn the steering wheel
away from the front turn signal light
whose bulb is to be replaced, then turn
off the engine.
57L70044
2) Insert a flat blade screwdriver into the
hole and remove the clip (1) by twisting
the screwdriver as shown in the illustra-
tion.
57L70045
3) Open the indicated end of the cover on
the inside of the fender and remove the
bulb socket (2) by turning it counter-
clockwise.
4) Replace the bulb, then follow the above
steps in reverse to restore the original
state.
(3)
(1)
(2)
Page 338 of 388

7-53INSPECTION AND MAINTENANCE
57L20-03E
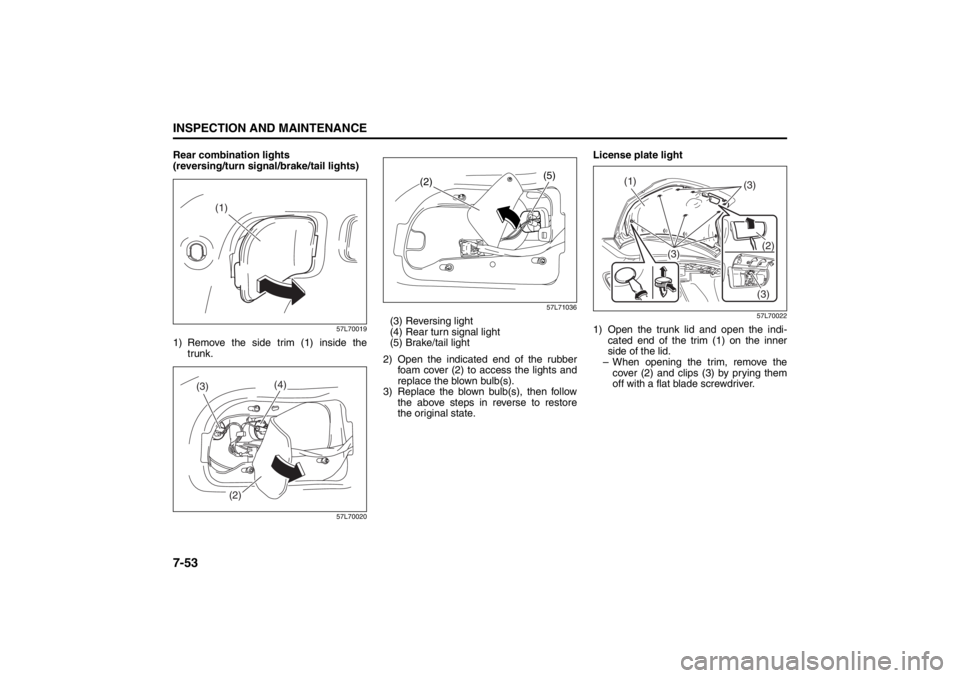
Rear combination lights
(reversing/turn signal/brake/tail lights)
57L70019
1) Remove the side trim (1) inside the
trunk.
57L7002057L71036
(3) Reversing light
(4) Rear turn signal light
(5) Brake/tail light
2) Open the indicated end of the rubber
foam cover (2) to access the lights and
replace the blown bulb(s).
3) Replace the blown bulb(s), then follow
the above steps in reverse to restore
the original state.License plate light
57L70022
1) Open the trunk lid and open the indi-
cated end of the trim (1) on the inner
side of the lid.
– When opening the trim, remove the
cover (2) and clips (3) by prying them
off with a flat blade screwdriver.
(1)
(4)
(3)
(2)
(5)
(2)
(1)
(3)
(3)(2)
(3)
Page 379 of 388

12-3
SPECIFICATIONS
57L20-03E
ITEM: Light WATTAGE BULB No.
Headlight 12V 55W H7
Front fog light 12V 55W H11
Front turn signal light 12V 27W 2357A
Rear turn signal light 12V 21W PY21W
Parking light 12V 5W W5W
Brake/tail light 12V 21/5W P21/5W
License plate light 12V 5W C5W
Reversing light 12V 21W P21W
Front dome light 12V 8W –
Rear dome light 12V 10W –
Glove box light 12V 1.4W –
Footwell lights LED –
Trunk room light 12V 5W W5W
Spot light 12V 8W –
High mount stop light LED –
Front side marker light 12V 5W 168
Curtsey light 12V 5W –
Vanity mirror light 12V 2W –
Specifications: 1, 2, 5, 6, 7, 10, 11
Page 385 of 388

13-5
INDEX57L20-03E
Temperature Gauge ............................................................. 2-79
Theft Deterrent Alarm System ............................................ 2-14
Thermometer ........................................................................ 2-84
Tilt/Telescoping/Steering Lock Lever .............................. 2-110
Tire Chains ............................................................................. 4-5
Tire Changing Tool ................................................................ 8-1
Tire Inflation Pressure ......................................................... 7-30
Tire Inspection ..................................................................... 7-31
Tire Pressure Monitoring System (TPMS) ......................... 3-34
Tire Rotation......................................................................... 7-34
Tire Sidewall Labeling ......................................................... 7-28
Tire Size ................................................................................ 7-29
Tires ...................................................................................... 7-28
Towing a Disabled Vehicle.................................................... 8-7
Towing Your Vehicle (recreational towing) ......................... 6-2
Traction Control System ..................................................... 3-31
Trailer Towing ........................................................................ 6-2
Transaxle Warning Light ..................................................... 2-76
Trip meter ............................................................................. 2-84
Trunk Lid ................................................................................ 2-5
Trunk Lid Lock Switch .......................................................... 2-6
Trunk Light ........................................................................... 5-79
Turn Signal Control Lever................................................. 2-105
Turn Signal Indicators ......................................................... 2-75
Turn Signal Operation ....................................................... 2-106UUniform Tire Quality Grading ............................................. 7-33
Universal Serial Bus (USB) Socket .................................... 5-81
Using the 2WD/i-AWD (intel ligent All Wheel Drive)
Switch ................................................................................... 3-19
Using the Transaxle............................................................. 3-13
VVehicle Cleaning .................................................................... 9-3
Vehicle Identification Number............................................. 10-1
Vehicle Loading............................................................. 6-1 , 7-37WWarning and Indicator Lights ............................................. 2-69
Warning and Indicator Messages ....................................... 2-86
Warranties............................................................................. 10-2
Washing .................................................................................. 9-5
Waxing .................................................................................... 9-6
Windows ............................................................................... 2-17
Windshield Washer ............................................................ 2-109
Windshield Washer Fluid .................................................... 7-56
Windshield Wipers ............................................................. 2-107
Wiper Blades ........................................................................ 7-54