2010 SUBARU TRIBECA wheel torque
[x] Cancel search: wheel torquePage 260 of 422

Gearshifts can be performed using the
select lever.
Shift to the next-higher gear by briefly
pushing the select lever toward the“+ ”
end of the manual gate.
Shift to the next-lower gear by briefly
pulling the select lever toward the “� ”
end of the manual gate. NOTE
Please read the following points care-
fully and bear them in mind when using
the manual mode. . When the temperature of the engine
oil is higher than normal, warning
beeps are emitted and the shift position
indicator shows “� ”. If these warnings
are issued, deselect the manual mode
to protect the engine from damage. .
The transmission does not automa-
tically shift up in the manual mode.
Perform gearshifts in accordance with
road conditions so that the tachometer
needle does not enter the red zone. If
the engine speed reaches a predeter-
mined level, a fuel-cut function will
operate. Shift up if this happens. Also,
the transmission may automatically
shift up to protect the engine.. If you attempt to shift down when
the engine speed is too high, i.e., when
a downshift would push the tachometer
needle beyond the red zone, beeps will
be emitted to warn you that the down-
shift is not possible. . If you attempt to shift up when the
vehicle speed is too low, the transmis-
sion will not respond.. You can perform a skip-shift (for
example, from 4th to 2nd) by operating
the select lever twice in rapid succes-sion.. The transmission automatically se-
lects 1st gear when the vehicle stopsmoving.. If the temperature of the automatic
transmission fluid becomes too high,the “AT OIL TEMP ”warning light will
illuminate and upshifts to 5th gear will
not be possible. Immediately stop the
vehicle in a safe place and let the
engine idle until the warning light turns off.
& Driving tips
. On a road surface where there is a risk
of wheelspin (for example, a snow- or
gravel-covered road), you can pull away
from a standstill safely and easily by first
selecting the 2nd gear of the manualmode. . Always apply the foot or parking brake
when the vehicle is stopped in the “D ”or
“ R ”position.
. Always set the parking brake when
parking your vehicle. Do not hold the
vehicle with only the transmission. . Do not keep the vehicle in a stationary
position on an uphill grade by using the “ D ”position. Use the brake instead.
. The engine may, on rare occasions,
knock when the vehicle rapidly acceler-
ates or rapidly pulls away from a standstill.
This phenomenon does not indicate aproblem. . A slight reduction in output torque may
occur before the engine warms up. Starting and operating
7-17
– CONTINUED –
Page 309 of 422

9-4In case of emergency
and pull it through the center of the
temporary spare tire.
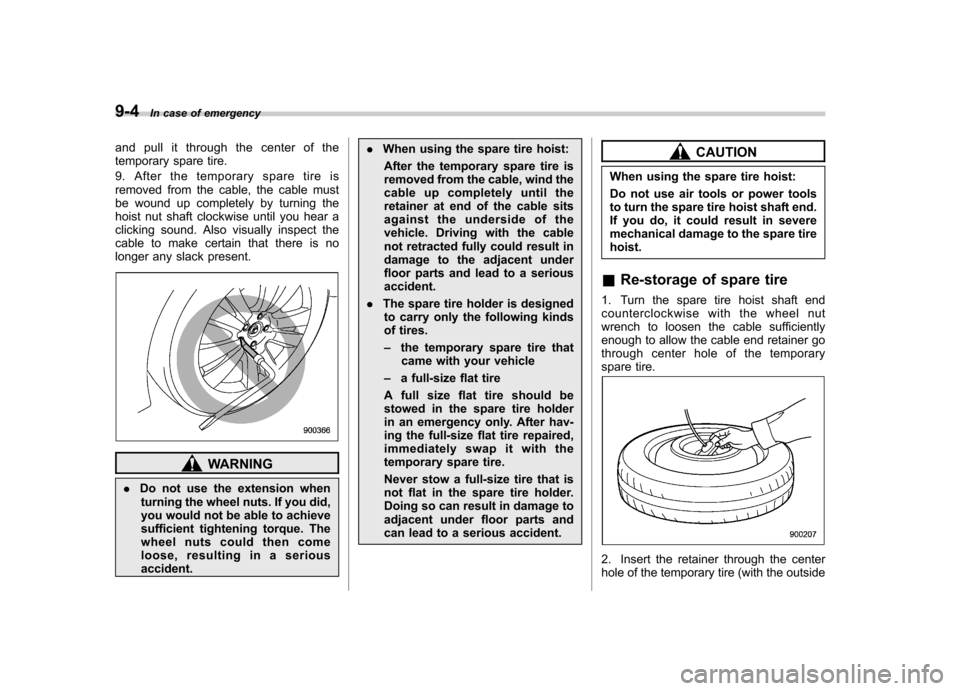
9. After the temporary spare tire is
removed from the cable, the cable must
be wound up completely by turning the
hoist nut shaft clockwise until you hear a
clicking sound. Also visually inspect the
cable to make certain that there is no
longer any slack present.
WARNING
. Do not use the extension when
turning the wheel nuts. If you did,
you would not be able to achieve
sufficient tightening torque. The
wheel nuts could then come
loose, resulting in a seriousaccident. .
When using the spare tire hoist:
After the temporary spare tire is
removed from the cable, wind the
cable up completely until the
retainer at end of the cable sits
against the underside of the
vehicle. Driving with the cable
not retracted fully could result in
damage to the adjacent under
floor parts and lead to a seriousaccident.
. The spare tire holder is designed
to carry only the following kinds
of tires. – the temporary spare tire that
came with your vehicle
– a full-size flat tire
A full size flat tire should be
stowed in the spare tire holder
in an emergency only. After hav-
ing the full-size flat tire repaired,
immediatelyswapitwiththe
temporary spare tire.
Never stow a full-size tire that is
not flat in the spare tire holder.
Doing so can result in damage to
adjacent under floor parts and
can lead to a serious accident.
CAUTION
When using the spare tire hoist:
Do not use air tools or power tools
to turn the spare tire hoist shaft end.
If you do, it could result in severe
mechanical damage to the spare tirehoist.
& Re-storage of spare tire
1. Turn the spare tire hoist shaft end
counterclockwise with the wheel nut
wrench to loosen the cable sufficiently
enough to allow the cable end retainer go
through center hole of the temporary
spare tire.
2. Insert the retainer through the center
hole of the temporary tire (with the outside
Page 314 of 422

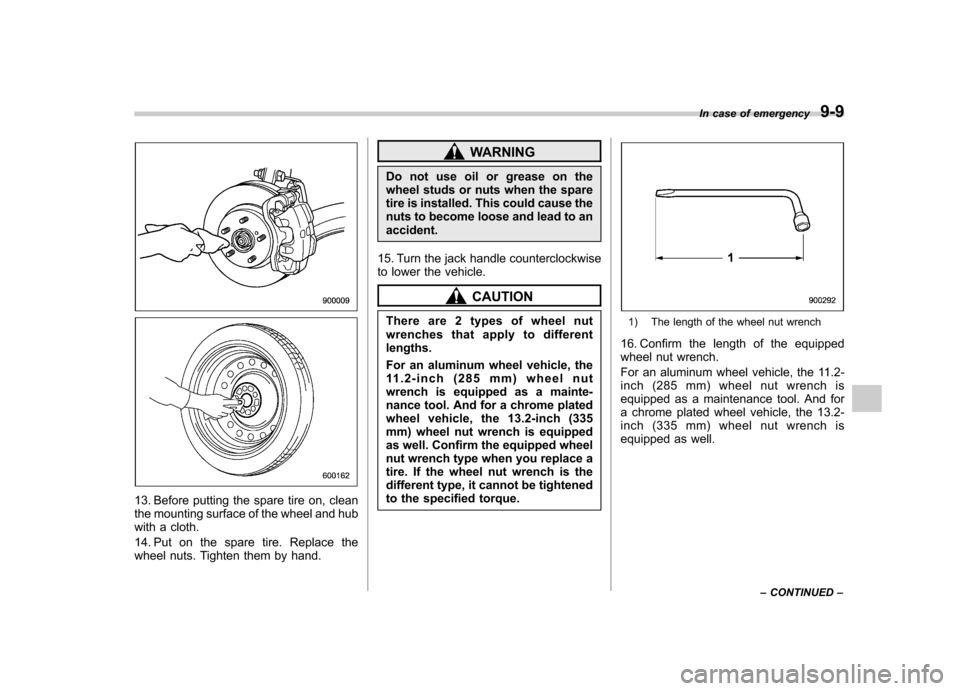
13. Before putting the spare tire on, clean
the mounting surface of the wheel and hub
with a cloth.
14. Put on the spare tire. Replace the
wheel nuts. Tighten them by hand.
WARNING
Do not use oil or grease on the
wheel studs or nuts when the spare
tire is installed. This could cause the
nuts to become loose and lead to anaccident.
15. Turn the jack handle counterclockwise
to lower the vehicle.
CAUTION
There are 2 types of wheel nut
wrenches that apply to differentlengths.
For an aluminum wheel vehicle, the
11.2-inch (285 mm) wheel nut
wrench is equipped as a mainte-
nance tool. And for a chrome plated
wheel vehicle, the 13.2-inch (335
mm) wheel nut wrench is equipped
as well. Confirm the equipped wheel
nut wrench type when you replace a
tire. If the wheel nut wrench is the
different type, it cannot be tightened
to the specified torque.
1) The length of the wheel nut wrench
16. Confirm the length of the equipped
wheel nut wrench.
For an aluminum wheel vehicle, the 11.2-
inch (285 mm) wheel nut wrench is
equipped as a maintenance tool. And for
a chrome plated wheel vehicle, the 13.2-
inch (335 mm) wheel nut wrench is
equipped as well. In case of emergency
9-9
– CONTINUED –
Page 315 of 422

9-10In case of emergency
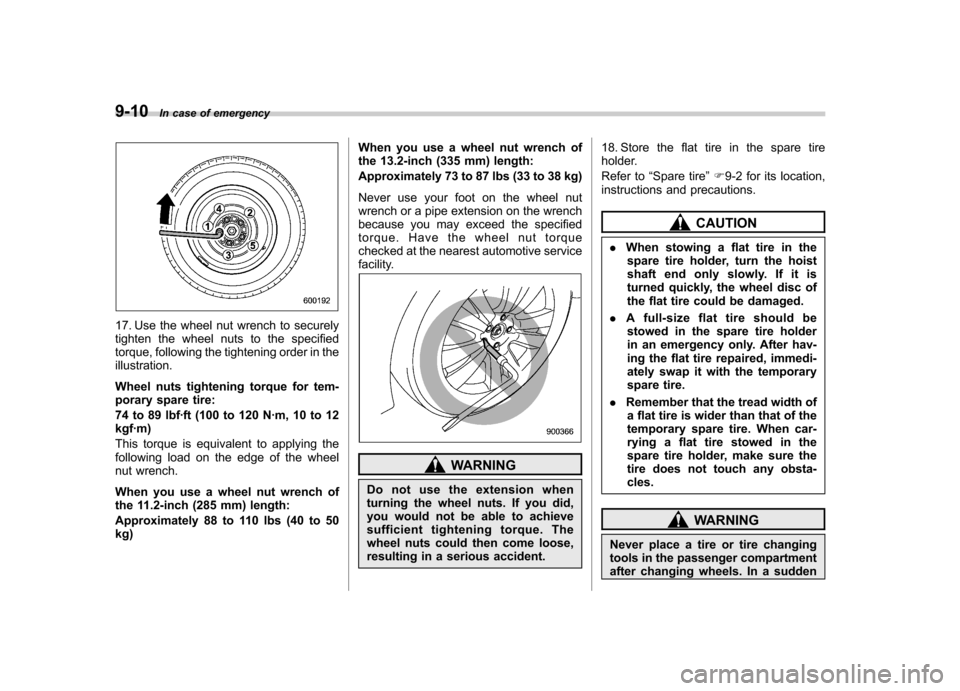
17. Use the wheel nut wrench to securely
tighten the wheel nuts to the specified
torque, following the tightening order in theillustration.
Wheel nuts tightening torque for tem-
porary spare tire:
74 to 89 lbf·ft (100 to 120 N·m, 10 to 12 kgf·m)
This torque is equivalent to applying the
following load on the edge of the wheel
nut wrench.
When you use a wheel nut wrench of
the 11.2-inch (285 mm) length:
Approximately 88 to 110 lbs (40 to 50 kg) When you use a wheel nut wrench of
the 13.2-inch (335 mm) length:
Approximately 73 to 87 lbs (33 to 38 kg)
Never use your foot on the wheel nut
wrench or a pipe extension on the wrench
because you may exceed the specified
torque. Have the wheel nut torque
checked at the nearest automotive service
facility.
WARNING
Do not use the extension when
turning the wheel nuts. If you did,
you would not be able to achieve
sufficient tightening torque. The
wheel nuts could then come loose,
resulting in a serious accident. 18. Store the flat tire in the spare tire
holder.
Refer to
“Spare tire ”F 9-2 for its location,
instructions and precautions.
CAUTION
. When stowing a flat tire in the
spare tire holder, turn the hoist
shaft end only slowly. If it is
turned quickly, the wheel disc of
the flat tire could be damaged.
. A full-size flat tire should be
stowed in the spare tire holder
in an emergency only. After hav-
ing the flat tire repaired, immedi-
ately swap it with the temporary
spare tire.
. Remember that the tread width of
a flat tire is wider than that of the
temporary spare tire. When car-
rying a flat tire stowed in the
spare tire holder, make sure the
tire does not touch any obsta-cles.
WARNING
Never place a tire or tire changing
tools in the passenger compartment
after changing wheels. In a sudden
Page 362 of 422

as well. Always use a wheel nut
wrench for an aluminum wheel. If
you use a wrench for a chrome
plated wheel, you cannot tighten it
to the specified torque.
. When any of the wheels are removed
and replaced for tire rotation or to change
a flat tire, always check the tightness of
the wheel nuts after driving approximately
600 miles (1,000 km). If any nut is loose,
tighten it to the following specified torque.
A tightening sequence specification for the
wheel nuts can be found in “Flat tires ”F 9-
6.
Wheel nuts tightening torque for alu-
minum wheel:
74 to 89 lbf·ft (100 to 120 N·m, 10 to 12 kgf·m)
This torque is equivalent to applying
approximately 88 to 110 lbs (40 to 50 kg)
at the top of the wheel nut wrench. . Never apply oil to the threaded parts,
wheel nuts, or tapered surface of the wheel. . Never let the wheel rub against sharp
protrusions or curbs.. When wheel nuts, balance weights, or
the center cap is replaced, be sure to
replace them with genuine SUBARU parts
designed for aluminum wheels. Chrome plated wheels (if equipped)
1) The length of the wheel nut wrench
CAUTION
There are 2 types of wheel nut
wrenches that apply to differentlengths.
For an aluminum wheel vehicle, the
11.2-inch (285 mm) wheel nut
wrench is equipped as a mainte-
nance tool. And for a chrome plated
wheel vehicle, the 13.2-inch (335
mm) wheel nut wrench is equipped
as well. Always use a wheel nut
wrench for a chrome plated wheel. If
you use a wrench for an aluminum wheel, you cannot tighten it to the
specified torque.
. When any of the wheels are removed
and replaced for tire rotation or to change
a flat tire, always check the tightness of
the wheel nuts after driving approximately
600 miles (1,000 km). If any nut is loose,
tighten it to the following specified torque.
A tightening sequence specification for the
wheel nuts can be found in “Flat tires ”F 9-
6.
Wheel nuts tightening torque for
chrome plated wheel:
89 to 111 lbf·ft (120 to 150 N·m, 12 to 15 kgf·m)
This torque is equivalent to applying
approximately 86 to 108 lbs (39 to 49 kg)
at the top of the wheel nut wrench. . Never apply oil to the threaded parts,
wheel nuts, or tapered surface of the wheel. . Never let the wheel rub against sharp
protrusions or curbs.. When wheel nuts, balance weights, or
the center cap is replaced, be sure to
replace them with genuine SUBARU parts
designed for chrome plated wheels. Maintenance and service
11-31
Page 402 of 422

&Tire care –maintenance and
safety practices
. Check on a daily basis that the
tires are free from serious damage,
nails, and stones. At the same time,
check the tires for abnormal wear. . Inspect the tire tread regularly
and replace the tires before their
tread wear indicators become visi-
ble. When a tire ’streadwear
indicator becomes visible, the tire
is worn beyond the acceptable limit
and must be replaced immediately.
With a tire in this condition, driving
at even low speeds in wet weather
can cause the vehicle to hydro-
plane. Possible resulting loss of
vehiclecontrolcanleadtoanaccident. . To maximize the life of each tire
and ensure that the tires wear
uniformly, it is best to rotate the
tires every 7,500 miles (12,000 km).
For information about the tire rota-
tion order, refer to “Tire rotation ”
F 11-29 .
Replace any damaged or
unevenly worn tires at the time of rotation. After tire rotation, adjust
the tire pressures and make sure
the wheel nuts are correctly tigh-
tened. For information about the
tightening torque and tightening
sequence for the wheel nuts, refer to
“Flat tires ”F 9-6 .
& Vehicle load limit –how to
determine
The load capacity of your vehicle is
determined by weight, not by avail-
able cargo space. The load limit of
your vehicle is shown on the
vehicle placard attached to the
driver ’s side B-pillar. Locate the
statement “The combined weight
of occupants and cargo should
never exceed XXX kg or XXX lbs ”
on your vehicle ’s placard.
Thevehicleplacardalsoshows
seating capacity of your vehicle.
The total load capacity includes the
total weight of driver and all pas-
sengers and their belongings, any
cargo, any optional equipment such
as a trailer hitch, roof rack or bike carrier, etc., and the tongue load of
a trailer. Therefore cargo capacity
can be calculated by the following method.
Cargo capacity = Load limit
�(total
weight of occupants + total weight
of optional equipment + tongue
load of a trailer (if applicable))
For information about vehicle load-
ing, refer to “Loading your vehicle ”
F 8-11 .
For information about towing capa-
city and weight limits, refer to “ Trailer towing ”F 8-20 .
Consumer information and Reporting safety defects
13-11
– CONTINUED –