2010 SUBARU TRIBECA mirror
[x] Cancel search: mirrorPage 6 of 422
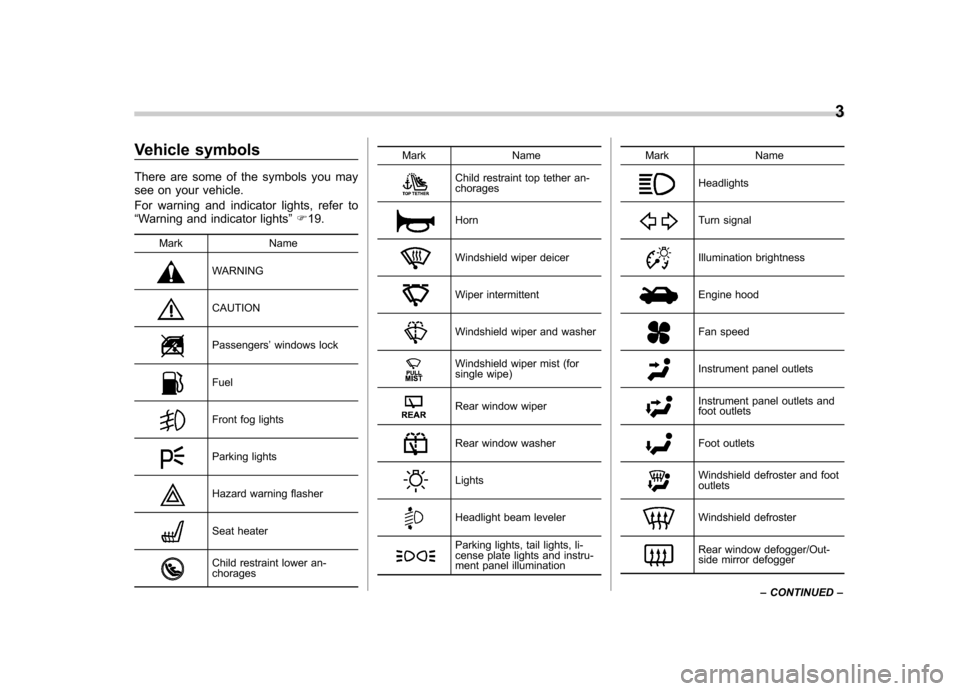
Vehicle symbols
There are some of the symbols you may
see on your vehicle.
For warning and indicator lights, refer to “Warning and indicator lights ”F 19.
Mark Name
WARNING
CAUTION
Passengers ’windows lock
Fuel
Front fog lights
Parking lights
Hazard warning flasher
Seat heater
Child restraint lower an- chorages Mark Name
Child restraint top tether an- chorages
Horn
Windshield wiper deicer
Wiper intermittent
Windshield wiper and washer
Windshield wiper mist (for
single wipe)
Rear window wiper
Rear window washer
Lights
Headlight beam leveler
Parking lights, tail lights, li-
cense plate lights and instru-
ment panel illumination
Mark Name
Headlights
Turn signal
Illumination brightness
Engine hood
Fan speed
Instrument panel outlets
Instrument panel outlets and
foot outlets
Foot outlets
Windshield defroster and foot outlets
Windshield defroster
Rear window defogger/Out-
side mirror defogger3
– CONTINUED –
Page 7 of 422
4
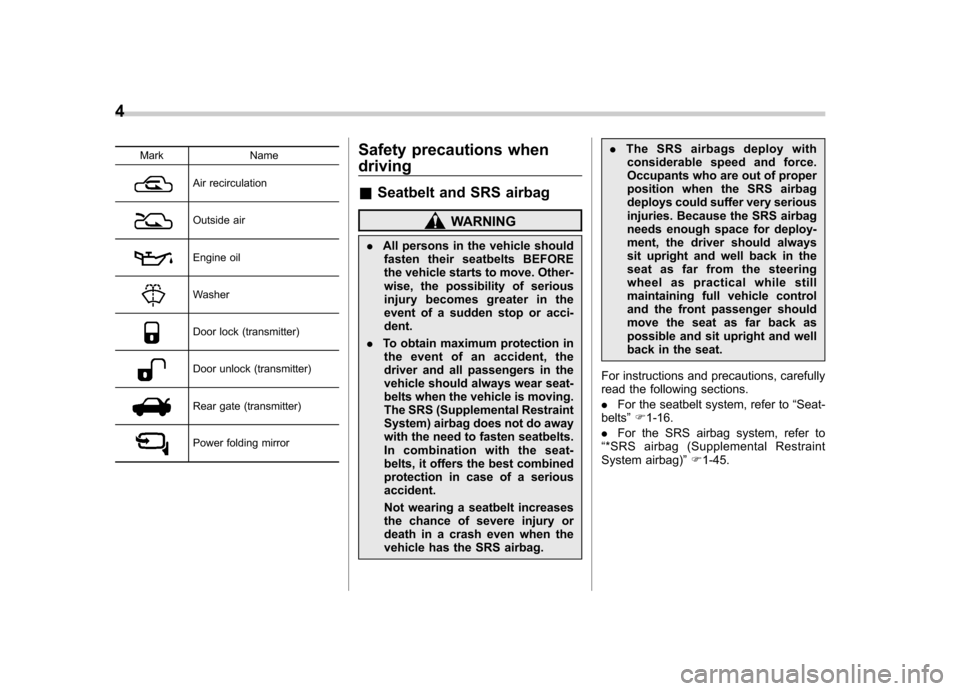
Mark Name
Air recirculation
Outside air
Engine oil
Washer
Door lock (transmitter)
Door unlock (transmitter)
Rear gate (transmitter)
Power folding mirrorSafety precautions when driving &
Seatbelt and SRS airbag
WARNING
. All persons in the vehicle should
fasten their seatbelts BEFORE
the vehicle starts to move. Other-
wise, the possibility of serious
injury becomes greater in the
event of a sudden stop or acci-dent.
. To obtain maximum protection in
the event of an accident, the
driver and all passengers in the
vehicle should always wear seat-
belts when the vehicle is moving.
The SRS (Supplemental Restraint
System) airbag does not do away
with the need to fasten seatbelts.
In combination with the seat-
belts, it offers the best combined
protection in case of a seriousaccident.
Not wearing a seatbelt increases
the chance of severe injury or
death in a crash even when the
vehicle has the SRS airbag. .
The SRS airbags deploy with
considerable speed and force.
Occupants who are out of proper
position when the SRS airbag
deploys could suffer very serious
injuries. Because the SRS airbag
needs enough space for deploy-
ment, the driver should always
sit upright and well back in the
seat as far from the steering
wheel as practical while still
maintaining full vehicle control
and the front passenger should
move the seat as far back as
possible and sit upright and well
back in the seat.
For instructions and precautions, carefully
read the following sections. . For the seatbelt system, refer to “Seat-
belts ”F 1-16.
. For the SRS airbag system, refer to
“ *SRS airbag (Supplemental Restraint
System airbag) ”F 1-45.
Page 18 of 422

&Instrument panel1) Door locks (page 2-5)
2) Illumination brightness control
(page 3-28)
3) Remote control mirror switch (page 3-42)
Power folding mirror switch (if equipped)
(page 3-43)
4) Windshield wiper deicer (page 3-36)
5) Traction Control system OFF switch (page 7-27)
6) Headlight beam leveler (if equipped) (page 3-29)
7) Light control switch (page 3-26)
8) Combination meter (page 3-5)
9) Wiper control lever (page 3-33)
10) Cruise control (page 7-30)
11) Horn (page 3-44)
12) SRS airbag (page 1-45)
13) Tilt steering (page 3-44)
14) Hood lock release knob (page 11-4)
15) Fuse box (page 11-38)
16) Power windows (page 2-21) 15
– CONTINUED –
Page 78 of 422
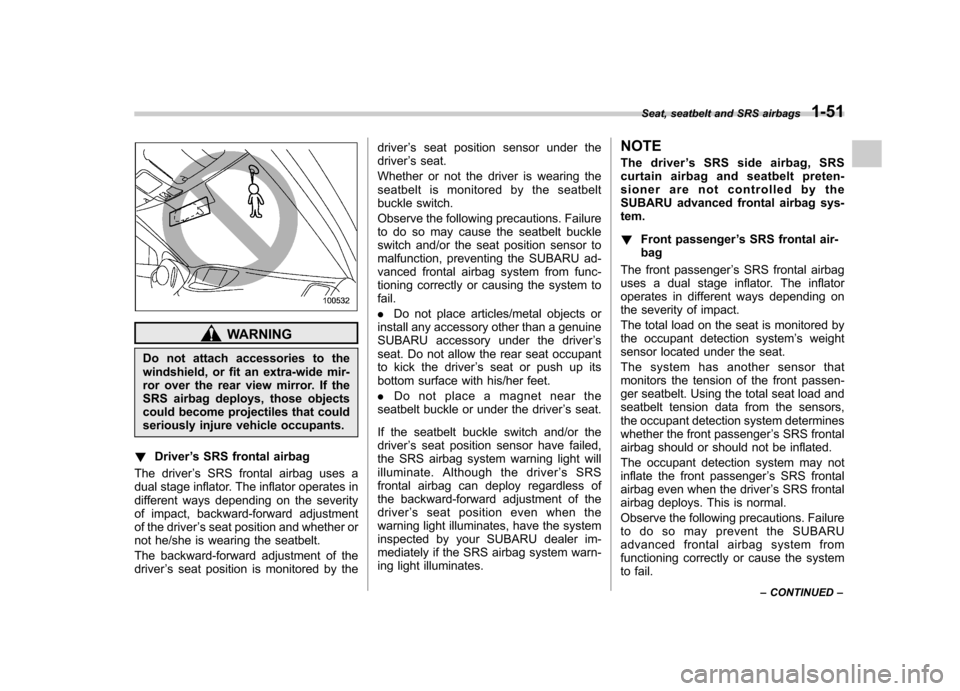
WARNING
Do not attach accessories to the
windshield, or fit an extra-wide mir-
ror over the rear view mirror. If the
SRS airbag deploys, those objects
could become projectiles that could
seriously injure vehicle occupants.
! Driver ’s SRS frontal airbag
The driver ’s SRS frontal airbag uses a
dual stage inflator. The inflator operates in
different ways depending on the severity
of impact, backward-forward adjustment
of the driver ’s seat position and whether or
not he/she is wearing the seatbelt.
The backward-forward adjustment of the driver ’s seat position is monitored by the driver
’s seat position sensor under the
driver ’s seat.
Whether or not the driver is wearing the
seatbelt is monitored by the seatbelt
buckle switch.
Observe the following precautions. Failure
to do so may cause the seatbelt buckle
switch and/or the seat position sensor to
malfunction, preventing the SUBARU ad-
vanced frontal airbag system from func-
tioning correctly or causing the system tofail. . Do not place articles/metal objects or
install any accessory other than a genuine
SUBARU accessory under the driver ’s
seat. Do not allow the rear seat occupant
to kick the driver ’s seat or push up its
bottom surface with his/her feet. . Do not place a magnet near the
seatbelt buckle or under the driver ’s seat.
If the seatbelt buckle switch and/or the driver ’s seat position sensor have failed,
the SRS airbag system warning light will
illuminate. Although the driver ’sSRS
frontal airbag can deploy regardless of
the backward-forward adjustment of the
driver ’s seat position even when the
warning light illuminates, have the system
inspected by your SUBARU dealer im-
mediately if the SRS airbag system warn-
ing light illuminates. NOTE
The driver
’s SRS side airbag, SRS
curtain airbag and seatbelt preten-
sioner are not controlled by the
SUBARU advanced frontal airbag sys-tem. ! Front passenger ’s SRS frontal air-
bag
The front passenger ’s SRS frontal airbag
uses a dual stage inflator. The inflator
operates in different ways depending on
the severity of impact.
The total load on the seat is monitored by
the occupant detection system ’s weight
sensor located under the seat.
The system has another sensor that
monitors the tension of the front passen-
ger seatbelt. Using the total seat load and
seatbelt tension data from the sensors,
the occupant detection system determines
whether the front passenger ’s SRS frontal
airbag should or should not be inflated.
The occupant detection system may not
inflate the front passenger ’s SRS frontal
airbag even when the driver ’s SRS frontal
airbag deploys. This is normal.
Observe the following precautions. Failure
to do so may prevent the SUBARU
advanced frontal airbag system from
functioning correctly or cause the system
to fail. Seat, seatbelt and SRS airbags
1-51
– CONTINUED –
Page 131 of 422

Instruments and controlsLight control switch ........................................... 3-26
Headlights. ......................................................... 3-26
High/low beam change (dimmer) ......................... 3-27
Headlight flasher ................................................ 3-27
Daytime running light system ............................. 3-27
Turn signal lever ................................................ 3-28
Illumination brightness control ......................... 3-28
Headlight beam leveler (if equipped) ................ 3-29
For 5-seater models ........................................... 3-30
For 7-seater models ........................................... 3-31
Parking light switch ........................................... 3-32
Front fog light switch ......................................... 3-32 Wiper and washer
.............................................. 3-33
Windshield wiper and washer switches .............. 3-34
Rear window wiper and washer switch ............... 3-35
Windshield wiper deicer .................................... 3-36
Rear window defogger button .......................... 3-37
Mirrors ................................................................ 3-38
Type A inside mirror (if equipped) . ..................... 3-38
Type B inside mirror (if equipped) . ..................... 3-38
Type C inside mirror (if equipped) . ..................... 3-41
Outside mirrors ................................................. 3-42
Tilt steering wheel ............................................. 3-44
Horn .................................................................... 3-44
Page 167 of 422
3-38Instruments and controls
NOTE
The outside mirror defogger also oper-
ates while the rear window defogger isoperating. Mirrors
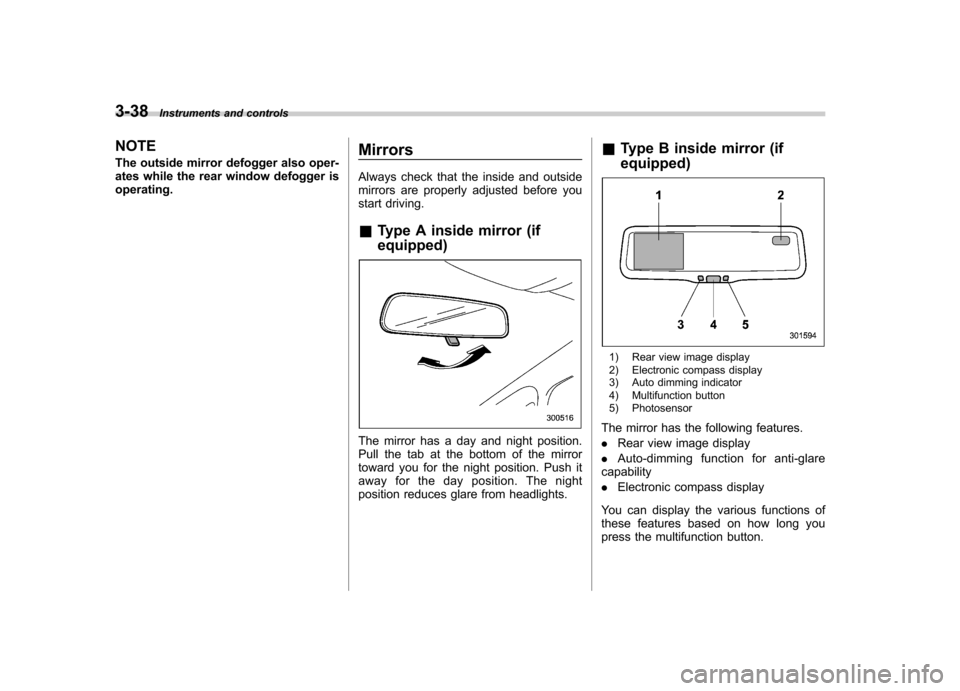
Always check that the inside and outside
mirrors are properly adjusted before you
start driving. &
Type A inside mirror (if equipped)
The mirror has a day and night position.
Pull the tab at the bottom of the mirror
toward you for the night position. Push it
away for the day position. The night
position reduces glare from headlights. &
Type B inside mirror (if equipped)
1) Rear view image display
2) Electronic compass display
3) Auto dimming indicator
4) Multifunction button
5) Photosensor
The mirror has the following features. . Rear view image display
. Auto-dimming function for anti-glare
capability. Electronic compass display
You can display the various functions of
these features based on how long you
press the multifunction button.
Page 168 of 422
Gear
position Period of
time multi-
function
button is pressed Function
displayed
R (reverse) Briefly
Rear view display ON/OFF*
More than
3 seconds Help lines indica-
tion ON/OFF
Except
R (reverse) Briefly
Auto-dimming
function ON/OFF*
3to6 seconds Electronic com-
pass display ON/ OFF
6to9seconds Enter the com-
pass zone setting mode
9to12 seconds Enter the com-
pass calibration mode
*: The setting returns to “ON ”as a default
setting every time the ignition switch is turned tothe “ON ”position.
! Rear view image display
When the ignition switch is “ON ”and the
select lever is set to “R ”, the rear view
camera automatically displays the rear
view image behind the vehicle on the
inside mirror.
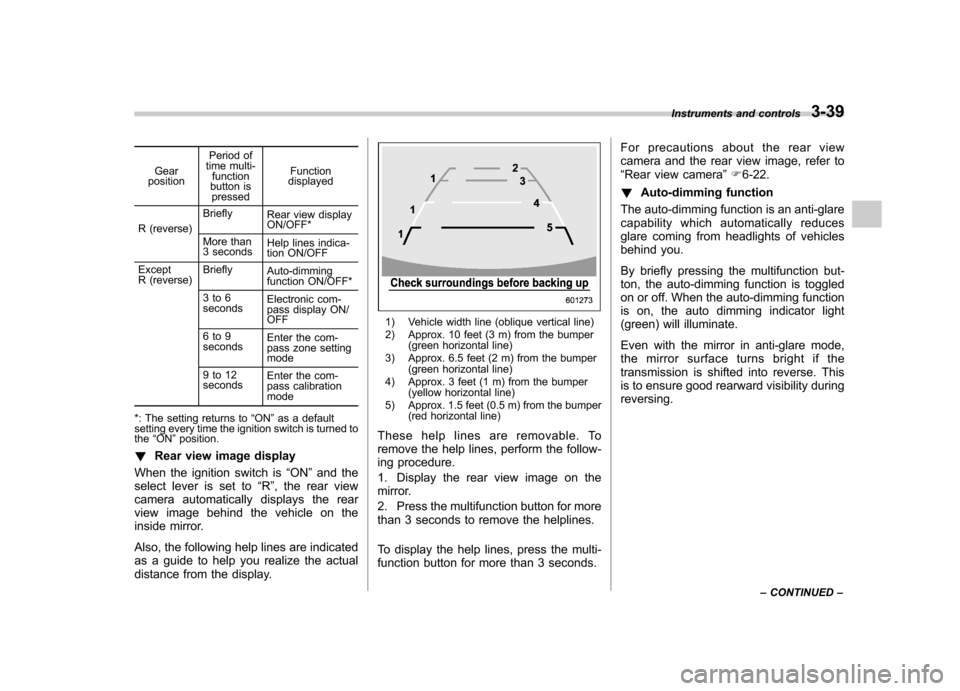
Also, the following help lines are indicated
as a guide to help you realize the actual
distance from the display.
1) Vehicle width line (oblique vertical line)
2) Approx. 10 feet (3 m) from the bumper (green horizontal line)
3) Approx. 6.5 feet (2 m) from the bumper (green horizontal line)
4) Approx. 3 feet (1 m) from the bumper (yellow horizontal line)
5) Approx. 1.5 feet (0.5 m) from the bumper (red horizontal line)
These help lines are removable. To
remove the help lines, perform the follow-
ing procedure.
1. Display the rear view image on the
mirror.
2. Press the multifunction button for more
than 3 seconds to remove the helplines.
To display the help lines, press the multi-
function button for more than 3 seconds. For precautions about the rear view
camera and the rear view image, refer to“
Rear view camera ”F 6-22.
! Auto-dimming function
The auto-dimming function is an anti-glare
capability which automatically reduces
glare coming from headlights of vehicles
behind you.
By briefly pressing the multifunction but-
ton, the auto-dimming function is toggled
on or off. When the auto-dimming function
is on, the auto dimming indicator light
(green) will illuminate.
Even with the mirror in anti-glare mode,
the mirror surface turns bright if the
transmission is shifted into reverse. This
is to ensure good rearward visibility duringreversing. Instruments and controls
3-39
– CONTINUED –
Page 169 of 422
3-40Instruments and controls
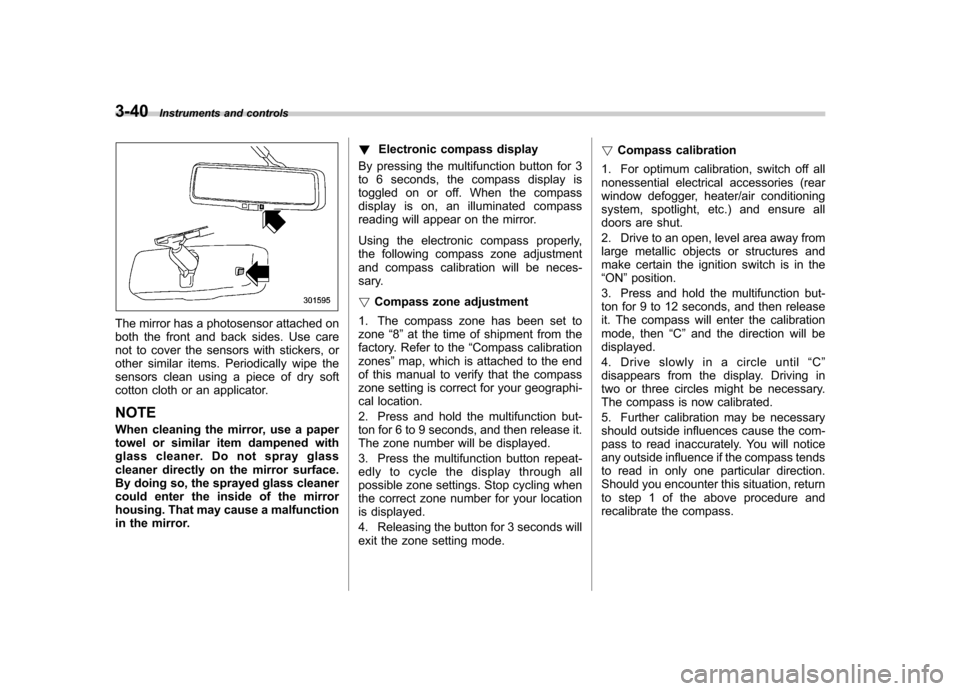
The mirror has a photosensor attached on
both the front and back sides. Use care
not to cover the sensors with stickers, or
other similar items. Periodically wipe the
sensors clean using a piece of dry soft
cotton cloth or an applicator. NOTE
When cleaning the mirror, use a paper
towel or similar item dampened with
glass cleaner. Do not spray glass
cleaner directly on the mirror surface.
By doing so, the sprayed glass cleaner
could enter the inside of the mirror
housing. That may cause a malfunction
in the mirror. !
Electronic compass display
By pressing the multifunction button for 3
to 6 seconds, the compass display is
toggled on or off. When the compass
display is on, an illuminated compass
reading will appear on the mirror.
Using the electronic compass properly,
the following compass zone adjustment
and compass calibration will be neces-
sary. ! Compass zone adjustment
1. The compass zone has been set to zone “8 ” at the time of shipment from the
factory. Refer to the “Compass calibration
zones ”map, which is attached to the end
of this manual to verify that the compass
zone setting is correct for your geographi-
cal location.
2. Press and hold the multifunction but-
ton for 6 to 9 seconds, and then release it.
The zone number will be displayed.
3. Press the multifunction button repeat-
edly to cycle the display through all
possible zone settings. Stop cycling when
the correct zone number for your location
is displayed.
4. Releasing the button for 3 seconds will
exit the zone setting mode. !
Compass calibration
1. For optimum calibration, switch off all
nonessential electrical accessories (rear
window defogger, heater/air conditioning
system, spotlight, etc.) and ensure all
doors are shut.
2. Drive to an open, level area away from
large metallic objects or structures and
make certain the ignition switch is in the“ ON ”position.
3. Press and hold the multifunction but-
ton for 9 to 12 seconds, and then release
it. The compass will enter the calibration
mode, then “C ” and the direction will be
displayed.
4. Drive slowly in a circle until “C ”
disappears from the display. Driving in
two or three circles might be necessary.
The compass is now calibrated.
5. Further calibration may be necessary
should outside influences cause the com-
pass to read inaccurately. You will notice
any outside influence if the compass tends
to read in only one particular direction.
Should you encounter this situation, return
to step 1 of the above procedure and
recalibrate the compass.