2010 SUBARU TRIBECA driver seat adjustment
[x] Cancel search: driver seat adjustmentPage 28 of 422

Front seats........................................................... 1-2
Power seat .......................................................... 1-3
Memory function (driver ’s seat –if equipped) ....... 1-4
Head restraint adjustment .................................... 1-5
Active head restraint ........................................... 1-6
Lumbar support .................................................. 1-6
Seat heater (if equipped) .................................... 1-7
Rear seats (5-seater models)/Second-row seats (7-seater models) ................................... 1-7
Forward and backward adjustment ...................... 1-8
Reclining the seatback ........................................ 1-9
Folding down the seatback ................................. 1-10
Head restraint adjustment ................................... 1-11
Armrest ............................................................. 1-13
Third-row seat (7-seater models) ...................... 1-13
Access to the third-row seat ............................... 1-13
Folding down the seatback ................................. 1-14
Head restraint adjustment ................................... 1-15
Seatbelts ............................................................. 1-16
Seatbelt safety tips ............................................. 1-16
Emergency Locking Retractor (ELR) ................... 1-18
Automatic/Emergency Locking Retractor (A/ELR) ............................................................ 1-18
Seatbelt warning light and chime ........................ 1-18Fastening the seatbelt
........................................ 1-19
Seatbelt maintenance ......................................... 1-28
Front seatbelt pretensioners ............................. 1-28
System monitors ............................................... 1-29
System servicing ............................................... 1-30
Precautions against vehicle modification ............ 1-31
Child restraint systems ..................................... 1-31
Where to place a child restraint system .............. 1-32
Choosing a child restraint system ...................... 1-34
Installing child restraint systems with A/ELR seatbelt ........................................................... 1-34
Installing a booster seat ..................................... 1-37
Installation of child restraint systems by use of lower and tether anchorages (LATCH) .............. 1-38
Top tether anchorages ....................................... 1-41
*SRS airbag (Supplemental Restraint System airbag) ................................................ 1-45
Your vehicle ’s SRS configuration ....................... 1-45
SUBARU advanced frontal airbag system ........... 1-49
SRS side airbag and SRS curtain airbag ............. 1-60
SRS airbag system monitors .............................. 1-71
SRS airbag system servicing ... .......................... 1-72
Precautions against vehicle modification ............ 1-72
Seat, seatbelt and SRS airbags1
Page 30 of 422

tions. For instructions and precau-
tions concerning child restraint sys-
tems, refer to“Child restraint sys-
tems ”F 1-31.
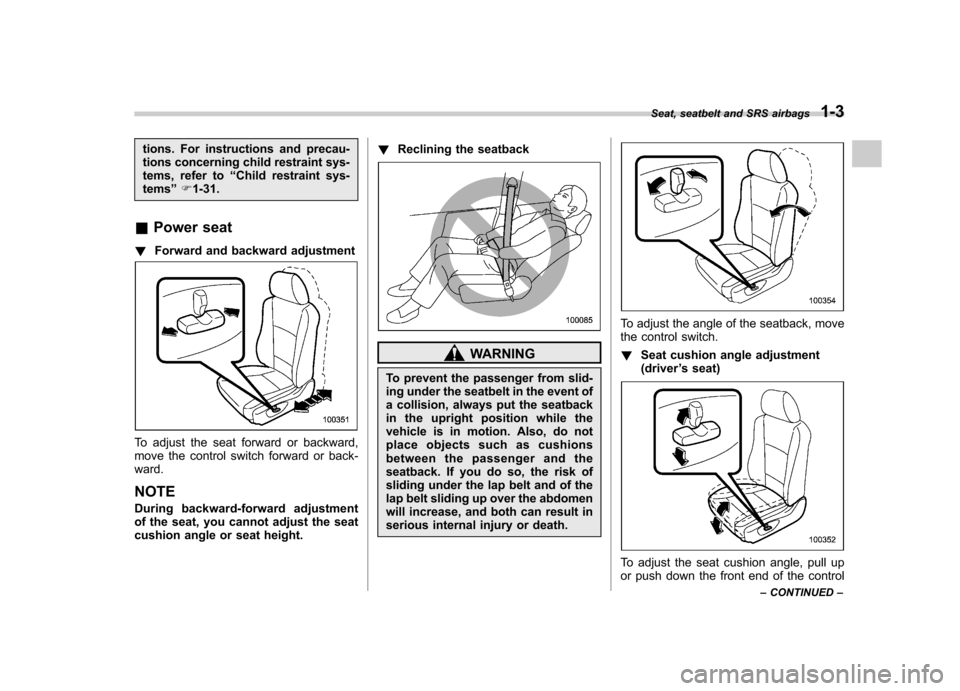
& Power seat
! Forward and backward adjustment
To adjust the seat forward or backward,
move the control switch forward or back-ward. NOTE
During backward-forward adjustment
of the seat, you cannot adjust the seat
cushion angle or seat height. !
Reclining the seatback
WARNING
To prevent the passenger from slid-
ing under the seatbelt in the event of
a collision, always put the seatback
in the upright position while the
vehicle is in motion. Also, do not
place objects such as cushions
between the passenger and the
seatback. If you do so, the risk of
sliding under the lap belt and of the
lap belt sliding up over the abdomen
will increase, and both can result in
serious internal injury or death.
To adjust the angle of the seatback, move
the control switch. ! Seat cushion angle adjustment (driver ’s seat)
To adjust the seat cushion angle, pull up
or push down the front end of the control Seat, seatbelt and SRS airbags
1-3
– CONTINUED –
Page 31 of 422

1-4Seat, seatbelt and SRS airbags
switch. !Seat height adjustment (driver ’s
seat)
To adjust the seat height, pull up or push
down the rear end of the control switch. & Memory function (driver ’s
seat –if equipped)
Two of your favorite seat positions can be
registered. Register the seat position withbutton “1 ” or “2 ” and retrieve the seat
position by pressing either button.
The following seat positions can be registered. . Forward/backward position of the seat
. Angle of seatback
. Angle of seat cushion .
Height of seat
! Registration of seat position
WARNING
. Never adjust the seat while driv-
ing to avoid the possibility of
loss of vehicle control and of
personal injury.
. Before adjusting the seat, make
sure the hands and feet of rear
seat passengers or luggage are
clear of the adjusting mechan-ism.
1. With the select lever in the “P ” posi-
tion, adjust the seat position.
2. While pressing the “SET ”button, press the desired button
“1 ” or “2 ”.
3. The chime sounds once, and the seat
position is registered. ! Retrieval of seat position
WARNING
. Never retrieve the seat position
while driving to avoid the possi-
bility of loss of vehicle control
and of personal injury.
. Perform the seat position retrie-
val before driving. Be sure to
confirm that the select lever
position is in the “P ” position.
Do not drive until the retrieval of
the seat position is complete.
. Be sure to press the correct
button to retrieve your registered
seat position. If the seat position
is not optimum for you, it may
adversely affect your driving and
may reduce the effectiveness of
the seatbelt. That could result in
an accident involving serious
injury or death.
. When retrieving a registered seat
position, make sure the hands,
feet and possessions of rear seat
passengers are clear of the seat
adjusting mechanism.
Page 32 of 422

.When any trouble or a malfunc-
tion occurs during the retrieval of
the seat position, stop the retrie-
val of the seat position using any
of the control switches for man-
ual adjustment, seat memory set
button, seat memory registered
button 1 or 2.
1. With the select lever in the “P ” posi-
tion, press the desired button “1 ” or “2 ”.
2. The chime sounds once and the seat
moves to the registered position.
3. When the seat moves to the registered
position, the chime sounds twice.
NOTE . If a new position is registered for the same button, the previous seat posi-
tion is deleted..
Even if the battery is disconnected,
the registered seat position is notdeleted. & Head restraint adjustment
1) Head restraint
2) Release button
Both the driver ’s seat and the front
passenger ’s seat are equipped with head
restraints.
The head restraint should be adjusted so
that the center of the head restraint is
closest to the top of the occupant ’s ears. To raise:
Pull the head restraint up.
To lower:
Push the head restraint down while
pressing the release button on the top of
the seatback.
To remove:
While pressing the release button, pull out
the head restraint.
To install:
Install the head restraint into the holes that
are located on the top of the seatback until
the head restraint locks.
WARNING
. Never drive the vehicle with the
head restraints removed because
they are designed to reduce the
risk of serious neck injury in the
event that the vehicle is struck
from the rear. Therefore, when
you remove the head restraints,
you must reinstall all head re-
straints to protect vehicle occu-pants.
. All occupants, including the dri-
ver, should not operate a vehicle
or sit in a vehicle ’s seat until the
head restraints are placed in their
proper positions in order to mini-
mize the risk of neck injury in the Seat, seatbelt and SRS airbags
1-5
– CONTINUED –
Page 78 of 422

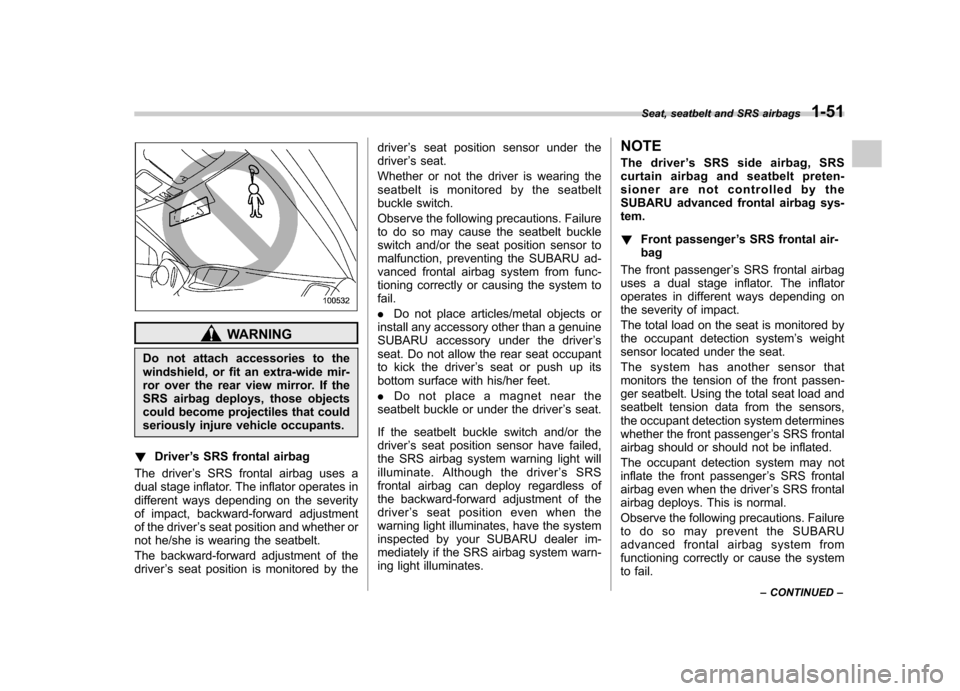
WARNING
Do not attach accessories to the
windshield, or fit an extra-wide mir-
ror over the rear view mirror. If the
SRS airbag deploys, those objects
could become projectiles that could
seriously injure vehicle occupants.
! Driver ’s SRS frontal airbag
The driver ’s SRS frontal airbag uses a
dual stage inflator. The inflator operates in
different ways depending on the severity
of impact, backward-forward adjustment
of the driver ’s seat position and whether or
not he/she is wearing the seatbelt.
The backward-forward adjustment of the driver ’s seat position is monitored by the driver
’s seat position sensor under the
driver ’s seat.
Whether or not the driver is wearing the
seatbelt is monitored by the seatbelt
buckle switch.
Observe the following precautions. Failure
to do so may cause the seatbelt buckle
switch and/or the seat position sensor to
malfunction, preventing the SUBARU ad-
vanced frontal airbag system from func-
tioning correctly or causing the system tofail. . Do not place articles/metal objects or
install any accessory other than a genuine
SUBARU accessory under the driver ’s
seat. Do not allow the rear seat occupant
to kick the driver ’s seat or push up its
bottom surface with his/her feet. . Do not place a magnet near the
seatbelt buckle or under the driver ’s seat.
If the seatbelt buckle switch and/or the driver ’s seat position sensor have failed,
the SRS airbag system warning light will
illuminate. Although the driver ’sSRS
frontal airbag can deploy regardless of
the backward-forward adjustment of the
driver ’s seat position even when the
warning light illuminates, have the system
inspected by your SUBARU dealer im-
mediately if the SRS airbag system warn-
ing light illuminates. NOTE
The driver
’s SRS side airbag, SRS
curtain airbag and seatbelt preten-
sioner are not controlled by the
SUBARU advanced frontal airbag sys-tem. ! Front passenger ’s SRS frontal air-
bag
The front passenger ’s SRS frontal airbag
uses a dual stage inflator. The inflator
operates in different ways depending on
the severity of impact.
The total load on the seat is monitored by
the occupant detection system ’s weight
sensor located under the seat.
The system has another sensor that
monitors the tension of the front passen-
ger seatbelt. Using the total seat load and
seatbelt tension data from the sensors,
the occupant detection system determines
whether the front passenger ’s SRS frontal
airbag should or should not be inflated.
The occupant detection system may not
inflate the front passenger ’s SRS frontal
airbag even when the driver ’s SRS frontal
airbag deploys. This is normal.
Observe the following precautions. Failure
to do so may prevent the SUBARU
advanced frontal airbag system from
functioning correctly or cause the system
to fail. Seat, seatbelt and SRS airbags
1-51
– CONTINUED –
Page 178 of 422

Automatic climate control system NOTE .Operate the automatic climate con-
trol system when the engine is running. . The blower fan rotates at a low
speed when the engine coolant tem-
perature is low.
For efficient defogging or dehumidify-
ing in cold weather, press the “A/C ”
button.. Even when cooling is not necessary,
setting the temperature much lower
than the current outlet air temperature
turns on the air conditioner compres-
sor automatically and the indicator
light on the “A/C ”button illuminates.
. 7-seater models each have a rear air
conditioner. The fan speed of the rear
air conditioner can be adjusted, but
other adjustments (outlet air tempera-
ture, air distribution, etc.) are not
possible for the rear air conditioner.
For details, refer to “Rear air condi-
tioner ”F 4-8.
The automatic climate control system
automatically controls outlet air tempera-
ture, fan speed, airflow distribution, air
inlet control, and air conditioner compres-
sor operation. It activates when the “
AUTO ”button is pressed, and is used to
maintain a constant, comfortable climate
within the passenger compartment.
The temperature can be set within a range
of 65 to 85 8F (18 to 32 8C).
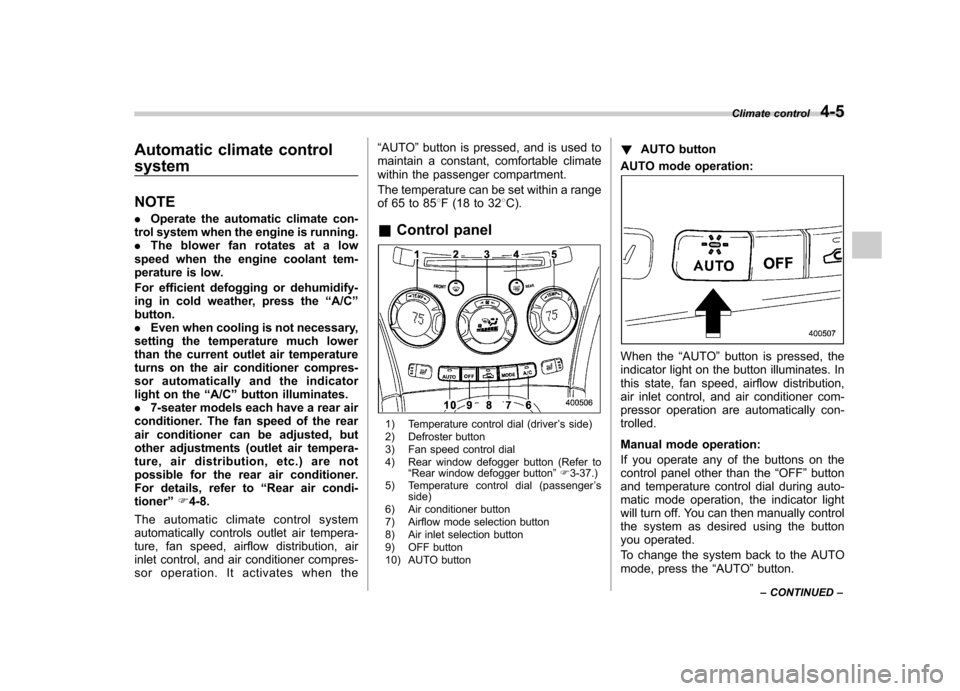
& Control panel
1) Temperature control dial (driver ’s side)
2) Defroster button
3) Fan speed control dial
4) Rear window defogger button (Refer to “Rear window defogger button ”F 3-37.)
5) Temperature control dial (passenger ’s
side)
6) Air conditioner button
7) Airflow mode selection button
8) Air inlet selection button
9) OFF button
10) AUTO button !
AUTO button
AUTO mode operation:
When the “AUTO ”button is pressed, the
indicator light on the button illuminates. In
this state, fan speed, airflow distribution,
air inlet control, and air conditioner com-
pressor operation are automatically con-trolled.
Manual mode operation:
If you operate any of the buttons on the
control panel other than the “OFF ”button
and temperature control dial during auto-
matic mode operation, the indicator light
will turn off. You can then manually control
the system as desired using the button
you operated.
To change the system back to the AUTO
mode, press the “AUTO ”button.
Climate control
4-5
– CONTINUED –