2010 SUBARU TRIBECA seat adjustment
[x] Cancel search: seat adjustmentPage 191 of 422
5-4Audio
Type A audio set (if equipped)
The audio set will operate only when the ignition switch is in the “Acc ”or “ON ”position.
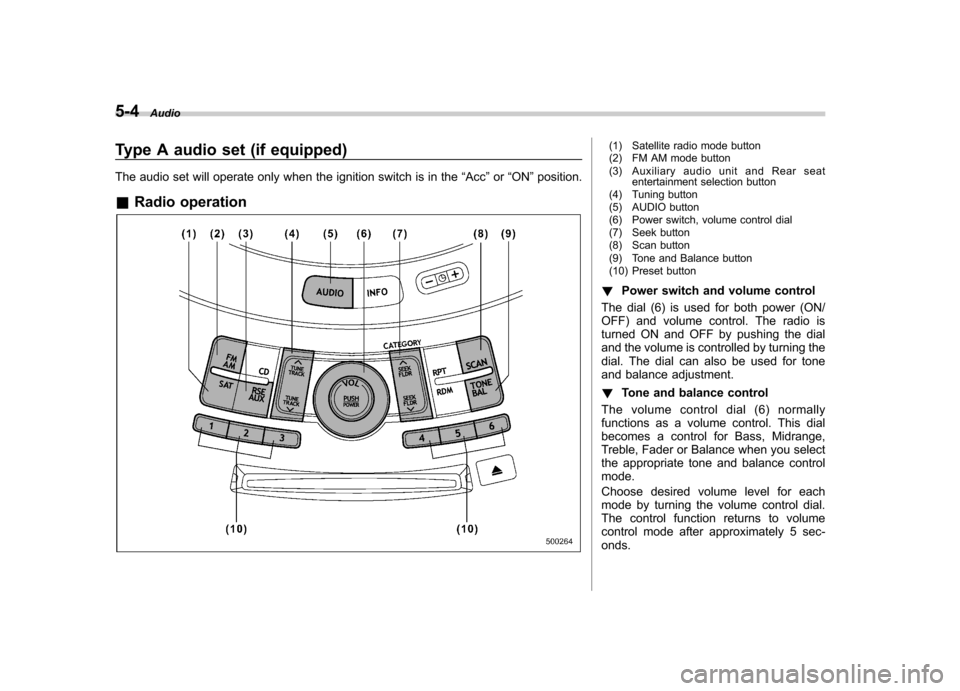
& Radio operation(1) Satellite radio mode button
(2) FM AM mode button
(3) Auxiliary audio unit and Rear seat
entertainment selection button
(4) Tuning button
(5) AUDIO button
(6) Power switch, volume control dial
(7) Seek button
(8) Scan button
(9) Tone and Balance button
(10) Preset button
! Power switch and volume control
The dial (6) is used for both power (ON/
OFF) and volume control. The radio is
turned ON and OFF by pushing the dial
and the volume is controlled by turning the
dial. The dial can also be used for tone
and balance adjustment. ! Tone and balance control
The volume control dial (6) normally
functions as a volume control. This dial
becomes a control for Bass, Midrange,
Treble, Fader or Balance when you select
the appropriate tone and balance controlmode.
Choose desired volume level for each
mode by turning the volume control dial.
The control function returns to volume
control mode after approximately 5 sec-onds.
Page 202 of 422
Type B audio set (if equipped)
The audio set will operate only when the ignition switch is in the“Acc ”or “ON ”positions.
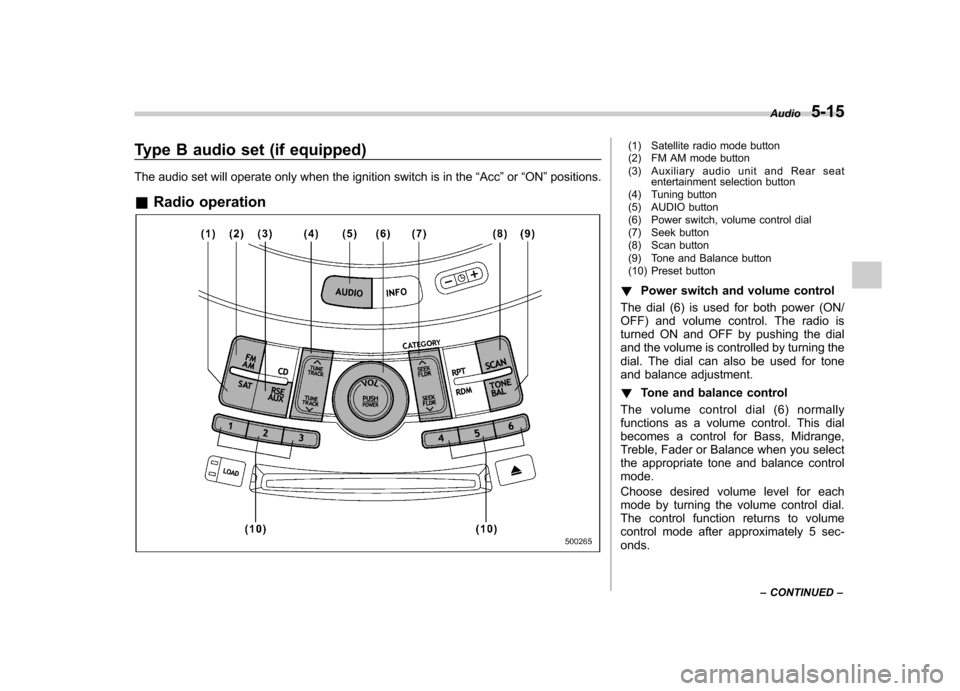
& Radio operation(1) Satellite radio mode button
(2) FM AM mode button
(3) Auxiliary audio unit and Rear seat
entertainment selection button
(4) Tuning button
(5) AUDIO button
(6) Power switch, volume control dial
(7) Seek button
(8) Scan button
(9) Tone and Balance button
(10) Preset button
! Power switch and volume control
The dial (6) is used for both power (ON/
OFF) and volume control. The radio is
turned ON and OFF by pushing the dial
and the volume is controlled by turning the
dial. The dial can also be used for tone
and balance adjustment. ! Tone and balance control
The volume control dial (6) normally
functions as a volume control. This dial
becomes a control for Bass, Midrange,
Treble, Fader or Balance when you select
the appropriate tone and balance controlmode.
Choose desired volume level for each
mode by turning the volume control dial.
The control function returns to volume
control mode after approximately 5 sec-onds. Audio
5-15
– CONTINUED –
Page 250 of 422

Preparing to drive
You should perform the following checks
and adjustments every day before you
start driving.
1. Check that all windows, mirrors, and
lights are clean and unobstructed.
2. Check the appearance and condition
of the tires. Also check tires for properinflation.
3. Look under the vehicle for any sign of leaks.
4. Check that the hood and rear gate are
fully closed.
5. Check the adjustment of the seat.
6. Check the adjustment of the inside
and outside mirrors.
7. Fasten your seatbelt. Check that your
passengers have fastened their seatbelts.
8. Check the operation of the warning
and indicator lights when the ignition
switch is turned to the“ON ”position.
9. Check the gauges, indicator and warn-
ing lights after starting the engine.
NOTE
Engine oil, engine coolant, brake fluid,
washer fluid and other fluid levels
should be checked daily, weekly or at
fuel stops. Starting the engine
CAUTION
. Do not operate the starter motor
continuously for more than 10
seconds. If the engine fails to
start after operating the starter
for 5 to 10 seconds, wait for 10
seconds or more before tryingagain.
. If you restart the engine while the
vehicle is moving, shift the select
lever into the “N ” position. Do
not attempt to place the select
lever of a moving vehicle into the“ P ” position.
1. Apply the parking brake.
2. Turn off unnecessary lights and ac- cessories.
3. Shift the select lever to the “P ” or “N ”
position (preferably “P ” position). The
starter will only operate when the select
lever is at the “P ”or “N ”position.
4. Turn the ignition switch to the “ON ”
position and check the operation of the
warning and indicator lights. Refer to“ Warning and indicator lights ”F 3-9.
5. Turn the ignition switch to the “START ”
position without depressing the accelera- tor pedal. Release the key immediately
after the engine has started.
If the engine does not start, try the following.
(1) Turn the ignition switch to the“LOCK ”position and wait for at least
10 seconds. After checking that the
parking brake is firmly set, turn the
ignition switch to the “START ”position
while depressing the accelerator pedal
slightly (approximately a quarter of the
full stroke). Release the accelerator
pedal as soon as the engine starts.
(2) If this fails to start the engine, turn
the ignition switch back to the “LOCK ”
position and wait for at least 10
seconds. Then fully depress the accel-
erator pedal and turn the ignition
switch to the “START ”position. If the
engine starts, quickly release the
accelerator pedal.
(3) If this fails to start the engine, turn
the ignition switch again to the “LOCK ”
position. After waiting for 10 seconds
or longer, turn the ignition switch to the“ START ”position without depressing
the accelerator pedal.
(4) If the engine still refuses to start,
contact your nearest SUBARU dealer
for assistance.
6. Confirm that all warning and indicator
lights have turned off after the engine has Starting and operating
7-7
– CONTINUED –
Page 414 of 422

Fog light...................................................... 3-32, 11-43
Fog light indicator light ............................................ 3-21
Seatbelt pretensioners ............................................ 1-28
Turn signal light .................................................... 11-43
Front seats .................................................................. 1-2
Forward and backward adjustment ............................. 1-3
Power seat .............................................................. 1-3
Reclining ................................................................. 1-3
Fuel ........................................................................... 7-2
Economy hints ......................................................... 8-2
Filler lid and cap ...................................................... 7-3
Gauge .................................................................... 3-8
Requirements .......................................................... 7-2
Fuses ...................................................................... 11-38
Main fuse ............................................................. 11-39
Fuses and circuits ...................................................... 12-5
G
GAWR (Gross Axle Weight Rating) .............................. 8-12
Glove box ................................................................... 6-6
GVWR (Gross Vehicle Weight Rating) .......................... 8-12
H
Hazard warning flasher ........................................... 3-5, 9-2
Head restraint adjustment Front seat ............................................................... 1-5
Rear (5-seater models)/Second-row (7-seater models) ................................................. 1-11
Third-row .............................................................. 1-15
Headlight Beam leveler ......................................................... 3-29 Bulb replacement
................................................. 11-40
Control switch ........................................................ 3-26
Flasher .................................................................. 3-27
Indicator light ......................................................... 3-21
High beam indicator light ............................................. 3-20
High/low beam change (dimmer) .................................. 3-27
HomeLink® Wireless Control System ............................ 6-17
Hook
Coat ..................................................................... 6-12
Convenient tie-down ............................................... 6-16
Shopping bag ........................................................ 6-13
Towing and tie-down ............................................... 9-15
Horn ......................................................................... 3-44
Hose and connections ............................................... 11-11
I
Ignition switch ............................................................. 3-3
Light ...................................................................... 3-4
Illuminated entry ......................................................... 2-10
Illumination brightness control ...................................... 3-28
Immobilizer ................................................................. 2-3
Indicator light (security indicator light) ................. 2-4, 3-19
Indicator light Cruise control ................................................ 3-20, 7-33
Cruise control set ........................................... 3-21, 7-33
Front fog light ......................................................... 3-21
Headlight ............................................................... 3-21
High beam ............................................................. 3-20
Immobilizer ............................................................ 3-19
Security .......................................................... 2-4, 3-19
Select lever/Gear position ........................................ 3-20Index
14-5