2010 SUBARU OUTBACK lights
[x] Cancel search: lightsPage 127 of 448

indicator needle is pointing to the“+ ” side,
it indicates fuel-efficient driving.
Except U.S.-spec. models:
If the current rate of fuel consumption is
lower than the average rate of fuel
consumption, the indicator needle points
to the “� ” side. If the current rate of fuel
consumption is higher than the average
rate of fuel consumption, the indicator
needle points to the “+ ” side. When the
indicator needle is pointing to the “� ” side,
it indicates fuel-efficient driving.
NOTE . The ECO gauge shows only an
approximate indication. . After resetting the trip meter, the
average rate of fuel consumption is not
shown until driving 0.6 mile (1 km).
Until that time, the ECO gauge does notoperate. Warning and indicator lights
Several of the warning and indicator lights
illuminate momentarily and then go out
when the ignition switch is initially turned
to the
“ON ”position. This permits check-
ing the operation of the bulbs.
Apply the parking brake and turn the
ignition switch to the “ON ”position. The
following lights illuminate:
: Seatbelt warning light (The seatbelt warning light turns off
only when the driver fastens theseatbelt.)
: Front passenger ’s seatbelt warning
light
(The seatbelt warning light turns off
only when the front seat passenger
fastens the seatbelt.)
: SRS airbag system warning light
: CHECK ENGINE warning light/Mal-
function indicator lamp
: Coolant temperature high warning light
: Charge warning light
: Oil pressure warning light
: Engine low oil level warning light
: Windshield washer fluid warning light
: AT OIL TEMP warning light(AT and CVT models)
/: ABS warning light
: Vehicle Dynamics Control warning light/Vehicle Dynamics Control opera-
tion indicator light
: Vehicle Dynamics Control OFF indica-tor light
/: Brake system warning light
: Hill Holder indicator light
: All-Wheel Drive warning light (AT andCVT models)
: Low tire pressure warning light (U.S.-spec. models)
ON /
: Front passenger ’s frontal airbag
ON indicator light
/: Front passenger ’s frontal airbag
OFF indicator light
: Low fuel warning light
: Door open warning light
: Door open indicator light
: Cruise control indicator light
: Cruise control set indicator light
: Select lever/gear position indicator Instruments and controls
3-9
– CONTINUED –
Page 128 of 448

3-10Instruments and controls
If any lights fail to illuminate, it indicates a
burned-out bulb or a malfunction of the
corresponding system.
Consult your authorized SUBARU dealer
for repair. & Seatbelt warning light
and chime
Your vehicle is equipped with a seatbelt
warning device at the driver ’s and front
passenger ’s seat, as required by current
safety standards.
With the ignition switch turned to the “ON ”
position, this device reminds the driver
and front passenger to fasten their seat-
belts by the warning lights in the locations
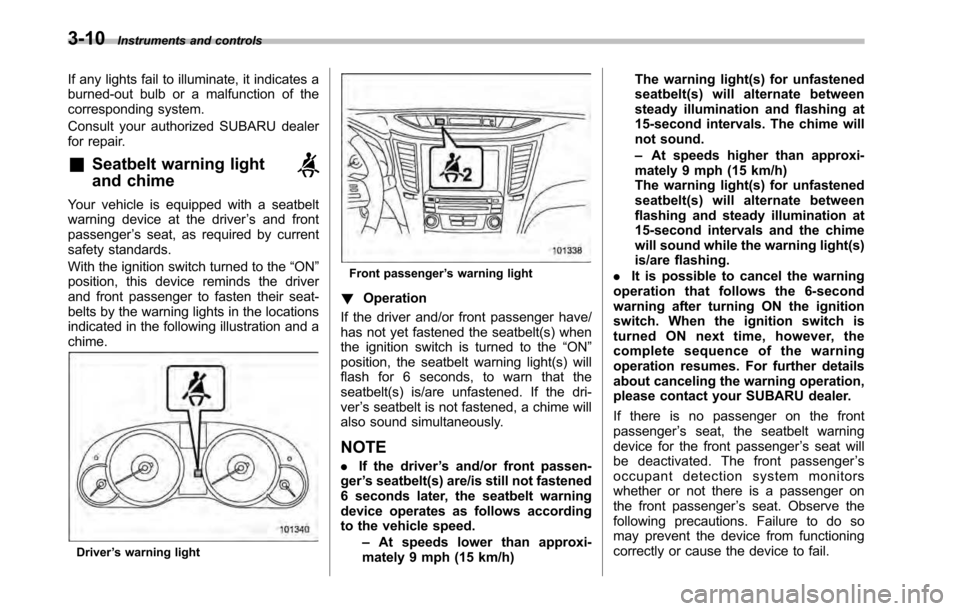
indicated in the following illustration and achime.
Driver ’s warning light
Front passenger ’s warning light
! Operation
If the driver and/or front passenger have/
has not yet fastened the seatbelt(s) when
the ignition switch is turned to the “ON ”
position, the seatbelt warning light(s) will
flash for 6 seconds, to warn that the
seatbelt(s) is/are unfastened. If the dri-ver ’s seatbelt is not fastened, a chime will
also sound simultaneously.
NOTE . If the driver ’s and/or front passen-
ger ’s seatbelt(s) are/is still not fastened
6 seconds later, the seatbelt warning
device operates as follows according
to the vehicle speed.
–At speeds lower than approxi-
mately 9 mph (15 km/h) The warning light(s) for unfastened
seatbelt(s) will alternate between
steady illumination and flashing at
15-second intervals. The chime will
not sound. –
At speeds higher than approxi-
mately 9 mph (15 km/h)
The warning light(s) for unfastened
seatbelt(s) will alternate between
flashing and steady illumination at
15-second intervals and the chime
will sound while the warning light(s)
is/are flashing.
. It is possible to cancel the warning
operation that follows the 6-second
warning after turning ON the ignition
switch. When the ignition switch is
turned ON next time, however, the
complete sequence of the warning
operation resumes. For further details
about canceling the warning operation,
please contact your SUBARU dealer.
If there is no passenger on the front passenger ’s seat, the seatbelt warning
device for the front passenger ’s seat will
be deactivated. The front passenger ’s
occupant detection system monitors
whether or not there is a passenger on
the front passenger ’s seat. Observe the
following precautions. Failure to do so
may prevent the device from functioning
correctly or cause the device to fail.
Page 136 of 448

3-18Instruments and controls
NOTE . When the ignition switch is turned to
the “LOCK ”position with the electronic
parking brake applied, the brake sys-
tem warning light remains illuminated
for approximately 30 seconds and then
turns off.. When the electronic parking brake
switch is pressed to apply the electro-
nic parking brake while the ignition
switch is in the “LOCK ”position, the
brake system warning light illuminates,
remains illuminated for approximately
30 seconds and then turns off.. Even if the brake system warning
light flashes, if the warning light beha-
vior is as described in the following
examples, the electronic parking brake
system is not malfunctioning.
–The warning light turns off when
the electronic parking brake is ap-
plied or released. – The warning light turns off when
the ignition switch is turned to the “ ON ”position again.
. The brake system warning light may
flash when the engine is started im-
mediately after the electronic parking
brake is applied or released. However,
the electronic parking brake system is
not malfunctioning if the warning light
turns off after the electronic parking brake is applied or released after that. .
The brake system warning light may
flash after the electronic parking brake
is frequently applied and released.
However, the electronic parking brake
system is not malfunctioning if the light
turns off for a short period of time.
This light has the following functions: ! Parking brake warning
The light illuminates with the parking
brake applied while the ignition switch is
in the “ON ”position. It turns off when the
parking brake is fully released. ! Brake fluid level warning
This light illuminates when the brake fluid
level has dropped to near the “MIN ”level
of the brake fluid reservoir with the ignition
switch in the “ON ”position and with the
parking brake fully released.
If the brake system warning light should
illuminate while driving (with the parking
brake fully released and with the ignition
switch positioned in “ON ”), it could be an
indication of leaking of brake fluid or worn
brake pads. If this occurs, immediately
stop the vehicle at the nearest safe place
and check the brake fluid level. If the fluid
level is below the “MIN ”mark in the
reservoir, do not drive the vehicle. Have
the vehicle towed to the nearest SUBARU dealer for repair. !
Electronic Brake Force Distribution
(EBD) system warning
The brake system warning light also
illuminates if a malfunction occurs in the
EBD system. In that event, it illuminates
together with the ABS warning light.
The EBD system may be malfunctioning if
the brake system warning light and ABS
warning light illuminate simultaneously
during driving.
Even if the EBD system fails, the conven-
tional braking system will still function.
However, the rear wheels will be more
prone to locking when the brakes are
applied harder than usual and the vehi-cle ’s motion may therefore become some-
what harder to control.
If the brake system warning light and ABS
warning light illuminate simultaneously,
take the following steps:
1. Stop the vehicle in the nearest safe,
flat place.
2. Shut down the engine, then restart it.
3. Release the parking brake. If both
warning lights turn off, the EBD system
may be malfunctioning.
Drive carefully to the nearest SUBARU
dealer and have the system inspected.
4. If both warning lights illuminate again
and remain illuminated after the engine
Page 141 of 448

3. To change the current setting, press
the trip knob for at least 2 seconds.
: Activated
: Deactivated
NOTE . The initial setting for your vehicle of
the gear position indicator and shift-up
indicator has been set for activation“
” at the time of shipment from the
factory. . It is not possible to change the
setting of the gear position indicator/
shift-up indicator when the ignition
switch is in the “ON ”position. Change
the setting when the ignition switch is
in the “LOCK ”or “Acc ”position.
& Turn signal indicator lights
These lights show the operation of the turn
signal or lane change signal.
If the indicator lights do not blink or blink
rapidly, the turn signal bulb may be burned
out. Replace the bulb as soon as possible.
Refer to “Replacing bulbs ”F 11-50. &
High beam indicator light
This light shows that the headlights are in
the high beam mode.
This indicator light also illuminates when
the headlight flasher is operated. &Cruise control indica-
tor light
The cruise control indicator light illumi-
nates when the ignition switch is turned tothe “ON ”position and turns off after
approximately 3 seconds.
This light illuminates when the “CRUISE ”
main switch is pressed. NOTE . If you move the cruise control lever
or press the main switch button while
turning the ignition switch “ON ”, the
cruise control function is deactivated
and the “CRUISE ”indicator light
flashes. To reactivate the cruise control
function, turn the ignition switch back
to the “Acc ”or “LOCK ”position, and
then turn it again to the “ON ”position.
. If this indicator light and the CHECK
ENGINE warning light/malfunction in-
dicator lamp flash simultaneously dur-
ing driving, have the vehicle checked
by your nearest SUBARU dealer. &
Cruise control set in-
dicator light
The cruise control set indicator light
illuminates when the ignition switch is
turned to the “ON ”position and turns off
after approximately 3 seconds.
This light illuminates when vehicle speed
has been set. & Headlight indicator light
This indicator light illuminates under the
following conditions. .when the light switch is turned to the
“
” or “”position
. when the light switch is in the “AUTO ”
position and the headlights illuminate automatically
& Front fog light indicator
light (if equipped)
This indicator light illuminates while the
front fog lights are illuminated. Instruments and controls
3-23
Page 145 of 448

1) U.S.-spec. models
2) Except U.S.-spec. models
If the driving range is shown as “
”,
there is only a tiny amount of fuel left in the
tank. You must refuel the vehicle immedi-
ately.
NOTE
The driving range on remaining fuel is
only a guide. The indicated value may
differ from the actual driving range on
remaining fuel, so you must immedi-
ately fill the tank when the low fuel
warning light illuminates. Light control switch
The light control switch only operates
when the key is inserted into the ignitionswitch.
Regardless of the position of the light
control switch, the illuminated lights are
turned off when the key is removed from
the ignition switch. NOTE .
Even if the key is removed from the
ignition switch, the lights can be illu-
minated by operating the light control
switch position from “OFF ”to “
”
and/or “”.
. If the driver ’s door is opened while
the lights are illuminated and the key is
removed from the ignition switch, the
chirp sound informs the driver that the
lights are illuminated.
CAUTION
. Use of any lights for a long period
of time while the engine is not
running can cause the battery todischarge.
. Before leaving the vehicle, make
sure that the light control switch
is turned to the “OFF ”position. If
the vehicle is left unattended for a long time with the light control
switch set to a position otherthan
“OFF ”, the battery may be
discharged.
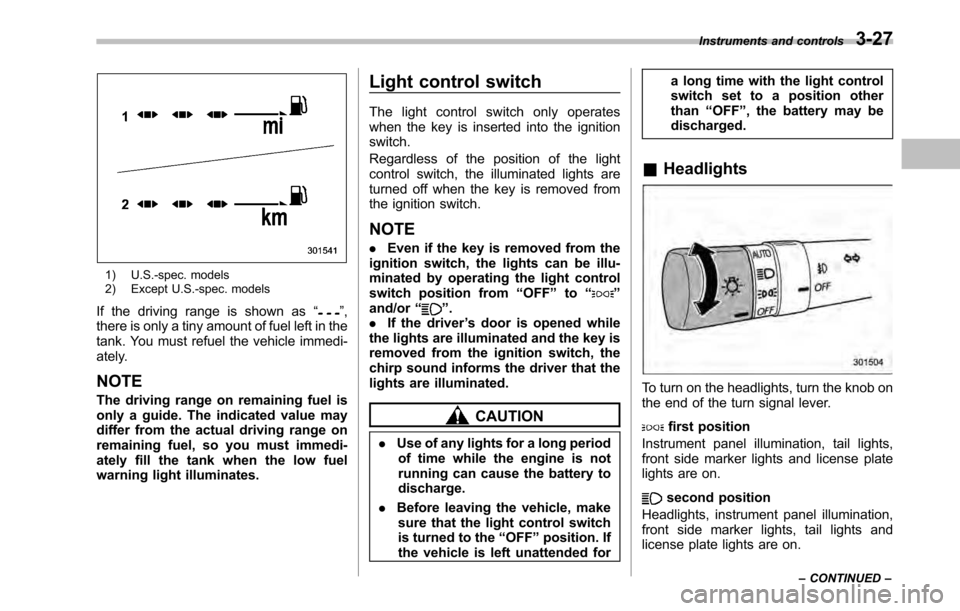
& Headlights
To turn on the headlights, turn the knob on
the end of the turn signal lever.
first position
Instrument panel illumination, tail lights,
front side marker lights and license plate
lights are on.
second position
Headlights, instrument panel illumination,
front side marker lights, tail lights and
license plate lights are on. Instruments and controls
3-27
– CONTINUED –
Page 146 of 448

3-28Instruments and controls
:Auto on/off headlights
When the ignition switch is in the “ON ”
position, the headlights, instrument panel
illumination, front side marker lights, tail
lights and license plate lights are auto-
matically on or off depending on the level
of the ambient light.
NOTE
The sensitivity of the auto on/off head-
lights can be changed by your
SUBARU dealer. Contact your SUBARU
dealer for details. ! Sensor of the auto on/off headlights
The sensor is on the instrument panel as
shown in the illustration.
CAUTION
If any object is placed on or near the
sensor, the sensor may not detect
the level of the ambient light cor-
rectly and the auto on/off headlights
may not operate properly.
& High/low beam change (dimmer)
To change from low beam to high beam,
push the turn signal lever forward. When
the headlights are on high beam, the high
beam indicator light “
”on the combina-
tion meter is also on.
To switch back to low beam, pull the lever
back to the detent position. &
Headlight flasher
CAUTION
Do not hold the lever in the flashing
position for more than just a fewseconds.
To flash the headlights, pull the lever
toward you and then release it. The high
beam will stay on for as long as you hold
the lever. The headlight flasher works
even though the lighting switch is in the“ OFF ”position.
When the headlights are on high beam,
the high beam indicator light “
”on the
combination meter also illuminates.
Page 147 of 448

&Daytime running light system
WARNING
The brightness of the illumination of
the high beam headlights is reduced
by the daytime running light system.
The light switch must always be
turned to the “
”position when it
is dark outside.
The high beam headlights will automati-
cally illuminate at reduced brightness
when the engine has started, under the
following conditions. . The parking brake is fully released.
. The light switch is in the “OFF ”or “
”
position. . The light switch is in the “AUTO ”
position and the headlights do not turn
on automatically. . The select lever is in a position other
than the “P ” position (AT and CVT mod-
els).
NOTE . When the light switch is in the “
”
position, the front side marker lights,
tail lights and license plate lights areilluminated.. After turning on the ignition switch
to the “ON ”position, even if the parking brake is applied, the daytime
running lights continue to illuminate
until the ignition switch is returned tothe
“LOCK ”position. Turn signal lever
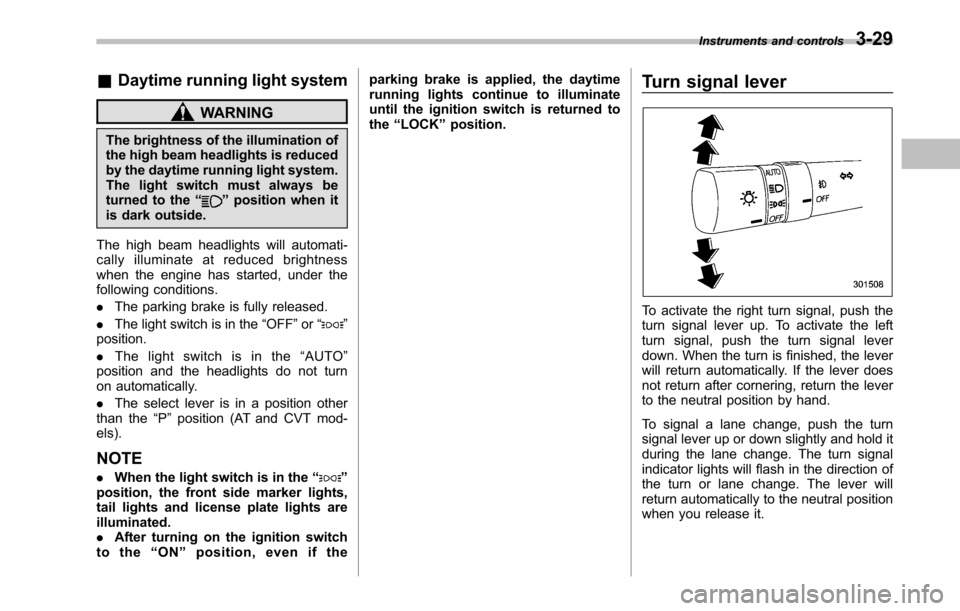
To activate the right turn signal, push the
turn signal lever up. To activate the left
turn signal, push the turn signal lever
down. When the turn is finished, the lever
will return automatically. If the lever does
not return after cornering, return the lever
to the neutral position by hand.
To signal a lane change, push the turn
signal lever up or down slightly and hold it
during the lane change. The turn signal
indicator lights will flash in the direction of
the turn or lane change. The lever will
return automatically to the neutral position
when you release it.Instruments and controls
3-29
Page 148 of 448

3-30Instruments and controls
Illumination brightness con- trol
The illumination brightness of the clock
display, audio, air conditioner, multi func-
tion display and meter/gauge dims under
the following conditions. .when the light switch is in the “
”or
“” position
. when the light switch is in the “AUTO ”
position and the headlights illuminate automatically
You can adjust the illumination brightness
for better visibility.
To brighten, turn the control dial upward.
To darken, turn the control dial downward. NOTE .
When the control dial is turned fully
upward, the illumination brightness
becomes the maximum and the auto-
matic dimming function does not work
at all.. The brightness setting is not can-
celed even when the ignition switch is
turned to the “LOCK ”position. Front fog light switch
(if equipped)
The front fog lights operate under the
following conditions. .
when the light switch is in the “
”
position . when the light switch is in the “AUTO ”
position and the headlights turn on auto- matically
However, the front fog lights turn off when
the headlights are switched to high beam.
To turn on the front fog lights, turn the front
fog light switch on the turn signal lever
upward to the “
”position. To turn off the
front fog lights, turn the switch back down
to the “OFF ”position.